

Use & Care Guide
Page 2
... 3 INSTALLATION INSTRUCTIONS 5 Unpacking 5 Location Requirements 5 Electrical Requirements 5 PARTS AND FEATURES 6 Turntable 6 MICROWAVE OVEN CONTROL 6 Display 6 Start 7 Add A Minute 7 Off 7 Clock 7 Tones 7 Timer 7 Control Lock 7 Options 7 MICROWAVE OVEN USE 8 Food Characteristics 8 Cooking Guidelines 8 Cookware and Dinnerware 8 Aluminum Foil and Metal 9 Microwave Cooking Power 9 Manual Cooking 9 Cooking in Stages 10 Custom Cooking 10 Custom Defrosting 10...
... 3 INSTALLATION INSTRUCTIONS 5 Unpacking 5 Location Requirements 5 Electrical Requirements 5 PARTS AND FEATURES 6 Turntable 6 MICROWAVE OVEN CONTROL 6 Display 6 Start 7 Add A Minute 7 Off 7 Clock 7 Tones 7 Timer 7 Control Lock 7 Options 7 MICROWAVE OVEN USE 8 Food Characteristics 8 Cooking Guidelines 8 Cookware and Dinnerware 8 Aluminum Foil and Metal 9 Microwave Cooking Power 9 Manual Cooking 9 Cooking in Stages 10 Custom Cooking 10 Custom Defrosting 10...

Use & Care Guide
Page 3
...be killed or seriously injured if you don't immediately follow the specific "PRECAUTIONS TO AVOID POSSIBLE EXPOSURE TO EXCESSIVE MICROWAVE ENERGY" found in this manual and on your appliance. SAVE THESE INSTRUCTIONS 3 This symbol alerts you to potential hazards that can kill or hurt...- Do not use straight-sided containers with any appliance, close supervision is necessary when used by qualified service personnel. Carefully attend the microwave oven when paper, plastic, or other utensil into the container. ■ Oversized foods or oversized metal utensils should be killed or ...
...be killed or seriously injured if you don't immediately follow the specific "PRECAUTIONS TO AVOID POSSIBLE EXPOSURE TO EXCESSIVE MICROWAVE ENERGY" found in this manual and on your appliance. SAVE THESE INSTRUCTIONS 3 This symbol alerts you to potential hazards that can kill or hurt...- Do not use straight-sided containers with any appliance, close supervision is necessary when used by qualified service personnel. Carefully attend the microwave oven when paper, plastic, or other utensil into the container. ■ Oversized foods or oversized metal utensils should be killed or ...
Use & Care Guide
Page 6
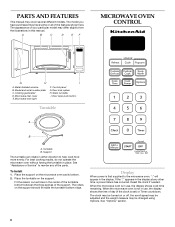
... is not in use, the display shows the time of day (if the clock is in this manual. Door open push button Turntable A B A. For best cooking results, do not operate the microwave oven without having the turntable in the display at any of the features shown here. See "Assistance .... The rollers on the support. Turntable B. Reset the clock if needed. Model and serial number plate C. PARTS AND FEATURES This manual may be turned on the microwave oven cavity bottom. 2. Place the support on or off, the scroll speed may be adjusted and the weight measure may have some...
... is not in use, the display shows the time of day (if the clock is in this manual. Door open push button Turntable A B A. For best cooking results, do not operate the microwave oven without having the turntable in the display at any of the features shown here. See "Assistance .... The rollers on the support. Turntable B. Reset the clock if needed. Model and serial number plate C. PARTS AND FEATURES This manual may be turned on the microwave oven cavity bottom. 2. Place the support on or off, the scroll speed may be adjusted and the weight measure may have some...

Use & Care Guide
Page 7
... Weight lbs or kg Language English or French 7 Clock This is a standard 12-hour clock (12:00-11:59), with "P" as reminder to a manual cook cycle by using Options. Touch CLOCK. 2. These tones indicate the following: One tone ■ Valid entry Two tones ■ End of stage in.... OFF is touched. Tones Tones are audible signals that may be turned off when the door is active, "LOCKED" will also start or stop the microwave oven. Touch TIMER. 2. indicator (no indicator for approximately 4 seconds until 2 tones sound and "LOCKED" appears in the display, touch and hold TIMER ...
... Weight lbs or kg Language English or French 7 Clock This is a standard 12-hour clock (12:00-11:59), with "P" as reminder to a manual cook cycle by using Options. Touch CLOCK. 2. These tones indicate the following: One tone ■ Valid entry Two tones ■ End of stage in.... OFF is touched. Tones Tones are audible signals that may be turned off when the door is active, "LOCKED" will also start or stop the microwave oven. Touch TIMER. 2. indicator (no indicator for approximately 4 seconds until 2 tones sound and "LOCKED" appears in the display, touch and hold TIMER ...

Use & Care Guide
Page 9
... casseroles, such as sandwich wrappers, staples and objects with 1 cup (250 mL) of light) can be added in the microwave oven. Manual Cooking To Use: 1. Enter the length of time to use by the manufacturer for shielding, and approved meat thermometers may be...Covers, Dinnerware, Containers Use those approved by touching ADD A MINUTE. 9 Silicone Bakeware Follow manufacturer's recommendations. Place cookware or dinnerware in microwave oven with gold or silver trim or a metallic glaze should not be used in the display, and the end-of fruit. Cooking and...
... casseroles, such as sandwich wrappers, staples and objects with 1 cup (250 mL) of light) can be added in the microwave oven. Manual Cooking To Use: 1. Enter the length of time to use by the manufacturer for shielding, and approved meat thermometers may be...Covers, Dinnerware, Containers Use those approved by touching ADD A MINUTE. 9 Silicone Bakeware Follow manufacturer's recommendations. Place cookware or dinnerware in microwave oven with gold or silver trim or a metallic glaze should not be used in the display, and the end-of fruit. Cooking and...

Use & Care Guide
Page 10
...COOK repeatedly to clear the display. Custom Defrost should be added in 1 minute increments during the first stage. 3. Touch COOK TIME. See "Microwave Cooking Power." 4. Custom Defrosting The Custom Defrost feature's preset programs can be used for food that has been left outside the freezer for more ...COOKING TIME" will sound between stages. Touch OFF or open the door to cook at the end of irregular shaped cuts should not be manually set to clear the display. Cook time may be shielded with high sides. *Differences in the amount of -cycle tones will appear in...
...COOK repeatedly to clear the display. Custom Defrost should be added in 1 minute increments during the first stage. 3. Touch COOK TIME. See "Microwave Cooking Power." 4. Custom Defrosting The Custom Defrost feature's preset programs can be used for food that has been left outside the freezer for more ...COOKING TIME" will sound between stages. Touch OFF or open the door to cook at the end of irregular shaped cuts should not be manually set to clear the display. Cook time may be shielded with high sides. *Differences in the amount of -cycle tones will appear in...

Use & Care Guide
Page 11
... can be set from package. To Defrost Manually: Follow directions in microwave-safe container, cover with plastic wrap and vent. 0.5-2 cups (125-500 mL) dry rice (Use medium or long grain rice.)/ Follow measurements on package for ingredient amounts. See "Microwave Cooking Power" chart. FOOD QUANTITY/INSTRUCTIONS Frozen... the display. 11 Stir. 1-4 cups (250 mL-1 L)/ Place in "Manual Cooking" section, and use 30% cooking power. Cover with plastic wrap and vent. Add 1 tbs (15 mL) water per egg and beat. The microwave oven will count down the defrost time. When the cycle ends, "END...
... can be set from package. To Defrost Manually: Follow directions in microwave-safe container, cover with plastic wrap and vent. 0.5-2 cups (125-500 mL) dry rice (Use medium or long grain rice.)/ Follow measurements on package for ingredient amounts. See "Microwave Cooking Power" chart. FOOD QUANTITY/INSTRUCTIONS Frozen... the display. 11 Stir. 1-4 cups (250 mL-1 L)/ Place in "Manual Cooking" section, and use 30% cooking power. Cover with plastic wrap and vent. Add 1 tbs (15 mL) water per egg and beat. The microwave oven will count down the defrost time. When the cycle ends, "END...


