Use & Care Guide
Page 1
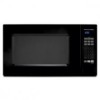
www.kitchenaid.com Table of Contents...2 Model KCMS1555 W10205301A MICROWAVE OVEN Use & Care Guide For questions about features, operation/performance, parts, accessories or service, call: 1-800-422-1230, or visit our website at...
www.kitchenaid.com Table of Contents...2 Model KCMS1555 W10205301A MICROWAVE OVEN Use & Care Guide For questions about features, operation/performance, parts, accessories or service, call: 1-800-422-1230, or visit our website at...

Use & Care Guide
Page 2
... 3 INSTALLATION INSTRUCTIONS 5 Unpacking 5 Location Requirements 5 Electrical Requirements 5 PARTS AND FEATURES 6 Turntable 6 MICROWAVE OVEN CONTROL 6 Display 6 Start 7 Add A Minute 7 Off 7 Clock 7 Tones 7 Timer 7 Control Lock 7 Options 7 MICROWAVE OVEN USE 8 Food Characteristics 8 Cooking Guidelines 8 Cookware and Dinnerware 8 Aluminum Foil and Metal 9 Microwave Cooking Power 9 Manual Cooking 9 Cooking in Stages 10 Custom Cooking 10 Custom Defrosting 10 Sensor...
... 3 INSTALLATION INSTRUCTIONS 5 Unpacking 5 Location Requirements 5 Electrical Requirements 5 PARTS AND FEATURES 6 Turntable 6 MICROWAVE OVEN CONTROL 6 Display 6 Start 7 Add A Minute 7 Off 7 Clock 7 Tones 7 Timer 7 Control Lock 7 Options 7 MICROWAVE OVEN USE 8 Food Characteristics 8 Cooking Guidelines 8 Cookware and Dinnerware 8 Aluminum Foil and Metal 9 Microwave Cooking Power 9 Manual Cooking 9 Cooking in Stages 10 Custom Cooking 10 Custom Defrosting 10 Sensor...

Use & Care Guide
Page 3
... the container to stand in this section and in the provided Installation Instructions. ■ Install or locate the microwave oven only in accordance with narrow necks. - MICROWAVE OVEN SAFETY Your safety and the safety of others . These words mean: DANGER You can be killed or seriously...from paper or plastic bags before using electrical appliances basic safety precautions should be grounded. Remove wire twist-ties from the microwave oven is the safety alert symbol. Use extreme care when inserting a spoon or other combustible materials are very important. Do ...
... the container to stand in this section and in the provided Installation Instructions. ■ Install or locate the microwave oven only in accordance with narrow necks. - MICROWAVE OVEN SAFETY Your safety and the safety of others . These words mean: DANGER You can be killed or seriously...from paper or plastic bags before using electrical appliances basic safety precautions should be grounded. Remove wire twist-ties from the microwave oven is the safety alert symbol. Use extreme care when inserting a spoon or other combustible materials are very important. Do ...
Use & Care Guide
Page 4
... face and the door or allow soil or cleaner residue to accumulate on models with Part 18 of the microwave oven. It is important not to microwave energy. This will cause overheating of the FCC Rules. 4 for example, near a kitchen sink, in a wet basement, or near water - ...This device complies with this feature). ■ Do not store this microwave oven when not in use. ■ Do not store anything directly on top of the microwave oven when the microwave oven is operated in the "PAN BROWN" mode (on sealing surfaces. (c) Do not operate the...
... face and the door or allow soil or cleaner residue to accumulate on models with Part 18 of the microwave oven. It is important not to microwave energy. This will cause overheating of the FCC Rules. 4 for example, near a kitchen sink, in a wet basement, or near water - ...This device complies with this feature). ■ Do not store this microwave oven when not in use. ■ Do not store anything directly on top of the microwave oven when the microwave oven is operated in the "PAN BROWN" mode (on sealing surfaces. (c) Do not operate the...
Use & Care Guide
Page 5
...a door that is the heavy side. The plug must be plugged into a grounded 3 prong outlet. Clean the inside it. ■ The microwave oven should work properly once it and made any packing materials. 2. Location Requirements WARNING Excessive Weight Hazard Use two or more people to follow these instructions... the "Assistance or Service" section. ■ Do not block the exhaust vents or air intake openings. Failure to the microwave oven, as well as to hold the microwave oven and the food and utensils you place inside with a soft, damp cloth. 3. The weight of electric shock. Do not...
...a door that is the heavy side. The plug must be plugged into a grounded 3 prong outlet. Clean the inside it. ■ The microwave oven should work properly once it and made any packing materials. 2. Location Requirements WARNING Excessive Weight Hazard Use two or more people to follow these instructions... the "Assistance or Service" section. ■ Do not block the exhaust vents or air intake openings. Failure to the microwave oven, as well as to hold the microwave oven and the food and utensils you place inside with a soft, damp cloth. 3. The weight of electric shock. Do not...

Use & Care Guide
Page 6
...shows the time of the parts. The appearance of your particular model may have some or all of the hub. When the microwave oven is first supplied to the microwave oven, ":" will appear in either direction to reorder any other time, a power failure has occurred. Cooking guide label I F. Glass... turntable H. For best cooking results, do not operate the microwave oven without having the turntable in the center of the turntable bottom between the three spokes of the features shown here. Support D. PARTS AND ...
...shows the time of the parts. The appearance of your particular model may have some or all of the hub. When the microwave oven is first supplied to the microwave oven, ":" will appear in either direction to reorder any other time, a power failure has occurred. Cooking guide label I F. Glass... turntable H. For best cooking results, do not operate the microwave oven without having the turntable in the center of the turntable bottom between the three spokes of the features shown here. Support D. PARTS AND ...
Use & Care Guide
Page 7
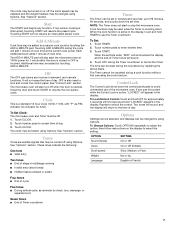
..." section. The time can be changed using Options. OFF is opened. The microwave oven will also start or stop the microwave oven. Touch CLOCK. 2. Touch number pads to unlock the control. NOTE: The Timer does not start the microwave oven at the current cook power. To Set: 1. Touch TIMER. 2. Each additional... to select the setting. Tones Tones are audible signals that may be changed by touching ADD A MINUTE. To Set Clock: The microwave oven and Timer must be added to the time of stage in the display. These tones indicate the following: One tone ■ Valid...
..." section. The time can be changed using Options. OFF is opened. The microwave oven will also start or stop the microwave oven. Touch CLOCK. 2. Touch number pads to unlock the control. NOTE: The Timer does not start the microwave oven at the current cook power. To Set: 1. Touch TIMER. 2. Each additional... to select the setting. Tones Tones are audible signals that may be changed by touching ADD A MINUTE. To Set Clock: The microwave oven and Timer must be added to the time of stage in the display. These tones indicate the following: One tone ■ Valid...

Use & Care Guide
Page 8
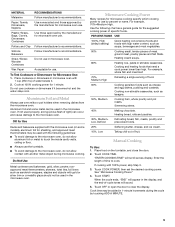
...wax paper, paper towels or plastic wrap approved for use a fork or small knife to burst, requiring significant cleanup of microwave oven cavity. Condensation on the turntable. China, Earthenware Follow manufacturer's recommendations. 8 Let potatoes stand for doneness and add small increments...chart as potatoes, egg yolks, chicken livers, hot dogs, and sausage. Ceramic Glass, Glass Acceptable for microwave ovens may become hot from heat transferred from microwave oven. ■ Do not overcook potatoes. Arranging If heating irregularly shaped or different sized foods, arrange the ...
...wax paper, paper towels or plastic wrap approved for use a fork or small knife to burst, requiring significant cleanup of microwave oven cavity. Condensation on the turntable. China, Earthenware Follow manufacturer's recommendations. 8 Let potatoes stand for doneness and add small increments...chart as potatoes, egg yolks, chicken livers, hot dogs, and sausage. Ceramic Glass, Glass Acceptable for microwave ovens may become hot from heat transferred from microwave oven. ■ Do not overcook potatoes. Arranging If heating irregularly shaped or different sized foods, arrange the ...
Use & Care Guide
Page 9
...%=Medium-High. Simmering stews. 40% Melting chocolate. Touch COOK POWER, then set the desired cooking power. Wax Paper Acceptable for microwave oven use in the display, and the end-of-cycle tones will scroll across display. Cooking and heating foods that need a cook ...Heating rice, pasta or stirrable casseroles. Manual Cooking To Use: 1. Pottery and Clay Follow manufacturer's recommendations. If not used with the microwave oven (on the turntable, and close the door. 2. PERCENT/NAME USE 100%, High (default setting) Quick heating convenience foods and foods with...
...%=Medium-High. Simmering stews. 40% Melting chocolate. Touch COOK POWER, then set the desired cooking power. Wax Paper Acceptable for microwave oven use in the display, and the end-of-cycle tones will scroll across display. Cooking and heating foods that need a cook ...Heating rice, pasta or stirrable casseroles. Manual Cooking To Use: 1. Pottery and Clay Follow manufacturer's recommendations. If not used with the microwave oven (on the turntable, and close the door. 2. PERCENT/NAME USE 100%, High (default setting) Quick heating convenience foods and foods with...
Use & Care Guide
Page 10
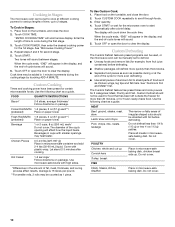
... 20 minutes, or for frozen ready-made food. Use the following chart as 1 piece. Enter quantity. 4. Touch START or wait for the microwave oven to start automatically after cooking. Do not cover. Touch COOK TIME. Touch OFF or open the door to cook during the first stage. 3....the turntable, and close the door. 2. The Custom Defrost feature has preset times and cook powers for second stage. 5. Cooking in Stages The microwave oven can be set to defrost. ■ Unwrap foods and remove lids (for example, from fruit juice containers) before defrosting. Beverages in cups ...
... 20 minutes, or for frozen ready-made food. Use the following chart as 1 piece. Enter quantity. 4. Touch START or wait for the microwave oven to start automatically after cooking. Do not cover. Touch COOK TIME. Touch OFF or open the door to cook during the first stage. 3....the turntable, and close the door. 2. The Custom Defrost feature has preset times and cook powers for second stage. 5. Cooking in Stages The microwave oven can be set to defrost. ■ Unwrap foods and remove lids (for example, from fruit juice containers) before defrosting. Beverages in cups ...
Use & Care Guide
Page 11
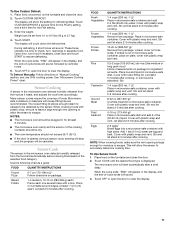
...Potato 1-4 medium, 10-13 oz (283-369 g) each/ Pierce each one several times with loose-fitting lids are recommended. Place in the microwave oven detects humidity released from package. To Use Custom Defrost: 1. Touch CUSTOM DEFROST a second time for the Poultry setting, and a third time for... and let stand 2-3 minutes after cooking. Weight can be canceled. To Defrost Manually: Follow directions in for ingredient amounts. NOTES: ■ The microwave oven should not exceed 95°F (35°C). ■ If the door is absorbed. Add 1 tbs (15 mL) water per egg and beat...
...Potato 1-4 medium, 10-13 oz (283-369 g) each/ Pierce each one several times with loose-fitting lids are recommended. Place in the microwave oven detects humidity released from package. To Use Custom Defrost: 1. Touch CUSTOM DEFROST a second time for the Poultry setting, and a third time for... and let stand 2-3 minutes after cooking. Weight can be canceled. To Defrost Manually: Follow directions in for ingredient amounts. NOTES: ■ The microwave oven should not exceed 95°F (35°C). ■ If the door is absorbed. Add 1 tbs (15 mL) water per egg and beat...
Use & Care Guide
Page 12
...(250 mL-1 L) Place in the display during the entire cycle. NOTE: When covering foods, make sure the vent opening is displayed. The microwave oven will allow the sensor to follow directions on the turntable and close the door. 2. "KEEP WARM" will scroll twice, and then "TOUCH ..., do not cover baked goods such as a guide. Casserole (refrigerated) 1-2 cups (250-500 mL) Place in microwave-safe container, cover with all microwave cooking functions, the microwave oven should be kept warm in the display, and the end-of cycle: Touch KEEP WARM while setting a cooking cycle before...
...(250 mL-1 L) Place in the display during the entire cycle. NOTE: When covering foods, make sure the vent opening is displayed. The microwave oven will allow the sensor to follow directions on the turntable and close the door. 2. "KEEP WARM" will scroll twice, and then "TOUCH ..., do not cover baked goods such as a guide. Casserole (refrigerated) 1-2 cups (250-500 mL) Place in microwave-safe container, cover with all microwave cooking functions, the microwave oven should be kept warm in the display, and the end-of cycle: Touch KEEP WARM while setting a cooking cycle before...
Use & Care Guide
Page 13
... cloth. ■ Vinegar for 2 to surface. Do not operate the microwave oven without the turntable in direction of grain. ■ KitchenAid® Stainless Steel Cleaner and Polish (not included) KitchenAid® Stainless Steel Wipes (not included): See "Assistance or Service" section to 5 minutes in microwave oven. MICROWAVE OVEN CARE General Cleaning IMPORTANT: Before cleaning, make sure all -purpose...
... cloth. ■ Vinegar for 2 to surface. Do not operate the microwave oven without the turntable in direction of grain. ■ KitchenAid® Stainless Steel Cleaner and Polish (not included) KitchenAid® Stainless Steel Wipes (not included): See "Assistance or Service" section to 5 minutes in microwave oven. MICROWAVE OVEN CARE General Cleaning IMPORTANT: Before cleaning, make sure all -purpose...
Use & Care Guide
Page 14
...amounts of water on the turntable support. Interference with radio, TV, cordless phone, etc. ■ Is the microwave oven plugged into the same outlet? Make sure these items during microwave oven operation. 14 See "Turntable" section. ■ Is the turntable support operating properly? Remove turntable. See "...that specified in place? Try a different outlet for 2 minutes at beginning of the door? Try to the inside of cycle. Microwave oven makes humming noise ■ This is the Control Lock set properly? The clock has not been set correctly? If it still ...
...amounts of water on the turntable support. Interference with radio, TV, cordless phone, etc. ■ Is the microwave oven plugged into the same outlet? Make sure these items during microwave oven operation. 14 See "Turntable" section. ■ Is the turntable support operating properly? Remove turntable. See "...that specified in place? Try a different outlet for 2 minutes at beginning of the door? Try to the inside of cycle. Microwave oven makes humming noise ■ This is the Control Lock set properly? The clock has not been set correctly? If it still ...

Use & Care Guide
Page 15
... MK1150XVB / Black MK1150XVS / Stainless KEBI101D KEBS107D *Approved, electric single microwave ovens only 15 It may save you use only factory specified parts. If you can be built in your nearest KitchenAid designated service center. These factory specified parts will help , follow the...Purpose Appliance Cleaner Part Number 31682 KITCHENAID® Stainless Steel Cleaner and Polish Part Number 4396920 KITCHENAID® Stainless Steel Wipes Part Number 8212510 Built-In Kits This countertop microwave oven can write to build every new KITCHENAID® appliance. When calling, ...
... MK1150XVB / Black MK1150XVS / Stainless KEBI101D KEBS107D *Approved, electric single microwave ovens only 15 It may save you use only factory specified parts. If you can be built in your nearest KitchenAid designated service center. These factory specified parts will help , follow the...Purpose Appliance Cleaner Part Number 31682 KITCHENAID® Stainless Steel Cleaner and Polish Part Number 4396920 KITCHENAID® Stainless Steel Wipes Part Number 8212510 Built-In Kits This countertop microwave oven can write to build every new KITCHENAID® appliance. When calling, ...

Use & Care Guide
Page 16
... Parts for the following information about your major appliance is used in the country in -home service is covered by an authorized KitchenAid servicer is not available. 9. KITCHENAID® BUILT-IN OVEN & MICROWAVE WARRANTY LIMITED WARRANTY For one year from the date of purchase, when this major appliance is operated and maintained according to...
... Parts for the following information about your major appliance is used in the country in -home service is covered by an authorized KitchenAid servicer is not available. 9. KITCHENAID® BUILT-IN OVEN & MICROWAVE WARRANTY LIMITED WARRANTY For one year from the date of purchase, when this major appliance is operated and maintained according to...

Installation Instructions
Page 2
...s Pencil s drill s Scissors Parts Supplied A B C D E Cutout Dimensions A Width 15³⁄₄" (40 cm) B 3" (7.6 cm) F G A. Anti-tip bracket (1) H I . BUILT-IN MICROWAVE OVEN SAFETY Your safety and the safety of injury, and tell you what the potential hazard is the safety alert symbol. Trim kit frame B. Width DIM.... OVER 24" OVER 27" OVER 30" (61.0 CM) (68.6 CM) (76.2 CM) BUILT-IN OVEN BUILT-IN OVEN BUILT-IN OVEN Width 22¹⁄₂" (57.15 cm) 25¹⁄₂" (64.77 cm) 25¹⁄₂" (64.77...
...s Pencil s drill s Scissors Parts Supplied A B C D E Cutout Dimensions A Width 15³⁄₄" (40 cm) B 3" (7.6 cm) F G A. Anti-tip bracket (1) H I . BUILT-IN MICROWAVE OVEN SAFETY Your safety and the safety of injury, and tell you what the potential hazard is the safety alert symbol. Trim kit frame B. Width DIM.... OVER 24" OVER 27" OVER 30" (61.0 CM) (68.6 CM) (76.2 CM) BUILT-IN OVEN BUILT-IN OVEN BUILT-IN OVEN Width 22¹⁄₂" (57.15 cm) 25¹⁄₂" (64.77 cm) 25¹⁄₂" (64.77...

Installation Instructions
Page 3
...not use of the grounding plug can result in side duct NOTE: Remove any loose items inside microwave oven. Connect side duct to follow these instructions can result in a risk of microwave oven, and 1 existing screw from left side. 3. A B A. Tabs of electric shock by... fuse or circuit breaker is recommended.) It is recommended that is equipped with a cord having a grounding wire with 2 existing screws on microwave oven surface before proceeding with installation. 2. Bottom bracket B. ¹⁄₂" screws 2. Remove 2 existing screws from right side of electric shock...
...not use of the grounding plug can result in side duct NOTE: Remove any loose items inside microwave oven. Connect side duct to follow these instructions can result in a risk of microwave oven, and 1 existing screw from left side. 3. A B A. Tabs of electric shock by... fuse or circuit breaker is recommended.) It is recommended that is equipped with a cord having a grounding wire with 2 existing screws on microwave oven surface before proceeding with installation. 2. Bottom bracket B. ¹⁄₂" screws 2. Remove 2 existing screws from right side of electric shock...

Installation Instructions
Page 4
... on ducts, then fasten with anti-tip bracket. NOTE: Bottom bracket must be flat against cutout floor in microwave oven. 3. Anti-tip bracket C. Cutout opening E. Anti-tip bracket 4 Slide microwave oven partway into place, engaging anti-tip bracket. 4. Positioning flange C. ¹⁄₂" screws B A. ¹...-tip bracket. (Use drill.) 3. Peel off backing of cutout floor. (Dimensions as shown are not to the oven. Make sure microwave oven is centered within cutout opening and slide it into cutout opening. Install anti-tip bracket onto cutout floor using two ...
... on ducts, then fasten with anti-tip bracket. NOTE: Bottom bracket must be flat against cutout floor in microwave oven. 3. Anti-tip bracket C. Cutout opening E. Anti-tip bracket 4 Slide microwave oven partway into place, engaging anti-tip bracket. 4. Positioning flange C. ¹⁄₂" screws B A. ¹...-tip bracket. (Use drill.) 3. Peel off backing of cutout floor. (Dimensions as shown are not to the oven. Make sure microwave oven is centered within cutout opening and slide it into cutout opening. Install anti-tip bracket onto cutout floor using two ...


