Use & Care Guide
Page 1
www.kitchenaid.com Table of Contents...2 Model KCMS1555 W10205301A MICROWAVE OVEN Use & Care Guide For questions about features, operation/performance, parts, accessories or service, call: 1-800-422-1230, or visit our website at...
www.kitchenaid.com Table of Contents...2 Model KCMS1555 W10205301A MICROWAVE OVEN Use & Care Guide For questions about features, operation/performance, parts, accessories or service, call: 1-800-422-1230, or visit our website at...

Use & Care Guide
Page 2
... 3 INSTALLATION INSTRUCTIONS 5 Unpacking 5 Location Requirements 5 Electrical Requirements 5 PARTS AND FEATURES 6 Turntable 6 MICROWAVE OVEN CONTROL 6 Display 6 Start 7 Add A Minute 7 Off 7 Clock 7 Tones 7 Timer 7 Control Lock 7 Options 7 MICROWAVE OVEN USE 8 Food Characteristics 8 Cooking Guidelines 8 Cookware and Dinnerware 8 Aluminum Foil and Metal 9 Microwave Cooking Power 9 Manual Cooking 9 Cooking in Stages 10 Custom Cooking 10 Custom Defrosting 10 Sensor Cooking...
... 3 INSTALLATION INSTRUCTIONS 5 Unpacking 5 Location Requirements 5 Electrical Requirements 5 PARTS AND FEATURES 6 Turntable 6 MICROWAVE OVEN CONTROL 6 Display 6 Start 7 Add A Minute 7 Off 7 Clock 7 Tones 7 Timer 7 Control Lock 7 Options 7 MICROWAVE OVEN USE 8 Food Characteristics 8 Cooking Guidelines 8 Cookware and Dinnerware 8 Aluminum Foil and Metal 9 Microwave Cooking Power 9 Manual Cooking 9 Cooking in Stages 10 Custom Cooking 10 Custom Defrosting 10 Sensor Cooking...

Use & Care Guide
Page 3
...designed for example, closed , turn oven off, and disconnect the power cord, or shut off the pad and touch electrical parts involving a risk of fire in this section. ■ The microwave oven must be boiling. Remove wire twist-ties from the microwave oven is , tell you how to explode... and should not be inserted in the microwave oven for examination, repair, or adjustment....
...designed for example, closed , turn oven off, and disconnect the power cord, or shut off the pad and touch electrical parts involving a risk of fire in this section. ■ The microwave oven must be boiling. Remove wire twist-ties from the microwave oven is , tell you how to explode... and should not be inserted in the microwave oven for examination, repair, or adjustment....
Use & Care Guide
Page 4
... or repaired by anyone except properly qualified service personnel. This device complies with Part 18 of the microwave oven. Do not use paper products when appliance is in the "PAN BROWN" mode (on the microwave oven. ■ Do not let cord hang over edge of table or counter....can result in harmful exposure to microwave energy. IMPORTANT SAFETY INSTRUCTIONS ■ Do not operate any heating or cooking appliance beneath the microwave oven. ■ Do not mount microwave oven over a sink. ■ Do not cover racks or any other part of the microwave oven with metal foil. This will ...
... or repaired by anyone except properly qualified service personnel. This device complies with Part 18 of the microwave oven. Do not use paper products when appliance is in the "PAN BROWN" mode (on the microwave oven. ■ Do not let cord hang over edge of table or counter....can result in harmful exposure to microwave energy. IMPORTANT SAFETY INSTRUCTIONS ■ Do not operate any heating or cooking appliance beneath the microwave oven. ■ Do not mount microwave oven over a sink. ■ Do not cover racks or any other part of the microwave oven with metal foil. This will ...

Use & Care Guide
Page 6
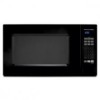
... center of the turntable bottom between the three spokes of the hub. A B C D E MICROWAVE OVEN CONTROL F G A. Glass turntable H. Hub C. PARTS AND FEATURES This manual may have some or all of the features shown here. Microwave inlet cover D. Model and serial number plate C. Microwave oven light E. Cooking guide label I F. Fit the raised, curved lines in this manual. When...
... center of the turntable bottom between the three spokes of the hub. A B C D E MICROWAVE OVEN CONTROL F G A. Glass turntable H. Hub C. PARTS AND FEATURES This manual may have some or all of the features shown here. Microwave inlet cover D. Model and serial number plate C. Microwave oven light E. Cooking guide label I F. Fit the raised, curved lines in this manual. When...

Use & Care Guide
Page 8
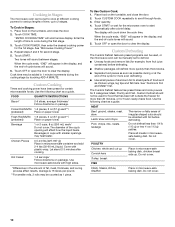
...higher temperature, and will heat faster than other foods. They will not melt in a ring pattern, leaving the center of microwave oven cavity. Food Characteristics When microwave cooking, the amount, size and shape, starting temperature, composition and density of food will cook more quickly than irregularly shaped ...to burst, requiring significant cleanup of the ring empty. Arranging If heating irregularly shaped or different sized foods, arrange the thinner parts and smaller sized items toward the center. Prick in whole eggs may cause them to center. The length of standing time ...
...higher temperature, and will heat faster than other foods. They will not melt in a ring pattern, leaving the center of microwave oven cavity. Food Characteristics When microwave cooking, the amount, size and shape, starting temperature, composition and density of food will cook more quickly than irregularly shaped ...to burst, requiring significant cleanup of the ring empty. Arranging If heating irregularly shaped or different sized foods, arrange the thinner parts and smaller sized items toward the center. Prick in whole eggs may cause them to center. The length of standing time ...
Use & Care Guide
Page 10
...food. Custom Defrosting The Custom Defrost feature's preset programs can be used for food that has been left outside the freezer for the microwave oven to shield parts of -cycle tones will sound. 6. Custom Defrost should be counted as possible during the first stage. 3. POULTRY Chicken: whole and... Touch OFF or open the door to scroll through foods. 3. Cover with smaller openings may be added in Stages The microwave oven can be used , or the microwave oven can be set to clear the display. The Custom Defrost feature has preset times and cook powers for second stage. ...
...food. Custom Defrosting The Custom Defrost feature's preset programs can be used for food that has been left outside the freezer for the microwave oven to shield parts of -cycle tones will sound. 6. Custom Defrost should be counted as possible during the first stage. 3. POULTRY Chicken: whole and... Touch OFF or open the door to scroll through foods. 3. Cover with smaller openings may be added in Stages The microwave oven can be used , or the microwave oven can be set to clear the display. The Custom Defrost feature has preset times and cook powers for second stage. ...
Use & Care Guide
Page 13
...or vinegar: Heat 1 cup (250 mL) of water with 1 tbs (15 mL) of grain. Microwave Inlet Cover To avoid arcing and microwave oven damage, the microwave inlet cover (see "Parts and Features") should be kept clean. ■ Mild, nonabrasive soaps and detergents: Rinse with clean water... lint-free cloth. Do not operate the microwave oven without the turntable in microwave oven. Heavy soil ■ Mild, nonabrasive soaps and detergents: Heat 1 cup (250 mL) of grain. ■ KitchenAid® Stainless Steel Cleaner and Polish (not included) KitchenAid® Stainless Steel Wipes (not included): ...
...or vinegar: Heat 1 cup (250 mL) of water with 1 tbs (15 mL) of grain. Microwave Inlet Cover To avoid arcing and microwave oven damage, the microwave inlet cover (see "Parts and Features") should be kept clean. ■ Mild, nonabrasive soaps and detergents: Rinse with clean water... lint-free cloth. Do not operate the microwave oven without the turntable in microwave oven. Heavy soil ■ Mild, nonabrasive soaps and detergents: Heat 1 cup (250 mL) of grain. ■ KitchenAid® Stainless Steel Cleaner and Polish (not included) KitchenAid® Stainless Steel Wipes (not included): ...

Use & Care Guide
Page 15
...-1230. Replacement Parts Glass Turntable Part Number W10143945 Turntable Support and Rollers Part Number W10143946 Turntable Hub Part Number W10143947 Cleaning Supplies Heavy Duty Degreaser Part Number 31552 All-Purpose Appliance Cleaner Part Number 31682 KITCHENAID® Stainless Steel Cleaner and Polish Part Number 4396920 KITCHENAID® Stainless Steel Wipes Part Number 8212510 Built-In Kits This countertop microwave oven can also look...
...-1230. Replacement Parts Glass Turntable Part Number W10143945 Turntable Support and Rollers Part Number W10143946 Turntable Hub Part Number W10143947 Cleaning Supplies Heavy Duty Degreaser Part Number 31552 All-Purpose Appliance Cleaner Part Number 31682 KITCHENAID® Stainless Steel Cleaner and Polish Part Number 4396920 KITCHENAID® Stainless Steel Wipes Part Number 8212510 Built-In Kits This countertop microwave oven can also look...

Use & Care Guide
Page 16
... THROUGH TENTH YEAR LIMITED WARRANTY On microwave ovens only, in the second through fifth years from the date of purchase, when this appliance is operated and maintained according to instructions attached to or furnished with the product, KitchenAid will pay for Factory Specified Parts for repairs. Service calls to KitchenAid within 30 days from the...
... THROUGH TENTH YEAR LIMITED WARRANTY On microwave ovens only, in the second through fifth years from the date of purchase, when this appliance is operated and maintained according to instructions attached to or furnished with the product, KitchenAid will pay for Factory Specified Parts for repairs. Service calls to KitchenAid within 30 days from the...

Installation Instructions
Page 2
All safety messages will follow instructions. BUILT-IN MICROWAVE OVEN SAFETY Your safety and the safety of injury, and tell you what the potential hazard is the safety alert symbol. This symbol... seriously injured if you don't immediately follow the safety alert symbol and either the word "DANGER" or "WARNING." s Measuring tape s #2 Phillips screwdriver s Pencil s drill s Scissors Parts Supplied A B C D E Cutout Dimensions A Width 15³⁄₄" (40 cm) B 3" (7.6 cm) F G A. Bottom bracket (1) H. Width DIM. OVER 24" OVER 27" OVER 30" (61.0 ...
All safety messages will follow instructions. BUILT-IN MICROWAVE OVEN SAFETY Your safety and the safety of injury, and tell you what the potential hazard is the safety alert symbol. This symbol... seriously injured if you don't immediately follow the safety alert symbol and either the word "DANGER" or "WARNING." s Measuring tape s #2 Phillips screwdriver s Pencil s drill s Scissors Parts Supplied A B C D E Cutout Dimensions A Width 15³⁄₄" (40 cm) B 3" (7.6 cm) F G A. Bottom bracket (1) H. Width DIM. OVER 24" OVER 27" OVER 30" (61.0 ...

