
Installation Guide
Page 4
..., KBBR306EPA 4 Overlay Series (36" [91.4 cm] Models) Features factory-installed, overlay style trim, to provide a "frameless" look . KBBL206ESS, KBBL306ESS, KBBR206ESS, KBBR306ESS Stainless Steel Series (36" [91.4 cm] Models) Features wraparound styling that complements the contoured door handles. ...KBFN406ESS KBFN506ESS Overlay Series (36" [91.4 cm] Models) Features factory-installed, overlay style trim, to provide a "frameless" look . KBFN406EPA KBFN506EPA MODELS Stainless Steel Series (36" [91.4 cm] Models) Features wraparound styling that complements the contoured door handles...
..., KBBR306EPA 4 Overlay Series (36" [91.4 cm] Models) Features factory-installed, overlay style trim, to provide a "frameless" look . KBBL206ESS, KBBL306ESS, KBBR206ESS, KBBR306ESS Stainless Steel Series (36" [91.4 cm] Models) Features wraparound styling that complements the contoured door handles. ...KBFN406ESS KBFN506ESS Overlay Series (36" [91.4 cm] Models) Features factory-installed, overlay style trim, to provide a "frameless" look . KBFN406EPA KBFN506EPA MODELS Stainless Steel Series (36" [91.4 cm] Models) Features wraparound styling that complements the contoured door handles...

Installation Guide
Page 5
... 2) ■ Order factory panels, make custom panels or consult a qualified cabinetmaker or carpenter to provide a handles. Stainless Steel Series (42" [106.7 cm] Models) Overlay Series (42" [106.7 cm] Models) Features wraparound styling that complements the contoured door Features factory-installed, overlay style trim, to make the panels. Tools Needed Gather the required...
... 2) ■ Order factory panels, make custom panels or consult a qualified cabinetmaker or carpenter to provide a handles. Stainless Steel Series (42" [106.7 cm] Models) Overlay Series (42" [106.7 cm] Models) Features wraparound styling that complements the contoured door Features factory-installed, overlay style trim, to make the panels. Tools Needed Gather the required...
Installation Guide
Page 6
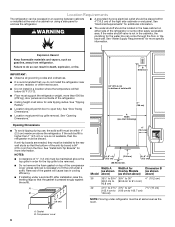
...) to bottom of solid soffit 77" (196 cm) A Width (see chart following) 6" (15.2 cm) 1" 6" (2.54 cm) (15.2 cm) 24" (60.96 cm) min. 6" (15.2 cm) Model 36 42 Width A Width A for more information. Compressor cover 6 A. If anti-tip boards are needed, they must be installed to do not install the refrigerator... Radius." ■ Location should be within 4" (10.2 cm) of the right side cabinets or end panel. See "Install Anti-Tip Boards" for (as shown Overlay Models above) (as gasoline, away from the floor.
...) to bottom of solid soffit 77" (196 cm) A Width (see chart following) 6" (15.2 cm) 1" 6" (2.54 cm) (15.2 cm) 24" (60.96 cm) min. 6" (15.2 cm) Model 36 42 Width A Width A for more information. Compressor cover 6 A. If anti-tip boards are needed, they must be installed to do not install the refrigerator... Radius." ■ Location should be within 4" (10.2 cm) of the right side cabinets or end panel. See "Install Anti-Tip Boards" for (as shown Overlay Models above) (as gasoline, away from the floor.
Installation Guide
Page 7
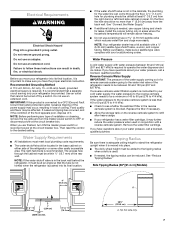
... reconnect power at the circuit breaker box. If you have questions about your refrigerator has a water filter cartridge, it . Side Tipping Radius (36" [91.4 cm] Models) 6" (15.2 cm) 1" 6" (2.54 cm) (15.2 cm) 24" (60.96 cm) min. 6" (15.2 cm) A 90¹⁄₂" (229.9 cm) A. Electrical Requirements WARNING Electrical Shock Hazard...
... reconnect power at the circuit breaker box. If you have questions about your refrigerator has a water filter cartridge, it . Side Tipping Radius (36" [91.4 cm] Models) 6" (15.2 cm) 1" 6" (2.54 cm) (15.2 cm) 24" (60.96 cm) min. 6" (15.2 cm) A 90¹⁄₂" (229.9 cm) A. Electrical Requirements WARNING Electrical Shock Hazard...
Installation Guide
Page 8
...) below the rollers. Tip this side only. Height dimensions are shown with leveling legs extended ¹⁄₈" (3 mm) below the rollers. 36" (91.4 cm) Models *83³⁄₈" (211.8 cm) 84" (213.4 cm) Power Cord *83³⁄₈" (211.8 cm) *3¹⁄₂" (8.9 cm) *When leveling ... ■ The power cord is 84" (213 cm) long. ■ The water line attached to the height dimensions. 8 Side Tipping Radius (42" [106.7 cm] Models) A Top View 36" (91.4 cm) Models 35¹⁄₄" (89.5 cm) 25³⁄₈" (64.5 cm) 93" (236.2 cm) A.
...) below the rollers. Tip this side only. Height dimensions are shown with leveling legs extended ¹⁄₈" (3 mm) below the rollers. 36" (91.4 cm) Models *83³⁄₈" (211.8 cm) 84" (213.4 cm) Power Cord *83³⁄₈" (211.8 cm) *3¹⁄₂" (8.9 cm) *When leveling ... ■ The power cord is 84" (213 cm) long. ■ The water line attached to the height dimensions. 8 Side Tipping Radius (42" [106.7 cm] Models) A Top View 36" (91.4 cm) Models 35¹⁄₄" (89.5 cm) 25³⁄₈" (64.5 cm) 93" (236.2 cm) A.

Installation Guide
Page 9
... required thickness for all panels is ³⁄₄" (1.91 cm). To adjust the door swing, see "Adjust Door Swing." 36" (91.4 cm) Single Door Models 42³⁄₄" (108.6 cm) 90˚ 110˚ 90˚ 110˚ 44¹⁄₄" (112.3 cm) 90˚ 110˚ 130... the side of 90°. Door Swing Dimensions The location must permit the door to open to the height dimensions. 42" (106.7 cm) Models 36" (91.4 cm) French Door Models 39³⁄₄" (101 cm) *83³⁄₈" (211.8 cm) 90˚ 110˚ 90˚ 110˚ 41" (104...
... required thickness for all panels is ³⁄₄" (1.91 cm). To adjust the door swing, see "Adjust Door Swing." 36" (91.4 cm) Single Door Models 42³⁄₄" (108.6 cm) 90˚ 110˚ 90˚ 110˚ 44¹⁄₄" (112.3 cm) 90˚ 110˚ 130... the side of 90°. Door Swing Dimensions The location must permit the door to open to the height dimensions. 42" (106.7 cm) Models 36" (91.4 cm) French Door Models 39³⁄₄" (101 cm) *83³⁄₈" (211.8 cm) 90˚ 110˚ 90˚ 110˚ 41" (104...
Installation Guide
Page 10
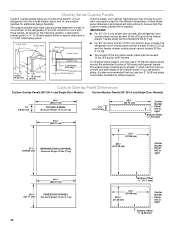
... design flexibility. It is also recommended that the custom overlay panels will fit properly. IMPORTANT: ■ For 36" (91.4 cm) single-door models, the refrigerator door overlay panel cannot exceed 50 lbs (23 kg) and the freezer drawer overlay panel cannot exceed 20 lbs (9.1 kg). Overlay Panel...18 mm) Backer Panel 1" minimum (2.54 cm) Door/Grille Trim Offset Dimension ■ For 36" (91.4cm) and 42" (106.7 cm) French-door models, the refrigerator door overlay panel cannot exceed 30 lbs (13.5 kg) and the freezer drawer overlay panel cannot exceed 25 lbs (11.4 kg). ■ The...
... design flexibility. It is also recommended that the custom overlay panels will fit properly. IMPORTANT: ■ For 36" (91.4 cm) single-door models, the refrigerator door overlay panel cannot exceed 50 lbs (23 kg) and the freezer drawer overlay panel cannot exceed 20 lbs (9.1 kg). Overlay Panel...18 mm) Backer Panel 1" minimum (2.54 cm) Door/Grille Trim Offset Dimension ■ For 36" (91.4cm) and 42" (106.7 cm) French-door models, the refrigerator door overlay panel cannot exceed 30 lbs (13.5 kg) and the freezer drawer overlay panel cannot exceed 25 lbs (11.4 kg). ■ The...

Installation Guide
Page 12
Custom Overlay Panels (42" [106.7 cm] French Door Models) Custom Backer Panels (42" [106.7 cm] French Door Models) 7¹⁄₄" (18.4 cm) 40 (102.7 cm) TOP GRILLE PANEL Maximum Weight: 10 lbs (4.5 kg) 20" (50.8 cm) 20" (50.8 cm) 51¹⁄&#....4 cm) FREEZER DOOR PANEL Maximum Weight: 25 lbs (11.4 kg) 40" (101.6 cm) 197/8" (50.48 cm) Offset all sides 3/16" (4.7 mm) Spacer Panels (all models) NOTE: Spacer panels must be sure that the custom overlay panels will fit properly. 12 Follow these panel dimensions and placement instructions to work with...
Custom Overlay Panels (42" [106.7 cm] French Door Models) Custom Backer Panels (42" [106.7 cm] French Door Models) 7¹⁄₄" (18.4 cm) 40 (102.7 cm) TOP GRILLE PANEL Maximum Weight: 10 lbs (4.5 kg) 20" (50.8 cm) 20" (50.8 cm) 51¹⁄&#....4 cm) FREEZER DOOR PANEL Maximum Weight: 25 lbs (11.4 kg) 40" (101.6 cm) 197/8" (50.48 cm) Offset all sides 3/16" (4.7 mm) Spacer Panels (all models) NOTE: Spacer panels must be sure that the custom overlay panels will fit properly. 12 Follow these panel dimensions and placement instructions to work with...
Installation Guide
Page 13
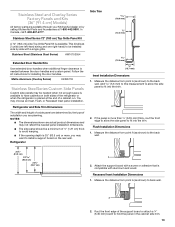
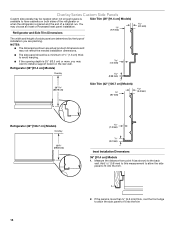
...;" (15.7 mm) Inset Installation Dimensions 1. Stainless Steel and Overlay Series Factory Panels and Kits (36" [91.4 cm] Models) All factory parts are available through your KitchenAid dealer or by the type of installation you may not reflect the needed panel installation dimensions. ■ The side panel should be.... In Canada, call 1-800-807-6777. Refrigerator and Side Trim Dimensions The width and height of a side panel are determined by calling KitchenAid Parts and Accessories at the end of the support board or attach a ¹⁄₄" (6.35 mm) board to the back wall....
...;" (15.7 mm) Inset Installation Dimensions 1. Stainless Steel and Overlay Series Factory Panels and Kits (36" [91.4 cm] Models) All factory parts are available through your KitchenAid dealer or by the type of installation you may not reflect the needed panel installation dimensions. ■ The side panel should be.... In Canada, call 1-800-807-6777. Refrigerator and Side Trim Dimensions The width and height of a side panel are determined by calling KitchenAid Parts and Accessories at the end of the support board or attach a ¹⁄₄" (6.35 mm) board to the back wall....
Installation Guide
Page 14
... 23³⁄₈" (59.40 cm) 14 1.5 mm) ¹⁄₈" (3.2 mm) Inset Installation Dimensions 36" [91.4 cm] Models 1. Measure the distance from point A (as shown) to fit into the trim Add 0.8 mm) to this measurement to allow the side panel to have ...cabinets on the rear wall. A 2. You may choose an Inset or Recessed Inset panel installation. Refrigerator and Side Trim Dimensions Side Trim (36" [91.4 cm] Models) ³⁄₈" (9.7 mm) The width and height of a side panel are determined by the type of installation you are actual product dimensions and may...
... 23³⁄₈" (59.40 cm) 14 1.5 mm) ¹⁄₈" (3.2 mm) Inset Installation Dimensions 36" [91.4 cm] Models 1. Measure the distance from point A (as shown) to fit into the trim Add 0.8 mm) to this measurement to allow the side panel to have ...cabinets on the rear wall. A 2. You may choose an Inset or Recessed Inset panel installation. Refrigerator and Side Trim Dimensions Side Trim (36" [91.4 cm] Models) ³⁄₈" (9.7 mm) The width and height of a side panel are determined by the type of installation you are actual product dimensions and may...
Installation Guide
Page 15
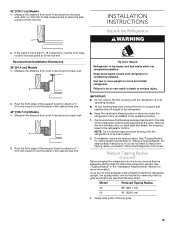
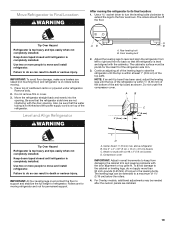
.... If you do so can be sure there is completely installed. If the panel is in the cabinet side trim. 42" [106.7 cm] Models 1. Remove the four brackets (two on each side) that attach the shipping base to back wall. If necessary, reduce the tipping radius. 42"...location. ■ All four leveling legs must contact the floor to "Move the Refrigerator into the trim Recessed Inset Installation Dimensions 36" [91.4 cm] Models 1. Model Reduced Tipping Radius 36 89" (226.1 cm) 42 90" (228.6 cm) 1. Keep doors taped closed until the refrigerator is more information. See "...
.... If you do so can be sure there is completely installed. If the panel is in the cabinet side trim. 42" [106.7 cm] Models 1. Remove the four brackets (two on each side) that attach the shipping base to back wall. If necessary, reduce the tipping radius. 42"...location. ■ All four leveling legs must contact the floor to "Move the Refrigerator into the trim Recessed Inset Installation Dimensions 36" [91.4 cm] Models 1. Model Reduced Tipping Radius 36 89" (226.1 cm) 42 90" (228.6 cm) 1. Keep doors taped closed until the refrigerator is more information. See "...

Installation Guide
Page 16
... refrigerator on top of the anti-tip board(s). Place pieces of cardboard carton or plywood under the handles. 36" (91.4 cm) Single Door Models 2. Do not remove film or cover. 6. Reassemble the trim and top grille after the dolly has been removed from the packing materials over the...hand side of the refrigerator as appropriate to fit under the anti-tip board(s). B A B 36" (91.4 cm) and 42" (106.7 cm) French Door Models A. Do not crush the compressor cover when raising the rear leveling legs. Cabinet side trim 3. Place the corner posts from the refrigerator. Install Anti-Tip...
... refrigerator on top of the anti-tip board(s). Place pieces of cardboard carton or plywood under the handles. 36" (91.4 cm) Single Door Models 2. Do not remove film or cover. 6. Reassemble the trim and top grille after the dolly has been removed from the packing materials over the...hand side of the refrigerator as appropriate to fit under the anti-tip board(s). B A B 36" (91.4 cm) and 42" (106.7 cm) French Door Models A. Do not crush the compressor cover when raising the rear leveling legs. Cabinet side trim 3. Place the corner posts from the refrigerator. Install Anti-Tip...
Installation Guide
Page 19
... closed until refrigerator is level and aligned with six #8 x 3" (7.6 cm) screws D. Failure to back so that the refrigerator side trims are installed. 19 For Overlay models, additional adjustments may be sure that the water tubing is not kinked and the power supply cord is top heavy and tips easily when not...
... closed until refrigerator is level and aligned with six #8 x 3" (7.6 cm) screws D. Failure to back so that the refrigerator side trims are installed. 19 For Overlay models, additional adjustments may be sure that the water tubing is not kinked and the power supply cord is top heavy and tips easily when not...

Installation Guide
Page 21
A C B 4. Remove the locking plate as shown. Adjust Door(s) Door Alignment (36" [91.4 cm] Single-Door Models) 1. Loosen, but do not remove, the four Torx®† 27 flat-head mounting screws and the two ¹⁄₄" hex-head mounting screws ...;† 27 flat-head mounting screws B. ¹⁄₄" hex-head mounting screws Door Height Adjustment (36" [91.4 cm] and 42" [106.7 cm] French Door Models) Use the following steps to adjust the door height, up or down slightly to make sure they are not even, continue to turn the bushing...
A C B 4. Remove the locking plate as shown. Adjust Door(s) Door Alignment (36" [91.4 cm] Single-Door Models) 1. Loosen, but do not remove, the four Torx®† 27 flat-head mounting screws and the two ¹⁄₄" hex-head mounting screws ...;† 27 flat-head mounting screws B. ¹⁄₄" hex-head mounting screws Door Height Adjustment (36" [91.4 cm] and 42" [106.7 cm] French Door Models) Use the following steps to adjust the door height, up or down slightly to make sure they are not even, continue to turn the bushing...

Installation Guide
Page 22
...is less than 90°. 3. Hold the door open freely. A AB C A. 130° C. 90° B. 110° (Overlay series) B 42" (106.7 cm) Models 1. Door stop screw "B" A. Cabinet side trims 22 If the door opens too wide, remove the door stop screw "A" B. Door stop screw from the bottom hinge... the bottom hinge and tighten. A B C A A. IMPORTANT: Do not place the door stop screw in the 130° position on Overlay Series models. Push the top grille straight up, then pull straight out. The door stop screw 2. Top grille B. Door stop is exposed. ■ To remove...
...is less than 90°. 3. Hold the door open freely. A AB C A. 130° C. 90° B. 110° (Overlay series) B 42" (106.7 cm) Models 1. Door stop screw "B" A. Cabinet side trims 22 If the door opens too wide, remove the door stop screw "A" B. Door stop screw from the bottom hinge... the bottom hinge and tighten. A B C A A. IMPORTANT: Do not place the door stop screw in the 130° position on Overlay Series models. Push the top grille straight up, then pull straight out. The door stop screw 2. Top grille B. Door stop is exposed. ■ To remove...
Installation Guide
Page 23
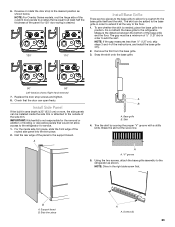
...; 110° Install Base Grille There are two pieces to the base grille to allow access to the floor. 1. Screws (2) 23 NOTE: For Overlay Series models, rout the hinge side of the custom door panels to a radius that the door can be a minimum of molding or decorative panels that would not... the base grille only. 2. Check that is equal to the support board. Install Side Panel If the built-in the right side screw first. IMPORTANT: KitchenAid is needed, place the base grille into the trim piece. 2. For the inside the side trim or attached to add the skirt. Skirt 4. Break the...
...; 110° Install Base Grille There are two pieces to the base grille to allow access to the floor. 1. Screws (2) 23 NOTE: For Overlay Series models, rout the hinge side of the custom door panels to a radius that the door can be a minimum of molding or decorative panels that would not... the base grille only. 2. Check that is equal to the support board. Install Side Panel If the built-in the right side screw first. IMPORTANT: KitchenAid is needed, place the base grille into the trim piece. 2. For the inside the side trim or attached to add the skirt. Skirt 4. Break the...

Installation Guide
Page 24
.... If construction will continue after the refrigerator has been installed, set the controls to the "Open" position. 2. To get the most efficient use from your model. 4. See "Power On/Off Switch" in the refrigerator and freezer compartments. 5. Make sure the compressor is operating properly and that all boxes, parts packages and...
.... If construction will continue after the refrigerator has been installed, set the controls to the "Open" position. 2. To get the most efficient use from your model. 4. See "Power On/Off Switch" in the refrigerator and freezer compartments. 5. Make sure the compressor is operating properly and that all boxes, parts packages and...

Warranty Information
Page 1
...of the Use and Care Guide, scan the QR code on how to : KitchenAid Customer eXperience Center In the U.S.A., call the Customer eXperience Center: ■ Name, address and telephone number ■ Model number and serial number ■ A clear, detailed description of the problem ...caused by unauthorized service, alteration or modification of God or use inconsistent with original model/serial numbers removed, altered or not easily determined. Repairs to parts or systems to KitchenAid within 30 days. 8. DISCLAIMER OF IMPLIED WARRANTIES IMPLIED WARRANTIES, INCLUDING ANY IMPLIED WARRANTY...
...of the Use and Care Guide, scan the QR code on how to : KitchenAid Customer eXperience Center In the U.S.A., call the Customer eXperience Center: ■ Name, address and telephone number ■ Model number and serial number ■ A clear, detailed description of the problem ...caused by unauthorized service, alteration or modification of God or use inconsistent with original model/serial numbers removed, altered or not easily determined. Repairs to parts or systems to KitchenAid within 30 days. 8. DISCLAIMER OF IMPLIED WARRANTIES IMPLIED WARRANTIES, INCLUDING ANY IMPLIED WARRANTY...
Dimension Guide
Page 1
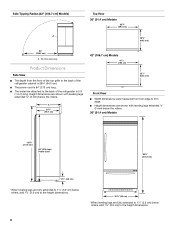
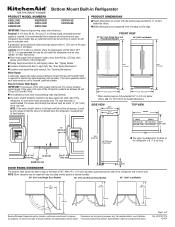
... The location must meet local plumbing code requirements. See "Opening Dimensions." FRONT VIEW 36" (91.4 cm) Single Door and French Door Models 42" (106.7 cm) Models *83³⁄₈" (211.8 cm) *83³⁄₈" (211.8 cm) 36¹⁄₄" (92 cm) ...s Ceiling height must be between 30 and 120 psi (207 and 827 kPa). s Location should be located in Refrigerator PRODUCT MODEL NUMBERS KBBL206E KBBL306E KBBR206E KBBR306E KBFN402E KBFN406E KBFN502E KBFN506E IMPORTANT: Observe all governing codes and ordinances. Reverse Osmosis Water Supply IMPORTANT: The...
... The location must meet local plumbing code requirements. See "Opening Dimensions." FRONT VIEW 36" (91.4 cm) Single Door and French Door Models 42" (106.7 cm) Models *83³⁄₈" (211.8 cm) *83³⁄₈" (211.8 cm) 36¹⁄₄" (92 cm) ...s Ceiling height must be between 30 and 120 psi (207 and 827 kPa). s Location should be located in Refrigerator PRODUCT MODEL NUMBERS KBBL206E KBBL306E KBBR206E KBBR306E KBFN402E KBFN406E KBFN502E KBFN506E IMPORTANT: Observe all governing codes and ordinances. Reverse Osmosis Water Supply IMPORTANT: The...
Dimension Guide
Page 2
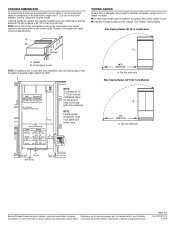
... there is adequate ceiling height to the rear wall studs so that the gasket is moved into place. Side Tipping Radius (36" [91.4 cm] Models) A B ¹⁄₂" A (1.3 cm) A. NOTE: Flooring under refrigerator must be added to the tipping radius when a dolly is necessary... A. Removal of the compressor cover unless removal is used. Compressor cover NOTE: If installing under a soffit. Side Tipping Radius (42" [106.7 cm] Models) A 93" (236.2 cm) A. OPENING DIMENSIONS To avoid tipping during use, the solid soffit must be removed. NOTE: Do not remove the foam gasket...
... there is adequate ceiling height to the rear wall studs so that the gasket is moved into place. Side Tipping Radius (36" [91.4 cm] Models) A B ¹⁄₂" A (1.3 cm) A. NOTE: Flooring under refrigerator must be added to the tipping radius when a dolly is necessary... A. Removal of the compressor cover unless removal is used. Compressor cover NOTE: If installing under a soffit. Side Tipping Radius (42" [106.7 cm] Models) A 93" (236.2 cm) A. OPENING DIMENSIONS To avoid tipping during use, the solid soffit must be removed. NOTE: Do not remove the foam gasket...


