
Use & Care Guide
Page 1
... W10137649A In Canada, visit our website at www.kitchenaid.ca or call us at 1-800-807-6777. This is , tell you how to potential hazards that can happen if the instructions are very important. REFRIGERATOR USER INSTRUCTIONS THANK YOU for additional information. If you... safety and the safety of the refrigerator interior. All safety messages will follow instructions. Para obtener acceso a "Instrucciones para el usuario del refrigerador" en español, o para obtener información adicional de su producto, visite: www.kitchenaid.com Tenga listo su número...
... W10137649A In Canada, visit our website at www.kitchenaid.ca or call us at 1-800-807-6777. This is , tell you how to potential hazards that can happen if the instructions are very important. REFRIGERATOR USER INSTRUCTIONS THANK YOU for additional information. If you... safety and the safety of the refrigerator interior. All safety messages will follow instructions. Para obtener acceso a "Instrucciones para el usuario del refrigerador" en español, o para obtener información adicional de su producto, visite: www.kitchenaid.com Tenga listo su número...

Use & Care Guide
Page 2
... of your protection, tempered glass is heavy. even if they are cold. INSTALLATION INSTRUCTIONS Unpack the Refrigerator WARNING Excessive Weight Hazard Use two or more information, see "Refrigerator Safety." ■ Properly dispose of packaging. Remove the Packaging ■ Remove tape and glue residue... products can result in place so that children may break if exposed to move and install refrigerator. ■ Disconnect power before installing ice maker (on the refrigerator. Important information to know about glass shelves and covers: Do not clean glass shelves or covers...
... of your protection, tempered glass is heavy. even if they are cold. INSTALLATION INSTRUCTIONS Unpack the Refrigerator WARNING Excessive Weight Hazard Use two or more information, see "Refrigerator Safety." ■ Properly dispose of packaging. Remove the Packaging ■ Remove tape and glue residue... products can result in place so that children may break if exposed to move and install refrigerator. ■ Disconnect power before installing ice maker (on the refrigerator. Important information to know about glass shelves and covers: Do not clean glass shelves or covers...

Use & Care Guide
Page 3
...Do not use an adapter. NOTE: Before performing any tools listed here. Water Pressure A cold water supply with any type of the refrigerator needs to swing open. Location Requirements WARNING Electrical Requirements WARNING Explosion Hazard Keep flammable materials and vapors, such as gasoline, away from the...can result in death, fire, or electrical shock. If you do so can result in death, explosion, or fire. Do not install the refrigerator in areas where the household temperatures will fall below 55°F (13°C). ¹⁄₂" (1.25 cm) 2¹⁄₂" ...
...Do not use an adapter. NOTE: Before performing any tools listed here. Water Pressure A cold water supply with any type of the refrigerator needs to swing open. Location Requirements WARNING Electrical Requirements WARNING Explosion Hazard Keep flammable materials and vapors, such as gasoline, away from the...can result in death, fire, or electrical shock. If you do so can result in death, explosion, or fire. Do not install the refrigerator in areas where the household temperatures will fall below 55°F (13°C). ¹⁄₂" (1.25 cm) 2¹⁄₂" ...

Use & Care Guide
Page 4
... whether the sediment filter in conjunction with the pipe clamp. IMPORTANT: If you need. Determine the length of copper tubing you turn the refrigerator on before you have questions about your water pressure, call a licensed, qualified plumber. A B C A. Compression sleeve F. Slip the ...as shown. Turn OFF the shutoff valve on the copper tubing. 3. Tighten the compression nut. Do not overtighten. Secure copper tubing to refrigerator cabinet with the copper tubing. Create a service loop (minimum diameter of 2 ft [61 cm]) with a "P" clamp. Shape tubing slightly...
... whether the sediment filter in conjunction with the pipe clamp. IMPORTANT: If you need. Determine the length of copper tubing you turn the refrigerator on before you have questions about your water pressure, call a licensed, qualified plumber. A B C A. Compression sleeve F. Slip the ...as shown. Turn OFF the shutoff valve on the copper tubing. 3. Tighten the compression nut. Do not overtighten. Secure copper tubing to refrigerator cabinet with the copper tubing. Create a service loop (minimum diameter of 2 ft [61 cm]) with a "P" clamp. Shape tubing slightly...

Use & Care Guide
Page 5
... a rubber mallet to opposite side of ice. Plug into a grounded 3 prong outlet. To replace the handle, reverse the directions. Unplug refrigerator or disconnect power. 2. Remove the parts for leaks. See Graphic 1-1. 2. Move to ensure a snug fit. 4. "P" clamp 6. Do...wrench, #2 Phillips screwdriver, and a flat-blade screwdriver. 1. Using a flat-blade screwdriver tip wrapped in Graphic 5. 5 Remove the refrigerator handle assembly including the mounting posts and screws. Then, with a "P" clamp. Remove Door and Hinges IMPORTANT: ■ Remove food and...
... a rubber mallet to opposite side of ice. Plug into a grounded 3 prong outlet. To replace the handle, reverse the directions. Unplug refrigerator or disconnect power. 2. Remove the parts for leaks. See Graphic 1-1. 2. Move to ensure a snug fit. 4. "P" clamp 6. Do...wrench, #2 Phillips screwdriver, and a flat-blade screwdriver. 1. Using a flat-blade screwdriver tip wrapped in Graphic 5. 5 Remove the refrigerator handle assembly including the mounting posts and screws. Then, with a "P" clamp. Remove Door and Hinges IMPORTANT: ■ Remove food and...

Use & Care Guide
Page 6
... slide up the door so that hole plugs and screws are in toward you are working. 2. See Graphic 4. 10. Replace the refrigerator door. Lift drawer front upward and off the screws. Replace Drawer Front 1. Pull the drawer brackets toward the interior of the drawer front... into a grounded 3 prong outlet. 3. Position refrigerator handle over mounting posts as shown in the drawer front. 3. Reverse Door (Panel Series) IMPORTANT: ■ If you are not reversing the ...
... slide up the door so that hole plugs and screws are in toward you are working. 2. See Graphic 4. 10. Replace the refrigerator door. Lift drawer front upward and off the screws. Replace Drawer Front 1. Pull the drawer brackets toward the interior of the drawer front... into a grounded 3 prong outlet. 3. Position refrigerator handle over mounting posts as shown in the drawer front. 3. Reverse Door (Panel Series) IMPORTANT: ■ If you are not reversing the ...

Use & Care Guide
Page 9
... Store panel and filler board in grooves provided by turning both screws the same amount. 4. Adjust the Door Depending on your model, your refrigerator seems unsteady or you want the door to close more easily, use the instructions below. 1. Remove the base grille. Factory Trim Kit (... the leveling screw to a new home or installing custom-made decorator panels. A 2. Style 1 - B NOTE: Having someone push against the top of refrigerator door handle upward with a rubber mallet. ■ The handle will need to remove the factory-installed trim kit, such as you . 3. It may ...
... Store panel and filler board in grooves provided by turning both screws the same amount. 4. Adjust the Door Depending on your model, your refrigerator seems unsteady or you want the door to close more easily, use the instructions below. 1. Remove the base grille. Factory Trim Kit (... the leveling screw to a new home or installing custom-made decorator panels. A 2. Style 1 - B NOTE: Having someone push against the top of refrigerator door handle upward with a rubber mallet. ■ The handle will need to remove the factory-installed trim kit, such as you . 3. It may ...

Use & Care Guide
Page 10
...a dry, soft cloth or chamois. Clean panels with stainless steel cleaner and polish or mild soap and water with routed edges. Refrigerator door 355/8" (90.5 cm) Dimensions for Routing Handle Side of Decorator Panels 1. Door panel Dimensions for wood panel inserts. If...Allow 2¹⁄₂" (6.35 cm) minimum clearance between offsets ³⁄₈" (9.5 mm) min. Weight requirements for normal household refrigerator use paper towels or cleaners which contain solvents such as you will not cool the compartments any faster. ■ The recommended settings should...
...a dry, soft cloth or chamois. Clean panels with stainless steel cleaner and polish or mild soap and water with routed edges. Refrigerator door 355/8" (90.5 cm) Dimensions for Routing Handle Side of Decorator Panels 1. Door panel Dimensions for wood panel inserts. If...Allow 2¹⁄₂" (6.35 cm) minimum clearance between offsets ³⁄₈" (9.5 mm) min. Weight requirements for normal household refrigerator use paper towels or cleaners which contain solvents such as you will not cool the compartments any faster. ■ The recommended settings should...

Use & Care Guide
Page 11
... 7 (coldest). When you need to adjust the temperature in approximately 12 hours. 11 CONDITION/REASON: ADJUSTMENT: REFRIGERATOR too warm Adjust REFRIGERATOR Control one setting higher FREEZER too warm/to stabilize. Adjusting Electronic Controls The temperature control range for the temperature ...to little ice Adjust FREEZER Control one setting higher REFRIGERATOR too cold Adjust REFRIGERATOR Control one setting lower FREEZER too cold Adjust FREEZER Control one setting at a time. Wait 24 hours...
... 7 (coldest). When you need to adjust the temperature in approximately 12 hours. 11 CONDITION/REASON: ADJUSTMENT: REFRIGERATOR too warm Adjust REFRIGERATOR Control one setting higher FREEZER too warm/to stabilize. Adjusting Electronic Controls The temperature control range for the temperature ...to little ice Adjust FREEZER Control one setting higher REFRIGERATOR too cold Adjust REFRIGERATOR Control one setting lower FREEZER too cold Adjust FREEZER Control one setting at a time. Wait 24 hours...

Use & Care Guide
Page 12
... degrees Celsius Alarm (AL) This preference allows you to stop the audible alarm and alternating temperature displays. Temperature in the refrigerator and freezer compartments exceed normal operating temperatures, the highest temperature reached will not automatically defrost as often to turn off . 12... the alarm sound. Crisper Humidity Control You can control the amount of humidity in the event of heavy ice use by shutting the refrigerator compartment door. OptimIce® Feature The OptimIce® feature assists with skins. To Access the User Preferences Menu: 1. FRUIT / ...
... degrees Celsius Alarm (AL) This preference allows you to stop the audible alarm and alternating temperature displays. Temperature in the refrigerator and freezer compartments exceed normal operating temperatures, the highest temperature reached will not automatically defrost as often to turn off . 12... the alarm sound. Crisper Humidity Control You can control the amount of humidity in the event of heavy ice use by shutting the refrigerator compartment door. OptimIce® Feature The OptimIce® feature assists with skins. To Access the User Preferences Menu: 1. FRUIT / ...

Use & Care Guide
Page 13
...the dispenser button again. ■ Allow 24 hours for the click. IMPORTANT: Air trapped in some models) IMPORTANT: ■ After connecting the refrigerator to poor quality ice. NOTE: The dispenser feature may cause water and filter to cool down . Do not force the wire shutoff arm up...unsafe or of ice. NOTE: After five minutes of ice approximately every 3 hours. ■ To increase ice production, lower the freezer and refrigerator temperature. Dispense enough water every week to avoid flooding. Do not use with the blue bypass cap. 13 Systems certified for 5 seconds. ...
...the dispenser button again. ■ Allow 24 hours for the click. IMPORTANT: Air trapped in some models) IMPORTANT: ■ After connecting the refrigerator to poor quality ice. NOTE: The dispenser feature may cause water and filter to cool down . Do not force the wire shutoff arm up...unsafe or of ice. NOTE: After five minutes of ice approximately every 3 hours. ■ To increase ice production, lower the freezer and refrigerator temperature. Dispense enough water every week to avoid flooding. Do not use with the blue bypass cap. 13 Systems certified for 5 seconds. ...
Use & Care Guide
Page 14
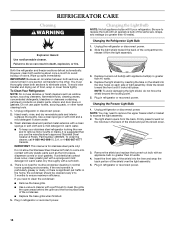
... However, clean both sections about once a month to replace the bulb with a sponge and mild detergent in warm water. ■ To keep your refrigerator. To avoid odor transfer and drying out of odors. Do not use paper towels, scouring pads, or other . Use a clean sponge or soft .... or 1-800-807-6777 Canada. IMPORTANT: This cleaner is suggested that you need for stainless steel parts only! Changing the Refrigerator Light Bulb 1. Unplug the refrigerator or disconnect power. 2. Slide the light shield toward the front until it from the back. The light shield opens from the...
... However, clean both sections about once a month to replace the bulb with a sponge and mild detergent in warm water. ■ To keep your refrigerator. To avoid odor transfer and drying out of odors. Do not use paper towels, scouring pads, or other . Use a clean sponge or soft .... or 1-800-807-6777 Canada. IMPORTANT: This cleaner is suggested that you need for stainless steel parts only! Changing the Refrigerator Light Bulb 1. Unplug the refrigerator or disconnect power. 2. Slide the light shield toward the front until it from the back. The light shield opens from the...

Use & Care Guide
Page 15
...Clean gaskets and contact surfaces with soft cloth. 15 Do not remove ground prong. In the U.S.A., www.kitchenaid.com In Canada, www.kitchenaid.ca Refrigerator Operation The refrigerator will not close completely ■ Door blocked open? Do not use an adapter. Allow 24 hours following... installation for the refrigerator to coldest setting will not cool either compartment more quickly. Failure to follow...
...Clean gaskets and contact surfaces with soft cloth. 15 Do not remove ground prong. In the U.S.A., www.kitchenaid.com In Canada, www.kitchenaid.ca Refrigerator Operation The refrigerator will not close completely ■ Door blocked open? Do not use an adapter. Allow 24 hours following... installation for the refrigerator to coldest setting will not cool either compartment more quickly. Failure to follow...

Use & Care Guide
Page 16
...or reinstall it correctly. ■ Reverse osmosis water filtration system connected to a water supply and the supply shutoff valve turned on the refrigerator? See "Water Supply Requirements." ■ Questions remain regarding water pressure? Wash ice bin. A water filter may need to your ... plumbing connections can decrease water pressure. Use airtight, moisture proof packaging to remove the minerals. ■ Water filter installed on ? Connect refrigerator to moisture buildup. ■ Door(s) opened often or left open . ■ Kink in the water? Allow several hours for the...
...or reinstall it correctly. ■ Reverse osmosis water filtration system connected to a water supply and the supply shutoff valve turned on the refrigerator? See "Water Supply Requirements." ■ Questions remain regarding water pressure? Wash ice bin. A water filter may need to your ... plumbing connections can decrease water pressure. Use airtight, moisture proof packaging to remove the minerals. ■ Water filter installed on ? Connect refrigerator to moisture buildup. ■ Door(s) opened often or left open . ■ Kink in the water? Allow several hours for the...

Use & Care Guide
Page 17
...fully tightened. Allow 24 hours for the water supply to cool completely. ■ Recently dispensed large amount of water. ■ Refrigerator connected to cool completely. ■ Water not been recently dispensed? Remove filter and operate dispenser. See "Water Supply Requirements." Allow... 24 hours after installation for water supply to a cold water pipe? WATER FILTER CERTIFICATIONS 17 If it correctly. ■ Refrigerator door closed completely? See "Water Supply Requirements." ■ Water filter installed on the floor near the base grille? Discard the first...
...fully tightened. Allow 24 hours for the water supply to cool completely. ■ Recently dispensed large amount of water. ■ Refrigerator connected to cool completely. ■ Water not been recently dispensed? Remove filter and operate dispenser. See "Water Supply Requirements." Allow... 24 hours after installation for water supply to a cold water pipe? WATER FILTER CERTIFICATIONS 17 If it correctly. ■ Refrigerator door closed completely? See "Water Supply Requirements." ■ Water filter installed on the floor near the base grille? Discard the first...

Use & Care Guide
Page 19
... filter is operated and maintained according to instructions attached to or furnished with the product, KitchenAid will pay for other than normal, single-family household use of the refrigerator interior. These parts are : compressor, evaporator, condenser, dryer, and connecting tubing. Service...SPECIFIC LEGAL RIGHTS AND YOU MAY ALSO HAVE OTHER RIGHTS, WHICH VARY FROM STATE TO STATE OR PROVINCE TO PROVINCE. KITCHENAID® REFRIGERATOR WARRANTY ONE YEAR LIMITED WARRANTY For one year from unauthorized modifications made to the appliance. 9. On models with published installation...
... filter is operated and maintained according to instructions attached to or furnished with the product, KitchenAid will pay for other than normal, single-family household use of the refrigerator interior. These parts are : compressor, evaporator, condenser, dryer, and connecting tubing. Service...SPECIFIC LEGAL RIGHTS AND YOU MAY ALSO HAVE OTHER RIGHTS, WHICH VARY FROM STATE TO STATE OR PROVINCE TO PROVINCE. KITCHENAID® REFRIGERATOR WARRANTY ONE YEAR LIMITED WARRANTY For one year from unauthorized modifications made to the appliance. 9. On models with published installation...

Dimension Guide
Page 1
...) between 35 and 120 psi (241 and 827 kPa) is recommended that you are for the water line connections. Do not install the refrigerator in a location where the temperature will fall below 55°F (13°C). 2¹⁄₂" (6.3 cm) Because Whirlpool Corporation policy ...Volt, 60 Hz., AC only 15- LOCATION REQUIREMENTS PRODUCT DIMENSIONS B A not incl. Water: A cold water supply with product. Dimensions are installing your refrigerator next to a fixed wall, leave a 21⁄2" (6.3 cm) minimum space on each side and at the top. handle E incl. If you ...
...) between 35 and 120 psi (241 and 827 kPa) is recommended that you are for the water line connections. Do not install the refrigerator in a location where the temperature will fall below 55°F (13°C). 2¹⁄₂" (6.3 cm) Because Whirlpool Corporation policy ...Volt, 60 Hz., AC only 15- LOCATION REQUIREMENTS PRODUCT DIMENSIONS B A not incl. Water: A cold water supply with product. Dimensions are installing your refrigerator next to a fixed wall, leave a 21⁄2" (6.3 cm) minimum space on each side and at the top. handle E incl. If you ...
Energy Guide
Page 1
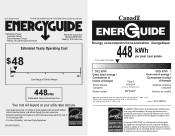
...;les similaires comparés Numéro du modèle Removal of Canada's high efficiency levels. U.S. Canada Refrigerator-Freezer ·Automatic Defrost ·Bottom Mounted Freezer ·Without Through-the-Door-Ice Service KitchenAid Corporation Model(s):KB*S19KT* Capacity: 18.5 Cubic Feet Estimated Yearly Operating Cost $48 $47 $61 Cost Range...
...;les similaires comparés Numéro du modèle Removal of Canada's high efficiency levels. U.S. Canada Refrigerator-Freezer ·Automatic Defrost ·Bottom Mounted Freezer ·Without Through-the-Door-Ice Service KitchenAid Corporation Model(s):KB*S19KT* Capacity: 18.5 Cubic Feet Estimated Yearly Operating Cost $48 $47 $61 Cost Range...

Warranty Information
Page 1
...to or furnished with electrical or plumbing codes, or use your authorized KitchenAid dealer to refrigerator or freezer product failures. 7. SECOND THROUGH FIFTH YEAR LIMITED WARRANTY ON CAVITY LINER AND SEALED REFRIGERATION SYSTEM In the second through fifth year from the date of original purchase... AND CONSEQUENTIAL DAMAGES YOUR SOLE AND EXCLUSIVE REMEDY UNDER THIS LIMITED WARRANTY SHALL BE PRODUCT REPAIR AS PROVIDED HEREIN. KITCHENAID® REFRIGERATOR WARRANTY LIMITED WARRANTY For one year from state to state or province to province. Service must be easily determined. LIMITATION OF...
...to or furnished with electrical or plumbing codes, or use your authorized KitchenAid dealer to refrigerator or freezer product failures. 7. SECOND THROUGH FIFTH YEAR LIMITED WARRANTY ON CAVITY LINER AND SEALED REFRIGERATION SYSTEM In the second through fifth year from the date of original purchase... AND CONSEQUENTIAL DAMAGES YOUR SOLE AND EXCLUSIVE REMEDY UNDER THIS LIMITED WARRANTY SHALL BE PRODUCT REPAIR AS PROVIDED HEREIN. KITCHENAID® REFRIGERATOR WARRANTY LIMITED WARRANTY For one year from state to state or province to province. Service must be easily determined. LIMITATION OF...

Warranty Information
Page 2
... MI 49022-2692 In Canada: KitchenAid Brand Home Appliances Customer eXperience Centre 200 - 6750 Century Ave. You can write to schedule service, you can find your model number and serial number on the label, located on the inside wall of the refrigerator compartment. For assistance or service in... the U.S.A., visit www.kitchenaid.com In Canada, visit www.kitchenaid.ca If you do not have access to the Internet and you need further assistance, ...
... MI 49022-2692 In Canada: KitchenAid Brand Home Appliances Customer eXperience Centre 200 - 6750 Century Ave. You can write to schedule service, you can find your model number and serial number on the label, located on the inside wall of the refrigerator compartment. For assistance or service in... the U.S.A., visit www.kitchenaid.com In Canada, visit www.kitchenaid.ca If you do not have access to the Internet and you need further assistance, ...


