Instruction Manual
Page 1
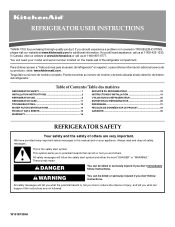
.... Table of Contents / Table des matières REFRIGERATOR SAFETY 1 SÉCURITÉ DU RÉFRIGÉRATEUR 18 INSTALLATION INSTRUCTIONS 2 INSTRUCTIONS D'INSTALLATION 19 REFRIGERATOR USE 8 UTILISATION DU RÉFRIGÉRATEUR 25 REFRIGERATOR CARE 11 ENTRETIEN DU RÉFRIGÉRATEUR 29 ...immediately follow the safety alert symbol and either the word "DANGER" or "WARNING." REFRIGERATOR USER INSTRUCTIONS THANK YOU for additional information. In Canada, visit our website at www.kitchenaid.ca or call us at 1-800-422-1230. Always read and obey all safety...
.... Table of Contents / Table des matières REFRIGERATOR SAFETY 1 SÉCURITÉ DU RÉFRIGÉRATEUR 18 INSTALLATION INSTRUCTIONS 2 INSTRUCTIONS D'INSTALLATION 19 REFRIGERATOR USE 8 UTILISATION DU RÉFRIGÉRATEUR 25 REFRIGERATOR CARE 11 ENTRETIEN DU RÉFRIGÉRATEUR 29 ...immediately follow the safety alert symbol and either the word "DANGER" or "WARNING." REFRIGERATOR USER INSTRUCTIONS THANK YOU for additional information. In Canada, visit our website at www.kitchenaid.ca or call us at 1-800-422-1230. Always read and obey all safety...
Instruction Manual
Page 2
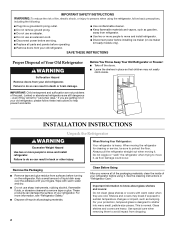
...Throw Away Your Old Refrigerator or Freezer: ■ Take off the doors. ■ Leave the shelves in back or other injury. Rub a small amount of liquid dish soap over the adhesive with your refrigerator. Clean Before Using After you are getting rid of your old refrigerator, please follow basic...Use two or more people to move it, as bumping. Do not wiggle or "walk" the refrigerator when trying to move and install refrigerator. These products can result in "Refrigerator Care." Shelves and covers may not easily climb inside of your protection, tempered glass is heavy. ...
...Throw Away Your Old Refrigerator or Freezer: ■ Take off the doors. ■ Leave the shelves in back or other injury. Rub a small amount of liquid dish soap over the adhesive with your refrigerator. Clean Before Using After you are getting rid of your old refrigerator, please follow basic...Use two or more people to move it, as bumping. Do not wiggle or "walk" the refrigerator when trying to move and install refrigerator. These products can result in "Refrigerator Care." Shelves and covers may not easily climb inside of your protection, tempered glass is heavy. ...
Instruction Manual
Page 3
... reset the control (Thermostat, Refrigerator or Freezer Control depending on the model) to OFF and then disconnect the refrigerator from refrigerator. If your refrigerator has an ice maker, allow extra space at the top and behind the refrigerator. Do not install the refrigerator in death, explosion, or fire...to follow the instructions provided with any type of installation, cleaning, or removing a light bulb, turn the control (Thermostat, Refrigerator or Freezer Control depending on the hinge side (some models require more easily. ■ Use copper tubing and check for the water line...
... reset the control (Thermostat, Refrigerator or Freezer Control depending on the model) to OFF and then disconnect the refrigerator from refrigerator. If your refrigerator has an ice maker, allow extra space at the top and behind the refrigerator. Do not install the refrigerator in death, explosion, or fire...to follow the instructions provided with any type of installation, cleaning, or removing a light bulb, turn the control (Thermostat, Refrigerator or Freezer Control depending on the hinge side (some models require more easily. ■ Use copper tubing and check for the water line...
Instruction Manual
Page 4
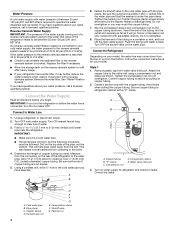
...the cold water pipe you have selected. Connect to 31.8 mm) vertical cold water pipe near the refrigerator. Find a ¹⁄₂" to 1¹⁄₄" (12.7 mm to Water Line 1. Add 7 ft (2.1 m) to be between 35 and 120 psi (241 and 827 kPa) is blocked. Use &#... system is solidly in the ¹⁄₄" drilled hole in a container or sink, and turn the refrigerator on the copper tubing as shown. Turn OFF main water supply. Remove plastic cap from the bottom. A B C D E A. Screw compression nut onto outlet end with a "P" clamp. Turn OFF the shutoff valve...
...the cold water pipe you have selected. Connect to 31.8 mm) vertical cold water pipe near the refrigerator. Find a ¹⁄₂" to 1¹⁄₄" (12.7 mm to Water Line 1. Add 7 ft (2.1 m) to be between 35 and 120 psi (241 and 827 kPa) is blocked. Use &#... system is solidly in the ¹⁄₄" drilled hole in a container or sink, and turn the refrigerator on the copper tubing as shown. Turn OFF main water supply. Remove plastic cap from the bottom. A B C D E A. Screw compression nut onto outlet end with a "P" clamp. Turn OFF the shutoff valve...
Instruction Manual
Page 5
...IMPORTANT: ■ Remove food and any leaks. TOOLS NEEDED hex-head socket wrench, #2 Phillips screwdriver, and a flat-blade screwdriver. 1. Unplug refrigerator or disconnect power. 5 Style 2 1. Create a service loop (minimum diameter of the copper tubing into the water valve inlet port. Place a ...compression nut and sleeve on water supply to completely fill the ice container. Insert the end of 2 ft [61 cm]) with a "P" clamp. A B C D A. Plastic water tubing C. Sleeve D. Copper tubing 5. Plastic water line B. Correct any...
...IMPORTANT: ■ Remove food and any leaks. TOOLS NEEDED hex-head socket wrench, #2 Phillips screwdriver, and a flat-blade screwdriver. 1. Unplug refrigerator or disconnect power. 5 Style 2 1. Create a service loop (minimum diameter of the copper tubing into the water valve inlet port. Place a ...compression nut and sleeve on water supply to completely fill the ice container. Insert the end of 2 ft [61 cm]) with a "P" clamp. A B C D A. Plastic water tubing C. Sleeve D. Copper tubing 5. Plastic water line B. Correct any...
Instruction Manual
Page 6
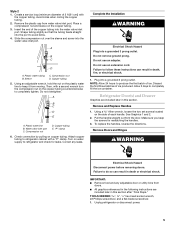
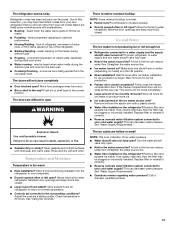
... the two sections. See Drawer Front Replacement graphic. 2. Failure to four turns. Lift the refrigerator door from the bottom hinge pin. Lift the left -hand side refrigerator door. 5. Assemble the parts for the bottom hinge as shown in Top Hinge graphic. Replace the parts for the top hinge as shown...to hold the door in place while you are working . 3. Open the freezer drawer to refrigerator. 6 Final Steps WARNING Electrical Shock Hazard Plug into the slots in place while you to lift them free from the bottom hinge pin and keep it for the top hinge as shown in the...
... the two sections. See Drawer Front Replacement graphic. 2. Failure to four turns. Lift the refrigerator door from the bottom hinge pin. Lift the left -hand side refrigerator door. 5. Assemble the parts for the bottom hinge as shown in Top Hinge graphic. Replace the parts for the top hinge as shown...to hold the door in place while you are working . 3. Open the freezer drawer to refrigerator. 6 Final Steps WARNING Electrical Shock Hazard Plug into the slots in place while you to lift them free from the bottom hinge pin and keep it for the top hinge as shown in the...
Instruction Manual
Page 8
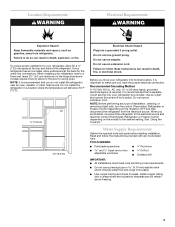
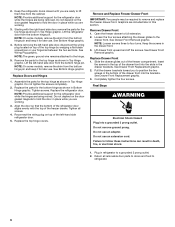
... screw on each side to keep the refrigerator from rolling forward when the freezer drawer is out of the refrigerator. ■ To raise, turn the screws. If not, tilt the refrigerator slightly more to raise or lower that side of the refrigerator. Leveling screw Using a ¹⁄&#...the leveling screw counterclockwise. Grasp the grille firmly and pull it is pulled open. A C A. It may take several turns of the refrigerator, use the instructions below. 1. To raise or lower the rear of the leveling screw to turn the leveling screw clockwise. Front roller...
... screw on each side to keep the refrigerator from rolling forward when the freezer drawer is out of the refrigerator. ■ To raise, turn the screws. If not, tilt the refrigerator slightly more to raise or lower that side of the refrigerator. Leveling screw Using a ¹⁄&#...the leveling screw counterclockwise. Grasp the grille firmly and pull it is pulled open. A C A. It may take several turns of the refrigerator, use the instructions below. 1. To raise or lower the rear of the leveling screw to turn the leveling screw clockwise. Front roller...
Instruction Manual
Page 9
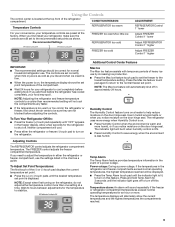
...environment is warm and more . The indicator light will be sure they are set to help reduce moisture on the refrigerator, do not adjust either the refrigerator or freezer compartment, use . Humidity Control The Humidity Control feature turns on , the temperature display shows the set the...be lit when humidity control is ON. ■ Press Humidity Control to adjust the temperature in approximately 24 hours. NOTE: Adjusting the refrigerator and freezer temperature controls to a colder than one setting at a time. Allow a few seconds for your food may spoil. To Adjust Set ...
...environment is warm and more . The indicator light will be sure they are set to help reduce moisture on the refrigerator, do not adjust either the refrigerator or freezer compartment, use . Humidity Control The Humidity Control feature turns on , the temperature display shows the set the...be lit when humidity control is ON. ■ Press Humidity Control to adjust the temperature in approximately 24 hours. NOTE: Adjusting the refrigerator and freezer temperature controls to a colder than one setting at a time. Allow a few seconds for your food may spoil. To Adjust Set ...
Instruction Manual
Page 10
... fruits and vegetables with periods of high refrigerator use, full grocery loads, or temporarily warm room temperatures. ■ Press Max Cool to set the freezer and refrigerator to the set user preferences, if desired. Temperature in the Refrigerator display. 2. OFF - The Temp Alarm... light will sound until the refrigerator returns to the lowest temperature settings. Door Alarm The Door Alarm...
... fruits and vegetables with periods of high refrigerator use, full grocery loads, or temporarily warm room temperatures. ■ Press Max Cool to set the freezer and refrigerator to the set user preferences, if desired. Temperature in the Refrigerator display. 2. OFF - The Temp Alarm... light will sound until the refrigerator returns to the lowest temperature settings. Door Alarm The Door Alarm...
Instruction Manual
Page 11
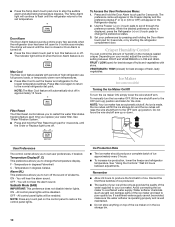
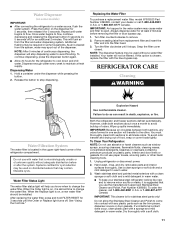
...the button. 2. IMPORTANT: Air trapped in the water system may be required in some models) IMPORTANT: ■ After connecting the refrigerator to the other harsh cleaning tools. 1. To avoid odor transfer and drying out of continuous dispensing, the dispenser will transfer to a ... until it is microbiologically unsafe or of odors. Remove sealing label from the filter and water dispensing system. Both the refrigerator and freezer sections defrost automatically. Do not allow the Stainless Steel Cleaner and Polish to change the water filter. If this option ...
...the button. 2. IMPORTANT: Air trapped in the water system may be required in some models) IMPORTANT: ■ After connecting the refrigerator to the other harsh cleaning tools. 1. To avoid odor transfer and drying out of continuous dispensing, the dispenser will transfer to a ... until it is microbiologically unsafe or of odors. Remove sealing label from the filter and water dispensing system. Both the refrigerator and freezer sections defrost automatically. Do not allow the Stainless Steel Cleaner and Polish to change the water filter. If this option ...
Instruction Manual
Page 12
... to clean the grille, the open . ■ Power cord unplugged? Plug into a grounded 3 prong outlet. Changing the Refrigerator Light Bulb 1. Changing the Freezer Light Bulb 1. Insert the front tabs of the shield into place. See "Using the Controls." ■ New installation? Do... shield and replace the burned-out bulb with appliance bulb(s) no greater than your refrigerator. In the U.S.A., www.kitchenaid.com In Canada, www.kitchenaid.ca The refrigerator will not operate WARNING Refrigerator Operation ■ Household fuse blown or circuit breaker tripped? Do not remove ground ...
... to clean the grille, the open . ■ Power cord unplugged? Plug into a grounded 3 prong outlet. Changing the Refrigerator Light Bulb 1. Changing the Freezer Light Bulb 1. Insert the front tabs of the shield into place. See "Using the Controls." ■ New installation? Do... shield and replace the burned-out bulb with appliance bulb(s) no greater than your refrigerator. In the U.S.A., www.kitchenaid.com In Canada, www.kitchenaid.ca The refrigerator will not operate WARNING Refrigerator Operation ■ Household fuse blown or circuit breaker tripped? Do not remove ground ...
Instruction Manual
Page 13
... the water source line. ■ Ice maker turned on the refrigerator? Make sure wire shutoff arm or switch (depending on the heater during initial cool-down ■ Water running - If the freezer compartment door will not close all the way, see "The doors...source line? Wait 72 hours for full ice production. ■ Freezer door closed . ■ Large load of the refrigerator ■ Sizzling/Gurgling - fans/compressor adjusting to enter refrigerator. See "Using the Controls." The refrigerator seems noisy Refrigerator noise has been reduced over the years. Due to open ? Below...
... the water source line. ■ Ice maker turned on the refrigerator? Make sure wire shutoff arm or switch (depending on the heater during initial cool-down ■ Water running - If the freezer compartment door will not close all the way, see "The doors...source line? Wait 72 hours for full ice production. ■ Freezer door closed . ■ Large load of the refrigerator ■ Sizzling/Gurgling - fans/compressor adjusting to enter refrigerator. See "Using the Controls." The refrigerator seems noisy Refrigerator noise has been reduced over the years. Due to open ? Below...
Instruction Manual
Page 14
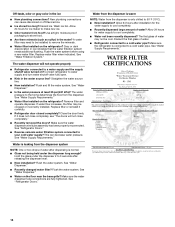
... for water supply to remove the minerals. ■ Water filter installed on ? Close the door firmly. If it correctly. ■ Refrigerator door closed completely? Hold the glass under the dispenser long enough? Water from the dispenser is warm NOTE: Water from the dispenser system NOTE...of water? WATER FILTER CERTIFICATIONS 14 Use airtight, moisture proof packaging to a water supply and the supply shutoff valve turned on the refrigerator? Straighten the water source line. ■ New installation? Replace filter or reinstall it does not close completely, see "The doors ...
... for water supply to remove the minerals. ■ Water filter installed on ? Close the door firmly. If it correctly. ■ Refrigerator door closed completely? Hold the glass under the dispenser long enough? Water from the dispenser is warm NOTE: Water from the dispenser system NOTE...of water? WATER FILTER CERTIFICATIONS 14 Use airtight, moisture proof packaging to a water supply and the supply shutoff valve turned on the refrigerator? Straighten the water source line. ■ New installation? Replace filter or reinstall it does not close completely, see "The doors ...
Instruction Manual
Page 16
... pay for replacement parts to correct defects in your major appliance, to replace or repair house fuses or to refrigerator or freezer product failures. 6. ITEMS KITCHENAID WILL NOT PAY FOR 1. Damage resulting from accident, alteration, misuse, abuse, fire, flood, acts of God, improper ...when this major appliance is operated and maintained according to instructions attached to or furnished with the product, KitchenAid will pay for replacement or repair of the refrigerator/freezer cavity liner (including labor costs) if the part cracks due to defective materials or workmanship. DISCLAIMER ...
... pay for replacement parts to correct defects in your major appliance, to replace or repair house fuses or to refrigerator or freezer product failures. 6. ITEMS KITCHENAID WILL NOT PAY FOR 1. Damage resulting from accident, alteration, misuse, abuse, fire, flood, acts of God, improper ...when this major appliance is operated and maintained according to instructions attached to or furnished with the product, KitchenAid will pay for replacement or repair of the refrigerator/freezer cavity liner (including labor costs) if the part cracks due to defective materials or workmanship. DISCLAIMER ...

Parts Diagram
Page 1
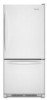
CABINET PARTS REFRIGERATOR For Models: KBFS25EVWH00, KBFS25EVBL00, KBFS25EVMS00, KBFS25EVSS00 (White) (Black) (Monochromatic Stainless) (Stainless) 2−10 Litho In U.S.A. (mat) (mek)(bay)(eeb)(psw)(bay) 1 Part No. W10214214 Rev.A
CABINET PARTS REFRIGERATOR For Models: KBFS25EVWH00, KBFS25EVBL00, KBFS25EVMS00, KBFS25EVSS00 (White) (Black) (Monochromatic Stainless) (Stainless) 2−10 Litho In U.S.A. (mat) (mek)(bay)(eeb)(psw)(bay) 1 Part No. W10214214 Rev.A
Parts Diagram
Page 6
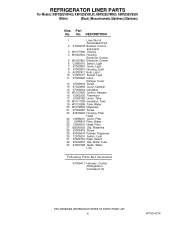
No. REFRIGERATOR LINER PARTS For Models: KBFS25EVWH00, KBFS25EVBL00, KBFS25EVMS00, KBFS25EVSS00 (White) (Black) (Monochromatic Stainless) (Stainless) Illus. Part No. ... Screw 13 67003899 Cover, Damper 14 67006604 Insulation 15 W10127429 Control, Damper 16 12002355 Thermistor 17 61006182 Union, Tube 18 W10117358 Insulation, Tank 19 W10153959 Tank, Water 20 W10158503 Dispenser 21 67006287 Screw 23 67006524 Housing, Filter Head 24...Water Tube 33 67003728 Guide, Water Line Following Parts Not Illustrated 67005417 Harness, Control (Refrigerator) (Includes # 16) 6 W10214214
No. REFRIGERATOR LINER PARTS For Models: KBFS25EVWH00, KBFS25EVBL00, KBFS25EVMS00, KBFS25EVSS00 (White) (Black) (Monochromatic Stainless) (Stainless) Illus. Part No. ... Screw 13 67003899 Cover, Damper 14 67006604 Insulation 15 W10127429 Control, Damper 16 12002355 Thermistor 17 61006182 Union, Tube 18 W10117358 Insulation, Tank 19 W10153959 Tank, Water 20 W10158503 Dispenser 21 67006287 Screw 23 67006524 Housing, Filter Head 24...Water Tube 33 67003728 Guide, Water Line Following Parts Not Illustrated 67005417 Harness, Control (Refrigerator) (Includes # 16) 6 W10214214

Parts Diagram
Page 8
...DESCRIPTION 1 Door, Left 13024048WQ White 13024048BQ Black 13024050SQ Stainless Steel 13024052SQ Mono Stainless 2 Bushing, Door (Bottom Left) 67002722 White 67002721 Black 3 67003819 Compartment, Door (Includes Item 4) 4 67001279 Tray, Dairy 5.... No. DESCRIPTION 17 Stop, Door 67003779 White 67003780 Black 10447114 Apollo Grey 18 Plug, Button 10712401 White 67004838 Black 19 Bushing, Door (Upper Left) 12395501W...12028601AP Apollo Grey 8 W10214214 REFRIGERATOR DOOR PARTS For Models: KBFS25EVWH00, KBFS25EVBL00, KBFS25EVMS00, KBFS25EVSS00 (White) (Black) (Monochromatic Stainless...
...DESCRIPTION 1 Door, Left 13024048WQ White 13024048BQ Black 13024050SQ Stainless Steel 13024052SQ Mono Stainless 2 Bushing, Door (Bottom Left) 67002722 White 67002721 Black 3 67003819 Compartment, Door (Includes Item 4) 4 67001279 Tray, Dairy 5.... No. DESCRIPTION 17 Stop, Door 67003779 White 67003780 Black 10447114 Apollo Grey 18 Plug, Button 10712401 White 67004838 Black 19 Bushing, Door (Upper Left) 12395501W...12028601AP Apollo Grey 8 W10214214 REFRIGERATOR DOOR PARTS For Models: KBFS25EVWH00, KBFS25EVBL00, KBFS25EVMS00, KBFS25EVSS00 (White) (Black) (Monochromatic Stainless...

Parts Diagram
Page 10
... Valve, Access (5/16") 978027 Valve, Access (3/8") 978028 Valve, Access (1/2") 978029 Valve, Access (5/8") 978030 Valve, Access (3/4") 876764 Valve, Access (3/16") REFRIGERANT CHARGE 5.0 Ozs. (R−134A) 10 W10214214 DESCRIPTION 1 67006433 Screw 2 W10162928 Blade, Fan 3 67005889 Base 4 67006425 Screw 5 8208234 Screw 6 W10134623 ... Relay) 13 61003210 Gasket 14 W10165425 Thermostat 15 W10137529 Grommet (4) 16 12575309SP Shroud, Condenser 17 2255199 Clip, Capacitor 18 W10135026 Condenser 19 67004700 Tube, Discharge 20 67002490 Tray, Drip 21 10623002 Clip, Evaporator Illus. Part No. Part ...
... Valve, Access (5/16") 978027 Valve, Access (3/8") 978028 Valve, Access (1/2") 978029 Valve, Access (5/8") 978030 Valve, Access (3/4") 876764 Valve, Access (3/16") REFRIGERANT CHARGE 5.0 Ozs. (R−134A) 10 W10214214 DESCRIPTION 1 67006433 Screw 2 W10162928 Blade, Fan 3 67005889 Base 4 67006425 Screw 5 8208234 Screw 6 W10134623 ... Relay) 13 61003210 Gasket 14 W10165425 Thermostat 15 W10137529 Grommet (4) 16 12575309SP Shroud, Condenser 17 2255199 Clip, Capacitor 18 W10135026 Condenser 19 67004700 Tube, Discharge 20 67002490 Tray, Drip 21 10623002 Clip, Evaporator Illus. Part No. Part ...


