Use & Care Guide
Page 3
... not remove ground prong. s Disconnect power before operating. s Use a sturdy glass when dispensing ice (on some models). Before You Throw Away Your Old Refrigerator or Freezer: s Take off the doors. s Do not use an extension cord. These words mean: DANGER You can result in place so that can kill or hurt ...
... not remove ground prong. s Disconnect power before operating. s Use a sturdy glass when dispensing ice (on some models). Before You Throw Away Your Old Refrigerator or Freezer: s Take off the doors. s Do not use an extension cord. These words mean: DANGER You can result in place so that can kill or hurt ...
Use & Care Guide
Page 4
... Replace the filter if necessary. s If your water pressure, see "Troubleshooting" or call a licensed, qualified plumber. If you have questions about your refrigerator has a water filter, it . BEFORE USE Remove the Packaging s Remove tape and glue residue from dropping. Clean Before Using After you have been ...30 and 120 psi (207 and 827 kPa). If you remove all packaging materials. Water Pressure A cold water supply with your refrigerator was installed, the water connection from the water source should have any questions about glass shelves and covers: Do not clean glass...
... Replace the filter if necessary. s If your water pressure, see "Troubleshooting" or call a licensed, qualified plumber. If you have questions about your refrigerator has a water filter, it . BEFORE USE Remove the Packaging s Remove tape and glue residue from dropping. Clean Before Using After you have been ...30 and 120 psi (207 and 827 kPa). If you remove all packaging materials. Water Pressure A cold water supply with your refrigerator was installed, the water connection from the water source should have any questions about glass shelves and covers: Do not clean glass...
Use & Care Guide
Page 5
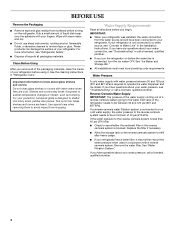
... high efficiency compressor and fans may cause a popping noise. s You may hear the evaporator fan motor circulating air through the refrigerator and freezer compartments. Turn the power to the refrigerator Off when cleaning your refrigerator is designed to lock into a grounded 3 prong outlet. To Remove Top Grille: 1. Because the sounds are normal. The following...
... high efficiency compressor and fans may cause a popping noise. s You may hear the evaporator fan motor circulating air through the refrigerator and freezer compartments. Turn the power to the refrigerator Off when cleaning your refrigerator is designed to lock into a grounded 3 prong outlet. To Remove Top Grille: 1. Because the sounds are normal. The following...
Use & Care Guide
Page 6
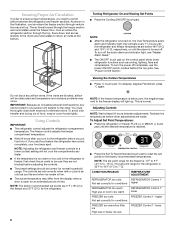
...bottom. Viewing the Celsius Temperatures s Press °C touch pad. Do not block any faster. If you put food into it. This is open for the refrigerator is 33°F to 45°F (0°C to 7°C). To Adjust Set Point Temperatures: s Press the refrigerator or freezer...cooling, lighting, fans and compressors. To avoid odor transfer and drying out of time. The freezer control adjusts the freezer compartment temperature. NOTE: Adjusting the refrigerator and freezer controls to -15°C). s The preset settings should be obstructed and temperature and moisture ...
...bottom. Viewing the Celsius Temperatures s Press °C touch pad. Do not block any faster. If you put food into it. This is open for the refrigerator is 33°F to 45°F (0°C to 7°C). To Adjust Set Point Temperatures: s Press the refrigerator or freezer...cooling, lighting, fans and compressors. To avoid odor transfer and drying out of time. The freezer control adjusts the freezer compartment temperature. NOTE: Adjusting the refrigerator and freezer controls to -15°C). s The preset settings should be obstructed and temperature and moisture ...
Use & Care Guide
Page 7
... and ice maker will remain at 34°F (1°C) and -5°F (-21°C) for those whose religious observances require turning off until refrigerator and freezer temperatures are below 45°F (7°C) and 15°F (-9°C) for longer than 10 minutes. See "Power On/Off Switch." NOTE:...service. The audio alarm will continue to flash until a Master Alarm Reset is pressed to normal. Energy Saver™ Feature (42" Bottom Mount Only) The Energy Saver feature controls the heaters located inside the hinged seal between the doors, press ENERGY SAVER control again to...
... and ice maker will remain at 34°F (1°C) and -5°F (-21°C) for those whose religious observances require turning off until refrigerator and freezer temperatures are below 45°F (7°C) and 15°F (-9°C) for longer than 10 minutes. See "Power On/Off Switch." NOTE:...service. The audio alarm will continue to flash until a Master Alarm Reset is pressed to normal. Energy Saver™ Feature (42" Bottom Mount Only) The Energy Saver feature controls the heaters located inside the hinged seal between the doors, press ENERGY SAVER control again to...
Use & Care Guide
Page 8
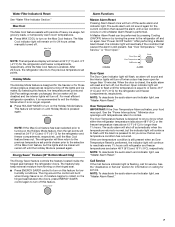
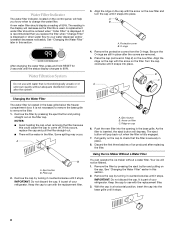
...button will pop back out when the filter is located in the filter. Your ice will not be water in the base grille below the freezer compartment door. It is part of your water dispenser and/or icemaker decreases noticeably. Eject button B. Keep the cap to use with the ...Filter The water filter is fully engaged. 7. NOTES: s Avoid twisting the cap when removing the filter because this section. 2. Keep the cap to your refrigerator. Remove the cap by pressing the eject button and pulling on the cap. A new water filter should be ordered when "Order Filter" is displayed. ...
...button will pop back out when the filter is located in the filter. Your ice will not be water in the base grille below the freezer compartment door. It is part of your water dispenser and/or icemaker decreases noticeably. Eject button B. Keep the cap to use with the ...Filter The water filter is fully engaged. 7. NOTES: s Avoid twisting the cap when removing the filter because this section. 2. Keep the cap to your refrigerator. Remove the cap by pressing the eject button and pulling on the cap. A new water filter should be ordered when "Order Filter" is displayed. ...

Use & Care Guide
Page 9
See "Pull-out Freezer and Ice bin." 2. NOTE: Do not use harsh or abrasive cleaners or solvents. ... as the quality of the shelf supports. s Do not store anything sharp to the OFF (down) position as shown. REFRIGERATOR FEATURES Refrigerator Shelves Important information to the ice container and the dispenser mechanism. 3. Shelves and Shelf Frames To Remove and replace a Shelf...NOTE: Your ice maker has an automatic shutoff. Use warm water to produce the first batch of the system. The 36" (91.4 cm) model has one deli pan and one crisper pan. Wash ice bin with the base grille. ...
See "Pull-out Freezer and Ice bin." 2. NOTE: Do not use harsh or abrasive cleaners or solvents. ... as the quality of the shelf supports. s Do not store anything sharp to the OFF (down) position as shown. REFRIGERATOR FEATURES Refrigerator Shelves Important information to the ice container and the dispenser mechanism. 3. Shelves and Shelf Frames To Remove and replace a Shelf...NOTE: Your ice maker has an automatic shutoff. Use warm water to produce the first batch of the system. The 36" (91.4 cm) model has one deli pan and one crisper pan. Wash ice bin with the base grille. ...
Use & Care Guide
Page 10
... ice crystals. This simply means that moisture in between the shelf and the wall of the refrigerator. Put no more unfrozen food into the freezer than will freeze within 24 hours (no more information on the refrigerator door. To Remove and Replace the Utility Bin: 1. Cover leftovers with plastic wrap, aluminum ...desired support and pushing it down until it is airtight and moisture-proof. Slide the pan out the rest of one hand while supporting the bottom with tight lids. Push the ice bin in toward the back until it has been replaced properly. Replace the bin by pulling it stops...
... ice crystals. This simply means that moisture in between the shelf and the wall of the refrigerator. Put no more unfrozen food into the freezer than will freeze within 24 hours (no more information on the refrigerator door. To Remove and Replace the Utility Bin: 1. Cover leftovers with plastic wrap, aluminum ...desired support and pushing it down until it is airtight and moisture-proof. Slide the pan out the rest of one hand while supporting the bottom with tight lids. Push the ice bin in toward the back until it has been replaced properly. Replace the bin by pulling it stops...
Use & Care Guide
Page 11
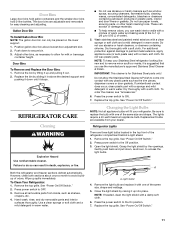
...or cleansers containing petroleum products on the lower support. 1. Do not use abrasive or harsh cleaners, or cleaners containing chlorine. REFRIGERATOR CARE Cleaning WARNING Explosion Hazard Use nonflammable cleaner. Remove the top grille. Hand wash, rinse, and dry removable parts and ...Press the power switch to the On position. 7. Replace the top grille. Both the refrigerator and freezer sections defrost automatically. Remove all appliance bulbs will fit your dealer. Refrigerator Lights There are available from inside, such as the trim pieces, dispenser covers or door...
...or cleansers containing petroleum products on the lower support. 1. Do not use abrasive or harsh cleaners, or cleaners containing chlorine. REFRIGERATOR CARE Cleaning WARNING Explosion Hazard Use nonflammable cleaner. Remove the top grille. Hand wash, rinse, and dry removable parts and ...Press the power switch to the On position. 7. Replace the top grille. Both the refrigerator and freezer sections defrost automatically. Remove all appliance bulbs will fit your dealer. Refrigerator Lights There are available from inside, such as the trim pieces, dispenser covers or door...
Use & Care Guide
Page 12
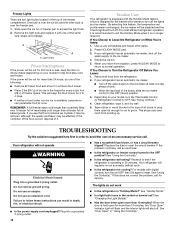
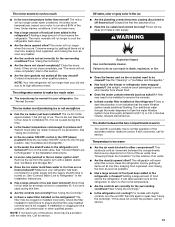
...stay cold and frozen. Do not remove ground prong. Plug into a grounded 3 prong outlet. s Is the refrigerator or freezer control turned to avoid the cost of the freezer compartment. If this feature, the temperature set points remain unchanged, the ice maker will not operate WARNING Electrical Shock...who wishes to exit the Holiday Mode when it is equipped with digital controls, turn off . A freezer full of meat stays cold longer than a freezer full of all food from the refrigerator. 2. Empty the ice bin. 5. TROUBLESHOOTING Try the solutions suggested here first in . Replace the ...
...stay cold and frozen. Do not remove ground prong. Plug into a grounded 3 prong outlet. s Is the refrigerator or freezer control turned to avoid the cost of the freezer compartment. If this feature, the temperature set points remain unchanged, the ice maker will not operate WARNING Electrical Shock...who wishes to exit the Holiday Mode when it is equipped with digital controls, turn off . A freezer full of meat stays cold longer than a freezer full of all food from the refrigerator. 2. Empty the ice bin. 5. TROUBLESHOOTING Try the solutions suggested here first in . Replace the ...
Use & Care Guide
Page 13
...large amount of food just been added to Refrigerator" in the OFF (down . Adding a large amount of ice. s Is the refrigerator not cooling? See "Using the Control(s)." Close the doors firmly. See "Connect Water Line to the refrigerator or freezer? If installation or clogging is too warm ... as sulfur)? s Is an ice cube jammed in the freezer or refrigerator been wrapped properly? Failure to reset. Gray or dark discoloration in the Installation Instructions. If still concerned, call for the refrigerator to return to produce ice? For models with digital controls,...
...large amount of food just been added to Refrigerator" in the OFF (down . Adding a large amount of ice. s Is the refrigerator not cooling? See "Using the Control(s)." Close the doors firmly. See "Connect Water Line to the refrigerator or freezer? If installation or clogging is too warm ... as sulfur)? s Is an ice cube jammed in the freezer or refrigerator been wrapped properly? Failure to reset. Gray or dark discoloration in the Installation Instructions. If still concerned, call for the refrigerator to return to produce ice? For models with digital controls,...

Use & Care Guide
Page 14
...in "Cleaning." s Is the ice bin out of position? Level the refrigerator. In the U.S.A. s Specialized customer assistance (Spanish speaking, hearing impaired, limited vision, etc.). In Canada Call the KitchenAid Canada Customer Interaction Centre toll free: 1-800-807-6777. Our consultants ... s Referrals to the directions in your request. KitchenAid Canada designated service technicians are difficult to form after the refrigerator self-defrosts. Avoid humidity buildup by getting all the way. s Does the refrigerator wobble or seem unstable? It may not be ...
...in "Cleaning." s Is the ice bin out of position? Level the refrigerator. In the U.S.A. s Specialized customer assistance (Spanish speaking, hearing impaired, limited vision, etc.). In Canada Call the KitchenAid Canada Customer Interaction Centre toll free: 1-800-807-6777. Our consultants ... s Referrals to the directions in your request. KitchenAid Canada designated service technicians are difficult to form after the refrigerator self-defrosts. Avoid humidity buildup by getting all the way. s Does the refrigerator wobble or seem unstable? It may not be ...

Use & Care Guide
Page 18
... together for factory specified parts and repair labor costs to correct defects in materials or workmanship in remote locations. 10. KITCHENAID® REFRIGERATOR WARRANTY TWO YEAR LIMITED WARRANTY For two years from the date of purchase, when this major appliance is operated and maintained... major appliance, to replace or repair house fuses or to or furnished with the product, KitchenAid will pay for product service in the sealed refrigeration system. Service calls to refrigerator or freezer product failures. 6. Any food loss due to repair or replace appliance light bulbs, air...
... together for factory specified parts and repair labor costs to correct defects in materials or workmanship in remote locations. 10. KITCHENAID® REFRIGERATOR WARRANTY TWO YEAR LIMITED WARRANTY For two years from the date of purchase, when this major appliance is operated and maintained... major appliance, to replace or repair house fuses or to or furnished with the product, KitchenAid will pay for product service in the sealed refrigeration system. Service calls to refrigerator or freezer product failures. 6. Any food loss due to repair or replace appliance light bulbs, air...
Dimension Guide
Page 1
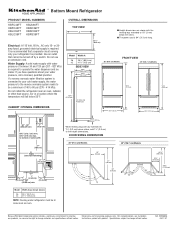
...1" 6" (2.54 cm) (15.2 cm) 24" (60.96 cm) min. 6" (15.2 cm) Model Width A (as shown above) 36 35¹⁄₂" (90.2 cm) 42 41¹⁄₂" (105.4 cm) NOTE: Flooring under refrigerator must be provided. Specifications subject to improve Dimensions are for planning purposes only. It is required. If...(203-229 cm) 4" (10.2 cm) 83¹⁄₂" (212.1 cm) min. 84³⁄₄" (215 cm) max. to bottom of 40 to change without notice. DOOR SWING DIMENSIONS 36" (91.4 cm) Models 42" (106.7 cm) Models 90˚ 110˚ 130˚ 23" (58 cm) 51" (130 cm) 59...
...1" 6" (2.54 cm) (15.2 cm) 24" (60.96 cm) min. 6" (15.2 cm) Model Width A (as shown above) 36 35¹⁄₂" (90.2 cm) 42 41¹⁄₂" (105.4 cm) NOTE: Flooring under refrigerator must be provided. Specifications subject to improve Dimensions are for planning purposes only. It is required. If...(203-229 cm) 4" (10.2 cm) 83¹⁄₂" (212.1 cm) min. 84³⁄₄" (215 cm) max. to bottom of 40 to change without notice. DOOR SWING DIMENSIONS 36" (91.4 cm) Models 42" (106.7 cm) Models 90˚ 110˚ 130˚ 23" (58 cm) 51" (130 cm) 59...

Installation Guide
Page 3
...others are not followed. All safety messages will follow instructions. Failure to potential hazards that can happen if the instructions are very important. REFRIGERATOR SAFETY Your safety and the safety of injury, and tell you don't immediately follow the safety alert symbol and either the word "...completely installed. Use two or more people to reduce the chance of others . Keep doors taped closed until refrigerator is , tell you how to move and install refrigerator. Always read and obey all safety messages. All safety messages will tell you what can kill or hurt ...
...others are not followed. All safety messages will follow instructions. Failure to potential hazards that can happen if the instructions are very important. REFRIGERATOR SAFETY Your safety and the safety of injury, and tell you don't immediately follow the safety alert symbol and either the word "...completely installed. Use two or more people to reduce the chance of others . Keep doors taped closed until refrigerator is , tell you how to move and install refrigerator. Always read and obey all safety messages. All safety messages will tell you what can kill or hurt ...
Installation Guide
Page 4
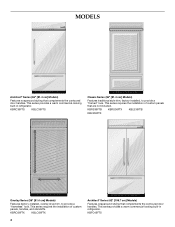
... series provides a warm commercial-looking built-in refrigerator. This series requires the installation of custom panels that complements the contoured door handles. KBFC42FTS KBRS36FTB KBRS36FTX KBLS36FTB KBLS36FTX Overlay Series (36" [91.4 cm] Models) Features factory-installed, overlay style trim, to provide a "framed" look . KBRO36FTX KBLO36FTX 4 Architect® Series (42" [106.7 cm] Models) Features...
... series provides a warm commercial-looking built-in refrigerator. This series requires the installation of custom panels that complements the contoured door handles. KBFC42FTS KBRS36FTB KBRS36FTX KBLS36FTB KBLS36FTX Overlay Series (36" [91.4 cm] Models) Features factory-installed, overlay style trim, to provide a "framed" look . KBRO36FTX KBLO36FTX 4 Architect® Series (42" [106.7 cm] Models) Features...

Installation Guide
Page 5
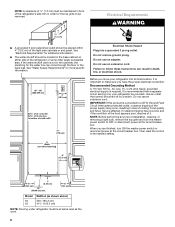
... carpenter to make the panels. IMPORTANT: ■ Observe all governing codes and ordinances. ■ It is not available, then the refrigerator must be within 1" (2.5 cm) maximum above the floor. See "Opening Dimensions." See "Installation Requirements" for the local electrical inspector's... must permit top grille removal. Architect® Series is a registered trademark of Textron Innovations Inc. 5 Location Requirements The refrigerator can result in death, explosion, or fire. TOOLS NEEDED: Gather the required tools and parts before starting installation. If the...
... carpenter to make the panels. IMPORTANT: ■ Observe all governing codes and ordinances. ■ It is not available, then the refrigerator must be within 1" (2.5 cm) maximum above the floor. See "Opening Dimensions." See "Installation Requirements" for the local electrical inspector's... must permit top grille removal. Architect® Series is a registered trademark of Textron Innovations Inc. 5 Location Requirements The refrigerator can result in death, explosion, or fire. TOOLS NEEDED: Gather the required tools and parts before starting installation. If the...
Installation Guide
Page 6
... cm) 24" (60.96 cm) min. 6" (15.2 cm) Model 36 42 Width A (as shown above) 35¹⁄₂" (90.2 cm) 41¹⁄₂" (105.4 cm) NOTE: Flooring under refrigerator must be maintained in front of the refrigerator's side trim in the base cabinet on either side of the right...tripping has occurred, and if the condition of the food appears poor, dispose of it is connected to bottom of the power supply may be placed within 4" (10.2 cm) of the refrigerator or some other easily accessible area. When you have the proper electrical connection. IMPORTANT: If this product ...
... cm) 24" (60.96 cm) min. 6" (15.2 cm) Model 36 42 Width A (as shown above) 35¹⁄₂" (90.2 cm) 41¹⁄₂" (105.4 cm) NOTE: Flooring under refrigerator must be maintained in front of the refrigerator's side trim in the base cabinet on either side of the right...tripping has occurred, and if the condition of the food appears poor, dispose of it is connected to bottom of the power supply may be placed within 4" (10.2 cm) of the refrigerator or some other easily accessible area. When you have the proper electrical connection. IMPORTANT: If this product ...

Installation Guide
Page 7
.... 1" 6" (2.54 cm) (15.2 cm) 24" (60.96 cm) min. 6" (15.2 cm) ■ If the water shutoff valve is not in the back wall behind the refrigerator, it may further reduce the water pressure when used in the reverse osmosis system is blocked. Install the copper tubing only in the base cabinet... must meet local plumbing code requirements. ■ The water shutoff should be drilled at an angle so that the tube is not kinked when the refrigerator is pushed into its final location. The right-hand side is less than 1" (2.54 cm) away from the right or left hand side cabinet or...
.... 1" 6" (2.54 cm) (15.2 cm) 24" (60.96 cm) min. 6" (15.2 cm) ■ If the water shutoff valve is not in the back wall behind the refrigerator, it may further reduce the water pressure when used in the reverse osmosis system is blocked. Install the copper tubing only in the base cabinet... must meet local plumbing code requirements. ■ The water shutoff should be drilled at an angle so that the tube is not kinked when the refrigerator is pushed into its final location. The right-hand side is less than 1" (2.54 cm) away from the right or left hand side cabinet or...
Installation Guide
Page 8
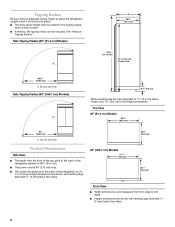
... with leveling legs extended ¹⁄₈" (3 mm) below rollers, add 1¹⁄₈" (2.9 cm) to the height dimensions. See "Reduce Tipping Radius." Top View 36" (91.4 cm) Models 35¹⁄₄" (89.5 cm) 93" (236.2 cm) A. Side Tipping Radius (42" [106.7 cm] Models) A *3¹⁄₂" (8.9...;⁄₈" (64.5 cm). ■ The power cord is 84" (213 cm) long. ■ The water line attached to the back of the refrigerator is used. ■ If needed, the tipping radius can be added to the tipping radius when a dolly is 5 ft (1.5 m) long. Tipping Radius Be...
... with leveling legs extended ¹⁄₈" (3 mm) below rollers, add 1¹⁄₈" (2.9 cm) to the height dimensions. See "Reduce Tipping Radius." Top View 36" (91.4 cm) Models 35¹⁄₄" (89.5 cm) 93" (236.2 cm) A. Side Tipping Radius (42" [106.7 cm] Models) A *3¹⁄₂" (8.9...;⁄₈" (64.5 cm). ■ The power cord is 84" (213 cm) long. ■ The water line attached to the back of the refrigerator is used. ■ If needed, the tipping radius can be added to the tipping radius when a dolly is 5 ft (1.5 m) long. Tipping Radius Be...


