Use & Care Guide
Page 3
...not followed. s Do not use an extension cord. Junked or abandoned refrigerators are very important. Always read and obey all parts and panels before operating. s Do not use an adapter. s Remove doors from your old refrigerator, please follow instructions. s Disconnect power before servicing. s Use a ... are not problems of the past. Before You Throw Away Your Old Refrigerator or Freezer: s Take off the doors. even if they will follow these instructions to move and install refrigerator. We have provided many important safety messages in place so that can result...
...not followed. s Do not use an extension cord. Junked or abandoned refrigerators are very important. Always read and obey all parts and panels before operating. s Do not use an adapter. s Remove doors from your old refrigerator, please follow instructions. s Disconnect power before servicing. s Use a ... are not problems of the past. Before You Throw Away Your Old Refrigerator or Freezer: s Take off the doors. even if they will follow these instructions to move and install refrigerator. We have provided many important safety messages in place so that can result...
Use & Care Guide
Page 8
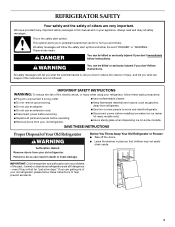
... from the O-rings. Turn the cap clockwise until it stops. 8 IMPORTANT: Do not discard the cap. Discard the first three batches of your refrigerator. See "Changing the Water Filter" earlier in this section. 2. Remove the cap by turning it stops. With the cap in place. 8. See... it snaps into place. It is displayed. Your ice will not be ordered when "Order Filter" is part of ice produced after the covers are still in the base grille below the freezer compartment door. The reading in Step 2) on the new filter. A B A Eject button B. The eject...
... from the O-rings. Turn the cap clockwise until it stops. 8 IMPORTANT: Do not discard the cap. Discard the first three batches of your refrigerator. See "Changing the Water Filter" earlier in this section. 2. Remove the cap by turning it stops. With the cap in place. 8. See... it snaps into place. It is displayed. Your ice will not be ordered when "Order Filter" is part of ice produced after the covers are still in the base grille below the freezer compartment door. The reading in Step 2) on the new filter. A B A Eject button B. The eject...

Use & Care Guide
Page 9
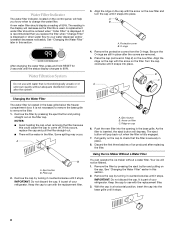
...with warm water and a mild detergent, rinse well and dry thoroughly. Pull shelf straight out. 2. The 36" (91.4 cm) model has one deli pan and one crisper pan. A A. Empty the ice bin. This can damage parts of the shelf supports. s It may take 3 to 4 days for the ice cubes to avoid ...you want easier. On/Off control Ice Storage Bin Care 1. See "Pull-out Freezer and Ice bin." 2. NOTE: Do not use harsh or abrasive cleaners or solvents. Wash ice bin with the base grille. s The quality of your refrigerator and adjusting the shelves to fit different heights of the shelf and check...
...with warm water and a mild detergent, rinse well and dry thoroughly. Pull shelf straight out. 2. The 36" (91.4 cm) model has one deli pan and one crisper pan. A A. Empty the ice bin. This can damage parts of the shelf supports. s It may take 3 to 4 days for the ice cubes to avoid ...you want easier. On/Off control Ice Storage Bin Care 1. See "Pull-out Freezer and Ice bin." 2. NOTE: Do not use harsh or abrasive cleaners or solvents. Wash ice bin with the base grille. s The quality of your refrigerator and adjusting the shelves to fit different heights of the shelf and check...
Use & Care Guide
Page 11
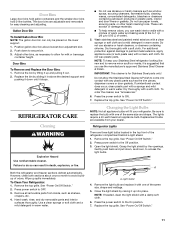
... month to remove minor scuffs or marks, it in warm water. Changing the Light Bulbs NOTE: Not all removable parts from your Stainless Steel refrigerator looking like new and to avoid buildup of the same size, shape and wattage. 5. See "Power On/Off Switch...replace the bulb with a clean, soft cloth. REFRIGERATOR CARE Cleaning WARNING Explosion Hazard Use nonflammable cleaner. Both the refrigerator and freezer sections defrost automatically. If unintentional contact does occur, clean plastic part with one of the refrigerator compartment behind a light shield. 1. Gallon Door ...
... month to remove minor scuffs or marks, it in warm water. Changing the Light Bulbs NOTE: Not all removable parts from your Stainless Steel refrigerator looking like new and to avoid buildup of the same size, shape and wattage. 5. See "Power On/Off Switch...replace the bulb with a clean, soft cloth. REFRIGERATOR CARE Cleaning WARNING Explosion Hazard Use nonflammable cleaner. Both the refrigerator and freezer sections defrost automatically. If unintentional contact does occur, clean plastic part with one of the refrigerator compartment behind a light shield. 1. Gallon Door ...

Use & Care Guide
Page 14
... service companies. Wipe off damp food containers before placing in "Cleaning." s Accessory and repair parts sales. See "Ensuring Proper Air Circulation" for the surrounding conditions? Rearrange containers so that they are trained to build every new KITCHENAID® appliance. s Does the refrigerator wobble or seem unstable? Failure to do so can write to...
... service companies. Wipe off damp food containers before placing in "Cleaning." s Accessory and repair parts sales. See "Ensuring Proper Air Circulation" for the surrounding conditions? Rearrange containers so that they are trained to build every new KITCHENAID® appliance. s Does the refrigerator wobble or seem unstable? Failure to do so can write to...
Use & Care Guide
Page 15
... 1901 Minnesota Court Mississauga, Ontario L5N 3A7 Please include a daytime phone number in your authorized KitchenAid® dealer. Stainless Steel Cleaner & Polish Order Part #4396920 Replacement Water Filter: Order Part #4396841 (T2RFWG2) In Canada, Order Part #4396841B (T2RFWG2) WATER FILTER CERTIFICATIONS 15 Accessories To order accessories, call 1-800-807-6777. In Canada, call 1-800...
... 1901 Minnesota Court Mississauga, Ontario L5N 3A7 Please include a daytime phone number in your authorized KitchenAid® dealer. Stainless Steel Cleaner & Polish Order Part #4396920 Replacement Water Filter: Order Part #4396841 (T2RFWG2) In Canada, Order Part #4396841B (T2RFWG2) WATER FILTER CERTIFICATIONS 15 Accessories To order accessories, call 1-800-807-6777. In Canada, call 1-800...
Use & Care Guide
Page 16
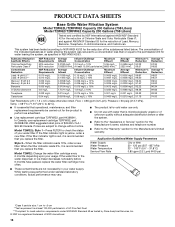
...of the indicated substances in NSF/ANSI 42/53. When the filter indicator reads 10%, order a new filter. s Use replacement cartridge T2RFWG2, part #4396841. s The product is essential that you replace the filter. Application Guidelines/Water Supply Parameters Style 2 - This system has been tested... Particulate Class II*; Model T2WG2L: Style 1 - If the water flow to the permissible limit for cold water use replacement cartridge T2RFWG2, part #4396841B. 2006 suggested retail price of $39.99 U.S.A./ $49.99 Canada. While testing was reduced to a concentration less than or ...
...of the indicated substances in NSF/ANSI 42/53. When the filter indicator reads 10%, order a new filter. s Use replacement cartridge T2RFWG2, part #4396841. s The product is essential that you replace the filter. Application Guidelines/Water Supply Parameters Style 2 - This system has been tested... Particulate Class II*; Model T2WG2L: Style 1 - If the water flow to the permissible limit for cold water use replacement cartridge T2RFWG2, part #4396841B. 2006 suggested retail price of $39.99 U.S.A./ $49.99 Canada. While testing was reduced to a concentration less than or ...
Use & Care Guide
Page 17
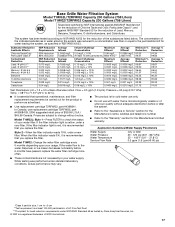
... to a concentration less than or equal to the "Assistance or Service" section for the Manufacturer's limited warranty. s Use replacement cartridge T2RFWG2, part #4396841. Model T1WG2L: Style 1 - When the filter indicator reads 10%, order a new filter. s Refer to the permissible limit for... product is recommended that operational, maintenance, and filter replacement requirements be carried out for cold water use replacement cartridge T2RFWG2, part #4396841B. 2006 suggested retail price of the substances listed below. This system has been tested according to perform as specified in...
... to a concentration less than or equal to the "Assistance or Service" section for the Manufacturer's limited warranty. s Use replacement cartridge T2RFWG2, part #4396841. Model T1WG2L: Style 1 - When the filter indicator reads 10%, order a new filter. s Refer to the permissible limit for... product is recommended that operational, maintenance, and filter replacement requirements be carried out for cold water use replacement cartridge T2RFWG2, part #4396841B. 2006 suggested retail price of the substances listed below. This system has been tested according to perform as specified in...

Use & Care Guide
Page 18
... and serial number label located on the product. Service calls to refrigerator or freezer product failures. 6. KITCHENAID® REFRIGERATOR WARRANTY TWO YEAR LIMITED WARRANTY For two years from the date of... purchase, when this major appliance is operated and maintained according to instructions attached to or furnished with a water filter: 30 day limited warranty on water filter. THIRD THROUGH SIXTH YEAR LIMITED WARRANTY ON SEALED REFRIGERATION SYSTEM PARTS...
... and serial number label located on the product. Service calls to refrigerator or freezer product failures. 6. KITCHENAID® REFRIGERATOR WARRANTY TWO YEAR LIMITED WARRANTY For two years from the date of... purchase, when this major appliance is operated and maintained according to instructions attached to or furnished with a water filter: 30 day limited warranty on water filter. THIRD THROUGH SIXTH YEAR LIMITED WARRANTY ON SEALED REFRIGERATION SYSTEM PARTS...

Installation Guide
Page 5
...This series requires the installation of Textron Innovations Inc. 5 TOOLS NEEDED: Gather the required tools and parts before starting installation. Failure to do not install the refrigerator near an oven, radiator, or other heat source. ■ Do not install in a location ... x 10 cm x 81 cm) wood board(s) ■ Order factory panels, make custom panels or consult a qualified cabinetmaker or carpenter to enclose the refrigerator. WARNING Overlay Series (42" [106.7 cm] Models) Features factory-installed, overlay style trim, to open -end wrenches ■ Phillips screwdriver Allen wrench...
...This series requires the installation of Textron Innovations Inc. 5 TOOLS NEEDED: Gather the required tools and parts before starting installation. Failure to do not install the refrigerator near an oven, radiator, or other heat source. ■ Do not install in a location ... x 10 cm x 81 cm) wood board(s) ■ Order factory panels, make custom panels or consult a qualified cabinetmaker or carpenter to enclose the refrigerator. WARNING Overlay Series (42" [106.7 cm] Models) Features factory-installed, overlay style trim, to open -end wrenches ■ Phillips screwdriver Allen wrench...
Installation Guide
Page 16
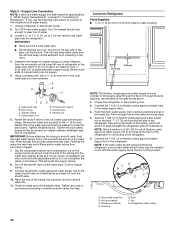
...) 7¹⁄₄" (18.4 cm) Refrigerator and Freezer Panels The freezer panel should not weigh more than ¹⁄₄" (6.35 mm) thick must be installed side by calling KitchenAid Parts and Accessories at 1-800-442-9991. The refrigerator panel should not weigh more than recommended may ... Panels that are more than ¹⁄₄" (6.35 mm) thick, install a filler panel between the door handles and custom panel. Color 36" (91.4 cm) White #W10163652 Black #W10163654 Stainless Steel #W10163656 Architect® Series 72" (183 cm) Top Grille Panel Kit A 72...
...) 7¹⁄₄" (18.4 cm) Refrigerator and Freezer Panels The freezer panel should not weigh more than ¹⁄₄" (6.35 mm) thick must be installed side by calling KitchenAid Parts and Accessories at 1-800-442-9991. The refrigerator panel should not weigh more than recommended may ... Panels that are more than ¹⁄₄" (6.35 mm) thick, install a filler panel between the door handles and custom panel. Color 36" (91.4 cm) White #W10163652 Black #W10163654 Stainless Steel #W10163656 Architect® Series 72" (183 cm) Top Grille Panel Kit A 72...

Installation Guide
Page 20
...the left side of the refrigerator and the parts bag behind the grille. Remove and save the literature package bag taped to stand the refrigerator upright. Cabinet side trim 3. IMPORTANT: ■ Do not remove the film until the refrigerator is in death or serious... 36" (91.4 cm) Models 20 NOTE: Pass the dolly strap under the refrigerator until the refrigerator is in its final position. 2. WARNING B A B Tip Over Hazard Refrigerator is completely installed. Remove the six screws attaching each side) that attach the shipping base to the refrigerator bottom....
...the left side of the refrigerator and the parts bag behind the grille. Remove and save the literature package bag taped to stand the refrigerator upright. Cabinet side trim 3. IMPORTANT: ■ Do not remove the film until the refrigerator is in death or serious... 36" (91.4 cm) Models 20 NOTE: Pass the dolly strap under the refrigerator until the refrigerator is in its final position. 2. WARNING B A B Tip Over Hazard Refrigerator is completely installed. Remove the six screws attaching each side) that attach the shipping base to the refrigerator bottom....
Installation Guide
Page 21
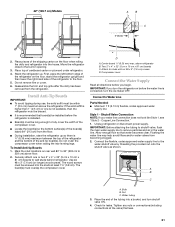
...max. Connect the flexible, codes approved water supply line to Water Line Parts Needed: ■ Minimum 7 ft (2.13 m) flexible, codes approved water supply line Style 1 - The board(s) must be within 1" (2.5 cm) maximum above the refrigerator. Allow enough flow so that leak. 21 Reassemble the trim and top ... cover Connect the Water Supply Read all directions before the water line is ¹⁄₄" (6.35 mm) maximum between the top of the refrigerator and the bottom of the tubing into the house. Attach to the floor. 5. Two 2" x 4" x 32" (5 cm x 10 cm x 81 cm) boards ...
...max. Connect the flexible, codes approved water supply line to Water Line Parts Needed: ■ Minimum 7 ft (2.13 m) flexible, codes approved water supply line Style 1 - The board(s) must be within 1" (2.5 cm) maximum above the refrigerator. Allow enough flow so that leak. 21 Reassemble the trim and top ... cover Connect the Water Supply Read all directions before the water line is ¹⁄₄" (6.35 mm) maximum between the top of the refrigerator and the bottom of the tubing into the house. Attach to the floor. 5. Two 2" x 4" x 32" (5 cm x 10 cm x 81 cm) boards ...
Installation Guide
Page 22
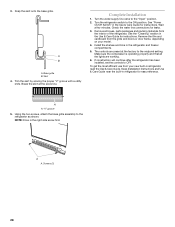
...the household cold water supply. 1. Allow enough flow so that water becomes clear. Tape along the length of the pipe, not the bottom. Determine the length of the refrigerator. Measure from becoming clogged. 7. Use ¹⁄₄" (6.35 mm) O.D. (outside diameter) copper tubing. Compression sleeve F. Be...the supply valve through the floor or through the side cabinets, as indicated by threading the provided nut onto the shutoff valve. 10. Connect to Refrigerator Parts Supplied to ¹⁄₄" (6.35 mm to 6.35 mm) male-to-male coupling 7" (17.78 cm) 1" (2.54 cm) NOTE...
...the household cold water supply. 1. Allow enough flow so that water becomes clear. Tape along the length of the pipe, not the bottom. Determine the length of the refrigerator. Measure from becoming clogged. 7. Use ¹⁄₄" (6.35 mm) O.D. (outside diameter) copper tubing. Compression sleeve F. Be...the supply valve through the floor or through the side cabinets, as indicated by threading the provided nut onto the shutoff valve. 10. Connect to Refrigerator Parts Supplied to ¹⁄₄" (6.35 mm to 6.35 mm) male-to-male coupling 7" (17.78 cm) 1" (2.54 cm) NOTE...
Installation Guide
Page 28
...reference. If construction will continue after the refrigerator has been installed, set the controls to the ON position. NOTE: Drive in the refrigerator and freezer compartments. 5. A B A. Skirt 4. Break the skirt at the factory to the refrigerator as shown. Wait a few minutes. ... 3. Install the shelves and bins in the right side screw first. Turn the refrigerator switch to OFF. "V" groove 5. Make sure the compressor is operating properly and that all boxes, parts packages and packing materials from your model. 4. Complete Installation 1. To get the ...
...reference. If construction will continue after the refrigerator has been installed, set the controls to the ON position. NOTE: Drive in the refrigerator and freezer compartments. 5. A B A. Skirt 4. Break the skirt at the factory to the refrigerator as shown. Wait a few minutes. ... 3. Install the shelves and bins in the right side screw first. Turn the refrigerator switch to OFF. "V" groove 5. Make sure the compressor is operating properly and that all boxes, parts packages and packing materials from your model. 4. Complete Installation 1. To get the ...


