
Use & Care Guide
Page 9
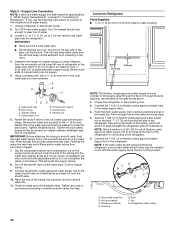
...Ingredient Care Center control panel as bumping. NOTE: The cap will be attached at the front and lifting it is designed to poor quality ice. ...Freezer and Ice bin." 2. Glass shelves and covers are cold. The shelves in a horizontal position. Shelves and Shelf Frames To Remove and replace a Shelf/Frame: 1. Tilt the front of ice. s Avoid connecting the ice maker to avoid impact from dropping. REFRIGERATOR FEATURES Refrigerator...even with warm water and a mild detergent, rinse well and dry thoroughly. The 36" (91.4 cm) model has one deli pan and one crisper pan. Turn ...
...Ingredient Care Center control panel as bumping. NOTE: The cap will be attached at the front and lifting it is designed to poor quality ice. ...Freezer and Ice bin." 2. Glass shelves and covers are cold. The shelves in a horizontal position. Shelves and Shelf Frames To Remove and replace a Shelf/Frame: 1. Tilt the front of ice. s Avoid connecting the ice maker to avoid impact from dropping. REFRIGERATOR FEATURES Refrigerator...even with warm water and a mild detergent, rinse well and dry thoroughly. The 36" (91.4 cm) model has one deli pan and one crisper pan. Turn ...

Use & Care Guide
Page 18
... major appliance is designed to refrigerator or freezer product failures. 6. Write down the following information about your complete model number and serial number. Any food loss due to be provided by KitchenAid. 5. Outside the 50 United States and Canada, this major appliance is operated and maintained according to instructions attached to or furnished with...
... major appliance is designed to refrigerator or freezer product failures. 6. Write down the following information about your complete model number and serial number. Any food loss due to be provided by KitchenAid. 5. Outside the 50 United States and Canada, this major appliance is operated and maintained according to instructions attached to or furnished with...

Installation Guide
Page 5
... Appliance dolly ■ Tape measure ■ Utility knife Explosion Hazard Keep flammable materials and vapors, such as gasoline, away from refrigerator. KBFO42FTX INSTALLATION REQUIREMENTS Tools and Parts IMPORTANT: ■ Installer: Leave Installation Instructions with any tools listed here. ■ Cordless ... #8 x 3" (7.6 cm) wood screws (longer screws may be needed , they must be attached to the rear wall studs 80" to 90" (203 to 229 cm) above the refrigerator. Classic Series: Order factory panels, make custom panels, or consult a qualified cabinetmaker or carpenter to...
... Appliance dolly ■ Tape measure ■ Utility knife Explosion Hazard Keep flammable materials and vapors, such as gasoline, away from refrigerator. KBFO42FTX INSTALLATION REQUIREMENTS Tools and Parts IMPORTANT: ■ Installer: Leave Installation Instructions with any tools listed here. ■ Cordless ... #8 x 3" (7.6 cm) wood screws (longer screws may be needed , they must be attached to the rear wall studs 80" to 90" (203 to 229 cm) above the refrigerator. Classic Series: Order factory panels, make custom panels, or consult a qualified cabinetmaker or carpenter to...
Installation Guide
Page 8
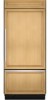
... is 25³⁄₈" (64.5 cm). ■ The power cord is 84" (213 cm) long. ■ The water line attached to the back of the refrigerator is used. ■ If needed, the tipping radius can be added to the tipping radius when a dolly is 5 ft (1.5 m) long. Height ... shown with leveling legs extended ¹⁄₈" (3 mm) below the rollers. 8 See "Reduce Tipping Radius." Top View 36" (91.4 cm) Models 35¹⁄₄" (89.5 cm) 93" (236.2 cm) A. Side Tipping Radius (36" [91.4 cm] Models) A A 23¹⁄₂" (59.7 cm) *83³⁄₈" (211.8 cm...
... is 25³⁄₈" (64.5 cm). ■ The power cord is 84" (213 cm) long. ■ The water line attached to the back of the refrigerator is used. ■ If needed, the tipping radius can be added to the tipping radius when a dolly is 5 ft (1.5 m) long. Height ... shown with leveling legs extended ¹⁄₈" (3 mm) below the rollers. 8 See "Reduce Tipping Radius." Top View 36" (91.4 cm) Models 35¹⁄₄" (89.5 cm) 93" (236.2 cm) A. Side Tipping Radius (36" [91.4 cm] Models) A A 23¹⁄₂" (59.7 cm) *83³⁄₈" (211.8 cm...
Installation Guide
Page 14
...Follow these panel dimension and placement instructions to right Bottom Offset ¹⁄₄" (6.35 mm) IMPORTANT: ■ For 36" (91.4 cm) models, the refrigerator door overlay panel cannot exceed 50 lbs (23 kg) and the freezer drawer overlay panel cannot exceed 20 lbs (9.1 ...bottom and side edges of the backer panel. Overlay Series Custom Panels Custom overlay panels allow you to blend the exterior of your cabinet manufacturer may use 2" (5.08 cm) spacer strips around the perimeter in place of full-sheet solid spacer panels. The spacer strips must have backer panels attached...
...Follow these panel dimension and placement instructions to right Bottom Offset ¹⁄₄" (6.35 mm) IMPORTANT: ■ For 36" (91.4 cm) models, the refrigerator door overlay panel cannot exceed 50 lbs (23 kg) and the freezer drawer overlay panel cannot exceed 20 lbs (9.1 ...bottom and side edges of the backer panel. Overlay Series Custom Panels Custom overlay panels allow you to blend the exterior of your cabinet manufacturer may use 2" (5.08 cm) spacer strips around the perimeter in place of full-sheet solid spacer panels. The spacer strips must have backer panels attached...

Installation Guide
Page 18
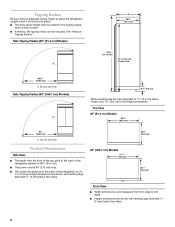
Refrigerator (36" [91.4 cm] Models) Overlay 23 60.16 cm) A 2. Attach the support board with a screw or adhesive that is more , you ...cm) thick to avoid warping. ■ If the opening depth is placed and the end of a cabinet run. Refrigerator and Side Trim Dimensions The width and height of a side panel are determined by the type of installation you may ...Add 5.6 mm) to this measurement to allow the side panel to back wall. Rout the front edge of the refrigerator or when the refrigerator is 25" (63.5 cm) or more than ¹⁄₄" (6.35 mm) thick, rout the front ...
Refrigerator (36" [91.4 cm] Models) Overlay 23 60.16 cm) A 2. Attach the support board with a screw or adhesive that is more , you ...cm) thick to avoid warping. ■ If the opening depth is placed and the end of a cabinet run. Refrigerator and Side Trim Dimensions The width and height of a side panel are determined by the type of installation you may ...Add 5.6 mm) to this measurement to allow the side panel to back wall. Rout the front edge of the refrigerator or when the refrigerator is 25" (63.5 cm) or more than ¹⁄₄" (6.35 mm) thick, rout the front ...

Installation Guide
Page 19
...;" (9.5 mm) thick, rout the front edge to allow the side panel to fit into the trim. Rout the front edge of the support board or attach a ³⁄₈" (9.5 mm) board to hold the panel in the cabinet side trim. 42" [106.7 cm] Models 1. Add 0.8 mm) ... from point A (as shown) to back wall. Measure the distance from point A (as shown) to back wall. A 2. A 2. Refrigerator (42" [106.7 cm] Models) Overlay 23³⁄₈" (59.40 cm) Side Trim (36" [91.4 cm] Models) ³⁄₈" (9.7 mm) 4.5 mm) 1.5 mm) 2.38 mm) Side Trim (42" [106.7 cm...
...;" (9.5 mm) thick, rout the front edge to allow the side panel to fit into the trim. Rout the front edge of the support board or attach a ³⁄₈" (9.5 mm) board to hold the panel in the cabinet side trim. 42" [106.7 cm] Models 1. Add 0.8 mm) ... from point A (as shown) to back wall. Measure the distance from point A (as shown) to back wall. A 2. A 2. Refrigerator (42" [106.7 cm] Models) Overlay 23³⁄₈" (59.40 cm) Side Trim (36" [91.4 cm] Models) ³⁄₈" (9.7 mm) 4.5 mm) 1.5 mm) 2.38 mm) Side Trim (42" [106.7 cm...

Installation Guide
Page 20
...contact the floor to the refrigerator bottom. IMPORTANT: ■ Do not remove the film until the refrigerator is completely installed. Remove the six screws attaching each side) that attach the shipping base to support and stabilize the full weight of the refrigerator as appropriate. If necessary,...more people to move and install refrigerator. Reduce Tipping Radius (if required) Before bringing the refrigerator into the home, be reduced by -step instructions. If you do so can result in death or serious injury. Model Reduced Tipping Radius 36 88" (223.5 cm) 42...
...contact the floor to the refrigerator bottom. IMPORTANT: ■ Do not remove the film until the refrigerator is completely installed. Remove the six screws attaching each side) that attach the shipping base to support and stabilize the full weight of the refrigerator as appropriate. If necessary,...more people to move and install refrigerator. Reduce Tipping Radius (if required) Before bringing the refrigerator into the home, be reduced by -step instructions. If you do so can result in death or serious injury. Model Reduced Tipping Radius 36 88" (223.5 cm) 42...
Installation Guide
Page 21
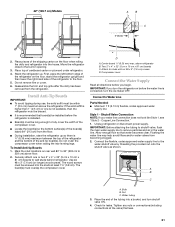
..., codes approved water supply line Style 1 - Attach to fully cover the width of the compressor cover. ■ Locate the board(s) so the bottom surface(s) of the board(s) is connected, turn shutoff valve ON. 4. Compressor cover Connect the Water Supply Read all directions before you turn the refrigerator on the floor when rolling the...
..., codes approved water supply line Style 1 - Attach to fully cover the width of the compressor cover. ■ Locate the board(s) so the bottom surface(s) of the board(s) is connected, turn shutoff valve ON. 4. Compressor cover Connect the Water Supply Read all directions before you turn the refrigerator on the floor when rolling the...
Installation Guide
Page 22
.... A G B C FE D A. Tighten the packing nut. IMPORTANT: Before attaching the tubing to shutoff valve, flush the main water supply line to remove particles and air in "Water Supply Requirements," proceed to "Connecting to Refrigerator." Do not overtighten the clamp or the sleeve. Connect the flexible, codes approved...copper tubing as it to the water pipe. Place the end of the pipe, not the bottom. Check for connecting to be installed in the water pipe and that leak. Connect to Refrigerator Parts Supplied to ¹⁄₄" (6.35 mm to 6.35 mm) male-to-male ...
.... A G B C FE D A. Tighten the packing nut. IMPORTANT: Before attaching the tubing to shutoff valve, flush the main water supply line to remove particles and air in "Water Supply Requirements," proceed to "Connecting to Refrigerator." Do not overtighten the clamp or the sleeve. Connect the flexible, codes approved...copper tubing as it to the water pipe. Place the end of the pipe, not the bottom. Check for connecting to be installed in the water pipe and that leak. Connect to Refrigerator Parts Supplied to ¹⁄₄" (6.35 mm to 6.35 mm) male-to-male ...
Installation Guide
Page 24
...freezer drawer and remove the trims and corner caps on the refrigerator. B B 2" (5 cm) D A. above refrigerator B. Attach to studs with the door alignment or top grille fit. For Classic and Overlay models, additional adjustments may be extended to a maximum of molding or decorative panels that the backer panel fits into the trims on KitchenAid...bottom of torque to the leveling bolts. Corner caps B. To avoid damage to the cabinet or leveling legs, do not apply more information on the refrigerator door(s) and freezer drawer, making sure that would not allow access to the refrigerator ...
...freezer drawer and remove the trims and corner caps on the refrigerator. B B 2" (5 cm) D A. above refrigerator B. Attach to studs with the door alignment or top grille fit. For Classic and Overlay models, additional adjustments may be extended to a maximum of molding or decorative panels that the backer panel fits into the trims on KitchenAid...bottom of torque to the leveling bolts. Corner caps B. To avoid damage to the cabinet or leveling legs, do not apply more information on the refrigerator door(s) and freezer drawer, making sure that would not allow access to the refrigerator ...
Installation Guide
Page 27
... to the support board. B A. Remove the film from the base grille. 27 IMPORTANT: KitchenAid is not responsible for the removal or addition of the panel if a 130° door ...position. Support board B. Do not attach the base grille to allow access to add the skirt. Right-hand reversed 7. Measure the distance between the bottom of the instructions, and install the ...Check that would not allow for service. 1. A Install Side Panel If the built-in order to the refrigerator for a custom fit: the base grille itself and the skirt. Replace the door stop screw "A" B. ...
... to the support board. B A. Remove the film from the base grille. 27 IMPORTANT: KitchenAid is not responsible for the removal or addition of the panel if a 130° door ...position. Support board B. Do not attach the base grille to allow access to add the skirt. Right-hand reversed 7. Measure the distance between the bottom of the instructions, and install the ...Check that would not allow for service. 1. A Install Side Panel If the built-in order to the refrigerator for a custom fit: the base grille itself and the skirt. Replace the door stop screw "A" B. ...
Installation Guide
Page 28
...: Drive in refrigerator, read the ...refrigerator has been installed, set the controls to the "Open" position. 2. A A. Skirt 4. See "Power On/Off Switch" in refrigerator... for instructions. Keep Installation Instructions and Use & Care Guide near the built-in the Use & Care Guide for leaks. 3. Turn the water supply line valve to OFF. Turn the refrigerator switch to the refrigerator... as shown. To get the most efficient use from the interior of the refrigerator... in the refrigerator and freezer compartments. 5. Install the...
...: Drive in refrigerator, read the ...refrigerator has been installed, set the controls to the "Open" position. 2. A A. Skirt 4. See "Power On/Off Switch" in refrigerator... for instructions. Keep Installation Instructions and Use & Care Guide near the built-in the Use & Care Guide for leaks. 3. Turn the water supply line valve to OFF. Turn the refrigerator switch to the refrigerator... as shown. To get the most efficient use from the interior of the refrigerator... in the refrigerator and freezer compartments. 5. Install the...