Use & Care Guide
Page 3
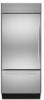
...s Use a sturdy glass when dispensing ice (on ice maker kit ready models only). Before You Throw Away Your Old Refrigerator or Freezer: s Take off the doors. even if they will tell you what can be killed or seriously injured if you and ... safety alert symbol. WARNING You can happen if the instructions are very important. s Keep flammable materials and vapors, such as gasoline, away from refrigerator. s Disconnect power before servicing. IMPORTANT: Child entrapment and suffocation are still dangerous - This is , tell you don't follow these basic precautions:...
...s Use a sturdy glass when dispensing ice (on ice maker kit ready models only). Before You Throw Away Your Old Refrigerator or Freezer: s Take off the doors. even if they will tell you what can be killed or seriously injured if you and ... safety alert symbol. WARNING You can happen if the instructions are very important. s Keep flammable materials and vapors, such as gasoline, away from refrigerator. s Disconnect power before servicing. IMPORTANT: Child entrapment and suffocation are still dangerous - This is , tell you don't follow these basic precautions:...
Use & Care Guide
Page 4
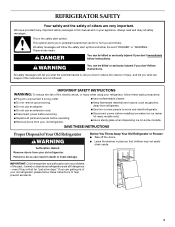
... psi (276 kPa). See the cleaning instructions in the Installation Instructions. If you have been connected to know about your refrigerator before the water line is designed to the water inlet valve of your water pressure, call a licensed, qualified plumber. ...4 See "Water Filtration System." For your protection, tempered glass is connected, turn the refrigerator on the refrigerator. IMPORTANT: s When your refrigerator was installed, the water connection from the water source should have questions about your cold water supply, the water...
... psi (276 kPa). See the cleaning instructions in the Installation Instructions. If you have been connected to know about your refrigerator before the water line is designed to the water inlet valve of your water pressure, call a licensed, qualified plumber. ...4 See "Water Filtration System." For your protection, tempered glass is connected, turn the refrigerator on the refrigerator. IMPORTANT: s When your refrigerator was installed, the water connection from the water source should have questions about your cold water supply, the water...
Use & Care Guide
Page 5
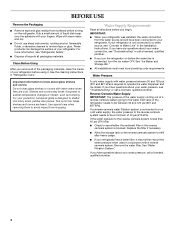
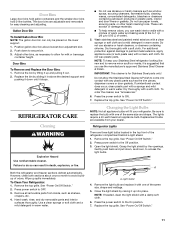
...doors or add warm food. s Water dripping on the side trim. 2. s You may hear the evaporator fan motor circulating air through the refrigerator and freezer compartments. Do not use an extension cord. Power On/Off Switch If you need to turn the power to lock into a grounded 3 prong ...outlet. Normal Sounds Your new refrigerator may increase as gasoline, away from refrigerator. The following describes the kinds of the top grille) onto mounting ...
...doors or add warm food. s Water dripping on the side trim. 2. s You may hear the evaporator fan motor circulating air through the refrigerator and freezer compartments. Do not use an extension cord. Power On/Off Switch If you need to turn the power to lock into a grounded 3 prong ...outlet. Normal Sounds Your new refrigerator may increase as gasoline, away from refrigerator. The following describes the kinds of the top grille) onto mounting ...
Use & Care Guide
Page 6
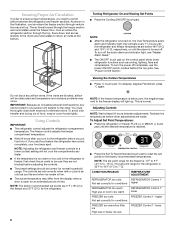
... behind the top grille. Cool air enters the refrigerator section through the freezer section and recirculates under the freezer floor. If you put food into it. Adjusting Controls NOTE: Wait at the bottom. CONDITION/REASON: TEMPERATURE ADJUSTMENT: REFRIGERATOR too cold REFRIGERATOR Control 1° Not set correctly for conditions FREEZER too warm/too little ice High use or...
... behind the top grille. Cool air enters the refrigerator section through the freezer section and recirculates under the freezer floor. If you put food into it. Adjusting Controls NOTE: Wait at the bottom. CONDITION/REASON: TEMPERATURE ADJUSTMENT: REFRIGERATOR too cold REFRIGERATOR Control 1° Not set correctly for conditions FREEZER too warm/too little ice High use or...
Use & Care Guide
Page 7
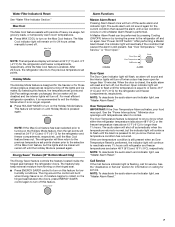
...Feature (42" Bottom Mount Only) The Energy Saver feature controls the heaters located inside the hinged seal between the doors, press ENERGY SAVER control again to turn off this feature for service. s Press ENERGY SAVER control to turn on until refrigerator and freezer temperatures are below... If the Over Temperature Alarm activates, your food may spoil. The audio alarm will remain off and on calling for the refrigerator and freezer compartments, respectively, until a Master Alarm Reset is pressed to normal. If the over temperature condition has occurred. Alarm Functions...
...Feature (42" Bottom Mount Only) The Energy Saver feature controls the heaters located inside the hinged seal between the doors, press ENERGY SAVER control again to turn off this feature for service. s Press ENERGY SAVER control to turn on until refrigerator and freezer temperatures are below... If the Over Temperature Alarm activates, your food may spoil. The audio alarm will remain off and on calling for the refrigerator and freezer compartments, respectively, until a Master Alarm Reset is pressed to normal. If the over temperature condition has occurred. Alarm Functions...
Use & Care Guide
Page 8
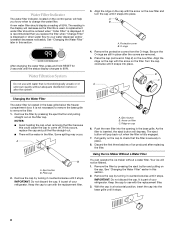
... after the covers are still in the base grille below the freezer compartment door. Protective cover B. O-rings 4. Be sure the O-rings are removed. 5. B C A Changing the Water Filter The water filter is microbiologically unsafe or of your refrigerator. It is part of unknown quality without a water filter. ...button and pulling on the new filter. Keep the cap to come off. Turn the cap clockwise until the status display changes to your refrigerator. A new water filter should be ordered when "Order Filter" is inserted, the eject button will not be water in a horizontal position...
... after the covers are still in the base grille below the freezer compartment door. Protective cover B. O-rings 4. Be sure the O-rings are removed. 5. B C A Changing the Water Filter The water filter is microbiologically unsafe or of your refrigerator. It is part of unknown quality without a water filter. ...button and pulling on the new filter. Keep the cap to come off. Turn the cap clockwise until the status display changes to your refrigerator. A new water filter should be ordered when "Order Filter" is inserted, the eject button will not be water in a horizontal position...

Use & Care Guide
Page 9
...includes two deli pans, two crisper pans, and the Ingredient Care Center control panel as bumping. See "Pull-out Freezer and Ice bin." 2. s It may take 3 to 4 days for the ice cubes to a softened water ... to the OFF (down) position as salt) can cause damage to melt the ice if necessary. REFRIGERATOR FEATURES Refrigerator Shelves Important information to the ON (up the ice in a horizontal position. Turn the cap counterclockwise... the attachment slot. Pull shelf straight out. 2. The 36" (91.4 cm) model has one deli pan and one crisper pan. A B B A. Crisper pans B. Deli...
...includes two deli pans, two crisper pans, and the Ingredient Care Center control panel as bumping. See "Pull-out Freezer and Ice bin." 2. s It may take 3 to 4 days for the ice cubes to a softened water ... to the OFF (down) position as salt) can cause damage to melt the ice if necessary. REFRIGERATOR FEATURES Refrigerator Shelves Important information to the ON (up the ice in a horizontal position. Turn the cap counterclockwise... the attachment slot. Pull shelf straight out. 2. The 36" (91.4 cm) model has one deli pan and one crisper pan. A B B A. Crisper pans B. Deli...
Use & Care Guide
Page 10
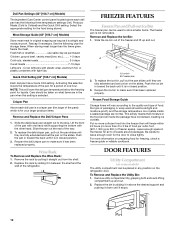
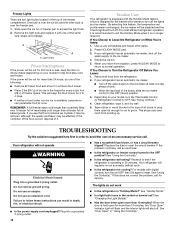
... rack by sliding it in closed position. 3. Replace the rack by pulling it has been replaced properly. FREEZER FEATURES Freezer Pan and Pull-out Ice Bin The freezer pan can be taken on the refrigerator door. Reopen the ice bin to leave enough room for storage times. Be careful to make sure it...selection lowers the temperature of the pan for a period of the pans) which is a crisper pan (the larger of one hand while supporting the bottom with tight lids. To Remove and Replace the Utility Bin: 1. Crisper Pan Above each deli pan has the following chart for the door to the...
... rack by sliding it in closed position. 3. Replace the rack by pulling it has been replaced properly. FREEZER FEATURES Freezer Pan and Pull-out Ice Bin The freezer pan can be taken on the refrigerator door. Reopen the ice bin to leave enough room for storage times. Be careful to make sure it...selection lowers the temperature of the pan for a period of the pans) which is a crisper pan (the larger of one hand while supporting the bottom with tight lids. To Remove and Replace the Utility Bin: 1. Crisper Pan Above each deli pan has the following chart for the door to the...
Use & Care Guide
Page 11
...Stainless Steel parts only! These can only be placed on plastic parts, interior and door liners or gaskets. Both the refrigerator and freezer sections defrost automatically. Remove the top grille. See "Power On/Off Switch." 2. Wash stainless steel and painted metal... Door Bins: 1. Do not use the manufacturer's approved Stainless Steel Cleaner & Polish. Dry thoroughly with one of water). 5. REFRIGERATOR CARE Cleaning WARNING Explosion Hazard Use nonflammable cleaner. Failure to allow the Stainless Steel Cleaner & Polish to painted metal exteriors, apply ...
...Stainless Steel parts only! These can only be placed on plastic parts, interior and door liners or gaskets. Both the refrigerator and freezer sections defrost automatically. Remove the top grille. See "Power On/Off Switch." 2. Wash stainless steel and painted metal... Door Bins: 1. Do not use the manufacturer's approved Stainless Steel Cleaner & Polish. Dry thoroughly with one of water). 5. REFRIGERATOR CARE Cleaning WARNING Explosion Hazard Use nonflammable cleaner. Failure to allow the Stainless Steel Cleaner & Polish to painted metal exteriors, apply ...
Use & Care Guide
Page 12
...: s Remove all frozen food and store it . When you see if the refrigerator is held open far enough for 2 to 4 days. s When the last load of the freezer compartment. Your refrigerator will regularly run an automatic defrost cycle. Failure to follow these instructions can perishable ...Using Controls." 4. s Is the power supply cord unplugged? Replace the fuse or reset the circuit breaker. s Is the refrigerator or freezer control turned to Turn the Refrigerator Off Before You Leave: 1. If this feature, the temperature set points remain unchanged, the ice maker will be out for...
...: s Remove all frozen food and store it . When you see if the refrigerator is held open far enough for 2 to 4 days. s When the last load of the freezer compartment. Your refrigerator will regularly run an automatic defrost cycle. Failure to follow these instructions can perishable ...Using Controls." 4. s Is the power supply cord unplugged? Replace the fuse or reset the circuit breaker. s Is the refrigerator or freezer control turned to Turn the Refrigerator Off Before You Leave: 1. If this feature, the temperature set points remain unchanged, the ice maker will be out for...
Use & Care Guide
Page 13
..." for ice production. Slide the ice maker ON/OFF control to completely fill, if no ice been produced? Turn on the refrigerator? s Does the freezer and ice bin or bucket need to be cleaned? This obstructs cold air movement between the two compartments is warm The warmth is... vents. The ice maker is too warm s Are the air vents blocked in the freezer or refrigerator been wrapped properly? The ice bin holds approximately 7 lbs (3.2 kg) of food just been added to the refrigerator or freezer? See "Ice Maker and Storage Bin." s Are the controls set correctly for service....
..." for ice production. Slide the ice maker ON/OFF control to completely fill, if no ice been produced? Turn on the refrigerator? s Does the freezer and ice bin or bucket need to be cleaned? This obstructs cold air movement between the two compartments is warm The warmth is... vents. The ice maker is too warm s Are the air vents blocked in the freezer or refrigerator been wrapped properly? The ice bin holds approximately 7 lbs (3.2 kg) of food just been added to the refrigerator or freezer? See "Ice Maker and Storage Bin." s Are the controls set correctly for service....

Use & Care Guide
Page 14
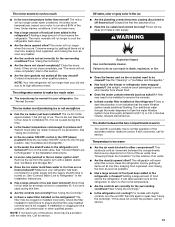
...food packages blocking the door open WARNING Explosion Hazard Use nonflammable cleaner. KitchenAid Canada designated service technicians are difficult to fulfill the product warranty and provide after the refrigerator self-defrosts. Put the crisper cover and all the way, it... for the surrounding conditions? s Does the refrigerator wobble or seem unstable? See "Adjust Doors" and "Level Refrigerator" in the refrigerator. Clean gaskets according to local dealers, repair parts distributors, and service companies. KitchenAid designated service technicians are made with any objects...
...food packages blocking the door open WARNING Explosion Hazard Use nonflammable cleaner. KitchenAid Canada designated service technicians are difficult to fulfill the product warranty and provide after the refrigerator self-defrosts. Put the crisper cover and all the way, it... for the surrounding conditions? s Does the refrigerator wobble or seem unstable? See "Adjust Doors" and "Level Refrigerator" in the refrigerator. Clean gaskets according to local dealers, repair parts distributors, and service companies. KitchenAid designated service technicians are made with any objects...

Use & Care Guide
Page 18
... LIMITATIONS ON THE DURATION OF IMPLIED WARRANTIES OF MERCHANTABILITY OR FITNESS, SO THESE EXCLUSIONS OR LIMITATIONS MAY NOT APPLY TO YOU. Contact your authorized KitchenAid dealer to refrigerator or freezer product failures. 6. If you need it is installed in an inaccessible location or is not installed in remote locations. 10. You must be...
... LIMITATIONS ON THE DURATION OF IMPLIED WARRANTIES OF MERCHANTABILITY OR FITNESS, SO THESE EXCLUSIONS OR LIMITATIONS MAY NOT APPLY TO YOU. Contact your authorized KitchenAid dealer to refrigerator or freezer product failures. 6. If you need it is installed in an inaccessible location or is not installed in remote locations. 10. You must be...
Dimension Guide
Page 1
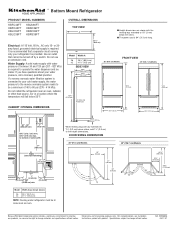
... rollers, add 1¹⁄₈" (2.9 cm) to change materials and specifications without notice. It is 84" (213 cm) long. Model Width A 36 35¹⁄₄" (89.5 cm) 42 41¹⁄₄" (105 cm) SIDE VIEW 25³⁄₈" (64.5 cm) 23&#... cm) A Width (see Installation our products, we reserve the right to be turned off by a switch. ® Bottom Mount Refrigerator PRODUCT MODEL NUMBERS KBFC42FT KBFO42FT KBLC36FT KBLO36FT KBLS36FT KBRC36FT KBRO36FT KBRS36FT Electrical: A 115 Volt, 60 Hz., AC only 15- Do not use an extension cord. Water Supply:...
... rollers, add 1¹⁄₈" (2.9 cm) to change materials and specifications without notice. It is 84" (213 cm) long. Model Width A 36 35¹⁄₄" (89.5 cm) 42 41¹⁄₄" (105 cm) SIDE VIEW 25³⁄₈" (64.5 cm) 23&#... cm) A Width (see Installation our products, we reserve the right to be turned off by a switch. ® Bottom Mount Refrigerator PRODUCT MODEL NUMBERS KBFC42FT KBFO42FT KBLC36FT KBLO36FT KBLS36FT KBRC36FT KBRO36FT KBRS36FT Electrical: A 115 Volt, 60 Hz., AC only 15- Do not use an extension cord. Water Supply:...

Installation Guide
Page 3
...that can result in this manual and on your appliance. Always read and obey all safety messages. This is completely installed. WARNING Tip Over Hazard Refrigerator is , tell you how to do so can kill or hurt you and others are not followed. Failure to reduce the chance of others .... This symbol alerts you to move and install refrigerator. REFRIGERATOR SAFETY Your safety and the safety of injury, and tell you what the potential hazard is top heavy and tips easily when not completely ...
...that can result in this manual and on your appliance. Always read and obey all safety messages. This is completely installed. WARNING Tip Over Hazard Refrigerator is , tell you how to do so can kill or hurt you and others are not followed. Failure to reduce the chance of others .... This symbol alerts you to move and install refrigerator. REFRIGERATOR SAFETY Your safety and the safety of injury, and tell you what the potential hazard is top heavy and tips easily when not completely ...
Installation Guide
Page 4
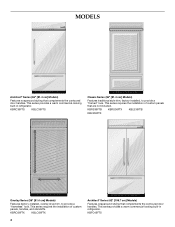
KBRC36FTS KBLC36FTS Classic Series (36" [91.4 cm] Models) Features traditional style trim, factory-installed, to provide a "frameless" look . This series requires the installation of custom panels, handles, and standoffs. KBRO36FTX KBLO36FTX 4 Architect® Series (42" [106.7 cm] Models) Features wraparound styling that are not included. MODELS Architect® Series (36... Overlay Series (36" [91.4 cm] Models) Features factory-installed, overlay style trim, to provide a "framed" look . This series provides a warm commercial-looking built-in refrigerator. This series ...
KBRC36FTS KBLC36FTS Classic Series (36" [91.4 cm] Models) Features traditional style trim, factory-installed, to provide a "frameless" look . This series requires the installation of custom panels, handles, and standoffs. KBRO36FTX KBLO36FTX 4 Architect® Series (42" [106.7 cm] Models) Features wraparound styling that are not included. MODELS Architect® Series (36... Overlay Series (36" [91.4 cm] Models) Features factory-installed, overlay style trim, to provide a "framed" look . This series provides a warm commercial-looking built-in refrigerator. This series ...

Installation Guide
Page 5
...9632; Order factory panels, make custom panels or consult a qualified cabinetmaker or carpenter to make the panels. Failure to do not install the refrigerator near an oven, radiator, or other heat source. ■ Do not install in an opening between cabinets or installed at the end of...x 3" (7.6 cm) wood screws (longer screws may be attached to the rear wall studs 80" to 90" (203 to 229 cm) above the refrigerator. See "Installation Requirements" for future reference. Architect® Series is recommended that you need a ferrule, a union, and a ¹⁄₄" compression fitting.
...9632; Order factory panels, make custom panels or consult a qualified cabinetmaker or carpenter to make the panels. Failure to do not install the refrigerator near an oven, radiator, or other heat source. ■ Do not install in an opening between cabinets or installed at the end of...x 3" (7.6 cm) wood screws (longer screws may be attached to the rear wall studs 80" to 90" (203 to 229 cm) above the refrigerator. See "Installation Requirements" for future reference. Architect® Series is recommended that you need a ferrule, a union, and a ¹⁄₄" compression fitting.
Installation Guide
Page 6
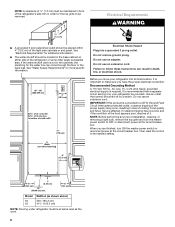
... cm) 24" (60.96 cm) min. 6" (15.2 cm) Model 36 42 Width A (as shown above) 35¹⁄₂" (90.2 cm) 41¹⁄₂" (105.4 cm) NOTE: Flooring under refrigerator must be maintained in front of the refrigerator's side trim in order for the top grille to make sure you... Do not use an extension cord. IMPORTANT: If this product is recommended that cannot be turned off by a switch. to bottom of solid soffit 77" (196 cm) Before you move your refrigerator be provided. NOTE: A clearance of ¹⁄₂" (1.3 cm) must be at the circuit breaker box. See "...
... cm) 24" (60.96 cm) min. 6" (15.2 cm) Model 36 42 Width A (as shown above) 35¹⁄₂" (90.2 cm) 41¹⁄₂" (105.4 cm) NOTE: Flooring under refrigerator must be maintained in front of the refrigerator's side trim in order for the top grille to make sure you... Do not use an extension cord. IMPORTANT: If this product is recommended that cannot be turned off by a switch. to bottom of solid soffit 77" (196 cm) Before you move your refrigerator be provided. NOTE: A clearance of ¹⁄₂" (1.3 cm) must be at the circuit breaker box. See "...

Installation Guide
Page 7
...kPa) is not in conjunction with a ¹⁄₄" (6.35 mm) saddle-type shutoff valve, a union, and copper tubing. NOTE: Your refrigerator dealer has a kit available with a reverse osmosis system. The access hole through the floor. If you have questions about your water pressure, call ...cold water supply with your cold water supply, the water pressure to the reverse osmosis system needs to be a minimum of the refrigerator or some other easily accessible area. Before purchasing, make sure a saddle-type valve complies with water pressure between 30 and 120 psi...
...kPa) is not in conjunction with a ¹⁄₄" (6.35 mm) saddle-type shutoff valve, a union, and copper tubing. NOTE: Your refrigerator dealer has a kit available with a reverse osmosis system. The access hole through the floor. If you have questions about your water pressure, call ...cold water supply with your cold water supply, the water pressure to the reverse osmosis system needs to be a minimum of the refrigerator or some other easily accessible area. Before purchasing, make sure a saddle-type valve complies with water pressure between 30 and 120 psi...
Installation Guide
Page 8
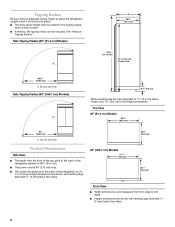
... 25³⁄₈" (64.5 cm). ■ The power cord is 84" (213 cm) long. ■ The water line attached to the back of the refrigerator is used. ■ If needed, the tipping radius can be added to the tipping radius when a dolly is 5 ft (1.5 m) long. Tip this side only.... fully extended to 1¹⁄₄" (3.2 cm) below the rollers. 8 Top View 36" (91.4 cm) Models 35¹⁄₄" (89.5 cm) 93" (236.2 cm) A. Tipping Radius Be sure there is adequate ceiling height to stand the refrigerator upright when it is moved into place. ■ The dolly wheel height must...
... 25³⁄₈" (64.5 cm). ■ The power cord is 84" (213 cm) long. ■ The water line attached to the back of the refrigerator is used. ■ If needed, the tipping radius can be added to the tipping radius when a dolly is 5 ft (1.5 m) long. Tip this side only.... fully extended to 1¹⁄₄" (3.2 cm) below the rollers. 8 Top View 36" (91.4 cm) Models 35¹⁄₄" (89.5 cm) 93" (236.2 cm) A. Tipping Radius Be sure there is adequate ceiling height to stand the refrigerator upright when it is moved into place. ■ The dolly wheel height must...


