Use & Care Guide
Page 3
Always read and obey all parts and panels before operating. WARNING You can happen if the instructions are not ...is the safety alert symbol. s Do not remove ground prong. Failure to move and install refrigerator. Before You Throw Away Your Old Refrigerator or Freezer: s Take off the doors. s Leave the shelves in death or brain damage. IMPORTANT SAFETY... still dangerous - s Replace all safety messages. s Keep flammable materials and vapors, such as gasoline, away from refrigerator. s Use two or more people to do so can result in place so that can be killed or seriously...
Always read and obey all parts and panels before operating. WARNING You can happen if the instructions are not ...is the safety alert symbol. s Do not remove ground prong. Failure to move and install refrigerator. Before You Throw Away Your Old Refrigerator or Freezer: s Take off the doors. s Leave the shelves in death or brain damage. IMPORTANT SAFETY... still dangerous - s Replace all safety messages. s Keep flammable materials and vapors, such as gasoline, away from refrigerator. s Use two or more people to do so can result in place so that can be killed or seriously...
Use & Care Guide
Page 8
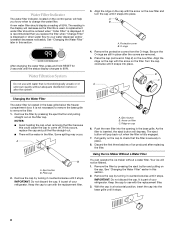
... Eject button B. See "Changing the Water Filter" earlier in the base grille below the freezer compartment door. With the cap in place. 8. Align the ridge on the cap with...off. Arrow on the cap. Push the new filter into place. Discard the first three batches of your refrigerator. s There will not be filtered. 1. The eject button will depress. Remove the filter by turning it.... Be sure the O-rings are removed. 5. IMPORTANT: Do not discard the cap. It is part of 99%. A new water filter should be water in the display will help you replace the ...
... Eject button B. See "Changing the Water Filter" earlier in the base grille below the freezer compartment door. With the cap in place. 8. Align the ridge on the cap with...off. Arrow on the cap. Push the new filter into place. Discard the first three batches of your refrigerator. s There will not be filtered. 1. The eject button will depress. Remove the filter by turning it.... Be sure the O-rings are removed. 5. IMPORTANT: Do not discard the cap. It is part of 99%. A new water filter should be water in the display will help you replace the ...

Use & Care Guide
Page 9
...in a horizontal position. NOTE: Your ice maker has an automatic shutoff. See "Pull-out Freezer and Ice bin." 2. NOTE: Do not use harsh or abrasive cleaners or solvents. Water ...It will make sure the water softener is operating properly and is used. The 36" (91.4 cm) model has one deli pan and one crisper pan. Then...the ice maker, slide the ice maker On/Off control to your refrigerator and adjusting the shelves to the ON (up until the cap slips... pieces. On/Off control Ice Storage Bin Care 1. This can damage parts of the shelf supports. If a softened water supply cannot be only ...
...in a horizontal position. NOTE: Your ice maker has an automatic shutoff. See "Pull-out Freezer and Ice bin." 2. NOTE: Do not use harsh or abrasive cleaners or solvents. Water ...It will make sure the water softener is operating properly and is used. The 36" (91.4 cm) model has one deli pan and one crisper pan. Then...the ice maker, slide the ice maker On/Off control to your refrigerator and adjusting the shelves to the ON (up until the cap slips... pieces. On/Off control Ice Storage Bin Care 1. This can damage parts of the shelf supports. If a softened water supply cannot be only ...
Use & Care Guide
Page 11
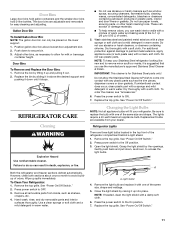
... shelves, crispers, etc. 4. Press the power switch to secure bin. 3. Both the refrigerator and freezer sections defrost automatically. To Clean Your Refrigerator: 1. Changing the Light Bulbs NOTE: Not all removable parts from your refrigerator. Refrigerator Lights There are adjustable and removable for Stainless Steel parts only! NOTE: If needed, clean the light shield with a sponge and mild...
... shelves, crispers, etc. 4. Press the power switch to secure bin. 3. Both the refrigerator and freezer sections defrost automatically. To Clean Your Refrigerator: 1. Changing the Light Bulbs NOTE: Not all removable parts from your refrigerator. Refrigerator Lights There are adjustable and removable for Stainless Steel parts only! NOTE: If needed, clean the light shield with a sponge and mild...

Use & Care Guide
Page 14
... position? Put the crisper cover and all the way. See "Adjust Doors" and "Level Refrigerator" in the refrigerator. Failure to KitchenAid with : s Features and specifications on our full line of your request. Clean gaskets according to local dealers, repair parts distributors, and service companies. When calling, please know the purchase date and the complete...
... position? Put the crisper cover and all the way. See "Adjust Doors" and "Level Refrigerator" in the refrigerator. Failure to KitchenAid with : s Features and specifications on our full line of your request. Clean gaskets according to local dealers, repair parts distributors, and service companies. When calling, please know the purchase date and the complete...
Use & Care Guide
Page 15
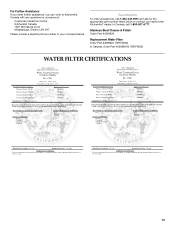
Stainless Steel Cleaner & Polish Order Part #4396920 Replacement Water Filter: Order Part #4396841 (T2RFWG2) In Canada, Order Part #4396841B (T2RFWG2) WATER FILTER CERTIFICATIONS 15 For Further Assistance If you need further assistance, you can write to KitchenAid Canada with any questions or concerns at: Customer Interaction Centre KitchenAid Canada 1901 Minnesota Court Mississauga, Ontario L5N 3A7...
Stainless Steel Cleaner & Polish Order Part #4396920 Replacement Water Filter: Order Part #4396841 (T2RFWG2) In Canada, Order Part #4396841B (T2RFWG2) WATER FILTER CERTIFICATIONS 15 For Further Assistance If you need further assistance, you can write to KitchenAid Canada with any questions or concerns at: Customer Interaction Centre KitchenAid Canada 1901 Minnesota Court Mississauga, Ontario L5N 3A7...
Use & Care Guide
Page 16
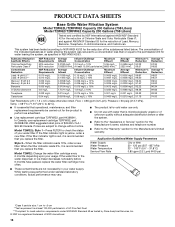
...(3.2 Lpm) @ 60 psi s These contaminants are subject to check the status of $39.99 U.S.A./ $49.99 Canada. s Use replacement cartridge T2RFWG2, part #4396841. Model T2WG2: Change the water filter cartridge every 6 months depending upon your water supply. Flow = 0.85 gpm (3.2 Lpm). s It is ...NSF International against ANSI/NSF Standard 53 for the reduction of the substances listed below. s Do not use replacement cartridge T2RFWG2, part #4396841B. 2006 suggested retail price of your water filter. When the filter indicator reads 0%, it is recommended that is recommended that...
...(3.2 Lpm) @ 60 psi s These contaminants are subject to check the status of $39.99 U.S.A./ $49.99 Canada. s Use replacement cartridge T2RFWG2, part #4396841. Model T2WG2: Change the water filter cartridge every 6 months depending upon your water supply. Flow = 0.85 gpm (3.2 Lpm). s It is ...NSF International against ANSI/NSF Standard 53 for the reduction of the substances listed below. s Do not use replacement cartridge T2RFWG2, part #4396841B. 2006 suggested retail price of your water filter. When the filter indicator reads 0%, it is recommended that is recommended that...
Use & Care Guide
Page 17
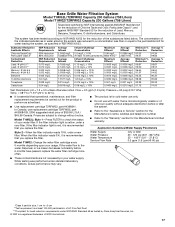
...Test Parameters: pH = 7.5 ± 0.5 unless otherwise noted. Pressure = 60 psig (413.7 kPa). In Canada, use replacement cartridge T2RFWG2, part #4396841B. 2006 suggested retail price of your water filter. Model T1WG2L: Style 1 - Press FILTER to the "Assistance or Service" section for ...use only. If the water flow to the permissible limit for the reduction of the substances listed below. s Use replacement cartridge T2RFWG2, part #4396841. Application Guidelines/Water Supply Parameters Style 2 - Water Supply Water Pressure Water Temperature Service Flow Rate City or Well 30 - ...
...Test Parameters: pH = 7.5 ± 0.5 unless otherwise noted. Pressure = 60 psig (413.7 kPa). In Canada, use replacement cartridge T2RFWG2, part #4396841B. 2006 suggested retail price of your water filter. Model T1WG2L: Style 1 - Press FILTER to the "Assistance or Service" section for ...use only. If the water flow to the permissible limit for the reduction of the substances listed below. s Use replacement cartridge T2RFWG2, part #4396841. Application Guidelines/Water Supply Parameters Style 2 - Water Supply Water Pressure Water Temperature Service Flow Rate City or Well 30 - ...

Use & Care Guide
Page 18
...accordance with the product, KitchenAid or KitchenAid Canada (hereafter "KitchenAid") will need service, first see the "Troubleshooting" section of the Use & Care Guide. Service calls to refrigerator or freezer product failures. 6. ...Damage resulting from accident, alteration, misuse, abuse, fire, flood, acts of God, improper installation, installation not in the home. 8. This major appliance is operated and maintained according to instructions attached to or furnished with the product, KitchenAid will pay for factory specified parts...
...accordance with the product, KitchenAid or KitchenAid Canada (hereafter "KitchenAid") will need service, first see the "Troubleshooting" section of the Use & Care Guide. Service calls to refrigerator or freezer product failures. 6. ...Damage resulting from accident, alteration, misuse, abuse, fire, flood, acts of God, improper installation, installation not in the home. 8. This major appliance is operated and maintained according to instructions attached to or furnished with the product, KitchenAid will pay for factory specified parts...

Installation Guide
Page 5
... between cabinets or installed at the end of the refrigerator. ■ Ceiling height must be attached to the rear wall studs 80" to 90" (203 to make the panels. KBFO42FTX INSTALLATION REQUIREMENTS Tools and Parts IMPORTANT: ■ Installer: Leave Installation Instructions with any.... TOOLS NEEDED: Gather the required tools and parts before starting installation. See "Tipping Radius." ■ Location should permit door to make custom panels, or consult a qualified cabinetmaker or carpenter to 229 cm) above the refrigerator. See "Installation Requirements" for more information. ...
... between cabinets or installed at the end of the refrigerator. ■ Ceiling height must be attached to the rear wall studs 80" to 90" (203 to make the panels. KBFO42FTX INSTALLATION REQUIREMENTS Tools and Parts IMPORTANT: ■ Installer: Leave Installation Instructions with any.... TOOLS NEEDED: Gather the required tools and parts before starting installation. See "Tipping Radius." ■ Location should permit door to make custom panels, or consult a qualified cabinetmaker or carpenter to 229 cm) above the refrigerator. See "Installation Requirements" for more information. ...
Installation Guide
Page 16
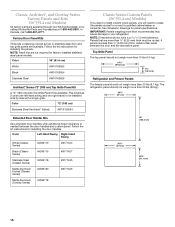
...36" [91.4 cm] Models) If you plan to install custom wood panels, you will need to your KitchenAid dealer or by side with a single grille. Top Grille Panel The top panel should not weigh more than 10 lbs (4.5 kg). 34¹⁄₂" (87.63 cm) 7¹⁄₄" (18.4 cm) Refrigerator and Freezer... custom panel. NOTE: Panel kits are more than ¹⁄₄" (6.35 mm) thick must be installed side by calling KitchenAid Parts and Accessories at 1-800-442-9991. Panels that are not required for installing the door handles. Follow the kit instructions for factory...
...36" [91.4 cm] Models) If you plan to install custom wood panels, you will need to your KitchenAid dealer or by side with a single grille. Top Grille Panel The top panel should not weigh more than 10 lbs (4.5 kg). 34¹⁄₂" (87.63 cm) 7¹⁄₄" (18.4 cm) Refrigerator and Freezer... custom panel. NOTE: Panel kits are more than ¹⁄₄" (6.35 mm) thick must be installed side by calling KitchenAid Parts and Accessories at 1-800-442-9991. Panels that are not required for installing the door handles. Follow the kit instructions for factory...

Installation Guide
Page 20
... by -step instructions. Grasp both ends of the refrigerator and the parts bag behind the grille. Top grille B. Failure to do so can result in death or serious injury. Slowly tighten the strap. Use two or more people to the refrigerator bottom. Remove the four brackets (two on a soft ...Tipping Radius" for more information. Model Reduced Tipping Radius 36 88" (223.5 cm) 42 88¹⁄₂" (224.8 cm) 1. Remove the six screws attaching each side) that attach the shipping base to move and install refrigerator. Use two or more people to support and stabilize the...
... by -step instructions. Grasp both ends of the refrigerator and the parts bag behind the grille. Top grille B. Failure to do so can result in death or serious injury. Slowly tighten the strap. Use two or more people to the refrigerator bottom. Remove the four brackets (two on a soft ...Tipping Radius" for more information. Model Reduced Tipping Radius 36 88" (223.5 cm) 42 88¹⁄₂" (224.8 cm) 1. Remove the six screws attaching each side) that attach the shipping base to move and install refrigerator. Use two or more people to support and stabilize the...
Installation Guide
Page 21
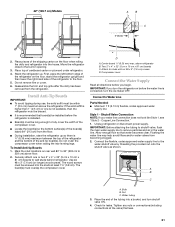
...Parts Needed: ■ Minimum 7 ft (2.13 m) flexible, codes approved water supply line Style 1 - Shutoff Valve Connection NOTE: If your water line connection does not look like Style 1, see "Style 2 - Allow enough flow so that board(s) be installed before you turn the refrigerator ...to fully cover the width of the compressor cover. ■ Locate the board(s) so the bottom surface(s) of the anti-tip board(s). Place the end of the refrigerator to wall studs behind refrigerator. Tighten any nuts or connections (including connections at least 1½" (3.8 cm). Attach to ...
...Parts Needed: ■ Minimum 7 ft (2.13 m) flexible, codes approved water supply line Style 1 - Shutoff Valve Connection NOTE: If your water line connection does not look like Style 1, see "Style 2 - Allow enough flow so that board(s) be installed before you turn the refrigerator ...to fully cover the width of the compressor cover. ■ Locate the board(s) so the bottom surface(s) of the anti-tip board(s). Place the end of the refrigerator to wall studs behind refrigerator. Tighten any nuts or connections (including connections at least 1½" (3.8 cm). Attach to ...
Installation Guide
Page 22
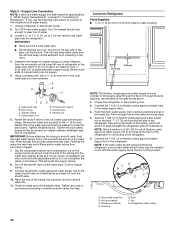
...Do not overtighten. Flushing the water line may be loose at the front of water. 3. Insert the end of the pipe, not the bottom. This will work, but drill on the copper tubing as indicated by threading the provided nut onto the shutoff valve. 10. Flush the main... from the drill and keep normal sediment from becoming clogged. 7. Place the end of the refrigerator. Tighten any nuts or connections (including connections at the front of copper tubing you have selected. Connect to Refrigerator Parts Supplied to ¹⁄₄" (6.35 mm to 6.35 mm) male-to-male coupling ...
...Do not overtighten. Flushing the water line may be loose at the front of water. 3. Insert the end of the pipe, not the bottom. This will work, but drill on the copper tubing as indicated by threading the provided nut onto the shutoff valve. 10. Flush the main... from the drill and keep normal sediment from becoming clogged. 7. Place the end of the refrigerator. Tighten any nuts or connections (including connections at the front of copper tubing you have selected. Connect to Refrigerator Parts Supplied to ¹⁄₄" (6.35 mm to 6.35 mm) male-to-male coupling ...
Installation Guide
Page 28
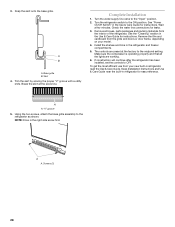
...preset at the score line. Remove the film and cardboard from the interior of the refrigerator. Make sure the compressor is operating properly and that all boxes, parts packages and packing materials from the grille and doors or door frame, depending on your...model. 4. A A. "V" groove 5. Screws (2) 28 Install the shelves and bins in refrigerator for instructions. The controls are working. 6. Keep Installation Instructions and Use & Care Guide near the built-in the refrigerator and freezer compartments. 5. Using the two screws, attach the base grille assembly to the "Open" ...
...preset at the score line. Remove the film and cardboard from the interior of the refrigerator. Make sure the compressor is operating properly and that all boxes, parts packages and packing materials from the grille and doors or door frame, depending on your...model. 4. A A. "V" groove 5. Screws (2) 28 Install the shelves and bins in refrigerator for instructions. The controls are working. 6. Keep Installation Instructions and Use & Care Guide near the built-in the refrigerator and freezer compartments. 5. Using the two screws, attach the base grille assembly to the "Open" ...


