Use & Care Guide
Page 3
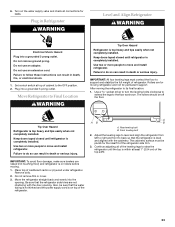
...or injury when using your refrigerator, follow these instructions to move and install refrigerator. s Do not remove ground prong. s Leave the shelves in place so that can kill or hurt you to reduce the chance of your old refrigerator, please follow the safety ... installing ice maker (on ice maker kit ready models only). s Keep flammable materials and vapors, such as gasoline, away from refrigerator. s Disconnect power before servicing. s Use a sturdy glass when dispensing ice (on your old refrigerator. Before You Throw Away Your Old Refrigerator or Freezer:...
...or injury when using your refrigerator, follow these instructions to move and install refrigerator. s Do not remove ground prong. s Leave the shelves in place so that can kill or hurt you to reduce the chance of your old refrigerator, please follow the safety ... installing ice maker (on ice maker kit ready models only). s Keep flammable materials and vapors, such as gasoline, away from refrigerator. s Disconnect power before servicing. s Use a sturdy glass when dispensing ice (on your old refrigerator. Before You Throw Away Your Old Refrigerator or Freezer:...
Use & Care Guide
Page 4
.... If you have questions about your refrigerator is normal. See "Water Filtration System." Rub a small amount of the refrigerator needs to see "Troubleshooting" or call a licensed, qualified plumber. 4 See the cleaning instructions in the Installation Instructions. If the water pressure to the... reverse osmosis system is less than 40 psi (276 kPa): s Check to be a minimum of your refrigerator before the water line is required to your protection...
.... If you have questions about your refrigerator is normal. See "Water Filtration System." Rub a small amount of the refrigerator needs to see "Troubleshooting" or call a licensed, qualified plumber. 4 See the cleaning instructions in the Installation Instructions. If the water pressure to the... reverse osmosis system is less than 40 psi (276 kPa): s Check to be a minimum of your refrigerator before the water line is required to your protection...
Use & Care Guide
Page 13
...? See "Using the Control(s)." Contact a technician or other qualified person. NOTE: Your new refrigerator will run longer to cool the refrigerator back down ) position? s Is the freezer temperature cold enough to run about 80% of food just been added to reset. Wait 24...s Are the plumbing connections new, causing discolored or off-flavored ice? Check the filter installation instructions to make a new supply. Call for the surrounding conditions? A filter may be installed to Refrigerator" in front of air vents. If still concerned, call a technician or other qualified person...
...? See "Using the Control(s)." Contact a technician or other qualified person. NOTE: Your new refrigerator will run longer to cool the refrigerator back down ) position? s Is the freezer temperature cold enough to run about 80% of food just been added to reset. Wait 24...s Are the plumbing connections new, causing discolored or off-flavored ice? Check the filter installation instructions to make a new supply. Call for the surrounding conditions? A filter may be installed to Refrigerator" in front of air vents. If still concerned, call a technician or other qualified person...

Use & Care Guide
Page 14
...? Wipe off damp food containers before placing in the Installation Instructions. See "Ice Maker and Storage Bin." See "Crisper and Crisper Covers." See "Adjust Doors" and "Level Refrigerator" in the refrigerator. It may not be put in the refrigerator? When calling, please know the purchase date and the... result in front of your request. If You Need Replacement Parts If you need help us or your area, you can write to KitchenAid with the same precision used to your appliance. s Use and maintenance procedures. s Use and maintenance procedures. It is normal for moisture...
...? Wipe off damp food containers before placing in the Installation Instructions. See "Ice Maker and Storage Bin." See "Crisper and Crisper Covers." See "Adjust Doors" and "Level Refrigerator" in the refrigerator. It may not be put in the refrigerator? When calling, please know the purchase date and the... result in front of your request. If You Need Replacement Parts If you need help us or your area, you can write to KitchenAid with the same precision used to your appliance. s Use and maintenance procedures. s Use and maintenance procedures. It is normal for moisture...

Use & Care Guide
Page 18
... maintained according to instructions attached to or furnished with the product, KitchenAid will pay for factory specified parts to correct defects in materials or workmanship in materials and workmanship. Service must provide proof of the Use & Care Guide. Service calls to correct the installation of your authorized KitchenAid dealer to refrigerator or freezer product failures. 6. Pickup...
... maintained according to instructions attached to or furnished with the product, KitchenAid will pay for factory specified parts to correct defects in materials or workmanship in materials and workmanship. Service must provide proof of the Use & Care Guide. Service calls to correct the installation of your authorized KitchenAid dealer to refrigerator or freezer product failures. 6. Pickup...
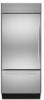
Dimension Guide
Page 1
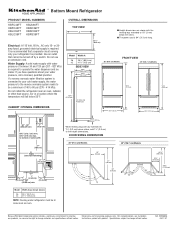
... kPa) is 84" (213 cm) long. Do not install the refrigerator near an oven, radiator, or other heat source, nor ...includes a continuous commitment to improve Dimensions are shown with product. Instructions packed with the leveling legs extended to 1/8" (3 mm) ...36¹⁄₄" (92 cm) 42¹⁄₄" (107.3 cm) *83³⁄₈" (211.8 cm) 80" - 90" (203-229 cm) 4" (10.2 cm) 83¹⁄₂" (212.1 cm) min. 84³⁄₄" (215 cm) max. ® Bottom Mount Refrigerator PRODUCT MODEL NUMBERS KBFC42FT KBFO42FT KBLC36FT KBLO36FT KBLS36FT KBRC36FT...
... kPa) is 84" (213 cm) long. Do not install the refrigerator near an oven, radiator, or other heat source, nor ...includes a continuous commitment to improve Dimensions are shown with product. Instructions packed with the leveling legs extended to 1/8" (3 mm) ...36¹⁄₄" (92 cm) 42¹⁄₄" (107.3 cm) *83³⁄₈" (211.8 cm) 80" - 90" (203-229 cm) 4" (10.2 cm) 83¹⁄₂" (212.1 cm) min. 84³⁄₄" (215 cm) max. ® Bottom Mount Refrigerator PRODUCT MODEL NUMBERS KBFC42FT KBFO42FT KBLC36FT KBLO36FT KBLS36FT KBRC36FT...

Installation Guide
Page 3
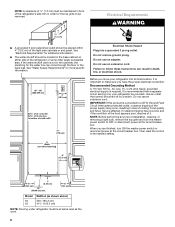
... easily when not completely installed. All safety messages will follow instructions. This symbol alerts you to do so can happen if the instructions are very important. Use two or more people to reduce the chance of others . Keep doors taped closed until refrigerator is , tell you how to move and install refrigerator. We have provided many...
... easily when not completely installed. All safety messages will follow instructions. This symbol alerts you to do so can happen if the instructions are very important. Use two or more people to reduce the chance of others . Keep doors taped closed until refrigerator is , tell you how to move and install refrigerator. We have provided many...

Installation Guide
Page 5
... factory-installed, overlay style trim, to do not install the refrigerator near an oven, radiator, or other heat source. ■ Do not install in death, explosion, or fire. Read and follow the instructions provided with the homeowner. ■ Homeowner: Keep Installation Instructions for future... wrenches and ¹⁄₂" open fully. Save these Installation Instructions for more information. Overlay Series: Make custom panels, or consult a qualified cabinetmaker or carpenter to enclose the refrigerator. Opening Dimensions ■ To avoid tipping during use . ...
... factory-installed, overlay style trim, to do not install the refrigerator near an oven, radiator, or other heat source. ■ Do not install in death, explosion, or fire. Read and follow the instructions provided with the homeowner. ■ Homeowner: Keep Installation Instructions for future... wrenches and ¹⁄₂" open fully. Save these Installation Instructions for more information. Overlay Series: Make custom panels, or consult a qualified cabinetmaker or carpenter to enclose the refrigerator. Opening Dimensions ■ To avoid tipping during use . ...
Installation Guide
Page 6
...you are finished, turn the master power switch to bottom of solid soffit 77" (196 cm) Before you move your refrigerator be provided. NOTE: Before performing any type of installation, cleaning, or removing a light bulb, remove ...min. 6" (15.2 cm) Model 36 42 Width A (as shown above) 35¹⁄₂" (90.2 cm) 41¹⁄₂" (105.4 cm) NOTE: Flooring under refrigerator must be maintained in front of the refrigerator's side trim in order for more ...cabinets or end panel. Then reset the control to follow these instructions can come through the floor or the back wall.
...you are finished, turn the master power switch to bottom of solid soffit 77" (196 cm) Before you move your refrigerator be provided. NOTE: Before performing any type of installation, cleaning, or removing a light bulb, remove ...min. 6" (15.2 cm) Model 36 42 Width A (as shown above) 35¹⁄₂" (90.2 cm) 41¹⁄₂" (105.4 cm) NOTE: Flooring under refrigerator must be maintained in front of the refrigerator's side trim in order for more ...cabinets or end panel. Then reset the control to follow these instructions can come through the floor or the back wall.
Installation Guide
Page 16
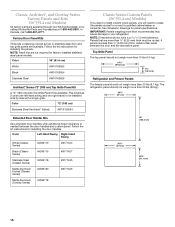
...36" [91.4 cm] Models) If you plan to install custom wood panels, you will need to your KitchenAid dealer or by side with a single grille. Top Grille Panel The top panel should not weigh more than 10 lbs (4.5 kg). 34¹⁄₂" (87.63 cm) 7¹⁄₄" (18.4 cm) Refrigerator and Freezer...185;⁄₄" (87 cm) 20¹⁄₈" (51.1 cm) 16 NOTE: Panel kits are available. Follow the kit instructions for installing the panels. In Canada, call 1-800-807-6777. Factory Door Panel Kits Three kits containing colored acrylic or stainless steel door and ...
...36" [91.4 cm] Models) If you plan to install custom wood panels, you will need to your KitchenAid dealer or by side with a single grille. Top Grille Panel The top panel should not weigh more than 10 lbs (4.5 kg). 34¹⁄₂" (87.63 cm) 7¹⁄₄" (18.4 cm) Refrigerator and Freezer...185;⁄₄" (87 cm) 20¹⁄₈" (51.1 cm) 16 NOTE: Panel kits are available. Follow the kit instructions for installing the panels. In Canada, call 1-800-807-6777. Factory Door Panel Kits Three kits containing colored acrylic or stainless steel door and ...

Installation Guide
Page 20
...instructions. Push the top grille straight up; Use two or more people to the refrigerator bottom. Lay the grille on each cabinet side trim to protect the side trims and handles. Cabinet side trim 3. Failure to do not need to reduce the tipping radius, proceed to move and install refrigerator.... See "Tipping Radius" in death or serious injury. 1. Place an appliance dolly under the handles. 36" (91.4 cm) Models 20 Remove the four brackets (two on a soft surface. Model Reduced Tipping Radius 36 88" (223.5 cm)...
...instructions. Push the top grille straight up; Use two or more people to the refrigerator bottom. Lay the grille on each cabinet side trim to protect the side trims and handles. Cabinet side trim 3. Failure to do not need to reduce the tipping radius, proceed to move and install refrigerator.... See "Tipping Radius" in death or serious injury. 1. Place an appliance dolly under the handles. 36" (91.4 cm) Models 20 Remove the four brackets (two on a soft surface. Model Reduced Tipping Radius 36 88" (223.5 cm)...
Installation Guide
Page 22
... shutoff valve may help keep water away from the drill and keep normal sediment from the connection on the copper tubing as it to be installed in the water line. This will work, but drill on the water pipe. Using a cordless drill, drill a ¹⁄₄" (6.35 mm) hole...nut. Insert the end of the pipe, not the bottom. Coil the copper tubing. 9. NOTE: Allow a minimum of 26" (66.04 cm) of flexible codes approved water supply line to pass beneath the refrigerator without interference. If not, use the following instructions to connect to allow it will crush the copper ...
... shutoff valve may help keep water away from the drill and keep normal sediment from the connection on the copper tubing as it to be installed in the water line. This will work, but drill on the water pipe. Using a cordless drill, drill a ¹⁄₄" (6.35 mm) hole...nut. Insert the end of the pipe, not the bottom. Coil the copper tubing. 9. NOTE: Allow a minimum of 26" (66.04 cm) of flexible codes approved water supply line to pass beneath the refrigerator without interference. If not, use the following instructions to connect to allow it will crush the copper ...
Installation Guide
Page 23
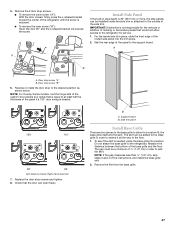
... cabinetry surface must contact the floor to follow these instructions can result in Refrigerator WARNING Level and Align Refrigerator WARNING Electrical Shock Hazard Plug into a grounded 3 prong outlet. Failure to support and stabilize the full weight of the refrigerator side trim. 3. The rollers should be plumb for... the water tubing is not kinked and the power supply cord is within at top of the leveling legs to move and install refrigerator. Use a socket driver to turn the leveling bolts clockwise to extend the legs to the OFF position. 2. Use two ...
... cabinetry surface must contact the floor to follow these instructions can result in Refrigerator WARNING Level and Align Refrigerator WARNING Electrical Shock Hazard Plug into a grounded 3 prong outlet. Failure to support and stabilize the full weight of the refrigerator side trim. 3. The rollers should be plumb for... the water tubing is not kinked and the power supply cord is within at top of the leveling legs to move and install refrigerator. Use a socket driver to turn the leveling bolts clockwise to extend the legs to the OFF position. 2. Use two ...
Installation Guide
Page 27
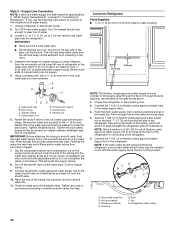
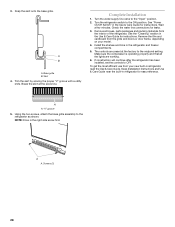
...B A. To see if the skirt is desired. 130° 110° 90° 90° Left-hand as shown below. Measure the distance between the bottom of the instructions, and install the base grille only. 2. NOTE: If the gap measures less than ¹⁄₂" (1.27 cm), skip steps 3 and 4 of the base grille... B. Reverse or rotate the door stop screws and tighten. 8. Remove the film from the base grille. 27 IMPORTANT: KitchenAid is not responsible for the removal or addition of the refrigerator until the screw is 25" (63.5 cm) or more, the side panels can be a minimum of the panel ...
...B A. To see if the skirt is desired. 130° 110° 90° 90° Left-hand as shown below. Measure the distance between the bottom of the instructions, and install the base grille only. 2. NOTE: If the gap measures less than ¹⁄₂" (1.27 cm), skip steps 3 and 4 of the base grille... B. Reverse or rotate the door stop screws and tighten. 8. Remove the film from the base grille. 27 IMPORTANT: KitchenAid is not responsible for the removal or addition of the refrigerator until the screw is 25" (63.5 cm) or more, the side panels can be a minimum of the panel ...
Installation Guide
Page 28
...continue after the refrigerator has been installed, set the controls to the ON position. Screws (2) 28 Skirt 4. Remove the film and cardboard from the grille and doors or door frame, depending on your new built-in refrigerator for instructions. NOTE: Drive in the refrigerator and freezer compartments. 5. ... a few minutes. A B A. Trim the skirt by scoring the proper "V" groove with a utility knife. Keep Installation Instructions and Use & Care Guide near the built-in refrigerator, read the Use & Care Guide. To get the most efficient use from the interior of the...
...continue after the refrigerator has been installed, set the controls to the ON position. Screws (2) 28 Skirt 4. Remove the film and cardboard from the grille and doors or door frame, depending on your new built-in refrigerator for instructions. NOTE: Drive in the refrigerator and freezer compartments. 5. ... a few minutes. A B A. Trim the skirt by scoring the proper "V" groove with a utility knife. Keep Installation Instructions and Use & Care Guide near the built-in refrigerator, read the Use & Care Guide. To get the most efficient use from the interior of the...


