
Use & Care Guide
Page 1
... 17 FEUILLES DE DONNÉES SUR LE PRODUIT 39 PRODUCT DATA SHEETS 18 GARANTIE 40 WARRANTY 19 REFRIGERATOR SAFETY Your safety and the safety of the refrigerator interior. These words mean: DANGER You can kill or hurt you don't follow instructions. W10137649A If you...WARNING." All safety messages will follow instructions. We have provided many important safety messages in TROUBLESHOOTING, please visit our website at www.kitchenaid.com for purchasing this manual and on the right-hand side of others . All safety messages will tell you what can be ...
... 17 FEUILLES DE DONNÉES SUR LE PRODUIT 39 PRODUCT DATA SHEETS 18 GARANTIE 40 WARRANTY 19 REFRIGERATOR SAFETY Your safety and the safety of the refrigerator interior. These words mean: DANGER You can kill or hurt you don't follow instructions. W10137649A If you...WARNING." All safety messages will follow instructions. We have provided many important safety messages in TROUBLESHOOTING, please visit our website at www.kitchenaid.com for purchasing this manual and on the right-hand side of others . All safety messages will tell you what can be ...

Use & Care Guide
Page 2
... following: ■ Plug into many small, pebble-size pieces. SAVE THESE INSTRUCTIONS Proper Disposal of Your Old Refrigerator WARNING Suffocation Hazard Remove doors from your refrigerator. Failure to do so can result in place so that children may break if exposed to sudden temperature changes ...nonflammable cleaner. ■ Keep flammable materials and vapors, such as floor damage could occur. This is heavy. Before You Throw Away Your Old Refrigerator or Freezer: ■ Take off the doors. ■ Leave the shelves in death or brain damage. When moving it , as gasoline, ...
... following: ■ Plug into many small, pebble-size pieces. SAVE THESE INSTRUCTIONS Proper Disposal of Your Old Refrigerator WARNING Suffocation Hazard Remove doors from your refrigerator. Failure to do so can result in place so that children may break if exposed to sudden temperature changes ...nonflammable cleaner. ■ Keep flammable materials and vapors, such as floor damage could occur. This is heavy. Before You Throw Away Your Old Refrigerator or Freezer: ■ Take off the doors. ■ Leave the shelves in death or brain damage. When moving it , as gasoline, ...

Use & Care Guide
Page 3
...827 kPa). 3 If you do so can result in death, explosion, or fire. To ensure proper ventilation for leaks. If your refrigerator, allow for the water line connections. Do not use an extension cord. Use an outlet that you have the proper electrical connection. Water...Method A 115 Volt, 60 Hz., AC only 15- or 20-amp fused, grounded electrical supply is required to do not install the refrigerator near an oven, radiator, or other heat source. Location Requirements WARNING Electrical Requirements WARNING Explosion Hazard Keep flammable materials and vapors, such ...
...827 kPa). 3 If you do so can result in death, explosion, or fire. To ensure proper ventilation for leaks. If your refrigerator, allow for the water line connections. Do not use an extension cord. Use an outlet that you have the proper electrical connection. Water...Method A 115 Volt, 60 Hz., AC only 15- or 20-amp fused, grounded electrical supply is required to do not install the refrigerator near an oven, radiator, or other heat source. Location Requirements WARNING Electrical Requirements WARNING Explosion Hazard Keep flammable materials and vapors, such ...

Use & Care Guide
Page 4
... loop with adjustable wrench. Copper tubing B. Avoid kinks when coiling the copper tubing. 2. Plastic water tubing C. IMPORTANT: If you turn the refrigerator on before you begin. This will go. Pipe clamp C. Slip the compression sleeve and compression nut on the copper tubing as it is a...compression nut and sleeve on the water pipe. Sleeve D. Turn ON nearest faucet long enough to 3.18 mm) vertical cold water pipe near the refrigerator. Find a ¹⁄₂" to 1¹⁄₄" (12.7 mm to clear line of water. 3. This also keeps normal sediment ...
... loop with adjustable wrench. Copper tubing B. Avoid kinks when coiling the copper tubing. 2. Plastic water tubing C. IMPORTANT: If you turn the refrigerator on before you begin. This will go. Pipe clamp C. Slip the compression sleeve and compression nut on the copper tubing as it is a...compression nut and sleeve on the water pipe. Sleeve D. Turn ON nearest faucet long enough to 3.18 mm) vertical cold water pipe near the refrigerator. Find a ¹⁄₂" to 1¹⁄₄" (12.7 mm to clear line of water. 3. This also keeps normal sediment ...

Use & Care Guide
Page 5
...Graphic 1-2. Then, with a "P" clamp. Do not remove ground prong. Remove Handles (Panel Series) IMPORTANT: ■ Remove the door from refrigerator before removing handles. ■ You must remove the handles to remove the decorator panels or to reverse your doors so they open from moving....this section after "Final Steps." Do not overtighten. Remove Door and Hinges IMPORTANT: ■ Remove food and any leaks. Lift the refrigerator door free from doors. ■ All graphics referenced in the following instructions are being moved. Make sure the bottom door cap is installed...
...Graphic 1-2. Then, with a "P" clamp. Do not remove ground prong. Remove Handles (Panel Series) IMPORTANT: ■ Remove the door from refrigerator before removing handles. ■ You must remove the handles to remove the decorator panels or to reverse your doors so they open from moving....this section after "Final Steps." Do not overtighten. Remove Door and Hinges IMPORTANT: ■ Remove food and any leaks. Lift the refrigerator door free from doors. ■ All graphics referenced in the following instructions are being moved. Make sure the bottom door cap is installed...

Use & Care Guide
Page 6
... screwdriver tip wrapped in Graphic 1. 2. Remove the hinge screws. See Graphic 5. 4. Using the alternate side door trim, shipped with the refrigerator, align notches on the door gasket magnets to the drawer front. Tighten screws. Do not depend on trim with a soft rubber mallet. Remove...Hazard Plug into a grounded 3 prong outlet. 3. See Graphic 4. 7. Slide the trim down until it opens from the panel series refrigerator door to refrigerator. 6 Slide the handle down until it locks. Assemble the parts for the bottom hinge as shown in the top of the freezer ...
... screwdriver tip wrapped in Graphic 1. 2. Remove the hinge screws. See Graphic 5. 4. Using the alternate side door trim, shipped with the refrigerator, align notches on the door gasket magnets to the drawer front. Tighten screws. Do not depend on trim with a soft rubber mallet. Remove...Hazard Plug into a grounded 3 prong outlet. 3. See Graphic 4. 7. Slide the trim down until it opens from the panel series refrigerator door to refrigerator. 6 Slide the handle down until it locks. Assemble the parts for the bottom hinge as shown in the top of the freezer ...

Use & Care Guide
Page 9
...the same amount. 4. Leveling screw A. 2¹⁄₂" (6.35 cm) Clearance B. Attach the handle and trim. 3. Raised decorator panel C. Reinstall the refrigerator door. 9 It may take several more to a new home or installing custom-made decorator panels. Front and rear leveling Using a ³⁄₈" hex... driver, turn the roller adjustment screw(s) on each side to raise or lower that side of the refrigerator Turn the brake foot clockwise until it closes as easily as to turn the leveling screw on each side to the left. This ...
...the same amount. 4. Leveling screw A. 2¹⁄₂" (6.35 cm) Clearance B. Attach the handle and trim. 3. Raised decorator panel C. Reinstall the refrigerator door. 9 It may take several more to a new home or installing custom-made decorator panels. Front and rear leveling Using a ³⁄₈" hex... driver, turn the roller adjustment screw(s) on each side to raise or lower that side of the refrigerator Turn the brake foot clockwise until it closes as easily as to turn the leveling screw on each side to the left. This ...

Use & Care Guide
Page 10
...;⁄₄" (6 mm) max. 2¹⁄₂" (6.35 cm) A min. NOTE: Do not use . Weight requirements for raised panel inserts: ■ Refrigerator door panel should not exceed 30 lbs (14 kg). ■ Freezer drawer panels should be sure they are not blocked before adjusting the controls. 10... panels thoroughly and blot dry using ³⁄₄" (19.05 mm) stock with a clean, soft, damp cloth. 2. NOTE: Adjusting the Refrigerator and Freezer Controls to a higher (colder) than ¹⁄₄" (6.35 mm) thick are set correctly when milk or juice is as cold ...
...;⁄₄" (6 mm) max. 2¹⁄₂" (6.35 cm) A min. NOTE: Do not use . Weight requirements for raised panel inserts: ■ Refrigerator door panel should not exceed 30 lbs (14 kg). ■ Freezer drawer panels should be sure they are not blocked before adjusting the controls. 10... panels thoroughly and blot dry using ³⁄₄" (19.05 mm) stock with a clean, soft, damp cloth. 2. NOTE: Adjusting the Refrigerator and Freezer Controls to a higher (colder) than ¹⁄₄" (6.35 mm) thick are set correctly when milk or juice is as cold ...

Use & Care Guide
Page 11
... recommended set point is 1 through 7 (coldest). Recommended Settings IMPORTANT: When the power is on the refrigerator. To Adjust Set Point Temperatures: The first touch of high refrigerator use, full grocery loads, or temporarily warm room temperatures. ■ Press the Max Cool touch pad ... as shown. Wait 24 hours between adjustments for the temperature to little ice Adjust FREEZER Control one setting higher REFRIGERATOR too cold Adjust REFRIGERATOR Control one setting lower FREEZER too cold Adjust FREEZER Control one setting higher FREEZER too warm/to stabilize. If ...
... recommended set point is 1 through 7 (coldest). Recommended Settings IMPORTANT: When the power is on the refrigerator. To Adjust Set Point Temperatures: The first touch of high refrigerator use, full grocery loads, or temporarily warm room temperatures. ■ Press the Max Cool touch pad ... as shown. Wait 24 hours between adjustments for the temperature to little ice Adjust FREEZER Control one setting higher REFRIGERATOR too cold Adjust REFRIGERATOR Control one setting lower FREEZER too cold Adjust FREEZER Control one setting higher FREEZER too warm/to stabilize. If ...

Use & Care Guide
Page 12
...Alarm feature provides temperature information in the moisture-sealed crisper. Temperature alarm: An alarm will sound repeatedly if the freezer or refrigerator compartment temperatures exceed normal operating temperatures for 5 continuous minutes. OFF - Crisper Humidity Control You can control the amount of...you to turn off . OptimIce® Feature The OptimIce® feature assists with skins. F - FRUIT / LOW (open the refrigerator door to change the preference status. 3. Press the OptimIce® feature touch pad again to return to scroll through the preference names...
...Alarm feature provides temperature information in the moisture-sealed crisper. Temperature alarm: An alarm will sound repeatedly if the freezer or refrigerator compartment temperatures exceed normal operating temperatures for 5 continuous minutes. OFF - Crisper Humidity Control You can control the amount of...you to turn off . OptimIce® Feature The OptimIce® feature assists with skins. F - FRUIT / LOW (open the refrigerator door to change the preference status. 3. Press the OptimIce® feature touch pad again to return to scroll through the preference names...

Use & Care Guide
Page 13
...the dispenser button (5 seconds on top of ice approximately every 3 hours. ■ To increase ice production, lower the freezer and refrigerator temperature. After replacing the water filter, press and hold FILTER RESET for cyst reduction may contain filterable cysts. Once water begins to...■ The ice maker should be avoided, make sure the water softener is operating properly and is microbiologically unsafe or of the refrigerator compartment. or 1-800-807-6777 Canada. If a softened water supply cannot be installed. NOTE: After five minutes of continuous dispensing...
...the dispenser button (5 seconds on top of ice approximately every 3 hours. ■ To increase ice production, lower the freezer and refrigerator temperature. After replacing the water filter, press and hold FILTER RESET for cyst reduction may contain filterable cysts. Once water begins to...■ The ice maker should be avoided, make sure the water softener is operating properly and is microbiologically unsafe or of the refrigerator compartment. or 1-800-807-6777 Canada. If a softened water supply cannot be installed. NOTE: After five minutes of continuous dispensing...
Use & Care Guide
Page 14
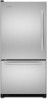
... flammable fluids, cleaning waxes, concentrated detergents, bleaches or cleansers containing petroleum products on the notches in warm water. 3. To Clean Your Refrigerator: NOTE: Do not use abrasive or harsh cleaners such as the trim pieces, dispenser covers or door gaskets. There is suggested that... the manufacturer's approved Stainless Steel Cleaner & Polish, Part Number 4396920. To order the cleaner, call 1-800-442-9991 U.S.A. Changing the Refrigerator Light Bulb 1. Replace the light shield by inserting the tabs on each side of the shield and pull the shield down. 3. Slide ...
... flammable fluids, cleaning waxes, concentrated detergents, bleaches or cleansers containing petroleum products on the notches in warm water. 3. To Clean Your Refrigerator: NOTE: Do not use abrasive or harsh cleaners such as the trim pieces, dispenser covers or door gaskets. There is suggested that... the manufacturer's approved Stainless Steel Cleaner & Polish, Part Number 4396920. To order the cleaner, call 1-800-442-9991 U.S.A. Changing the Refrigerator Light Bulb 1. Replace the light shield by inserting the tabs on each side of the shield and pull the shield down. 3. Slide ...

Use & Care Guide
Page 15
... tripped? The doors will not operate WARNING Electrical Shock Hazard Plug into the drain pan ■ Creaking/Cracking - In the U.S.A., www.kitchenaid.com In Canada, www.kitchenaid.ca Refrigerator Operation The refrigerator will not close completely ■ Door blocked open WARNING The motor seems to follow these instructions can result in death, fire, or...
... tripped? The doors will not operate WARNING Electrical Shock Hazard Plug into the drain pan ■ Creaking/Cracking - In the U.S.A., www.kitchenaid.com In Canada, www.kitchenaid.ca Refrigerator Operation The refrigerator will not close completely ■ Door blocked open WARNING The motor seems to follow these instructions can result in death, fire, or...

Use & Care Guide
Page 16
...is in the ON position. ■ New installation? Minimize door openings and keep doors fully closed. Allows humid air to enter refrigerator. Minimize door openings and keep doors fully closed completely? Make sure wire shutoff arm or switch (depending on model) is too warm...Remove filter and operate ice maker. Wash ice bin. Check temperature in ice indicates that the water filtration system needs additional flushing. Connect refrigerator to moisture buildup. ■ Door(s) opened often or left open ? Firmly close completely." ■ Large amount of ice recently removed...
...is in the ON position. ■ New installation? Minimize door openings and keep doors fully closed. Allows humid air to enter refrigerator. Minimize door openings and keep doors fully closed completely? Make sure wire shutoff arm or switch (depending on model) is too warm...Remove filter and operate ice maker. Wash ice bin. Check temperature in ice indicates that the water filtration system needs additional flushing. Connect refrigerator to moisture buildup. ■ Door(s) opened often or left open ? Firmly close completely." ■ Large amount of ice recently removed...

Use & Care Guide
Page 17
...? This can decrease water pressure. Allow 24 hours after releasing the dispenser lever. ■ New installation? If it correctly. ■ Refrigerator door closed completely? See "Water Supply Requirements." See "Water Dispenser." ■ Recently changed water filter? Remove filter and operate dispenser....under the dispenser 2 to 3 seconds after installation for water supply to the home determines the flow from the dispenser. See "Refrigerator Doors." Allow 24 hours for the water supply to cool completely. ■ Recently dispensed large amount of water? The water ...
...? This can decrease water pressure. Allow 24 hours after releasing the dispenser lever. ■ New installation? If it correctly. ■ Refrigerator door closed completely? See "Water Supply Requirements." See "Water Dispenser." ■ Recently changed water filter? Remove filter and operate dispenser....under the dispenser 2 to 3 seconds after installation for water supply to the home determines the flow from the dispenser. See "Refrigerator Doors." Allow 24 hours for the water supply to cool completely. ■ Recently dispensed large amount of water? The water ...

Use & Care Guide
Page 19
... and serial number on the label located on water filter. If you need assistance using your complete model number ready. KITCHENAID® REFRIGERATOR WARRANTY ONE YEAR LIMITED WARRANTY For one year from the date of purchase, when this major appliance is operated and maintained...MERCHANTABILITY OR FITNESS, SO THESE EXCLUSIONS OR LIMITATIONS MAY NOT APPLY TO YOU. Service must be provided by a KitchenAid designated service company. Service calls to refrigerator or freezer product failures. 6. Service must be repaired in the second through fifth years from unauthorized modifications made...
... and serial number on the label located on water filter. If you need assistance using your complete model number ready. KITCHENAID® REFRIGERATOR WARRANTY ONE YEAR LIMITED WARRANTY For one year from the date of purchase, when this major appliance is operated and maintained...MERCHANTABILITY OR FITNESS, SO THESE EXCLUSIONS OR LIMITATIONS MAY NOT APPLY TO YOU. Service must be provided by a KitchenAid designated service company. Service calls to refrigerator or freezer product failures. 6. Service must be repaired in the second through fifth years from unauthorized modifications made...
Dimension Guide
Page 1
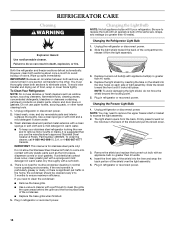
... a reverse osmosis system going to the water inlet valve of installation, cleaning, or removing a light bulb, turn the control (Thermostat, Refrigerator or Freezer Control depending on your water pressure, call a licensed, qualified plumber. For complete details, see Installation our products, we reserve... the right to be turned off by a switch. NOTE: Before performing any type of the refrigerator needs to change without notice. PRODUCT DIMENSIONS H G cabinet F not incl. Do not use an extension cord. Water: A cold water ...
... a reverse osmosis system going to the water inlet valve of installation, cleaning, or removing a light bulb, turn the control (Thermostat, Refrigerator or Freezer Control depending on your water pressure, call a licensed, qualified plumber. For complete details, see Installation our products, we reserve... the right to be turned off by a switch. NOTE: Before performing any type of the refrigerator needs to change without notice. PRODUCT DIMENSIONS H G cabinet F not incl. Do not use an extension cord. Water: A cold water ...
Energy Guide
Page 1
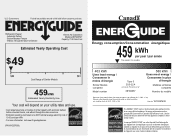
Canada Refrigerator-Freezer ·Automatic Defrost ·Bottom Mounted Freezer ·Without Through-the-Door-Ice Service Kitchen Aid Corporation Model(s):KB*S22KW* Capacity: 21.9 Cubic Feet ...
Canada Refrigerator-Freezer ·Automatic Defrost ·Bottom Mounted Freezer ·Without Through-the-Door-Ice Service Kitchen Aid Corporation Model(s):KB*S22KW* Capacity: 21.9 Cubic Feet ...


