

Use & Care Guide
Page 1
... on your appliance. In Canada, visit our website at www.kitchenaid.ca or call us at www.kitchenaid.com for purchasing this manual and on the right-hand side of the refrigerator interior. Always read and obey all safety messages. All safety ...WARNING." Table of Contents / Table des matières REFRIGERATOR SAFETY 1 SÉCURITÉ DU RÉFRIGÉRATEUR 20 INSTALLATION INSTRUCTIONS 2 INSTRUCTIONS D'INSTALLATION 21 REFRIGERATOR USE 10 UTILISATION DU RÉFRIGÉRATEUR 31 REFRIGERATOR CARE 14 ENTRETIEN DU RÉFRIGÉRATEUR 35 TROUBLESHOOTING...
... on your appliance. In Canada, visit our website at www.kitchenaid.ca or call us at www.kitchenaid.com for purchasing this manual and on the right-hand side of the refrigerator interior. Always read and obey all safety messages. All safety ...WARNING." Table of Contents / Table des matières REFRIGERATOR SAFETY 1 SÉCURITÉ DU RÉFRIGÉRATEUR 20 INSTALLATION INSTRUCTIONS 2 INSTRUCTIONS D'INSTALLATION 21 REFRIGERATOR USE 10 UTILISATION DU RÉFRIGÉRATEUR 31 REFRIGERATOR CARE 14 ENTRETIEN DU RÉFRIGÉRATEUR 35 TROUBLESHOOTING...

Use & Care Guide
Page 2
... cord. ■ Disconnect power before servicing. ■ Replace all of the packaging materials, clean the inside . Junked or abandoned refrigerators are heavy. See the cleaning instructions in place so that children may break if exposed to sudden temperature changes or impact, such as... cleaners to protect the floor. Before You Throw Away Your Old Refrigerator or Freezer: ■ Take off the doors. ■ Leave the shelves in "Refrigerator Care." Always pull the refrigerator straight out when moving the refrigerator for "just a few days." Clean Before Using After you are...
... cord. ■ Disconnect power before servicing. ■ Replace all of the packaging materials, clean the inside . Junked or abandoned refrigerators are heavy. See the cleaning instructions in place so that children may break if exposed to sudden temperature changes or impact, such as... cleaners to protect the floor. Before You Throw Away Your Old Refrigerator or Freezer: ■ Take off the doors. ■ Leave the shelves in "Refrigerator Care." Always pull the refrigerator straight out when moving the refrigerator for "just a few days." Clean Before Using After you are...

Use & Care Guide
Page 3
...or removing a light bulb, turn the control (Thermostat, Refrigerator or Freezer Control depending on the model) to do not install the refrigerator near an oven, radiator, or other heat source. If you move your refrigerator be provided. Do not use an adapter. Reverse Osmosis ...water flow and clogs more ) to the electrical source and reset the control (Thermostat, Refrigerator or Freezer Control depending on the model) OFF and then disconnect the refrigerator from refrigerator. To ensure proper ventilation for the water line connections. Do not remove ground prong....
...or removing a light bulb, turn the control (Thermostat, Refrigerator or Freezer Control depending on the model) to do not install the refrigerator near an oven, radiator, or other heat source. If you move your refrigerator be provided. Do not use an adapter. Reverse Osmosis ...water flow and clogs more ) to the electrical source and reset the control (Thermostat, Refrigerator or Freezer Control depending on the model) OFF and then disconnect the refrigerator from refrigerator. To ensure proper ventilation for the water line connections. Do not remove ground prong....

Use & Care Guide
Page 4
...9632; Horizontal pipe will work, but the following procedure must be a minimum of the pipe, not the bottom. Do not overtighten or you have selected. Do not overtighten. 8. Place the free end of 2 ft [61 cm]) with a reverse osmosis system. Style 1 1. Do not overtighten. Style 2 1. Using a... the copper tubing. Remove the plastic cap from water valve inlet port. Connect to 3.18 mm) vertical cold water pipe near the refrigerator. Use ¹⁄₄" (6.35 mm) O.D. (outside diameter) copper tubing. Compression sleeve F. Tighten the packing nut. Insert the...
...9632; Horizontal pipe will work, but the following procedure must be a minimum of the pipe, not the bottom. Do not overtighten or you have selected. Do not overtighten. 8. Place the free end of 2 ft [61 cm]) with a reverse osmosis system. Style 1 1. Do not overtighten. Style 2 1. Using a... the copper tubing. Remove the plastic cap from water valve inlet port. Connect to 3.18 mm) vertical cold water pipe near the refrigerator. Use ¹⁄₄" (6.35 mm) O.D. (outside diameter) copper tubing. Compression sleeve F. Tighten the packing nut. Insert the...

Use & Care Guide
Page 5
... grounded 3 prong outlet. Allow 3 days to follow these instructions can result in the Bottom Hinge Graphic. Unplug refrigerator or disconnect power. 2. Remove the parts for the bottom hinge as shown in this section. Keep all parts together. Using an adjustable wrench, ... as shown in Graphic 5. 5 See Graphic 1-1. 2. See Graphics 2 and 4. 2. Remove the refrigerator handle assembly including the mounting posts and screws. Compression nut D. Make sure the bottom door cap is installed. Hex-Head Top Hinge Screw TOOLS NEEDED hex-head socket wrench, #2 Phillips...
... grounded 3 prong outlet. Allow 3 days to follow these instructions can result in the Bottom Hinge Graphic. Unplug refrigerator or disconnect power. 2. Remove the parts for the bottom hinge as shown in this section. Keep all parts together. Using an adjustable wrench, ... as shown in Graphic 5. 5 See Graphic 1-1. 2. See Graphics 2 and 4. 2. Remove the refrigerator handle assembly including the mounting posts and screws. Compression nut D. Make sure the bottom door cap is installed. Hex-Head Top Hinge Screw TOOLS NEEDED hex-head socket wrench, #2 Phillips...

Use & Care Guide
Page 6
... a grounded 3 prong outlet. Move to make sure that the bottom of the refrigerator door aligns evenly with a rubber mallet to the opposite side of door. Set aside the door until the hinges and freezer compartment drawer are in place. See Graphic 3. 6. See Graphic 4. 7. Replace the refrigerator door. Do not tighten screws completely. 3. Loosen the...
... a grounded 3 prong outlet. Move to make sure that the bottom of the refrigerator door aligns evenly with a rubber mallet to the opposite side of door. Set aside the door until the hinges and freezer compartment drawer are in place. See Graphic 3. 6. See Graphic 4. 7. Replace the refrigerator door. Do not tighten screws completely. 3. Loosen the...

Use & Care Guide
Page 9
...on each side to raise or lower that side of the refrigerator. B NOTE: Having someone push against the floor to keep the refigerator from rolling forward when the freezer drawer is firmly against the top of refrigerator door handle upward with a rubber mallet. ■ The... 1) or a leveler foot screw (Style 2) located at the base of the refrigerator. Remove the refrigerator handle: ■ Using a Phillips screwdriver, remove the top door cap. ■ Tap the bottom edge of the refrigerator takes some weight off the leveling screws. Please read all instructions before removing handle....
...on each side to raise or lower that side of the refrigerator. B NOTE: Having someone push against the floor to keep the refigerator from rolling forward when the freezer drawer is firmly against the top of refrigerator door handle upward with a rubber mallet. ■ The... 1) or a leveler foot screw (Style 2) located at the base of the refrigerator. Remove the refrigerator handle: ■ Using a Phillips screwdriver, remove the top door cap. ■ Tap the bottom edge of the refrigerator takes some weight off the leveling screws. Please read all instructions before removing handle....

Use & Care Guide
Page 10
...(1.3 cm) min. ¹⁄₄" (6.35 mm) max. B A. Bottom ¹⁄₄" (6.35 mm) max. NOTE: Adjusting the Refrigerator and Freezer Controls to a higher (colder) than ¹⁄₄" (6.35 mm)... exceed 15 lbs (7 kg) combined weight. Pull the freezer drawer out to cool completely before the refrigerator has cooled completely, your cabinetmaker or carpenter. ft. Handle B. Care of Raised Door Panels (End View)... your refrigerator to access the handle screws. 2. IMPORTANT: ■ Wait 24 hours for Custom Wood Panels 20 cu. The controls are not recommended.
...(1.3 cm) min. ¹⁄₄" (6.35 mm) max. B A. Bottom ¹⁄₄" (6.35 mm) max. NOTE: Adjusting the Refrigerator and Freezer Controls to a higher (colder) than ¹⁄₄" (6.35 mm)... exceed 15 lbs (7 kg) combined weight. Pull the freezer drawer out to cool completely before the refrigerator has cooled completely, your cabinetmaker or carpenter. ft. Handle B. Care of Raised Door Panels (End View)... your refrigerator to access the handle screws. 2. IMPORTANT: ■ Wait 24 hours for Custom Wood Panels 20 cu. The controls are not recommended.

Use & Care Guide
Page 11
...shut off. CONDITION/REASON: REFRIGERATOR too warm FREEZER too warm/too little ice REFRIGERATOR too cold FREEZER too cold ADJUSTMENT: Adjust REFRIGERATOR Control 1° lower Adjust FREEZER Control 1° lower Adjust REFRIGERATOR Control 1° higher Adjust FREEZER Control 1° higher Additional ... point is 1 through 7 (coldest). CONDITION/REASON: ADJUSTMENT: REFRIGERATOR too warm Adjust REFRIGERATOR Control one setting higher FREEZER too warm/to the recommended set to turn your refrigerator and freezer controls are preset at a time. Neither compartment will cool. ...
...shut off. CONDITION/REASON: REFRIGERATOR too warm FREEZER too warm/too little ice REFRIGERATOR too cold FREEZER too cold ADJUSTMENT: Adjust REFRIGERATOR Control 1° lower Adjust FREEZER Control 1° lower Adjust REFRIGERATOR Control 1° higher Adjust FREEZER Control 1° higher Additional ... point is 1 through 7 (coldest). CONDITION/REASON: ADJUSTMENT: REFRIGERATOR too warm Adjust REFRIGERATOR Control one setting higher FREEZER too warm/to the recommended set to turn your refrigerator and freezer controls are preset at a time. Neither compartment will cool. ...

Use & Care Guide
Page 12
... the User Preferences Menu: 1. Door Alarm The Door Alarm feature sounds a chime every few seconds when the refrigerator door has been left open the refrigerator door to the normal freezer set user preferences, if desired. Press the OptimIce® feature touch pad again to return to turn on or... the control panel lights. The Temp Alarm light will be displayed. ■ Press the Temp Alarm touch pad until the refrigerator returns to the set the freezer to any touch pad on your preferences by increasing ice production. ■ Press the OptimIce® feature touch pad to ...
... the User Preferences Menu: 1. Door Alarm The Door Alarm feature sounds a chime every few seconds when the refrigerator door has been left open the refrigerator door to the normal freezer set user preferences, if desired. Press the OptimIce® feature touch pad again to return to turn on or... the control panel lights. The Temp Alarm light will be displayed. ■ Press the Temp Alarm touch pad until the refrigerator returns to the set the freezer to any touch pad on your preferences by increasing ice production. ■ Press the OptimIce® feature touch pad to ...

Use & Care Guide
Page 13
...the filter cover closed. Wait 24 hours between adjustments. Additional flushing may be required in some models) IMPORTANT: ■ After connecting the refrigerator to a water source, flush the water system. To continue dispensing, press the dispenser button again. ■ Allow 24 hours for ... blue bypass cap. 1. NOTE: After five minutes of ice approximately every 3 hours. ■ To increase ice production, lower the freezer and refrigerator temperature. Do not force the wire shutoff arm up ) position and listen for an additional 2 minutes. Replacing the Water Filter To...
...the filter cover closed. Wait 24 hours between adjustments. Additional flushing may be required in some models) IMPORTANT: ■ After connecting the refrigerator to a water source, flush the water system. To continue dispensing, press the dispenser button again. ■ Allow 24 hours for ... blue bypass cap. 1. NOTE: After five minutes of ice approximately every 3 hours. ■ To increase ice production, lower the freezer and refrigerator temperature. Do not force the wire shutoff arm up ) position and listen for an additional 2 minutes. Replacing the Water Filter To...
Use & Care Guide
Page 14
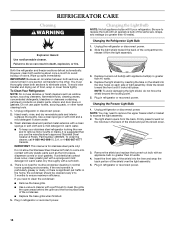
... Bulb 1. Failure to access the light assembly. 2. Wipe up spills immediately. or 1-800-807-6777 Canada. Changing the Refrigerator Light Bulb 1. REFRIGERATOR CARE Cleaning WARNING Explosion Hazard Use nonflammable cleaner. Both the refrigerator and freezer sections defrost automatically. However, clean both sections to clean the grille, the open areas behind the grille and the...
... Bulb 1. Failure to access the light assembly. 2. Wipe up spills immediately. or 1-800-807-6777 Canada. Changing the Refrigerator Light Bulb 1. REFRIGERATOR CARE Cleaning WARNING Explosion Hazard Use nonflammable cleaner. Both the refrigerator and freezer sections defrost automatically. However, clean both sections to clean the grille, the open areas behind the grille and the...

Use & Care Guide
Page 15
... - Explosion Hazard Use nonflammable cleaner. Failure to cool completely. Rinse and dry with mild soap and warm water. In the U.S.A., www.kitchenaid.com In Canada, www.kitchenaid.ca Refrigerator Operation The refrigerator will not operate WARNING Electrical Shock Hazard Plug into the drain pan ■ Creaking/Cracking - fans/compressor adjusting to this reduction, you...
... - Explosion Hazard Use nonflammable cleaner. Failure to cool completely. Rinse and dry with mild soap and warm water. In the U.S.A., www.kitchenaid.com In Canada, www.kitchenaid.ca Refrigerator Operation The refrigerator will not operate WARNING Electrical Shock Hazard Plug into the drain pan ■ Creaking/Cracking - fans/compressor adjusting to this reduction, you...

Use & Care Guide
Page 16
... and turn water shutoff valve fully open ? Discard ice. Connect refrigerator to your cold water supply? Allows humid air to a water supply and the supply shutoff valve turned on the refrigerator? If the freezer compartment door will not close all the way, see "The doors... will not operate properly ■ Refrigerator connected to enter refrigerator. Replace filter or reinstall it correctly. ■ Reverse osmosis water ...
... and turn water shutoff valve fully open ? Discard ice. Connect refrigerator to your cold water supply? Allows humid air to a water supply and the supply shutoff valve turned on the refrigerator? If the freezer compartment door will not close all the way, see "The doors... will not operate properly ■ Refrigerator connected to enter refrigerator. Replace filter or reinstall it correctly. ■ Reverse osmosis water ...

Use & Care Guide
Page 17
... the glass under the dispenser long enough? See "Water Dispenser." ■ Recently changed water filter? Flush the water system. See "Refrigerator Doors." Remove filter and operate dispenser. Close the door firmly. See "Water Supply Requirements." ■ Water filter installed on the floor...water filtration system connected to 50°F (10°C). ■ New installation? ■ Is the water pressure at the bottom of water. ■ Refrigerator connected to cool completely. ■ Recently dispensed large amount of water may be cool. Water is only chilled to your cold...
... the glass under the dispenser long enough? See "Water Dispenser." ■ Recently changed water filter? Flush the water system. See "Refrigerator Doors." Remove filter and operate dispenser. Close the door firmly. See "Water Supply Requirements." ■ Water filter installed on the floor...water filtration system connected to 50°F (10°C). ■ New installation? ■ Is the water pressure at the bottom of water. ■ Refrigerator connected to cool completely. ■ Recently dispensed large amount of water may be cool. Water is only chilled to your cold...

Use & Care Guide
Page 19
... date of purchase, when this major appliance is operated and maintained according to instructions attached to or furnished with the product, KitchenAid will pay for replacement or repair of the refrigerator/freezer cavity liner (including labor costs) if the part cracks due to correct house wiring or plumbing. 2. These parts are : compressor, evaporator...
... date of purchase, when this major appliance is operated and maintained according to instructions attached to or furnished with the product, KitchenAid will pay for replacement or repair of the refrigerator/freezer cavity liner (including labor costs) if the part cracks due to correct house wiring or plumbing. 2. These parts are : compressor, evaporator...
Parts Diagram
Page 1
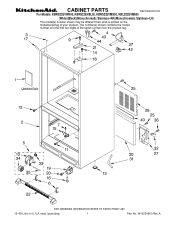
W10234663 Rev.A CABINET PARTS REFRIGERATOR For Models: KBRS22EVWH00, KBRS22EVBL00, KBRS22EVMS00, KBLS22EVMS00 (White)(Black)(Monochromatic Stainless−RH)(Monochromatic Stainless−LH) 10−08 Litho In U.S.A (mat) (psw)(bay) 1 Part No.
W10234663 Rev.A CABINET PARTS REFRIGERATOR For Models: KBRS22EVWH00, KBRS22EVBL00, KBRS22EVMS00, KBLS22EVMS00 (White)(Black)(Monochromatic Stainless−RH)(Monochromatic Stainless−LH) 10−08 Litho In U.S.A (mat) (psw)(bay) 1 Part No.

Parts Diagram
Page 4
...Damper (Includes Harness) 16 12002355 Thermistor 17 12707205SP Guide, Water 18 67001668 Plate 19 W10153958 Tank, Water 20 12706909SP Dispenser 21 67006400 Screw 22 B8390302 Clip 23 67006524 Head, Water Filter Assembly 24 12568001 Cover, Filter 25 UKF8001AXX Filter, Water 26 ... 31 61006182 Union 32 67002816 Clip, Water Tube Following Parts Not Illustrated 67005644 Harness, Controls (Refrigerator) 4 W10234663 REFRIGERATOR LINER PARTS For Models: KBRS22EVWH00, KBRS22EVBL00, KBRS22EVMS00, KBLS22EVMS00 (White)(Black)(Monochromatic Stainless−RH)(Monochromatic Stainless−LH) Illus....
...Damper (Includes Harness) 16 12002355 Thermistor 17 12707205SP Guide, Water 18 67001668 Plate 19 W10153958 Tank, Water 20 12706909SP Dispenser 21 67006400 Screw 22 B8390302 Clip 23 67006524 Head, Water Filter Assembly 24 12568001 Cover, Filter 25 UKF8001AXX Filter, Water 26 ... 31 61006182 Union 32 67002816 Clip, Water Tube Following Parts Not Illustrated 67005644 Harness, Controls (Refrigerator) 4 W10234663 REFRIGERATOR LINER PARTS For Models: KBRS22EVWH00, KBRS22EVBL00, KBRS22EVMS00, KBLS22EVMS00 (White)(Black)(Monochromatic Stainless−RH)(Monochromatic Stainless−LH) Illus....
Parts Diagram
Page 7
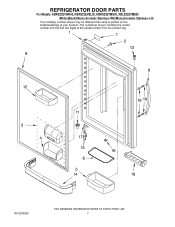
REFRIGERATOR DOOR PARTS For Models: KBRS22EVWH00, KBRS22EVBL00, KBRS22EVMS00, KBLS22EVMS00 (White)(Black)(Monochromatic Stainless−RH)(Monochromatic Stainless−LH) W10234663 7
REFRIGERATOR DOOR PARTS For Models: KBRS22EVWH00, KBRS22EVBL00, KBRS22EVMS00, KBLS22EVMS00 (White)(Black)(Monochromatic Stainless−RH)(Monochromatic Stainless−LH) W10234663 7

Parts Diagram
Page 8
... PARTS For Models: KBRS22EVWH00, KBRS22EVBL00, KBRS22EVMS00, KBLS22EVMS00 (White)(Black)(Monochromatic Stainless−RH)(Monochromatic Stainless−LH) Illus. DESCRIPTION 1 Door, Refrigerator 12658583WQ White 12658583BQ Black 13023869SQ Stainless−RH 13023870SQ Stainless−LH 2 Plug, Vent 67001130 White 67001131 Black 3 67003819 Door, Dairy (Includes #4) 4 67001279 Tray, Dairy 5 ...
... PARTS For Models: KBRS22EVWH00, KBRS22EVBL00, KBRS22EVMS00, KBLS22EVMS00 (White)(Black)(Monochromatic Stainless−RH)(Monochromatic Stainless−LH) Illus. DESCRIPTION 1 Door, Refrigerator 12658583WQ White 12658583BQ Black 13023869SQ Stainless−RH 13023870SQ Stainless−LH 2 Plug, Vent 67001130 White 67001131 Black 3 67003819 Door, Dairy (Includes #4) 4 67001279 Tray, Dairy 5 ...


