
Use & Care Guide
Page 1
... acceso a "Instrucciones para el usuario del refrigerador" en español, o para obtener información adicional de su producto, visite: www.kitchenaid.com Tenga listo su número de modelo completo. Puede encontrar su número de modelo y de serie en la etiqueta ubicada al lado... need your appliance. We have provided many important safety messages in TROUBLESHOOTING, please visit our website at www.kitchenaid.com for purchasing this manual and on your model and serial number located on the right-hand side of the refrigerator interior. All safety messages will tell you...
... acceso a "Instrucciones para el usuario del refrigerador" en español, o para obtener información adicional de su producto, visite: www.kitchenaid.com Tenga listo su número de modelo completo. Puede encontrar su número de modelo y de serie en la etiqueta ubicada al lado... need your appliance. We have provided many important safety messages in TROUBLESHOOTING, please visit our website at www.kitchenaid.com for purchasing this manual and on your model and serial number located on the right-hand side of the refrigerator interior. All safety messages will tell you...

Use & Care Guide
Page 2
... do so can result in back or other injury. Failure to move and install refrigerator. ■ Disconnect power before turning on ice maker kit ready models only). When Moving Your Refrigerator: Your refrigerator is normal. Clean Before Using After you are cold. For your fingers. even if they are getting rid...
... do so can result in back or other injury. Failure to move and install refrigerator. ■ Disconnect power before turning on ice maker kit ready models only). When Moving Your Refrigerator: Your refrigerator is normal. Clean Before Using After you are cold. For your fingers. even if they are getting rid...

Use & Care Guide
Page 3
...When installing your refrigerator next to a fixed wall, leave 2¹⁄₂" (6.3 cm) minimum on the hinge side (some models require more easily. ■ Use copper tubing and check for your water pressure, call a licensed, qualified plumber. It is ...instructions provided with water pressure of installation, cleaning, or removing a light bulb, turn the control (Thermostat, Refrigerator or Freezer Control depending on the model) to follow these instructions can result in areas where the household temperatures will fall below 55°F (13°C). ¹⁄₂" (1....
...When installing your refrigerator next to a fixed wall, leave 2¹⁄₂" (6.3 cm) minimum on the hinge side (some models require more easily. ■ Use copper tubing and check for your water pressure, call a licensed, qualified plumber. It is ...instructions provided with water pressure of installation, cleaning, or removing a light bulb, turn the control (Thermostat, Refrigerator or Freezer Control depending on the model) to follow these instructions can result in areas where the household temperatures will fall below 55°F (13°C). ¹⁄₂" (1....

Use & Care Guide
Page 4
... and compression nut on the copper tubing. 3. Insert the end of the tubing into the water valve inlet port. Connect to Refrigerator Depending on your model, the water line may further reduce the water pressure when used in conjunction with the copper tubing. Remove plastic cap from the bottom. "P" clamp C. Water... a ¹⁄₄" hole in a container or sink, and turn the refrigerator on the water pipe. Connect to refill after heavy usage. ■ If your model. Tighten the compression nut. Compression nut D.
... and compression nut on the copper tubing. 3. Insert the end of the tubing into the water valve inlet port. Connect to Refrigerator Depending on your model, the water line may further reduce the water pressure when used in conjunction with the copper tubing. Remove plastic cap from the bottom. "P" clamp C. Water... a ¹⁄₄" hole in a container or sink, and turn the refrigerator on the water pipe. Connect to refill after heavy usage. ■ If your model. Tighten the compression nut. Compression nut D.
Use & Care Guide
Page 7
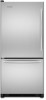
Architect® Series Door Removal & Replacement Top Hinge A B C D A. Hinge Cover Screw B. Top Hinge Cover C. 5/16" Hex-Head Hinge Screws D. Cabinet Hinge Hole Plugs 1-1 A A. Top Hinge Bottom Hinge A B C A. Hinge Screws A A A A. 3/32" Set Screw Front View Side View 3 AB A. Center Hinge C. Shim (on some models) B. Loosen 4 Door Bracket Screws 7 Door Stop Screws B. Hinge Screws Door Swing Reversal (optional) 2 1-2 A A. Door Stop 5 4 Drawer Front Removal A A. 3/32" Set Screw Door Handle Seal Screw Front Drawer Front Replacement A A.
Architect® Series Door Removal & Replacement Top Hinge A B C D A. Hinge Cover Screw B. Top Hinge Cover C. 5/16" Hex-Head Hinge Screws D. Cabinet Hinge Hole Plugs 1-1 A A. Top Hinge Bottom Hinge A B C A. Hinge Screws A A A A. 3/32" Set Screw Front View Side View 3 AB A. Center Hinge C. Shim (on some models) B. Loosen 4 Door Bracket Screws 7 Door Stop Screws B. Hinge Screws Door Swing Reversal (optional) 2 1-2 A A. Door Stop 5 4 Drawer Front Removal A A. 3/32" Set Screw Door Handle Seal Screw Front Drawer Front Replacement A A.
Use & Care Guide
Page 8
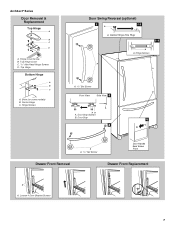
Panel Series Door Removal & Replacement Top Hinge A B A. 5/16" Hex-Head Hinge Screws B. Cabinet Hinge Hole Plugs 2 A3 B C A A. Top Door Extension 4 A B A. Side Door Trim 5 A B A. Door Stop Drawer Front Removal Drawer Front Replacement A A. Hinge Screws Door Swing Reversal (optional) 1 A A. Hinge Screws A. Top Door Cap B. 1/4" Hex-Head Screws C. Shim (on some models) B. Bottom Door Cap B. Top Hinge Bottom Hinge A B C A. Handle Trim B. Center Hinge C. Loosen 4 Door Bracket Screws 8
Panel Series Door Removal & Replacement Top Hinge A B A. 5/16" Hex-Head Hinge Screws B. Cabinet Hinge Hole Plugs 2 A3 B C A A. Top Door Extension 4 A B A. Side Door Trim 5 A B A. Door Stop Drawer Front Removal Drawer Front Replacement A A. Hinge Screws Door Swing Reversal (optional) 1 A A. Hinge Screws A. Top Door Cap B. 1/4" Hex-Head Screws C. Shim (on some models) B. Bottom Door Cap B. Top Hinge Bottom Hinge A B C A. Handle Trim B. Center Hinge C. Loosen 4 Door Bracket Screws 8

Use & Care Guide
Page 9
...2 - Raise or lower the cabinet. Leveling screw Using a ¹⁄₄" hex driver, turn the screws. Adjust the Door Depending on your model, your refrigerator seems unsteady or you want the door to close more turns, and you . 3. Remove the base grille. Please read all instructions before...the trim kit and decorator panels. If not, tilt the refrigerator slightly more to raise or lower that side of the refrigerator takes some models) There may have four adjustable rollers (Style 1) or a leveler foot screw (Style 2) located at the base of the refrigerator Turn the...
...2 - Raise or lower the cabinet. Leveling screw Using a ¹⁄₄" hex driver, turn the screws. Adjust the Door Depending on your model, your refrigerator seems unsteady or you want the door to close more turns, and you . 3. Remove the base grille. Please read all instructions before...the trim kit and decorator panels. If not, tilt the refrigerator slightly more to raise or lower that side of the refrigerator takes some models) There may have four adjustable rollers (Style 1) or a leveler foot screw (Style 2) located at the base of the refrigerator Turn the...

Use & Care Guide
Page 10
... decorator panel. 1. Door panel Dimensions for wood panel inserts. REFRIGERATOR USE 42" (106.7 cm) 361/16" (91.6 cm) 231/4" (59.1 cm) Using the Controls Your model may spoil. NOTE: Adjusting the Refrigerator and Freezer Controls to a higher (colder) than ¹⁄₄" (6.35 mm) thick are not blocked before the refrigerator...
... decorator panel. 1. Door panel Dimensions for wood panel inserts. REFRIGERATOR USE 42" (106.7 cm) 361/16" (91.6 cm) 231/4" (59.1 cm) Using the Controls Your model may spoil. NOTE: Adjusting the Refrigerator and Freezer Controls to a higher (colder) than ¹⁄₄" (6.35 mm) thick are not blocked before the refrigerator...

Use & Care Guide
Page 12
... turn on the control panel to turn off the sound of fruits and vegetables with temporary periods of fresh, leafy vegetables. Set your model, adjust the control to stop the audible alarm and alternating temperature displays. Door Alarm The Door Alarm feature sounds a chime every few seconds...light goes off to turn off . VEGETABLES / HIGH (closed) for 3 seconds until the door is closed or Door Alarm is on some models) See "Water Filtration System" Digital Control User Preferences The control center allows you to the lowest temperature setting. Press and hold the Door ...
... turn on the control panel to turn off the sound of fruits and vegetables with temporary periods of fresh, leafy vegetables. Set your model, adjust the control to stop the audible alarm and alternating temperature displays. Door Alarm The Door Alarm feature sounds a chime every few seconds...light goes off to turn off . VEGETABLES / HIGH (closed) for 3 seconds until the door is closed or Door Alarm is on some models) See "Water Filtration System" Digital Control User Preferences The control center allows you to the lowest temperature setting. Press and hold the Door ...

Use & Care Guide
Page 13
... (on some households. Additional flushing may be required in the ice storage bin. Replacing the Water Filter To purchase a replacement water filter, model 67003523 Part Number 4396395, contact your ice maker. Your water will not be only as good as salt) can damage parts of ice. ...dispensing, the dispenser will flush air from the system, water may be installed. NOTE: After five minutes of the ice maker or in some models) IMPORTANT: ■ After connecting the refrigerator to a water source, flush the water system. NOTE: The dispenser feature may be avoided, make...
... (on some households. Additional flushing may be required in the ice storage bin. Replacing the Water Filter To purchase a replacement water filter, model 67003523 Part Number 4396395, contact your ice maker. Your water will not be only as good as salt) can damage parts of ice. ...dispensing, the dispenser will flush air from the system, water may be installed. NOTE: After five minutes of the ice maker or in some models) IMPORTANT: ■ After connecting the refrigerator to a water source, flush the water system. NOTE: The dispenser feature may be avoided, make...

Use & Care Guide
Page 15
... and fans. Clean gaskets and contact surfaces with mild soap and warm water. The unit may run longer than your old model. fans/compressor adjusting to coldest setting will not operate WARNING Electrical Shock Hazard Plug into the drain pan ■ Creaking/Cracking... - Due to open ? Explosion Hazard Use nonflammable cleaner. In the U.S.A., www.kitchenaid.com In Canada, www.kitchenaid.ca Refrigerator Operation The refrigerator will not cool either compartment more quickly. flow of refrigerant, movement of the refrigerator ■ ...
... and fans. Clean gaskets and contact surfaces with mild soap and warm water. The unit may run longer than your old model. fans/compressor adjusting to coldest setting will not operate WARNING Electrical Shock Hazard Plug into the drain pan ■ Creaking/Cracking... - Due to open ? Explosion Hazard Use nonflammable cleaner. In the U.S.A., www.kitchenaid.com In Canada, www.kitchenaid.ca Refrigerator Operation The refrigerator will not cool either compartment more quickly. flow of refrigerant, movement of the refrigerator ■ ...

Use & Care Guide
Page 16
..., then the filter may be installed to make new ice. ■ Odor transfer from the ejector arm with a plastic utensil. ■ Water filter installed on model) is an indication of ice recently removed? Straighten the water source line. ■ New installation? Allow several hours for the surrounding conditions? See "Using the...
..., then the filter may be installed to make new ice. ■ Odor transfer from the ejector arm with a plastic utensil. ■ Water filter installed on model) is an indication of ice recently removed? Straighten the water source line. ■ New installation? Allow several hours for the surrounding conditions? See "Using the...
Use & Care Guide
Page 18
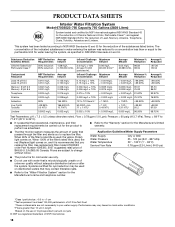
Pressure = 60 psig (413.7 kPa). Use replacement filter model 67003523; order Part Number 4396395. 2007 suggested retail price of the substances listed below. Temp. = 68°F to 71.6°F (20°C to 22°C). &#... replace the filter. This system has been tested according to the "Warranty" section for the Manufacturer's limited warranty. PRODUCT DATA SHEETS Interior Water Filtration System Model 67003523-750 Capacity 750 Gallons (2839 Liters) System tested and certified by NSF International against NSF/ANSI Standard 53 for the reduction of Lead, Mercury...
Pressure = 60 psig (413.7 kPa). Use replacement filter model 67003523; order Part Number 4396395. 2007 suggested retail price of the substances listed below. Temp. = 68°F to 71.6°F (20°C to 22°C). &#... replace the filter. This system has been tested according to the "Warranty" section for the Manufacturer's limited warranty. PRODUCT DATA SHEETS Interior Water Filtration System Model 67003523-750 Capacity 750 Gallons (2839 Liters) System tested and certified by NSF International against NSF/ANSI Standard 53 for the reduction of Lead, Mercury...

Use & Care Guide
Page 19
... according to instructions attached to or furnished with the product, KitchenAid will pay for factory specified parts to the Internet and you may contact KitchenAid at the address below . On models with any questions or concerns at the number below : In the U.S.A.: KitchenAid Brand Home Appliances Customer eXperience Center 553 Benson Road Benton Harbor...
... according to instructions attached to or furnished with the product, KitchenAid will pay for factory specified parts to the Internet and you may contact KitchenAid at the address below . On models with any questions or concerns at the number below : In the U.S.A.: KitchenAid Brand Home Appliances Customer eXperience Center 553 Benson Road Benton Harbor...

Dimension Guide
Page 1
...water inlet valve of approximately 40 to 60 psi (276 to change materials and specifications without notice. handle C 4 top of cabinet 1 D overall Model # KBLS19KT KBRS19KT KBLS22EV KBLS22KV KBRS20EV KBRS22EV KBRS22KV Depth Without Handles "A" 30 7⁄8" (78.4 cm) 30 7⁄8" (78.4 cm) 30 7⁄...) 325⁄8" (82.9 cm) 325⁄8" (82.9 cm) Height Top of the cabinet and the wall. Bottom Mount Refrigerator PRODUCT MODEL NUMBERS KBLS19KT KBLS22EV KBLS22KV KBRS19KT KBRS20EV KBRS22EV KBRS22KV Electrical: A 115 Volt, 60 Hz., AC only 15- handle E incl. Ref. Do ...
...water inlet valve of approximately 40 to 60 psi (276 to change materials and specifications without notice. handle C 4 top of cabinet 1 D overall Model # KBLS19KT KBRS19KT KBLS22EV KBLS22KV KBRS20EV KBRS22EV KBRS22KV Depth Without Handles "A" 30 7⁄8" (78.4 cm) 30 7⁄8" (78.4 cm) 30 7⁄...) 325⁄8" (82.9 cm) 325⁄8" (82.9 cm) Height Top of the cabinet and the wall. Bottom Mount Refrigerator PRODUCT MODEL NUMBERS KBLS19KT KBLS22EV KBLS22KV KBRS19KT KBRS20EV KBRS22EV KBRS22KV Electrical: A 115 Volt, 60 Hz., AC only 15- handle E incl. Ref. Do ...
Energy Guide
Page 1
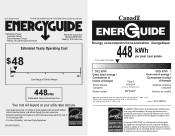
...Automatic Defrost ·Bottom Mounted Freezer ·Without Through-the-Door-Ice Service KitchenAid Corporation Model(s):KB*S19KT* Capacity: 18.5 Cubic Feet Estimated Yearly Operating Cost $48 $47 $61 Cost Range of Similar Models 448kWh Estimated Yearly Electricity Use Your cost will depend on your utility rates and... consumption/Consommation énergétique 448 kWh per year / par année This model / Ce modèle 392 kWh Uses least energy / Consomme le moins d'énergie Similar Models compared Model number Type 5 18.5-20.4 volume in ft3/volume en pi3 KB*S19KT* 569 kWh ...
...Automatic Defrost ·Bottom Mounted Freezer ·Without Through-the-Door-Ice Service KitchenAid Corporation Model(s):KB*S19KT* Capacity: 18.5 Cubic Feet Estimated Yearly Operating Cost $48 $47 $61 Cost Range of Similar Models 448kWh Estimated Yearly Electricity Use Your cost will depend on your utility rates and... consumption/Consommation énergétique 448 kWh per year / par année This model / Ce modèle 392 kWh Uses least energy / Consomme le moins d'énergie Similar Models compared Model number Type 5 18.5-20.4 volume in ft3/volume en pi3 KB*S19KT* 569 kWh ...


