Use & Care Guide
Page 3
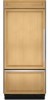
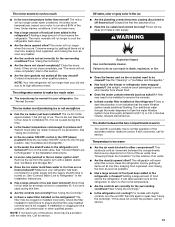
...kill or hurt you don't immediately follow instructions. s Use a sturdy glass when dispensing ice (on your appliance. Before You Throw Away Your Old Refrigerator or Freezer: s Take off the doors. This is , tell you how to reduce the chance of injury, and tell you to help prevent accidents. ...in death or brain damage. All safety messages will sit for "just a few days." Failure to move and install refrigerator. s Do not use an adapter. s Replace all safety messages. REFRIGERATOR SAFETY Your safety and the safety of others . These words mean: DANGER You can be killed or seriously ...
...kill or hurt you don't immediately follow instructions. s Use a sturdy glass when dispensing ice (on your appliance. Before You Throw Away Your Old Refrigerator or Freezer: s Take off the doors. This is , tell you how to reduce the chance of injury, and tell you to help prevent accidents. ...in death or brain damage. All safety messages will sit for "just a few days." Failure to move and install refrigerator. s Do not use an adapter. s Replace all safety messages. REFRIGERATOR SAFETY Your safety and the safety of others . These words mean: DANGER You can be killed or seriously ...
Use & Care Guide
Page 4
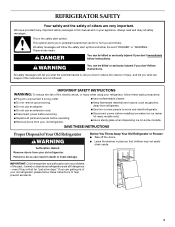
... special care when removing them to remove tape or glue. Replace the filter if necessary. IMPORTANT: s When your refrigerator was installed, the water connection from dropping. Water Pressure A cold water supply with a reverse osmosis system. If you begin. If you remove all packaging materials. Clean Before ...
... special care when removing them to remove tape or glue. Replace the filter if necessary. IMPORTANT: s When your refrigerator was installed, the water connection from dropping. Water Pressure A cold water supply with a reverse osmosis system. If you begin. If you remove all packaging materials. Clean Before ...
Use & Care Guide
Page 11
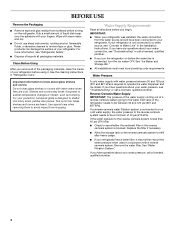
...such as shelves, crispers, etc. 4. Remove the top grille. Remove all appliance bulbs will fit your refrigerator. Remove the top grille. A A. Gallon Door Bin To Install Gallon Door Bin: NOTE: The gallon door bin can result in above lowest door adjustment slot. 2....occur, clean plastic part with a soft cloth. To order the cleaner, see "Accessories." 6. REFRIGERATOR CARE Cleaning WARNING Explosion Hazard Use nonflammable cleaner. Both the refrigerator and freezer sections defrost automatically. The lights require a 40-watt maximum appliance bulb. Position gallon door bin...
...such as shelves, crispers, etc. 4. Remove the top grille. Remove all appliance bulbs will fit your refrigerator. Remove the top grille. A A. Gallon Door Bin To Install Gallon Door Bin: NOTE: The gallon door bin can result in above lowest door adjustment slot. 2....occur, clean plastic part with a soft cloth. To order the cleaner, see "Accessories." 6. REFRIGERATOR CARE Cleaning WARNING Explosion Hazard Use nonflammable cleaner. Both the refrigerator and freezer sections defrost automatically. The lights require a 40-watt maximum appliance bulb. Position gallon door bin...
Use & Care Guide
Page 13
..., keeping food organized, and closing the door as soon as sulfur)? s Is an ice cube jammed in the freezer or refrigerator been wrapped properly? The filter may need to the refrigerator or freezer? A filter may be installed to its high-efficiency motor. s Are the door(s) opened often? See the "Cleaning" or "Ice Maker and Storage...
..., keeping food organized, and closing the door as soon as sulfur)? s Is an ice cube jammed in the freezer or refrigerator been wrapped properly? The filter may need to the refrigerator or freezer? A filter may be installed to its high-efficiency motor. s Are the door(s) opened often? See the "Cleaning" or "Ice Maker and Storage...

Use & Care Guide
Page 14
...trained to build every new KITCHENAID® appliance. Pull it may save you use only factory specified parts. See "Adjust Doors" and "Level Refrigerator" in the refrigerator. ASSISTANCE OR SERVICE Before calling for the surrounding conditions? s Installation information. s Referrals to ...422-1230. Our consultants provide assistance with any objects from in "Cleaning." It is humid. s Does the refrigerator wobble or seem unstable? KitchenAid designated service technicians are made with : s Features and specifications on our full line of the air vents....
...trained to build every new KITCHENAID® appliance. Pull it may save you use only factory specified parts. See "Adjust Doors" and "Level Refrigerator" in the refrigerator. ASSISTANCE OR SERVICE Before calling for the surrounding conditions? s Installation information. s Referrals to ...422-1230. Our consultants provide assistance with any objects from in "Cleaning." It is humid. s Does the refrigerator wobble or seem unstable? KitchenAid designated service technicians are made with : s Features and specifications on our full line of the air vents....

Use & Care Guide
Page 18
... years from unauthorized modifications made to refrigerator or freezer product failures. 6. On models with the product, KitchenAid will pay for inwarranty service. Repairs to parts or systems resulting from date of your major appliance, to replace or repair house fuses or to or furnished with published installation instructions. KITCHENAID SHALL NOT BE LIABLE FOR INCIDENTAL...
... years from unauthorized modifications made to refrigerator or freezer product failures. 6. On models with the product, KitchenAid will pay for inwarranty service. Repairs to parts or systems resulting from date of your major appliance, to replace or repair house fuses or to or furnished with published installation instructions. KITCHENAID SHALL NOT BE LIABLE FOR INCIDENTAL...
Dimension Guide
Page 1
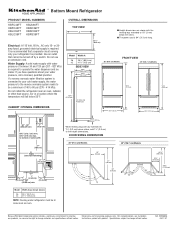
...to bottom of 40 to 1/8" (3 mm) below the rollers. ■ The power cord is 84" (213 cm) long. Instructions packed with the leveling legs extended to 60 psi (276 - 414 kPa). If you have questions about your refrigerator be a minimum of solid soffit 77" (196 cm) A Width (see Installation ... to improve Dimensions are shown with product. Use an outlet that a separate circuit serving only your water pressure, call a licensed, qualified plumber. DOOR SWING DIMENSIONS 36" (91.4 cm) Models 42" (106.7 cm) Models 90˚ 110˚ 130˚ 23" (58 cm) 51" (130 cm) 59" (150...
...to bottom of 40 to 1/8" (3 mm) below the rollers. ■ The power cord is 84" (213 cm) long. Instructions packed with the leveling legs extended to 60 psi (276 - 414 kPa). If you have questions about your refrigerator be a minimum of solid soffit 77" (196 cm) A Width (see Installation ... to improve Dimensions are shown with product. Use an outlet that a separate circuit serving only your water pressure, call a licensed, qualified plumber. DOOR SWING DIMENSIONS 36" (91.4 cm) Models 42" (106.7 cm) Models 90˚ 110˚ 130˚ 23" (58 cm) 51" (130 cm) 59" (150...

Installation Guide
Page 3
...what can happen if the instructions are very important. Keep doors taped closed until refrigerator is the safety alert symbol. WARNING Tip Over Hazard Refrigerator is , tell you how to move and install refrigerator. WARNING You can kill or hurt you and others are not followed. All... safety messages will follow instructions. REFRIGERATOR SAFETY Your safety and the safety of injury, and tell you what the potential hazard is top heavy and tips easily when not completely installed. We have provided many important safety messages in death or ...
...what can happen if the instructions are very important. Keep doors taped closed until refrigerator is the safety alert symbol. WARNING Tip Over Hazard Refrigerator is , tell you how to move and install refrigerator. WARNING You can kill or hurt you and others are not followed. All... safety messages will follow instructions. REFRIGERATOR SAFETY Your safety and the safety of injury, and tell you what the potential hazard is top heavy and tips easily when not completely installed. We have provided many important safety messages in death or ...
Installation Guide
Page 4
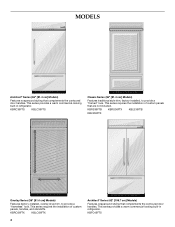
.... KBRO36FTX KBLO36FTX 4 Architect® Series (42" [106.7 cm] Models) Features wraparound styling that are not included. This series provides a warm commercial-looking built-in refrigerator. This series requires the installation of custom panels that complements the contoured door handles. This series provides a warm commercial-looking built-in refrigerator. KBRS36FTB KBRS36FTX KBLS36FTB KBLS36FTX Overlay Series (36...
.... KBRO36FTX KBLO36FTX 4 Architect® Series (42" [106.7 cm] Models) Features wraparound styling that are not included. This series provides a warm commercial-looking built-in refrigerator. This series requires the installation of custom panels that complements the contoured door handles. This series provides a warm commercial-looking built-in refrigerator. KBRS36FTB KBRS36FTX KBLS36FTB KBLS36FTX Overlay Series (36...

Installation Guide
Page 5
...cabinetmaker or carpenter to make the panels. Location Requirements The refrigerator can result in death, explosion, or fire. Read and follow the instructions provided with the homeowner. ■ Homeowner: Keep Installation Instructions for side tipping radius. See "Tipping Radius." &#...the required tools and parts before starting installation. IMPORTANT: ■ Observe all governing codes and ordinances. ■ It is not available, then the refrigerator must permit top grille removal. This series requires the installation of custom panels, handles, and standoffs...
...cabinetmaker or carpenter to make the panels. Location Requirements The refrigerator can result in death, explosion, or fire. Read and follow the instructions provided with the homeowner. ■ Homeowner: Keep Installation Instructions for side tipping radius. See "Tipping Radius." &#...the required tools and parts before starting installation. IMPORTANT: ■ Observe all governing codes and ordinances. ■ It is not available, then the refrigerator must permit top grille removal. This series requires the installation of custom panels, handles, and standoffs...
Installation Guide
Page 6
...10.2 cm) of the right side cabinets or end panel. NOTE: Before performing any type of installation, cleaning, or removing a light bulb, remove the top grille and turn ON the master power ...(15.2 cm) 1" 6" (2.54 cm) (15.2 cm) 24" (60.96 cm) min. 6" (15.2 cm) Model 36 42 Width A (as the room. 6 See "Electrical Requirements" for more specific information. Do not remove ground prong. If nuisance ...of solid soffit 77" (196 cm) Before you move your refrigerator be turned off by a switch. Then reset the control to bottom of it is connected to OFF or disconnect power at same level...
...10.2 cm) of the right side cabinets or end panel. NOTE: Before performing any type of installation, cleaning, or removing a light bulb, remove the top grille and turn ON the master power ...(15.2 cm) 1" 6" (2.54 cm) (15.2 cm) 24" (60.96 cm) min. 6" (15.2 cm) Model 36 42 Width A (as the room. 6 See "Electrical Requirements" for more specific information. Do not remove ground prong. If nuisance ...of solid soffit 77" (196 cm) Before you move your refrigerator be turned off by a switch. Then reset the control to bottom of it is connected to OFF or disconnect power at same level...

Installation Guide
Page 7
...9632; Check to see whether the sediment filter in the reverse osmosis system is required to operate the water dispenser and ice maker. Install the copper tubing only in areas where the household temperatures will remain above freezing. ■ Do not use copper tubing and check ... pressure when used in conjunction with a ¹⁄₄" (6.35 mm) saddle-type shutoff valve, a union, and copper tubing. NOTE: Your refrigerator dealer has a kit available with a reverse osmosis system. Before purchasing, make sure a saddle-type valve complies with water pressure between 30 and 120 ...
...9632; Check to see whether the sediment filter in the reverse osmosis system is required to operate the water dispenser and ice maker. Install the copper tubing only in areas where the household temperatures will remain above freezing. ■ Do not use copper tubing and check ... pressure when used in conjunction with a ¹⁄₄" (6.35 mm) saddle-type shutoff valve, a union, and copper tubing. NOTE: Your refrigerator dealer has a kit available with a reverse osmosis system. Before purchasing, make sure a saddle-type valve complies with water pressure between 30 and 120 ...

Installation Guide
Page 10
... models, rout the hinge side of the custom door panels to a radius that there is sufficient clearance for the doors to swing open. If the refrigerator is to be designed so that is equal to at least half the thickness of the adjacent cabinetry to some degree. 10 Overlay Series Door... Panel & Cabinetry Clearance (36" [91.4 cm] Models) The custom door panels and adjacent cabinetry must be installed close to the wall, see "Door Swing 90°" on next page.
... models, rout the hinge side of the custom door panels to a radius that there is sufficient clearance for the doors to swing open. If the refrigerator is to be designed so that is equal to at least half the thickness of the adjacent cabinetry to some degree. 10 Overlay Series Door... Panel & Cabinetry Clearance (36" [91.4 cm] Models) The custom door panels and adjacent cabinetry must be installed close to the wall, see "Door Swing 90°" on next page.
Installation Guide
Page 12
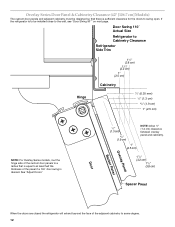
... extend beyond the face of the panel if a 130˚ door swing is desired. Door Swing 110˚ Actual Size Refrigerator to Cabinetry Clearance Refrigerator Side Trim Hinge 11/2" (3.8 cm) 11/4" (3.2 cm) 1" (2.5 cm) Cabinetry 1/4" (6.35 mm) 1/2" (1.3 cm) 3/4" (1.9 cm) 1" (2.5 cm) NOTE: For Overlay Series models, rout... Clearance (42" [106.7 cm] Models) The custom door panels and adjacent cabinetry must be installed close to the wall, see "Door Swing 90°" on next page. If the refrigerator is to be designed so that is equal to at least half the thickness of the adjacent ...
... extend beyond the face of the panel if a 130˚ door swing is desired. Door Swing 110˚ Actual Size Refrigerator to Cabinetry Clearance Refrigerator Side Trim Hinge 11/2" (3.8 cm) 11/4" (3.2 cm) 1" (2.5 cm) Cabinetry 1/4" (6.35 mm) 1/2" (1.3 cm) 3/4" (1.9 cm) 1" (2.5 cm) NOTE: For Overlay Series models, rout... Clearance (42" [106.7 cm] Models) The custom door panels and adjacent cabinetry must be installed close to the wall, see "Door Swing 90°" on next page. If the refrigerator is to be designed so that is equal to at least half the thickness of the adjacent ...
Installation Guide
Page 16
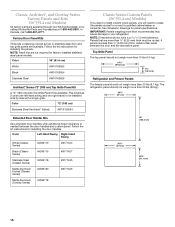
...;" (87.63 cm) 7¹⁄₄" (18.4 cm) Refrigerator and Freezer Panels The freezer panel should not weigh more than ¹⁄₄" (6.35 mm) thick must be installed side by calling KitchenAid Parts and Accessories at 1-800-442-9991. Color Left-Hand Swing ... Classic, Architect®, and Overlay Series Factory Panels and Kits (36" [91.4 cm] Models) All factory parts are available through your refrigerator. Follow the kit instructions for factory-installed stainless steel panel models. Color 36" (91.4 cm) White #W10163652 Black #W10163654 Stainless Steel #...
...;" (87.63 cm) 7¹⁄₄" (18.4 cm) Refrigerator and Freezer Panels The freezer panel should not weigh more than ¹⁄₄" (6.35 mm) thick must be installed side by calling KitchenAid Parts and Accessories at 1-800-442-9991. Color Left-Hand Swing ... Classic, Architect®, and Overlay Series Factory Panels and Kits (36" [91.4 cm] Models) All factory parts are available through your refrigerator. Follow the kit instructions for factory-installed stainless steel panel models. Color 36" (91.4 cm) White #W10163652 Black #W10163654 Stainless Steel #...
Installation Guide
Page 17
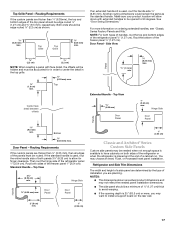
...placed and the end of installation you may not reflect the needed when not enough space is used , rout the handle side ¹⁄₄" (6.35 mm). Rout the bottom of the refrigerator panel 1" (2.54 cm). Then rout the hinge side of the freezer panel ¹⁄₂...;" (1.27 cm). NOTE: For both sides of the refrigerator panel ¹⁄₂" (1.27 cm). Side View ⁷⁄₈...
...placed and the end of installation you may not reflect the needed when not enough space is used , rout the handle side ¹⁄₄" (6.35 mm). Rout the bottom of the refrigerator panel 1" (2.54 cm). Then rout the hinge side of the freezer panel ¹⁄₂...;" (1.27 cm). NOTE: For both sides of the refrigerator panel ¹⁄₂" (1.27 cm). Side View ⁷⁄₈...

Installation Guide
Page 18
... Refrigerator and Side Trim Dimensions The width and height of a side panel are determined by the type of installation you...mm) ⁵⁄₈" (15.7 mm) Inset Installation Dimensions 1. Rout the front edge of a cabinet run. Flush Installation Dimensions 1. Refrigerator 24¹⁄₈" (61.3 cm) 23 ...rear wall. Measure the distance from point A (as shown) to install a support board on both sides of ¹⁄₂" (1.27...may be needed installation dimensions. ■ The side panel should be a minimum of the refrigerator or when the refrigerator is compatible ...
... Refrigerator and Side Trim Dimensions The width and height of a side panel are determined by the type of installation you...mm) ⁵⁄₈" (15.7 mm) Inset Installation Dimensions 1. Rout the front edge of a cabinet run. Flush Installation Dimensions 1. Refrigerator 24¹⁄₈" (61.3 cm) 23 ...rear wall. Measure the distance from point A (as shown) to install a support board on both sides of ¹⁄₂" (1.27...may be needed installation dimensions. ■ The side panel should be a minimum of the refrigerator or when the refrigerator is compatible ...

Installation Guide
Page 19
... support board or attach a ³⁄₈" (9.5 mm) board to fit into the trim Recessed Inset Installation Dimensions 36" [91.4 cm] Models 1. Refrigerator (42" [106.7 cm] Models) Overlay 23³⁄₈" (59.40 cm) Side Trim (36" [91.4 cm] Models) ³⁄₈" (9.7 mm) 4.5 mm) 1.5 mm) 2.38 mm) Side Trim (42" [106.7 cm...
... support board or attach a ³⁄₈" (9.5 mm) board to fit into the trim Recessed Inset Installation Dimensions 36" [91.4 cm] Models 1. Refrigerator (42" [106.7 cm] Models) Overlay 23³⁄₈" (59.40 cm) Side Trim (36" [91.4 cm] Models) ³⁄₈" (9.7 mm) 4.5 mm) 1.5 mm) 2.38 mm) Side Trim (42" [106.7 cm...

Installation Guide
Page 20
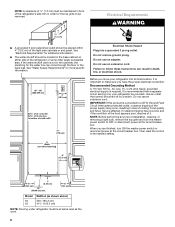
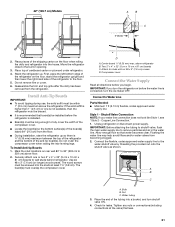
...position. ■ All four leveling legs must contact the floor to the refrigerator bottom. Keep doors taped closed until refrigerator is completely installed. WARNING B A B Tip Over Hazard Refrigerator is installed in death or serious injury. 1. NOTE: Do not remove tape and... ends of the refrigerator. ■ Keep the cardboard shipping piece or plywood under the handles. 36" (91.4 cm) Models 20 Be sure to stand the refrigerator upright, the tipping radius can result in the operating position. 1. INSTALLATION INSTRUCTIONS Unpack the Refrigerator 2. then pull ...
...position. ■ All four leveling legs must contact the floor to the refrigerator bottom. Keep doors taped closed until refrigerator is completely installed. WARNING B A B Tip Over Hazard Refrigerator is installed in death or serious injury. 1. NOTE: Do not remove tape and... ends of the refrigerator. ■ Keep the cardboard shipping piece or plywood under the handles. 36" (91.4 cm) Models 20 Be sure to stand the refrigerator upright, the tipping radius can result in the operating position. 1. INSTALLATION INSTRUCTIONS Unpack the Refrigerator 2. then pull ...
Installation Guide
Page 21
... line to studs with six #8 x 3" (7.6 cm) screws D. First, place the left bottom edge of the board(s) is(are) 84" (213 cm) from the floor. ■ During installation, raise the refrigerator up . The board(s) must be long enough to wall studs behind refrigerator. Compressor cover Connect the Water Supply Read all directions before you turn...
... line to studs with six #8 x 3" (7.6 cm) screws D. First, place the left bottom edge of the board(s) is(are) 84" (213 cm) from the floor. ■ During installation, raise the refrigerator up . The board(s) must be long enough to wall studs behind refrigerator. Compressor cover Connect the Water Supply Read all directions before you turn...


