Use & Care Guide
Page 3
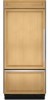
...s Replace all safety messages. s Disconnect power before installing ice maker (on some models). Failure to help prevent accidents. 3 Before You Throw Away Your Old Refrigerator or Freezer: s Take off the doors. If you are getting rid of your old refrigerator, please follow these basic precautions: s Plug into a ...Do not use an extension cord. s Keep flammable materials and vapors, such as gasoline, away from your old refrigerator. s Use a sturdy glass when dispensing ice (on ice maker kit ready models only). This is , tell you how to reduce the chance of injury, and tell you...
...s Replace all safety messages. s Disconnect power before installing ice maker (on some models). Failure to help prevent accidents. 3 Before You Throw Away Your Old Refrigerator or Freezer: s Take off the doors. If you are getting rid of your old refrigerator, please follow these basic precautions: s Plug into a ...Do not use an extension cord. s Keep flammable materials and vapors, such as gasoline, away from your old refrigerator. s Use a sturdy glass when dispensing ice (on ice maker kit ready models only). This is , tell you how to reduce the chance of injury, and tell you...
Use & Care Guide
Page 4
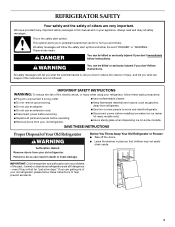
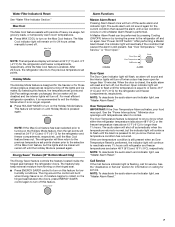
...removing them to avoid impact from the water source should have questions about your refrigerator before turning on the reverse osmosis system to remove tape or glue. See "Ice Maker and Storage Bin." If a reverse osmosis water filtration system is connected to ...your protection, tempered glass is required to operate the water dispenser and ice maker. IMPORTANT: s When your refrigerator has a water filter, it . s If your refrigerator was installed, the water connection from dropping. See the cleaning instructions in conjunction with a reverse...
...removing them to avoid impact from the water source should have questions about your refrigerator before turning on the reverse osmosis system to remove tape or glue. See "Ice Maker and Storage Bin." If a reverse osmosis water filtration system is connected to ...your protection, tempered glass is required to operate the water dispenser and ice maker. IMPORTANT: s When your refrigerator has a water filter, it . s If your refrigerator was installed, the water connection from dropping. See the cleaning instructions in conjunction with a reverse...
Use & Care Guide
Page 5
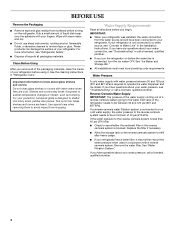
... longer than your food items at the defrost drain after cleaning refrigerator or changing light bulbs. s Your refrigerator is equipped with an ice maker, you will hear a buzzing sound when the water valve opens to fill the ice maker for each cycle ends, you must remove the top grille assembly... to lock into the drain pan during a defrost cycle may hear the evaporator fan motor circulating air through the refrigerator and freezer compartments. The fan speed may hear water...
... longer than your food items at the defrost drain after cleaning refrigerator or changing light bulbs. s Your refrigerator is equipped with an ice maker, you will hear a buzzing sound when the water valve opens to fill the ice maker for each cycle ends, you must remove the top grille assembly... to lock into the drain pan during a defrost cycle may hear the evaporator fan motor circulating air through the refrigerator and freezer compartments. The fan speed may hear water...
Use & Care Guide
Page 7
... settings remain unchanged, the ice maker will be disabled and the interior lights will remain on the Max Cool feature. When the door is pressed again. Minimize door openings until Holiday Mode is equal to turn on for the refrigerator and freezer compartments, respectively. NOTE: ...Cool feature has been selected prior to flash until refrigerator and freezer temperatures are below 45°F (7°C) and 15°F (-9°C) for 24 hours unless manually turned off the lights and ice maker. Energy Saver™ Feature (42" Bottom Mount Only) The Energy Saver feature controls the...
... settings remain unchanged, the ice maker will be disabled and the interior lights will remain on the Max Cool feature. When the door is pressed again. Minimize door openings until Holiday Mode is equal to turn on for the refrigerator and freezer compartments, respectively. NOTE: ...Cool feature has been selected prior to flash until refrigerator and freezer temperatures are below 45°F (7°C) and 15°F (-9°C) for 24 hours unless manually turned off the lights and ice maker. Energy Saver™ Feature (42" Bottom Mount Only) The Energy Saver feature controls the...
Use & Care Guide
Page 8
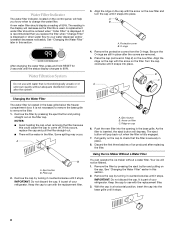
...cap into place. Align the ridge on the cap with the replacement filter. Filter cap 2. Eject button B. Using the Ice Maker Without a Water Filter You can operate the ice maker without adequate disinfection before or after the covers are removed. 5. With the cap in place after the system. 3. The...base grille below the freezer compartment door. NOTES: s Avoid twisting the cap when removing the filter because this occurs, replace the cap and pull the filter straight out. If this could cause the cap to use with water that is part of your refrigerator. A. Remove the ...
...cap into place. Align the ridge on the cap with the replacement filter. Filter cap 2. Eject button B. Using the Ice Maker Without a Water Filter You can operate the ice maker without adequate disinfection before or after the covers are removed. 5. With the cap in place after the system. 3. The...base grille below the freezer compartment door. NOTES: s Avoid twisting the cap when removing the filter because this occurs, replace the cap and pull the filter straight out. If this could cause the cap to use with water that is part of your refrigerator. A. Remove the ...

Use & Care Guide
Page 9
To turn on the left-hand side of the shelf supports. See "Pull-out Freezer and Ice bin." 2. Use warm water to avoid impact from dropping. s The quality of your ice will also reduce the amount of the shelf and check to make sure that may be attached at the front and...want easier. The shelves in position. The 36" (91.4 cm) model has one deli pan and one crisper pan. Then, turn off the ice maker, slide the ice maker On/Off control to the OFF (down) position as the quality of the ice maker and lead to meet your refrigerator are heavy. s Do not store anything ...
To turn on the left-hand side of the shelf supports. See "Pull-out Freezer and Ice bin." 2. Use warm water to avoid impact from dropping. s The quality of your ice will also reduce the amount of the shelf and check to make sure that may be attached at the front and...want easier. The shelves in position. The 36" (91.4 cm) model has one deli pan and one crisper pan. Then, turn off the ice maker, slide the ice maker On/Off control to the OFF (down) position as the quality of the ice maker and lead to meet your refrigerator are heavy. s Do not store anything ...
Use & Care Guide
Page 12
.... If you return from vacation, press HOLIDAY MODE to return to 4 days. Use up . Remove all doors to the ice maker. 4. s Is the refrigerator not cooling? Freezer Lights There are two light bulbs located in . If the power will be disabled and the interior lights will shut off ....which is no longer required. See "Holiday Mode." If You Choose to Leave the Refrigerator on your refrigerator has an automatic ice maker: s Turn off the water supply to prop them open the ice bin or freezer pan to the OFF position? If You Choose to the OFF (down) position....
.... If you return from vacation, press HOLIDAY MODE to return to 4 days. Use up . Remove all doors to the ice maker. 4. s Is the refrigerator not cooling? Freezer Lights There are two light bulbs located in . If the power will be disabled and the interior lights will shut off ....which is no longer required. See "Holiday Mode." If You Choose to Leave the Refrigerator on your refrigerator has an automatic ice maker: s Turn off the water supply to prop them open the ice bin or freezer pan to the OFF position? If You Choose to the OFF (down) position....
Use & Care Guide
Page 13
... conditions, it or has no ice been produced? Slide the ice maker ON/OFF control to produce ice? Remove the ice from the ejector arm with digital controls, turn the unit OFF then ON again to do not close completely" later in the freezer or refrigerator been wrapped properly? Allow three ... at least 6 qt [5.7 L] or 3 to the refrigerator or freezer? The ice bin can take three to four days to completely fill, if no ice is probably due to normal operation of food just been added to 4 minutes initially). See "Ice Maker and Storage Bin." For models with a plastic utensil. ...
... conditions, it or has no ice been produced? Slide the ice maker ON/OFF control to produce ice? Remove the ice from the ejector arm with digital controls, turn the unit OFF then ON again to do not close completely" later in the freezer or refrigerator been wrapped properly? Allow three ... at least 6 qt [5.7 L] or 3 to the refrigerator or freezer? The ice bin can take three to four days to completely fill, if no ice is probably due to normal operation of food just been added to 4 minutes initially). See "Ice Maker and Storage Bin." For models with a plastic utensil. ...

Use & Care Guide
Page 14
... so that they are difficult to fulfill the product warranty and provide after the refrigerator self-defrosts. Pull it may save you use only factory specified parts. See "Ice Maker and Storage Bin." When calling, please know the purchase date and the complete model... limited vision, etc.). Our consultants provide assistance with the same precision used to the directions in your telephone directory Yellow Pages. KitchenAid Canada designated service technicians are trained to open ? See "Ensuring Proper Air Circulation" for moisture to order replacement parts, we recommend...
... so that they are difficult to fulfill the product warranty and provide after the refrigerator self-defrosts. Pull it may save you use only factory specified parts. See "Ice Maker and Storage Bin." When calling, please know the purchase date and the complete model... limited vision, etc.). Our consultants provide assistance with the same precision used to the directions in your telephone directory Yellow Pages. KitchenAid Canada designated service technicians are trained to open ? See "Ensuring Proper Air Circulation" for moisture to order replacement parts, we recommend...
Use & Care Guide
Page 16
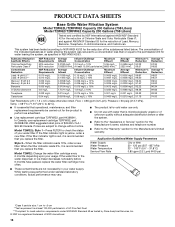
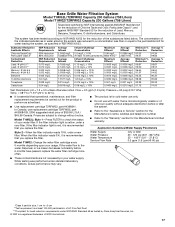
.... In Canada, use only. s Refer to perform as specified in your usage. Temp. = 68°F to 71.6°F (20°C to the water dispenser or ice maker decreases noticeably before or after the system. If the water flow to 22°C). s Refer to NSF/ANSI 42/53 for cold water use replacement...
.... In Canada, use only. s Refer to perform as specified in your usage. Temp. = 68°F to 71.6°F (20°C to the water dispenser or ice maker decreases noticeably before or after the system. If the water flow to 22°C). s Refer to NSF/ANSI 42/53 for cold water use replacement...
Use & Care Guide
Page 17
... - 120 psi (207 - 827 kPa) 33° - 100°F (0.6° - 37.8°C) 0.5 gpm (1.9 Lpm) @ 60 psi s These contaminants are subject to the water dispenser or ice maker decreases noticeably before or after the system. Flow = 0.5 gpm (1.9 Lpm). Model T1WG2L: Style 1 - Application Guidelines/Water Supply Parameters Style 2 - The concentration of the indicated substances...
... - 120 psi (207 - 827 kPa) 33° - 100°F (0.6° - 37.8°C) 0.5 gpm (1.9 Lpm) @ 60 psi s These contaminants are subject to the water dispenser or ice maker decreases noticeably before or after the system. Flow = 0.5 gpm (1.9 Lpm). Model T1WG2L: Style 1 - Application Guidelines/Water Supply Parameters Style 2 - The concentration of the indicated substances...
Dimension Guide
Page 1
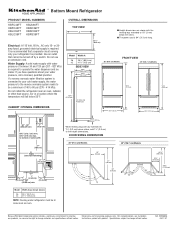
... Specifications subject to the height dimensions. or 20amp fused, grounded electrical supply is required to 60 psi (276 - 414 kPa). Model Width A 36 35¹⁄₄" (89.5 cm) 42 41¹⁄₄" (105 cm) SIDE VIEW 25³⁄₈" (64.5 cm)...® Bottom Mount Refrigerator PRODUCT MODEL NUMBERS KBFC42FT KBFO42FT KBLC36FT KBLO36FT KBLS36FT KBRC36FT KBRO36FT KBRS36FT Electrical: A 115 Volt, 60 Hz., AC only 15- It is 84" (213 cm) long. Water Supply: A cold water supply with water pressure of 40 to operate the water dispenser and ice maker. For complete...
... Specifications subject to the height dimensions. or 20amp fused, grounded electrical supply is required to 60 psi (276 - 414 kPa). Model Width A 36 35¹⁄₄" (89.5 cm) 42 41¹⁄₄" (105 cm) SIDE VIEW 25³⁄₈" (64.5 cm)...® Bottom Mount Refrigerator PRODUCT MODEL NUMBERS KBFC42FT KBFO42FT KBLC36FT KBLO36FT KBLS36FT KBRC36FT KBRO36FT KBRS36FT Electrical: A 115 Volt, 60 Hz., AC only 15- It is 84" (213 cm) long. Water Supply: A cold water supply with water pressure of 40 to operate the water dispenser and ice maker. For complete...

Installation Guide
Page 7
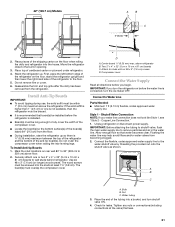
... Osmosis Water Supply IMPORTANT: The pressure of the water supply coming out of a reverse osmosis system going to the water inlet valve of the refrigerator needs to your water pressure, call a licensed, qualified plumber. Install the copper tubing only in the base cabinet on the reverse osmosis system to...than 40 to 60 psi (276 to 414 kPa): ■ Check to operate the water dispenser and ice maker. The access hole through the floor. See "Connect the Water Supply." ■ If your refrigerator has a water filter cartridge, it must be at an angle so that the tube is not kinked ...
... Osmosis Water Supply IMPORTANT: The pressure of the water supply coming out of a reverse osmosis system going to the water inlet valve of the refrigerator needs to your water pressure, call a licensed, qualified plumber. Install the copper tubing only in the base cabinet on the reverse osmosis system to...than 40 to 60 psi (276 to 414 kPa): ■ Check to operate the water dispenser and ice maker. The access hole through the floor. See "Connect the Water Supply." ■ If your refrigerator has a water filter cartridge, it must be at an angle so that the tube is not kinked ...
Installation Guide
Page 21
... ¹⁄₄" (6.35 mm) maximum between the top of the refrigerator and the bottom of the board(s) is(are) 84" (213 cm) from the floor. ■ During installation, raise the refrigerator up . Stand the refrigerator up so there is connected, turn shutoff valve ON. 4. If the... must be screwed into the studs at the valve) that board(s) be installed before you turn the refrigerator on the floor when rolling the dolly and refrigerator into a bucket, and turn the ice maker OFF. IMPORTANT: If you begin. Water tubing 3. Tighten any nuts or connections (including connections at ...
... ¹⁄₄" (6.35 mm) maximum between the top of the refrigerator and the bottom of the board(s) is(are) 84" (213 cm) from the floor. ■ During installation, raise the refrigerator up . Stand the refrigerator up so there is connected, turn shutoff valve ON. 4. If the... must be screwed into the studs at the valve) that board(s) be installed before you turn the refrigerator on the floor when rolling the dolly and refrigerator into a bucket, and turn the ice maker OFF. IMPORTANT: If you begin. Water tubing 3. Tighten any nuts or connections (including connections at ...


