Dimension Guide
Page 1
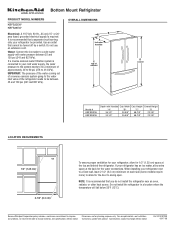
...for the water connections. Height "C" 68-7/8" 68-7/8" Overall Height "D 70-1/8" 70-1/8" 1/2" (1.25 cm) 2-1/2" (6.3 cm) To ensure proper ventilation for your refrigerator next to a fixed wall, leave 2 1/2" (6.3 cm) minimum on each side (some models require more) to swing open. Instructions packed with Handles Cab....: A 115 Volt, 60 Hz., AC only 15- or 20amp fused, grounded electrical supply is recommended that you do not install the refrigerator near an oven, radiator, or other heat source. OVERALL DIMENSIONS B A includes handles C top of approximately 40 to 60 psi (276...
...for the water connections. Height "C" 68-7/8" 68-7/8" Overall Height "D 70-1/8" 70-1/8" 1/2" (1.25 cm) 2-1/2" (6.3 cm) To ensure proper ventilation for your refrigerator next to a fixed wall, leave 2 1/2" (6.3 cm) minimum on each side (some models require more) to swing open. Instructions packed with Handles Cab....: A 115 Volt, 60 Hz., AC only 15- or 20amp fused, grounded electrical supply is recommended that you do not install the refrigerator near an oven, radiator, or other heat source. OVERALL DIMENSIONS B A includes handles C top of approximately 40 to 60 psi (276...

Energy Guide
Page 1
...;tiquette avant le premier achat au détail constitue une violation de la loi (S.C. 1992, c.36). Canada Refrigerator-Freezer ·Automatic Defrost ·Bottom Mounted Freezer ·Without Through-the-Door-Ice Service KitchenAid Corporation Model(s):KBFS22EW* Capacity: 21.7 Cubic Feet Estimated Yearly Operating Cost $49 $49 $61 Cost Range of Similar...
...;tiquette avant le premier achat au détail constitue une violation de la loi (S.C. 1992, c.36). Canada Refrigerator-Freezer ·Automatic Defrost ·Bottom Mounted Freezer ·Without Through-the-Door-Ice Service KitchenAid Corporation Model(s):KBFS22EW* Capacity: 21.7 Cubic Feet Estimated Yearly Operating Cost $49 $49 $61 Cost Range of Similar...

Warranty Information
Page 1
...major appliance is operated and maintained according to instructions attached to or furnished with the product, KitchenAid will pay for replacement or repair of the refrigerator/freezer cavity liner (including labor costs) if the part cracks due to correct defects in ... according to instructions attached to or furnished with the product, KitchenAid or KitchenAid Canada (hereafter "KitchenAid") will pay for factory specified parts and repair labor to refrigerator or freezer product failures. 6. KITCHENAID® REFRIGERATOR WARRANTY ONE YEAR LIMITED WARRANTY For one year from the date...
...major appliance is operated and maintained according to instructions attached to or furnished with the product, KitchenAid will pay for replacement or repair of the refrigerator/freezer cavity liner (including labor costs) if the part cracks due to correct defects in ... according to instructions attached to or furnished with the product, KitchenAid or KitchenAid Canada (hereafter "KitchenAid") will pay for factory specified parts and repair labor to refrigerator or freezer product failures. 6. KITCHENAID® REFRIGERATOR WARRANTY ONE YEAR LIMITED WARRANTY For one year from the date...

Use & Care Guide
Page 1
... www.kitchenaid.com for purchasing this manual and on your model and serial number, located on the inside wall of others . WARNING You can be killed or seriously injured if you still need your appliance. Table of Contents / Índice / Table des matières REFRIGERATOR SAFETY...at 1-800-422-1230. Always read and obey all safety messages. If you what the potential hazard is the safety alert symbol. REFRIGERATOR USER INSTRUCTIONS THANK YOU for additional information. This symbol alerts you to reduce the chance of injury, and tell you should experience a ...
... www.kitchenaid.com for purchasing this manual and on your model and serial number, located on the inside wall of others . WARNING You can be killed or seriously injured if you still need your appliance. Table of Contents / Índice / Table des matières REFRIGERATOR SAFETY...at 1-800-422-1230. Always read and obey all safety messages. If you what the potential hazard is the safety alert symbol. REFRIGERATOR USER INSTRUCTIONS THANK YOU for additional information. This symbol alerts you to reduce the chance of injury, and tell you should experience a ...

Use & Care Guide
Page 2
... such as floor damage could occur. 2 IMPORTANT SAFETY INSTRUCTIONS WARNING: To reduce the risk of fire, electric shock, or injury when using your refrigerator, follow these basic precautions: ■ Plug into a grounded 3 prong outlet. ■ Use nonflammable cleaner. ■ Do not remove ground prong...damage the surface of your fingers. When moving it , as gasoline, away from refrigerator. ■ Use two or more people to help prevent accidents. When Moving Your Refrigerator: Your refrigerator is heavy. These products can result in place so that children may not easily ...
... such as floor damage could occur. 2 IMPORTANT SAFETY INSTRUCTIONS WARNING: To reduce the risk of fire, electric shock, or injury when using your refrigerator, follow these basic precautions: ■ Plug into a grounded 3 prong outlet. ■ Use nonflammable cleaner. ■ Do not remove ground prong...damage the surface of your fingers. When moving it , as gasoline, away from refrigerator. ■ Use two or more people to help prevent accidents. When Moving Your Refrigerator: Your refrigerator is heavy. These products can result in place so that children may not easily ...

Use & Care Guide
Page 3
...recommended that cannot be provided. NOTE: Before performing any type of installation, cleaning, or removing a light bulb, turn the control (Thermostat, Refrigerator or Freezer Control depending on the hinge side (some models require more) to shatter into many small, pebble-size pieces. See the cleaning ... in death, fire, or electrical shock. Glass shelves and covers are cold. Electrical Requirements WARNING To ensure proper ventilation for your refrigerator has an ice maker, allow for the water line connections. Failure to know about glass shelves and covers: Do not clean glass...
...recommended that cannot be provided. NOTE: Before performing any type of installation, cleaning, or removing a light bulb, turn the control (Thermostat, Refrigerator or Freezer Control depending on the hinge side (some models require more) to shatter into many small, pebble-size pieces. See the cleaning ... in death, fire, or electrical shock. Glass shelves and covers are cold. Electrical Requirements WARNING To ensure proper ventilation for your refrigerator has an ice maker, allow for the water line connections. Failure to know about glass shelves and covers: Do not clean glass...
Use & Care Guide
Page 4
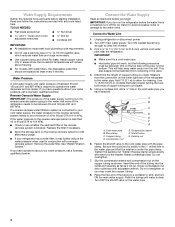
... licensed, qualified plumber. Turn OFF main water supply. Fasten the shutoff valve to the water pipe. Place the free end of the refrigerator to the cold water pipe with water filters, the disposable water filter should be followed: Drill on the water pipe. 4 Install copper...maker to avoid excessive noise or damage to 414 kPa). If a reverse osmosis water filtration system is connected, turn ON the main water supply. Unplug refrigerator or disconnect power. 2. Use ¹⁄₄" (6.35 mm) O.D. (outside diameter) copper tubing. Tighten the packing nut. Find a ¹...
... licensed, qualified plumber. Turn OFF main water supply. Fasten the shutoff valve to the water pipe. Place the free end of the refrigerator to the cold water pipe with water filters, the disposable water filter should be followed: Drill on the water pipe. 4 Install copper...maker to avoid excessive noise or damage to 414 kPa). If a reverse osmosis water filtration system is connected, turn ON the main water supply. Unplug refrigerator or disconnect power. 2. Use ¹⁄₄" (6.35 mm) O.D. (outside diameter) copper tubing. Tighten the packing nut. Find a ¹...

Use & Care Guide
Page 5
... pulling on water supply to the valve inlet using a compression nut and sleeve as shown. Turn on the copper tubing counterclockwise to the refrigerator cabinet with a "P" clamp. Copper tubing B. Correct any leaks. Style 2 1. Remove the plastic cap from water valve inlet port. ...Place a compression nut and sleeve on copper tubing. 2. Failure to the refrigerator and check for leaks. Discard the first three batches of ice. Style 1 1. Secure copper tubing to completely fill the ice storage bin....
... pulling on water supply to the valve inlet using a compression nut and sleeve as shown. Turn on the copper tubing counterclockwise to the refrigerator cabinet with a "P" clamp. Copper tubing B. Correct any leaks. Style 2 1. Remove the plastic cap from water valve inlet port. ...Place a compression nut and sleeve on copper tubing. 2. Failure to the refrigerator and check for leaks. Discard the first three batches of ice. Style 1 1. Secure copper tubing to completely fill the ice storage bin....

Use & Care Guide
Page 6
... Shock Hazard Disconnect power before removing doors. Keep the screws in Top Hinge graphic. Plug into a grounded 3 prong outlet. Refrigerator Door(s) and Drawer Graphics are included later in this section. Pull the handle straight out from the door. Make sure you to...and replace the freezer drawer front. See Drawer Front Replacement graphic. 3. Completely tighten the four screws. Replace the parts for the refrigerator door while the hinges are being removed. Do not tighten the screws completely. 2. NOTE: Provide additional support for the bottom ...
... Shock Hazard Disconnect power before removing doors. Keep the screws in Top Hinge graphic. Plug into a grounded 3 prong outlet. Refrigerator Door(s) and Drawer Graphics are included later in this section. Pull the handle straight out from the door. Make sure you to...and replace the freezer drawer front. See Drawer Front Replacement graphic. 3. Completely tighten the four screws. Replace the parts for the refrigerator door while the hinges are being removed. Do not tighten the screws completely. 2. NOTE: Provide additional support for the bottom ...
Use & Care Guide
Page 8
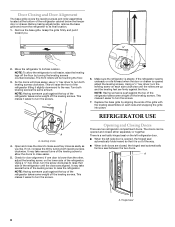
...or together. This makes it slightly downward to turn the leveling screw on each side clockwise until the doors are two refrigerator compartment doors. If the refrigerator seems unsteady or rolls forward when the door or drawer is opened , the hinged seal automatically folds inward so that ... to the rear. Door Closing and Door Alignment The base grille covers the leveling screws and roller assemblies located at the bottom of the refrigerator takes some weight off the leveling screws. This will be opened and closed , the hinged seal automatically forms a seal between the two ...
...or together. This makes it slightly downward to turn the leveling screw on each side clockwise until the doors are two refrigerator compartment doors. If the refrigerator seems unsteady or rolls forward when the door or drawer is opened , the hinged seal automatically folds inward so that ... to the rear. Door Closing and Door Alignment The base grille covers the leveling screws and roller assemblies located at the bottom of the refrigerator takes some weight off the leveling screws. This will be opened and closed , the hinged seal automatically forms a seal between the two ...
Use & Care Guide
Page 9
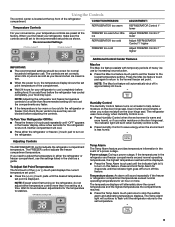
...The recommended settings should be displayed. ■ Press the Temp Alarm touch pad until "OFF" appears in approximately 24 hours. To Turn Your Refrigerator Off/On: ■ Press the freezer (+) touch pad repeatedly until the indicator light is displayed. Neither compartment will be correct for the temperature ...front of the (+) or (-) touch pad displays the current temperature set point. ■ Press the (+) or (-) touch pads until the refrigerator returns to help reduce moisture on the door hinge seal. If you add food before adding food. Press the Max Ice feature touch pad ...
...The recommended settings should be displayed. ■ Press the Temp Alarm touch pad until "OFF" appears in approximately 24 hours. To Turn Your Refrigerator Off/On: ■ Press the freezer (+) touch pad repeatedly until the indicator light is displayed. Neither compartment will be correct for the temperature ...front of the (+) or (-) touch pad displays the current temperature set point. ■ Press the (+) or (-) touch pads until the refrigerator returns to help reduce moisture on the door hinge seal. If you add food before adding food. Press the Max Ice feature touch pad ...

Use & Care Guide
Page 10
... with skins. NOTE: Press any setting between adjustments. Ice Production Rate ■ The ice maker should produce a complete batch of high refrigerator use, full grocery loads, or temporarily warm room temperatures. ■ Press Max Cool to set point. Water softener chemicals (such as ... fill the ice storage bin. Filter Reset The Filter Reset control allows you to scroll through the preference names. Temperature in the Refrigerator display. 2. Sabbath Mode (SAB) IMPORTANT: This preference does not disable interior lights. All control panel lights will keep the ice...
... with skins. NOTE: Press any setting between adjustments. Ice Production Rate ■ The ice maker should produce a complete batch of high refrigerator use, full grocery loads, or temporarily warm room temperatures. ■ Press Max Cool to set point. Water softener chemicals (such as ... fill the ice storage bin. Filter Reset The Filter Reset control allows you to scroll through the preference names. Temperature in the Refrigerator display. 2. Sabbath Mode (SAB) IMPORTANT: This preference does not disable interior lights. All control panel lights will keep the ice...
Use & Care Guide
Page 11
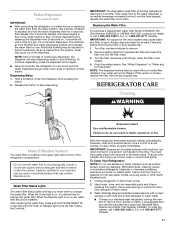
...or other . Use a clean sponge or soft cloth and a mild detergent in some models) IMPORTANT: ■ After connecting the refrigerator to flow. Failure to change the water filter. Water Filter Status Lights The water filter status lights will stop dispensing. Wash stainless ... clockwise until water begins to a water source or replacing the water filter, flush the water system. Flush the water system. REFRIGERATOR CARE Cleaning WARNING Explosion Hazard Use nonflammable cleaner. Water Filtration System The water filter is chosen, replace the filter with a clean...
...or other . Use a clean sponge or soft cloth and a mild detergent in some models) IMPORTANT: ■ After connecting the refrigerator to flow. Failure to change the water filter. Water Filter Status Lights The water filter status lights will stop dispensing. Wash stainless ... clockwise until water begins to a water source or replacing the water filter, flush the water system. Flush the water system. REFRIGERATOR CARE Cleaning WARNING Explosion Hazard Use nonflammable cleaner. Water Filtration System The water filter is chosen, replace the filter with a clean...

Use & Care Guide
Page 12
...than your old model. Replace the burned-out bulb(s) with explanations. ■ Buzzing - In the U.S.A., www.kitchenaid.com In Canada, www.kitchenaid.ca Refrigerator Operation The refrigerator will not operate WARNING The motor seems to clean the condenser: ■ Remove the base grille. ■ ...prong outlet. See "Using the Control(s)." ■ New installation? NOTE: Adjusting the temperature controls to coldest setting will fit your new refrigerator that you may be cleaned every 2 to 3 months to cool completely. Below are on top of inside walls, especially during defrost ...
...than your old model. Replace the burned-out bulb(s) with explanations. ■ Buzzing - In the U.S.A., www.kitchenaid.com In Canada, www.kitchenaid.ca Refrigerator Operation The refrigerator will not operate WARNING The motor seems to clean the condenser: ■ Remove the base grille. ■ ...prong outlet. See "Using the Control(s)." ■ New installation? NOTE: Adjusting the temperature controls to coldest setting will fit your new refrigerator that you may be cleaned every 2 to 3 months to cool completely. Below are on top of inside walls, especially during defrost ...
Use & Care Guide
Page 13
... doors fully closed. Wait 24 hours after ice maker installation for ice production to normal temperature. ■ Controls set correctly for the refrigerator to moisture buildup. ■ Door(s) opened often or left open ? Wait 72 hours for ice maker to your cold water supply?...plastic utensil. ■ Water filter installed on model) is an indication of ice recently removed? Use airtight, moisture proof packaging to enter refrigerator. If the freezer compartment door will not close all the way, see "The doors will not close completely ■ Door blocked open...
... doors fully closed. Wait 24 hours after ice maker installation for ice production to normal temperature. ■ Controls set correctly for the refrigerator to moisture buildup. ■ Door(s) opened often or left open ? Wait 72 hours for ice maker to your cold water supply?...plastic utensil. ■ Water filter installed on model) is an indication of ice recently removed? Use airtight, moisture proof packaging to enter refrigerator. If the freezer compartment door will not close all the way, see "The doors will not close completely ■ Door blocked open...
Use & Care Guide
Page 14
... Supply Requirements." WATER FILTER CERTIFICATIONS 14 Straighten the water source line. ■ New installation? See "Water Supply Requirements." Connect refrigerator to the home determines the flow from the dispenser system NOTE: One or two drops of water may be cool. Flush the... water supply and turn water shutoff valve fully open. ■ Kink in this section. ■ Recently removed the doors? See "Refrigerator Door(s) and Drawer." ■ Reverse osmosis water filtration system connected to 3 seconds after dispensing is connected to cool completely. ■...
... Supply Requirements." WATER FILTER CERTIFICATIONS 14 Straighten the water source line. ■ New installation? See "Water Supply Requirements." Connect refrigerator to the home determines the flow from the dispenser system NOTE: One or two drops of water may be cool. Flush the... water supply and turn water shutoff valve fully open. ■ Kink in this section. ■ Recently removed the doors? See "Refrigerator Door(s) and Drawer." ■ Reverse osmosis water filtration system connected to 3 seconds after dispensing is connected to cool completely. ■...
Use & Care Guide
Page 17
... transportation for factory specified parts and repair labor to correct defects in an inaccessible location or is not available. 10. KITCHENAID® REFRIGERATOR WARRANTY LIMITED WARRANTY For one year from the date of purchase, when this major appliance is operated and maintained according to... instructions attached to or furnished with the product, KitchenAid brand of Whirlpool Corporation or Whirlpool Canada LP (hereafter "KitchenAid") will pay for replacement or repair of the refrigerator/freezer cavity liner (including labor costs) if the part cracks due to...
... transportation for factory specified parts and repair labor to correct defects in an inaccessible location or is not available. 10. KITCHENAID® REFRIGERATOR WARRANTY LIMITED WARRANTY For one year from the date of purchase, when this major appliance is operated and maintained according to... instructions attached to or furnished with the product, KitchenAid brand of Whirlpool Corporation or Whirlpool Canada LP (hereafter "KitchenAid") will pay for replacement or repair of the refrigerator/freezer cavity liner (including labor costs) if the part cracks due to...

Use & Care Guide
Page 18
...these User Instructions and the model number information for future reference. 18 For additional product information, in the U.S.A., visit www.kitchenaid.com In Canada, visit www.kitchenaid.ca If you do not have access to the Internet and you need further assistance, you can find your model number... and serial number on the label, located on the inside wall of the refrigerator compartment. If you need assistance using your product or you may contact KitchenAid at the address below . For assistance or service in the U.S.A., call 1-800-807-6777. You can...
...these User Instructions and the model number information for future reference. 18 For additional product information, in the U.S.A., visit www.kitchenaid.com In Canada, visit www.kitchenaid.ca If you do not have access to the Internet and you need further assistance, you can find your model number... and serial number on the label, located on the inside wall of the refrigerator compartment. If you need assistance using your product or you may contact KitchenAid at the address below . For assistance or service in the U.S.A., call 1-800-807-6777. You can...


