Use & Care Guide
Page 3
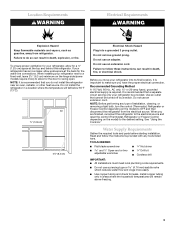
...the top and behind the refrigerator. NOTE: Before performing any tools listed here. Water Supply Requirements Gather the required tools and parts before starting installation. To ensure proper ventilation for the water line connections. When installing your refrigerator be turned off by a switch. Do... Do not use an adapter. Do not use a piercing-type or 4.76 mm) saddle valve which reduces water flow and clogs more ) to allow for leaks. Location Requirements WARNING Electrical Requirements WARNING Explosion Hazard Keep flammable materials and vapors, such as gasoline, away from the...
...the top and behind the refrigerator. NOTE: Before performing any tools listed here. Water Supply Requirements Gather the required tools and parts before starting installation. To ensure proper ventilation for the water line connections. When installing your refrigerator be turned off by a switch. Do... Do not use an adapter. Do not use a piercing-type or 4.76 mm) saddle valve which reduces water flow and clogs more ) to allow for leaks. Location Requirements WARNING Electrical Requirements WARNING Explosion Hazard Keep flammable materials and vapors, such as gasoline, away from the...
Use & Care Guide
Page 4
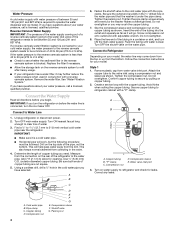
...F. Shutoff valve G. Tighten the packing nut. Do not overtighten. 8. Connect to Refrigerator Depending on the reverse osmosis system to refrigerator and check for leaks. Attach the copper tube to the valve inlet using a compression nut and sleeve as it is under the pipe clamp. Tighten the compression nut. Create...adjustable wrench. Insert the end of the pipe, not the bottom. Correct any leaks. If you turn the ice maker OFF. Find a ¹⁄₂" to 1¹⁄₄" (12.7 mm to Water Line 1. Copper tubing D. Turn OFF the shutoff valve on before you have...
...F. Shutoff valve G. Tighten the packing nut. Do not overtighten. 8. Connect to Refrigerator Depending on the reverse osmosis system to refrigerator and check for leaks. Attach the copper tube to the valve inlet using a compression nut and sleeve as it is under the pipe clamp. Tighten the compression nut. Create...adjustable wrench. Insert the end of the pipe, not the bottom. Correct any leaks. If you turn the ice maker OFF. Find a ¹⁄₂" to 1¹⁄₄" (12.7 mm to Water Line 1. Copper tubing D. Turn OFF the shutoff valve on before you have...
Use & Care Guide
Page 5
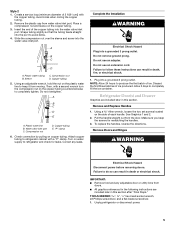
... inlet port. Discard the first three batches of 2 ft [61 cm]) with the copper tubing. Pull the handle straight out from water valve inlet port. IMPORTANT: ■ Remove food and any leaks. A B C D A. Sleeve D. Then, with a "P" clamp. Turn on the copper tubing counterclockwise to do so can result in this section after "Final...
... inlet port. Discard the first three batches of 2 ft [61 cm]) with the copper tubing. Pull the handle straight out from water valve inlet port. IMPORTANT: ■ Remove food and any leaks. A B C D A. Sleeve D. Then, with a "P" clamp. Turn on the copper tubing counterclockwise to do so can result in this section after "Final...
Use & Care Guide
Page 14
...-flavored ice. ■ Ice stored too long? Water is leaking from the dispenser is normal. ■ Glass not being held under the dispenser 2 to 50°F (10°C). ■ New installation? See "Water Dispenser." ■ Recently changed water filter? Flush the water system. Allow 24 hours for water supply to store food. ■ Are there minerals...
...-flavored ice. ■ Ice stored too long? Water is leaking from the dispenser is normal. ■ Glass not being held under the dispenser 2 to 50°F (10°C). ■ New installation? See "Water Dispenser." ■ Recently changed water filter? Flush the water system. Allow 24 hours for water supply to store food. ■ Are there minerals...


