Instruction Manual
Page 1
...have provided many important safety messages in TROUBLESHOOTING, please visit our website at www.kitchenaid.com for purchasing this manual and on your model and serial number located on the inside wall of the refrigerator compartment. You will need assistance, call us at 1-800-807-6777. Tenga ...or seriously injured if you still need your appliance. All safety messages will follow instructions. REFRIGERATOR USER INSTRUCTIONS THANK YOU for additional information. In Canada, visit our website at www.kitchenaid.ca or call us at 1-800-422-1230. This is , tell you how to...
...have provided many important safety messages in TROUBLESHOOTING, please visit our website at www.kitchenaid.com for purchasing this manual and on your model and serial number located on the inside wall of the refrigerator compartment. You will need assistance, call us at 1-800-807-6777. Tenga ...or seriously injured if you still need your appliance. All safety messages will follow instructions. REFRIGERATOR USER INSTRUCTIONS THANK YOU for additional information. In Canada, visit our website at www.kitchenaid.ca or call us at 1-800-422-1230. This is , tell you how to...
Instruction Manual
Page 2
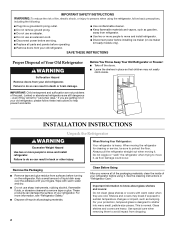
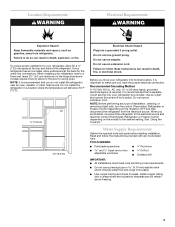
... Before Using After you are not problems of your old refrigerator, please follow basic precautions, including the following: ■ Plug into many small, pebble-size pieces. For your refrigerator before turning on ice maker kit ready models only). INSTALLATION INSTRUCTIONS Unpack the Refrigerator WARNING Excessive Weight Hazard Use two or more people to move...
... Before Using After you are not problems of your old refrigerator, please follow basic precautions, including the following: ■ Plug into many small, pebble-size pieces. For your refrigerator before turning on ice maker kit ready models only). INSTALLATION INSTRUCTIONS Unpack the Refrigerator WARNING Excessive Weight Hazard Use two or more people to move...
Instruction Manual
Page 3
...any tools listed here. NOTE: It is important to the electrical source and reset the control (Thermostat, Refrigerator or Freezer Control depending on the hinge side (some models require more easily. ■ Use copper tubing and check for the water line connections. Water Supply Requirements... provided with any type of installation, cleaning, or removing a light bulb, turn the control (Thermostat, Refrigerator or Freezer Control depending on the model) to do not install the refrigerator near an oven, radiator, or other heat source. Do not use a piercing-type or 4.76 mm...
...any tools listed here. NOTE: It is important to the electrical source and reset the control (Thermostat, Refrigerator or Freezer Control depending on the hinge side (some models require more easily. ■ Use copper tubing and check for the water line connections. Water Supply Requirements... provided with any type of installation, cleaning, or removing a light bulb, turn the control (Thermostat, Refrigerator or Freezer Control depending on the model) to do not install the refrigerator near an oven, radiator, or other heat source. Do not use a piercing-type or 4.76 mm...
Instruction Manual
Page 4
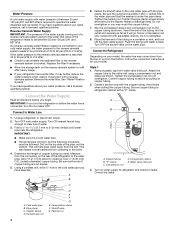
...pressure when used in the valve. 4. Connect to allow for cleaning. Turn ON nearest faucet long enough to clear line of the refrigerator to 414 kPa). Add 7 ft (2.1 m) to Water Line 1. Using a cordless drill, drill a ¹⁄₄" hole in a container or sink, and ... of the tubing in the cold water pipe you may come down from the top or up from the connection on your model. Connect to refrigerator and check for your model, the water line may crush the copper tubing. 7. Follow the connection instructions for leaks. Style 1 1. A B C D E A. "P" clamp ...
...pressure when used in the valve. 4. Connect to allow for cleaning. Turn ON nearest faucet long enough to clear line of the refrigerator to 414 kPa). Add 7 ft (2.1 m) to Water Line 1. Using a cordless drill, drill a ¹⁄₄" hole in a container or sink, and ... of the tubing in the cold water pipe you may come down from the top or up from the connection on your model. Connect to refrigerator and check for your model, the water line may crush the copper tubing. 7. Follow the connection instructions for leaks. Style 1 1. A B C D E A. "P" clamp ...
Instruction Manual
Page 6
...to position the two screws in death, fire, or electrical shock. 1. NOTE: On some models, remove the shim from the bottom hinge pin. Align the door so that the bottom of the refrigerator door aligns evenly with the right-hand side door, remove the parts for later use . Open...Hinges 1. Do not tighten the screws completely. 2. Return all screws. 4. Tighten screws. 2. NOTE: On some models, remove the shim from the bottom hinge pin and keep it for the refrigerator door while the hinges are working . 3. Slide the drawer glides out of the freezer drawer. See Drawer Front ...
...to position the two screws in death, fire, or electrical shock. 1. NOTE: On some models, remove the shim from the bottom hinge pin. Align the door so that the bottom of the refrigerator door aligns evenly with the right-hand side door, remove the parts for later use . Open...Hinges 1. Do not tighten the screws completely. 2. Return all screws. 4. Tighten screws. 2. NOTE: On some models, remove the shim from the bottom hinge pin and keep it for the refrigerator door while the hinges are working . 3. Slide the drawer glides out of the freezer drawer. See Drawer Front ...
Instruction Manual
Page 7
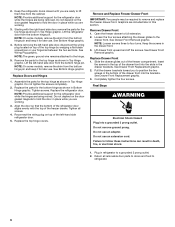
WARNING Electrical Shock Hazard Disconnect power before removing doors. Shim (on some models) B. Loosen 4 Door Bracket Screws 7 Top Hinge Bottom Hinges 1 A B C A. Bottom Hinge C. Top Hinge Cover C. 5/16" Hex-Head Hinge Screws D. Hinge Screws Wiring Plug 2 A Drawer Front Removal A. 3/32" Set Screw A A. 3/32" Set Screw Drawer Front Replacement A A. Failure to do so can result in death or electrical shock. Top Hinges A B C D Door Removal & Replacement A. Hinge Cover Screw B.
WARNING Electrical Shock Hazard Disconnect power before removing doors. Shim (on some models) B. Loosen 4 Door Bracket Screws 7 Top Hinge Bottom Hinges 1 A B C A. Bottom Hinge C. Top Hinge Cover C. 5/16" Hex-Head Hinge Screws D. Hinge Screws Wiring Plug 2 A Drawer Front Removal A. 3/32" Set Screw A A. 3/32" Set Screw Drawer Front Replacement A A. Failure to do so can result in death or electrical shock. Top Hinges A B C D Door Removal & Replacement A. Hinge Cover Screw B.
Instruction Manual
Page 8
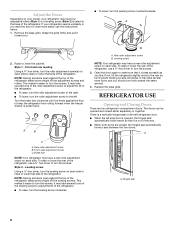
... take several turns of the roller adjustment screw to adjust the tilt of the refrigerator, use the instructions below. 1. Adjust the Doors Depending on your model, your refrigerator seems unsteady or you . ■ To lower, turn the leveling screw counterclockwise. Front and rear leveling Using a ³⁄₈" hex driver, turn the roller...
... take several turns of the roller adjustment screw to adjust the tilt of the refrigerator, use the instructions below. 1. Adjust the Doors Depending on your model, your refrigerator seems unsteady or you . ■ To lower, turn the leveling screw counterclockwise. Front and rear leveling Using a ³⁄₈" hex driver, turn the roller...
Instruction Manual
Page 10
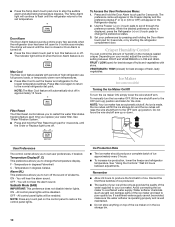
...will appear in the Freezer display and the preference status (F or C) or (ON or OFF) will be disabled. Set your model, adjust the control to the normal refrigerator set temperature. Ice Maker (on . User Preferences The control center allows you to the lowest temperature settings. Temperature Display (F_C)...the Door Alarm touch pad for 3 seconds. ■ Press the Temp Alarm touch pad once to change the temperature display. F - Wait 24 hours between FRUIT and VEGETABLES or LOW and HIGH. To manually turn this feature on the control panel to poor quality ice. NOTE: Your ...
...will appear in the Freezer display and the preference status (F or C) or (ON or OFF) will be disabled. Set your model, adjust the control to the normal refrigerator set temperature. Ice Maker (on . User Preferences The control center allows you to the lowest temperature settings. Temperature Display (F_C)...the Door Alarm touch pad for 3 seconds. ■ Press the Temp Alarm touch pad once to change the temperature display. F - Wait 24 hours between FRUIT and VEGETABLES or LOW and HIGH. To manually turn this feature on the control panel to poor quality ice. NOTE: Your ...
Instruction Manual
Page 11
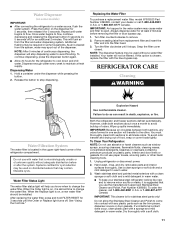
... air from replacement filter and insert the filter end into contact with a sponge and mild detergent in some models) IMPORTANT: ■ After connecting the refrigerator to change the water filter. Additional flushing may be installed. Hold a container under the dispenser while pressing the... Unplug refrigerator or disconnect power. 2. To order the cleaner, call 1-800-442-9991 U.S.A. IMPORTANT: This cleaner is chosen, replace the filter with a soft cloth. 11 NOTE: After 5 minutes of odors. To continue dispensing, press the dispenser button again. ■ Allow 24 hours ...
... air from replacement filter and insert the filter end into contact with a sponge and mild detergent in some models) IMPORTANT: ■ After connecting the refrigerator to change the water filter. Additional flushing may be installed. Hold a container under the dispenser while pressing the... Unplug refrigerator or disconnect power. 2. To order the cleaner, call 1-800-442-9991 U.S.A. IMPORTANT: This cleaner is chosen, replace the filter with a soft cloth. 11 NOTE: After 5 minutes of odors. To continue dispensing, press the dispenser button again. ■ Allow 24 hours ...
Instruction Manual
Page 13
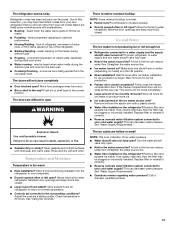
...kink in the line can reduce water flow. Straighten the water source line. ■ Water filter installed on model) is not producing ice or not enough ice ■ Refrigerator connected to moisture buildup. ■ Door(s) opened often or left open ? If ice quality improves, then ...humid air to normal temperature. ■ Controls set correctly for ice production to your old model. Connect refrigerator to this reduction, you did not notice from items placed on ? Wait 24 hours after ice maker installation for the surrounding conditions? Firmly close completely." ■ Large ...
...kink in the line can reduce water flow. Straighten the water source line. ■ Water filter installed on model) is not producing ice or not enough ice ■ Refrigerator connected to moisture buildup. ■ Door(s) opened often or left open ? If ice quality improves, then ...humid air to normal temperature. ■ Controls set correctly for ice production to your old model. Connect refrigerator to this reduction, you did not notice from items placed on ? Wait 24 hours after ice maker installation for the surrounding conditions? Firmly close completely." ■ Large ...
Instruction Manual
Page 15
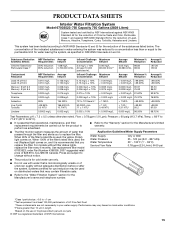
... 38°C) 0.78 gpm (2.9 L/min.) @ 60 psi ■ The product is used on . Flow = 0.78 gpm (1.9 Lpm). Use replacement filter model 67003523; order Part Number 4396395. 2007 suggested retail price of unknown quality without filter status lights, replace the filter every 6 months. This system has been...10% 0.015 ± 10% 0.009 mg/L ± 10% 107 to replace the filter. PRODUCT DATA SHEETS Interior Water Filtration System Model 67003523-750 Capacity 750 Gallons (2839 Liters) System tested and certified by NSF International against NSF/ANSI Standard 53 for the product to perform ...
... 38°C) 0.78 gpm (2.9 L/min.) @ 60 psi ■ The product is used on . Flow = 0.78 gpm (1.9 Lpm). Use replacement filter model 67003523; order Part Number 4396395. 2007 suggested retail price of unknown quality without filter status lights, replace the filter every 6 months. This system has been...10% 0.015 ± 10% 0.009 mg/L ± 10% 107 to replace the filter. PRODUCT DATA SHEETS Interior Water Filtration System Model 67003523-750 Capacity 750 Gallons (2839 Liters) System tested and certified by NSF International against NSF/ANSI Standard 53 for the product to perform ...
Instruction Manual
Page 16
...you do not have access to the Internet and you need further assistance, you how to use of products not approved by KitchenAid. 5. Service calls to refrigerator or freezer product failures. 6. Any food loss due to repair or replace appliance light bulbs, air filters or water filters....to instruct you can find your complete model number ready. Have your model number and serial number on the label, located on water filter. On models with a water filter: 30 day limited warranty on the inside wall of the refrigerator compartment. ITEMS KITCHENAID WILL NOT PAY FOR 1. Repairs to ...
...you do not have access to the Internet and you need further assistance, you how to use of products not approved by KitchenAid. 5. Service calls to refrigerator or freezer product failures. 6. Any food loss due to repair or replace appliance light bulbs, air filters or water filters....to instruct you can find your complete model number ready. Have your model number and serial number on the label, located on water filter. On models with a water filter: 30 day limited warranty on the inside wall of the refrigerator compartment. ITEMS KITCHENAID WILL NOT PAY FOR 1. Repairs to ...
Parts Diagram
Page 1
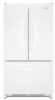
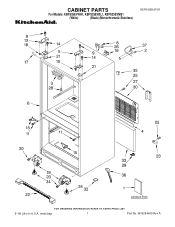
CABINET PARTS For Models: KBFS25EVWH1, KBFS25EVBL1, KBFS25EVMS1 (White) (Black) (Monochromatic Stainless) REFRIGERATOR 9−09 Litho In U.S.A. (mat)(bay) 1 Part No. W10294609 Rev.A
CABINET PARTS For Models: KBFS25EVWH1, KBFS25EVBL1, KBFS25EVMS1 (White) (Black) (Monochromatic Stainless) REFRIGERATOR 9−09 Litho In U.S.A. (mat)(bay) 1 Part No. W10294609 Rev.A

Parts Diagram
Page 2
... 33 12820505 Insulation, Sound 34 10354002 Brake, Foot 35 M0104106 Clip (2) 36 W10210988 Tube, Drain 37 M0114003SP Clip 2 W10294609 No. Part No. CABINET PARTS For Models: KBFS25EVWH1, KBFS25EVBL1, KBFS25EVMS1 (White) (Black) (Monochromatic Stainless) Illus.
... 33 12820505 Insulation, Sound 34 10354002 Brake, Foot 35 M0104106 Clip (2) 36 W10210988 Tube, Drain 37 M0114003SP Clip 2 W10294609 No. Part No. CABINET PARTS For Models: KBFS25EVWH1, KBFS25EVBL1, KBFS25EVMS1 (White) (Black) (Monochromatic Stainless) Illus.
Parts Diagram
Page 4
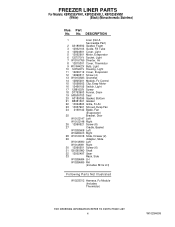
...18 D7753903 Funnel, Drain 19 M0500703 Seal 20 A3189396 Gasket, Bottom 21 B8381501 Gasket 22 13024803 Grille, Fz Air 23 13057901 Shroud, Evap Fan 24 2169142 Blade, Fan (Evaporator) 25 Bracket, Door W10122147 Left W10122148 Right 26 12990521 Screw (8) 27 Cradle, Basket W10280608 Left W10280613 Right 28 W10120018... RH (Includes RH & LH) Following Parts Not Illustrated W10235312 Harness, Fz Module (Includes Thermistor) 4 W10294609 Part No. FREEZER LINER PARTS For Models: KBFS25EVWH1, KBFS25EVBL1, KBFS25EVMS1 (White) (Black) (Monochromatic Stainless) Illus. No.
...18 D7753903 Funnel, Drain 19 M0500703 Seal 20 A3189396 Gasket, Bottom 21 B8381501 Gasket 22 13024803 Grille, Fz Air 23 13057901 Shroud, Evap Fan 24 2169142 Blade, Fan (Evaporator) 25 Bracket, Door W10122147 Left W10122148 Right 26 12990521 Screw (8) 27 Cradle, Basket W10280608 Left W10280613 Right 28 W10120018... RH (Includes RH & LH) Following Parts Not Illustrated W10235312 Harness, Fz Module (Includes Thermistor) 4 W10294609 Part No. FREEZER LINER PARTS For Models: KBFS25EVWH1, KBFS25EVBL1, KBFS25EVMS1 (White) (Black) (Monochromatic Stainless) Illus. No.

Parts Diagram
Page 6
... 19 UKF8001AXX Filter, Water 20 12568001 Cover, Filter 21 12990512 Screw (2) 22 B8390302SP Clip, Facade (2) 23 12706909SP Facade, Disp. 24 12707303SP Plate, Switch 25 12575501 Switch, Limit 26 12707206SP Guide, Waterline 27 12251001SP Clip, Waterline 28 12707005 Facade, Disp (Top) ... 32 12990513 Screw 33 W10117358 Insulation, Water Tank Following Parts Not Illustrated W10224292 Harness, Control (Refrigerator) (Includes Thermistor) 6 W10294609 REFRIGERATOR LINER PARTS For Models: KBFS25EVWH1, KBFS25EVBL1, KBFS25EVMS1 (White) (Black) (Monochromatic Stainless) Illus. No.
... 19 UKF8001AXX Filter, Water 20 12568001 Cover, Filter 21 12990512 Screw (2) 22 B8390302SP Clip, Facade (2) 23 12706909SP Facade, Disp. 24 12707303SP Plate, Switch 25 12575501 Switch, Limit 26 12707206SP Guide, Waterline 27 12251001SP Clip, Waterline 28 12707005 Facade, Disp (Top) ... 32 12990513 Screw 33 W10117358 Insulation, Water Tank Following Parts Not Illustrated W10224292 Harness, Control (Refrigerator) (Includes Thermistor) 6 W10294609 REFRIGERATOR LINER PARTS For Models: KBFS25EVWH1, KBFS25EVBL1, KBFS25EVMS1 (White) (Black) (Monochromatic Stainless) Illus. No.

Parts Diagram
Page 8
... (2) W10163894 White W10163895 Black W10179332 Apollo Grey 10 12691403 Mount, Handle 11 Bushing, Door (Bottom Right) 12028601W White 12028601B Black 12028601AP Apollo Grey Illus. REFRIGERATOR DOOR PARTS For Models: KBFS25EVWH1, KBFS25EVBL1, KBFS25EVMS1 (White) (Black) (Monochromatic Stainless) Illus. Part No. No. Part No. No. DESCRIPTION 18 12567321SP Mat, Medium 19 Bushing, Door (Upper...
... (2) W10163894 White W10163895 Black W10179332 Apollo Grey 10 12691403 Mount, Handle 11 Bushing, Door (Bottom Right) 12028601W White 12028601B Black 12028601AP Apollo Grey Illus. REFRIGERATOR DOOR PARTS For Models: KBFS25EVWH1, KBFS25EVBL1, KBFS25EVMS1 (White) (Black) (Monochromatic Stainless) Illus. Part No. No. Part No. No. DESCRIPTION 18 12567321SP Mat, Medium 19 Bushing, Door (Upper...
Parts Diagram
Page 10
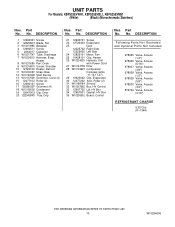
...Valve, Access (3/8") 978028 Valve, Access (1/2") 978029 Valve, Access (5/8") 978030 Valve, Access (3/4") 876764 Valve, Access (3/16") REFRIGERANT CHARGE 5.25 Ozs. (R−134A) 10 W10294609 UNIT PARTS For Models: KBFS25EVWH1, KBFS25EVBL1, KBFS25EVMS1 (White) (Black) (Monochromatic Stainless) Illus. Part No. Heater 8 W10215085 Pan, Drain 9 ... Drier 20 12225403WD Tray, Drip 21 12990701 Screw 22 12726403 Evaporator 23 Dam 12225702 Right Side 12225602 Left Side 24 12825101 Motor, Fan 25 10428101 Clip, Heater 26 W10234025 Harness, Unit with Power Cord 27 W10143759 Drier 28 ...
...Valve, Access (3/8") 978028 Valve, Access (1/2") 978029 Valve, Access (5/8") 978030 Valve, Access (3/4") 876764 Valve, Access (3/16") REFRIGERANT CHARGE 5.25 Ozs. (R−134A) 10 W10294609 UNIT PARTS For Models: KBFS25EVWH1, KBFS25EVBL1, KBFS25EVMS1 (White) (Black) (Monochromatic Stainless) Illus. Part No. Heater 8 W10215085 Pan, Drain 9 ... Drier 20 12225403WD Tray, Drip 21 12990701 Screw 22 12726403 Evaporator 23 Dam 12225702 Right Side 12225602 Left Side 24 12825101 Motor, Fan 25 10428101 Clip, Heater 26 W10234025 Harness, Unit with Power Cord 27 W10143759 Drier 28 ...
Parts Diagram
Page 11
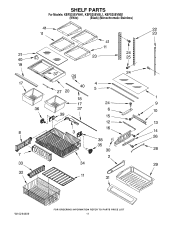
SHELF PARTS For Models: KBFS25EVWH1, KBFS25EVBL1, KBFS25EVMS1 (White) (Black) (Monochromatic Stainless) W10294609 11
SHELF PARTS For Models: KBFS25EVWH1, KBFS25EVBL1, KBFS25EVMS1 (White) (Black) (Monochromatic Stainless) W10294609 11
Parts Diagram
Page 12
... 12642303WD Brace, Crisper 19 W10231484 Trim, Crisper 20 12796301SP Frame, Crisper 21 12204824 Glass, Crisper Cover 22 W10273463 Ladder, Center 23 W10251971 Ladder, Side 24 12990513 Screw (6) 25 12990515 Screw (2) 26 12990504 Screw (4) 27 12530805SP Slide, Humidity Control 28 12655304 Rod, Temperature Control 29 12731302 Drawer, Pantry 30... 38 W10233899 Mount, RH 39 W10233898 Mount, LH 40 13062602 Support, Crisper 41 12654710 Shelf, Stationary 12 W10294609 SHELF PARTS For Models: KBFS25EVWH1, KBFS25EVBL1, KBFS25EVMS1 (White) (Black) (Monochromatic Stainless) Illus.
... 12642303WD Brace, Crisper 19 W10231484 Trim, Crisper 20 12796301SP Frame, Crisper 21 12204824 Glass, Crisper Cover 22 W10273463 Ladder, Center 23 W10251971 Ladder, Side 24 12990513 Screw (6) 25 12990515 Screw (2) 26 12990504 Screw (4) 27 12530805SP Slide, Humidity Control 28 12655304 Rod, Temperature Control 29 12731302 Drawer, Pantry 30... 38 W10233899 Mount, RH 39 W10233898 Mount, LH 40 13062602 Support, Crisper 41 12654710 Shelf, Stationary 12 W10294609 SHELF PARTS For Models: KBFS25EVWH1, KBFS25EVBL1, KBFS25EVMS1 (White) (Black) (Monochromatic Stainless) Illus.


