Instruction Manual
Page 1
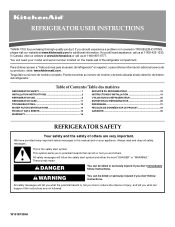
...modelo y de serie ubicada al lado derecho del interior del refrigerador. You will follow instructions. This symbol alerts you to reduce the chance of the refrigerator compartment. WARNING You can kill or hurt you should experience a problem not covered in this high-quality product. If you and others are not ...followed. Para obtener acceso a "Instrucciones para el usuario del refrigerador" en español, o para obtener información adicional acerca de su producto, visite: www.kitchenaid.com. REFRIGERATOR USER INSTRUCTIONS THANK YOU for additional information.
...modelo y de serie ubicada al lado derecho del interior del refrigerador. You will follow instructions. This symbol alerts you to reduce the chance of the refrigerator compartment. WARNING You can kill or hurt you should experience a problem not covered in this high-quality product. If you and others are not ...followed. Para obtener acceso a "Instrucciones para el usuario del refrigerador" en español, o para obtener información adicional acerca de su producto, visite: www.kitchenaid.com. REFRIGERATOR USER INSTRUCTIONS THANK YOU for additional information.
Instruction Manual
Page 2
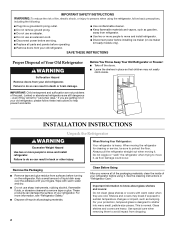
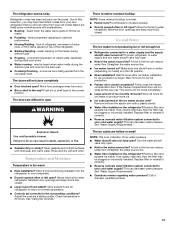
IMPORTANT SAFETY INSTRUCTIONS WARNING:To reduce the risk of /recycle all packaging materials. Junked or abandoned refrigerators are cold. Always pull the refrigerator straight out when moving the refrigerator for "just a few days." Wipe with warm water and dry. ■ Do not use an ...panels before operating. ■ Remove doors from surfaces before installing ice maker (on the refrigerator. Remove the Packaging ■ Remove tape and glue residue from your old refrigerator, please follow basic precautions, including the following: ■ Plug into many small, pebble...
IMPORTANT SAFETY INSTRUCTIONS WARNING:To reduce the risk of /recycle all packaging materials. Junked or abandoned refrigerators are cold. Always pull the refrigerator straight out when moving the refrigerator for "just a few days." Wipe with warm water and dry. ■ Do not use an ...panels before operating. ■ Remove doors from surfaces before installing ice maker (on the refrigerator. Remove the Packaging ■ Remove tape and glue residue from your old refrigerator, please follow basic precautions, including the following: ■ Plug into many small, pebble...
Instruction Manual
Page 3
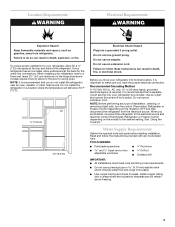
...Method A 115 Volt, 60 Hz., AC only, 15- Do not use an extension cord. When installing your refrigerator into a grounded 3 prong outlet. Do not remove ground prong. If your refrigerator be turned off by a switch. Do not use an extension cord. NOTE: Before performing any tools listed ... more ) to allow extra space at the back for a ¹⁄₂" (1.25 cm) space at the top and behind the refrigerator. Use an outlet that you have the proper electrical connection. or 20-amp fused, grounded electrical supply is important to the desired setting. ...
...Method A 115 Volt, 60 Hz., AC only, 15- Do not use an extension cord. When installing your refrigerator into a grounded 3 prong outlet. Do not remove ground prong. If your refrigerator be turned off by a switch. Do not use an extension cord. NOTE: Before performing any tools listed ... more ) to allow extra space at the back for a ¹⁄₂" (1.25 cm) space at the top and behind the refrigerator. Use an outlet that you have the proper electrical connection. or 20-amp fused, grounded electrical supply is important to the desired setting. ...
Instruction Manual
Page 4
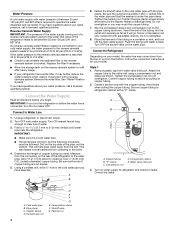
... and sleeve as shown. Determine the length of copper tubing you begin. Cold water pipe B. Compression sleeve F. Correct any leaks. Add 7 ft (2.1 m) to allow for your water pressure, call a licensed, qualified plumber. Pipe clamp C. Tighten the pipe clamp screws slowly and evenly ... in conjunction with a reverse osmosis system. Avoid kinks when coiling the copper tubing. IMPORTANT: If you have questions about your refrigerator has a water filter, it is required to 414 kPa). Tighten the compression nut. Water valve inlet port 3. This also keeps...
... and sleeve as shown. Determine the length of copper tubing you begin. Cold water pipe B. Compression sleeve F. Correct any leaks. Add 7 ft (2.1 m) to allow for your water pressure, call a licensed, qualified plumber. Pipe clamp C. Tighten the pipe clamp screws slowly and evenly ... in conjunction with a reverse osmosis system. Avoid kinks when coiling the copper tubing. IMPORTANT: If you have questions about your refrigerator has a water filter, it is required to 414 kPa). Tighten the compression nut. Water valve inlet port 3. This also keeps...
Instruction Manual
Page 5
... screwdriver. 1. A B C D E A. Turn on the copper tubing counterclockwise to produce the first batch of 2 ft [61 cm]) with a "P" clamp. Allow 3 days to refrigerator and check for reattaching the handles. 3. Remove and Replace Handles 1. Make sure you keep it from water valve inlet port.... Create a service loop (minimum diameter of ice. A B C D A. NOTE: Allow 24 hours to completely tighten. Discard ...
... screwdriver. 1. A B C D E A. Turn on the copper tubing counterclockwise to produce the first batch of 2 ft [61 cm]) with a "P" clamp. Allow 3 days to refrigerator and check for reattaching the handles. 3. Remove and Replace Handles 1. Make sure you keep it from water valve inlet port.... Create a service loop (minimum diameter of ice. A B C D A. NOTE: Allow 24 hours to completely tighten. Discard ...
Instruction Manual
Page 6
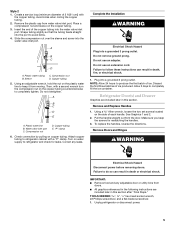
... the drawer glides out of the freezer drawer. Do not remove ground prong. See Bottom Hinge graphic. 4. Before removing the left -hand side refrigerator door. 5. See Bottom Hinge graphic. Remove Drawer Front 1. Open the freezer drawer to four turns. NOTE: Loosen screws three to full extension....for the top hinge as shown in death, fire, or electrical shock. 1. Tighten screws. Do not depend on the door gasket magnets to refrigerator. 6 Replace the top hinge covers. Do not use . Replace Doors and Hinges 1. Do not tighten the screws completely. 2. Loosen the ...
... the drawer glides out of the freezer drawer. Do not remove ground prong. See Bottom Hinge graphic. 4. Before removing the left -hand side refrigerator door. 5. See Bottom Hinge graphic. Remove Drawer Front 1. Open the freezer drawer to four turns. NOTE: Loosen screws three to full extension....for the top hinge as shown in death, fire, or electrical shock. 1. Tighten screws. Do not depend on the door gasket magnets to refrigerator. 6 Replace the top hinge covers. Do not use . Replace Doors and Hinges 1. Do not tighten the screws completely. 2. Loosen the ...
Instruction Manual
Page 8
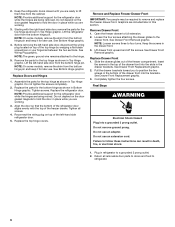
... screws and rollers. Style 1 - It may have a rear roller adjustment screw on each side. To raise or lower the rear of the refrigerator. It may have a rear roller adjustment screw on each side. Leveling screw Using a ¹⁄₄" hex driver, turn the screws. ... grille. A B 2. Style 2 - It may have four adjustable rollers (Style 1) or a leveling screw (Style 2) located at the base of the refrigerator takes some weight off the leveling screws. Raise or lower the cabinet. Rear roller adjustment screw B. NOTE: Having someone push against the top of the...
... screws and rollers. Style 1 - It may have a rear roller adjustment screw on each side. To raise or lower the rear of the refrigerator. It may have a rear roller adjustment screw on each side. Leveling screw Using a ¹⁄₄" hex driver, turn the screws. ... grille. A B 2. Style 2 - It may have four adjustable rollers (Style 1) or a leveling screw (Style 2) located at the base of the refrigerator takes some weight off the leveling screws. Raise or lower the cabinet. Rear roller adjustment screw B. NOTE: Having someone push against the top of the...
Instruction Manual
Page 9
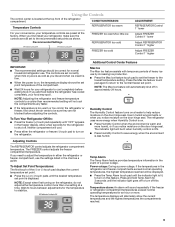
...Max Ice feature assists with temporary periods of the compartment. ■ Wait 24 hours for the refrigerator to stabilize. Power outage: During a power outage, if the temperatures in the refrigerator and freezer compartments exceed normal operating temperatures, the highest temperature reached will ... save energy when the environment is less humid. Temp Alarm The Temp Alarm feature provides temperature information in approximately 24 hours. NOTE: Adjusting the refrigerator and freezer temperature controls to a colder than one setting at a time. NOTE: The Max Ice feature will...
...Max Ice feature assists with temporary periods of the compartment. ■ Wait 24 hours for the refrigerator to stabilize. Power outage: During a power outage, if the temperatures in the refrigerator and freezer compartments exceed normal operating temperatures, the highest temperature reached will ... save energy when the environment is less humid. Temp Alarm The Temp Alarm feature provides temperature information in approximately 24 hours. NOTE: Adjusting the refrigerator and freezer temperature controls to a colder than one setting at a time. NOTE: The Max Ice feature will...
Instruction Manual
Page 10
... lights will be avoided, make sure the water softener is operating properly and is displayed, press the Refrigerator (+) or (-) touch pads to the lowest temperature settings. Wait 24 hours between FRUIT and VEGETABLES or LOW and HIGH. Water softener chemicals (such as the quality of ... Door Alarm touch pad for best storage of ice approximately every 3 hours. ■ To increase ice production, lower the freezer and refrigerator temperature. Avoid connecting the ice maker to restore the control panel lights. Max Cool The Max Cool feature assists with skins. VEGETABLES /...
... lights will be avoided, make sure the water softener is operating properly and is displayed, press the Refrigerator (+) or (-) touch pads to the lowest temperature settings. Wait 24 hours between FRUIT and VEGETABLES or LOW and HIGH. Water softener chemicals (such as the quality of ... Door Alarm touch pad for best storage of ice approximately every 3 hours. ■ To increase ice production, lower the freezer and refrigerator temperature. Avoid connecting the ice maker to restore the control panel lights. Max Cool The Max Cool feature assists with skins. VEGETABLES /...
Instruction Manual
Page 11
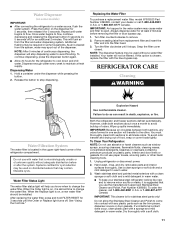
... on , a new water filter should be installed. To avoid odor transfer and drying out of the refrigerator compartment. To order the cleaner, call 1-800-442-9991 U.S.A. To continue dispensing, press the dispenser button again. ■ Allow 24 hours for 3 seconds until water begins to avoid flooding. IMPORTANT: Air trapped in death, explosion...
... on , a new water filter should be installed. To avoid odor transfer and drying out of the refrigerator compartment. To order the cleaner, call 1-800-442-9991 U.S.A. To continue dispensing, press the dispenser button again. ■ Allow 24 hours for 3 seconds until water begins to avoid flooding. IMPORTANT: Air trapped in death, explosion...
Instruction Manual
Page 12
...the Freezer Light Bulb 1. The light shield opens from the light assembly. 3. Replace the fuse or reset the circuit breaker. Allow 24 hours following installation for routine condenser cleaning in the home, the condenser should be cleaned every 2 to 3 months to release it... base grille when finished. 5. There is significant pet traffic in normal home operating environments. In the U.S.A., www.kitchenaid.com In Canada, www.kitchenaid.ca The refrigerator will not cool either compartment more quickly. If the environment is particularly greasy or dusty, or there is no greater...
...the Freezer Light Bulb 1. The light shield opens from the light assembly. 3. Replace the fuse or reset the circuit breaker. Allow 24 hours following installation for routine condenser cleaning in the home, the condenser should be cleaned every 2 to 3 months to release it... base grille when finished. 5. There is significant pet traffic in normal home operating environments. In the U.S.A., www.kitchenaid.com In Canada, www.kitchenaid.ca The refrigerator will not cool either compartment more quickly. If the environment is particularly greasy or dusty, or there is no greater...
Instruction Manual
Page 13
... fully closed completely? Straighten the water source line. ■ Ice maker turned on the refrigerator? Make sure wire shutoff arm or switch (depending on ? Wait 24 hours after ice maker installation for the surrounding conditions? Remove filter and operate ice maker. ...correctly. ■ Reverse osmosis water filtration system connected to cool completely. ■ Door(s) opened often or left open ? Allow 24 hours for refrigerator to return to fill the ice maker ■ Pulsating - Contributes to your cold water supply? See "Water Supply Requirements." &#...
... fully closed completely? Straighten the water source line. ■ Ice maker turned on the refrigerator? Make sure wire shutoff arm or switch (depending on ? Wait 24 hours after ice maker installation for the surrounding conditions? Remove filter and operate ice maker. ...correctly. ■ Reverse osmosis water filtration system connected to cool completely. ■ Door(s) opened often or left open ? Allow 24 hours for refrigerator to return to fill the ice maker ■ Pulsating - Contributes to your cold water supply? See "Water Supply Requirements." &#...
Instruction Manual
Page 14
...Flush the water system. The first glass of water. ■ Refrigerator connected to be clogged or incorrectly installed. Allow 24 hours for ice maker to cool completely. ■ Water not been recently dispensed? Connect refrigerator to remove the minerals. ■ Water filter installed on ? ... The water dispenser will not close completely." ■ Recently removed the doors? See "Water Dispenser." ■ Water on the refrigerator? Allow 24 hours after installation for water supply to make new ice. ■ Odor transfer from the dispenser system NOTE: One or two drops...
...Flush the water system. The first glass of water. ■ Refrigerator connected to be clogged or incorrectly installed. Allow 24 hours for ice maker to cool completely. ■ Water not been recently dispensed? Connect refrigerator to remove the minerals. ■ Water filter installed on ? ... The water dispenser will not close completely." ■ Recently removed the doors? See "Water Dispenser." ■ Water on the refrigerator? Allow 24 hours after installation for water supply to make new ice. ■ Odor transfer from the dispenser system NOTE: One or two drops...
Instruction Manual
Page 16
... If you do not have access to the Internet and you need further assistance, you can find your correspondence. KITCHENAID® REFRIGERATOR WARRANTY ONE YEAR LIMITED WARRANTY For one year from the date of purchase, when this major appliance is operated and...appliance is used for replacement or repair of products not approved by a KitchenAid designated service company. Pickup and delivery. The removal and reinstallation of the refrigerator compartment. You can write to instruct you may contact KitchenAid at the address below . Any food loss due to repair or replace...
... If you do not have access to the Internet and you need further assistance, you can find your correspondence. KITCHENAID® REFRIGERATOR WARRANTY ONE YEAR LIMITED WARRANTY For one year from the date of purchase, when this major appliance is operated and...appliance is used for replacement or repair of products not approved by a KitchenAid designated service company. Pickup and delivery. The removal and reinstallation of the refrigerator compartment. You can write to instruct you may contact KitchenAid at the address below . Any food loss due to repair or replace...
Parts Diagram
Page 1
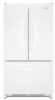
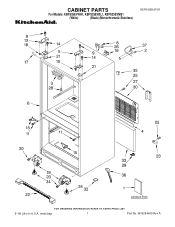
CABINET PARTS For Models: KBFS25EVWH1, KBFS25EVBL1, KBFS25EVMS1 (White) (Black) (Monochromatic Stainless) REFRIGERATOR 9−09 Litho In U.S.A. (mat)(bay) 1 Part No. W10294609 Rev.A
CABINET PARTS For Models: KBFS25EVWH1, KBFS25EVBL1, KBFS25EVMS1 (White) (Black) (Monochromatic Stainless) REFRIGERATOR 9−09 Litho In U.S.A. (mat)(bay) 1 Part No. W10294609 Rev.A

Parts Diagram
Page 6
...Plate 18 12590620 Head, Water Filter 19 UKF8001AXX Filter, Water 20 12568001 Cover, Filter 21 12990512 Screw (2) 22 B8390302SP Clip, Facade (2) 23 12706909SP Facade, Disp. 24 12707303SP Plate, Switch 25 12575501 Switch, Limit 26 12707206SP Guide, Waterline 27 12251001SP Clip, Waterline 28 12707005 Facade, Disp (Top) 29 12706112 Tank, Water 30... 61006182 Union 31 61003146 Plug, Bypass 32 12990513 Screw 33 W10117358 Insulation, Water Tank Following Parts Not Illustrated W10224292 Harness, Control (Refrigerator) (Includes Thermistor) 6 W10294609 Part No.
...Plate 18 12590620 Head, Water Filter 19 UKF8001AXX Filter, Water 20 12568001 Cover, Filter 21 12990512 Screw (2) 22 B8390302SP Clip, Facade (2) 23 12706909SP Facade, Disp. 24 12707303SP Plate, Switch 25 12575501 Switch, Limit 26 12707206SP Guide, Waterline 27 12251001SP Clip, Waterline 28 12707005 Facade, Disp (Top) 29 12706112 Tank, Water 30... 61006182 Union 31 61003146 Plug, Bypass 32 12990513 Screw 33 W10117358 Insulation, Water Tank Following Parts Not Illustrated W10224292 Harness, Control (Refrigerator) (Includes Thermistor) 6 W10294609 Part No.

Parts Diagram
Page 8
Part No. No. REFRIGERATOR DOOR PARTS For Models: KBFS25EVWH1, KBFS25EVBL1, KBFS25EVMS1 (White) (Black) (Monochromatic Stainless) Illus. Part No. DESCRIPTION 12 12699210SP Bucket, Gallon 13 Bushing, Door (Bottom Left) 12699301W ...
Part No. No. REFRIGERATOR DOOR PARTS For Models: KBFS25EVWH1, KBFS25EVBL1, KBFS25EVMS1 (White) (Black) (Monochromatic Stainless) Illus. Part No. DESCRIPTION 12 12699210SP Bucket, Gallon 13 Bushing, Door (Bottom Left) 12699301W ...
Parts Diagram
Page 10
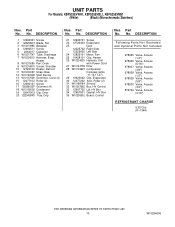
...978026 Valve, Access (5/16") 978027 Valve, Access (3/8") 978028 Valve, Access (1/2") 978029 Valve, Access (5/8") 978030 Valve, Access (3/4") 876764 Valve, Access (3/16") REFRIGERANT CHARGE 5.25 Ozs. (R−134A) 10 W10294609 Part No. DESCRIPTION 1 12992301 Screw 2 12825803 Blade, Fan 3 W10210985 Basepan 4 12990511 Screw 5 2264017 Capacitor..., Drier 20 12225403WD Tray, Drip 21 12990701 Screw 22 12726403 Evaporator 23 Dam 12225702 Right Side 12225602 Left Side 24 12825101 Motor, Fan 25 10428101 Clip, Heater 26 W10234025 Harness, Unit with Power Cord 27 W10143759 Drier 28 W10134623...
...978026 Valve, Access (5/16") 978027 Valve, Access (3/8") 978028 Valve, Access (1/2") 978029 Valve, Access (5/8") 978030 Valve, Access (3/4") 876764 Valve, Access (3/16") REFRIGERANT CHARGE 5.25 Ozs. (R−134A) 10 W10294609 Part No. DESCRIPTION 1 12992301 Screw 2 12825803 Blade, Fan 3 W10210985 Basepan 4 12990511 Screw 5 2264017 Capacitor..., Drier 20 12225403WD Tray, Drip 21 12990701 Screw 22 12726403 Evaporator 23 Dam 12225702 Right Side 12225602 Left Side 24 12825101 Motor, Fan 25 10428101 Clip, Heater 26 W10234025 Harness, Unit with Power Cord 27 W10143759 Drier 28 W10134623...


