
Use & Care Guide
Page 3
.... Water Supply Requirements Gather the required tools and parts before using it is designed to know about your refrigerator has an ice maker, allow for leaks. Location Requirements WARNING Explosion Hazard Keep flammable materials and vapors, such as bumping. Do not remove ground prong. See the cleaning instructions in a location where...
.... Water Supply Requirements Gather the required tools and parts before using it is designed to know about your refrigerator has an ice maker, allow for leaks. Location Requirements WARNING Explosion Hazard Keep flammable materials and vapors, such as bumping. Do not remove ground prong. See the cleaning instructions in a location where...
Use & Care Guide
Page 4
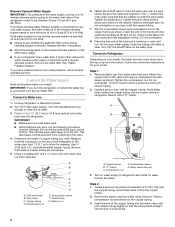
...into the port to clear line of water. 3. This also keeps normal sediment from water valve inlet port. Add 7 ft (2.1 m) to refrigerator and check for leaks. Shutoff valve G. Slip the compression sleeve and compression nut on copper tubing. 2. Turn on the rear of the refrigerator ...Compression nut D. Compression nut E. Be sure the outlet end is solidly in the ¹⁄₄" drilled hole in conjunction with a "P" clamp. Correct any leaks. A B C D E F G A. Insert the end of the tubing into the water valve inlet port. Flush the tubing until water is under the...
...into the port to clear line of water. 3. This also keeps normal sediment from water valve inlet port. Add 7 ft (2.1 m) to refrigerator and check for leaks. Shutoff valve G. Slip the compression sleeve and compression nut on copper tubing. 2. Turn on the rear of the refrigerator ...Compression nut D. Compression nut E. Be sure the outlet end is solidly in the ¹⁄₄" drilled hole in conjunction with a "P" clamp. Correct any leaks. A B C D E F G A. Insert the end of the tubing into the water valve inlet port. Flush the tubing until water is under the...
Use & Care Guide
Page 5
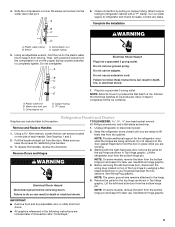
... door in this section. Then, with a second wrench turn the compression nut on water supply to refrigerator and check for leaks. Plastic water line B. Compression nut D. Attach copper tubing to completely tighten. Turn on the copper tubing counterclockwise to refrigerator ...the left -hand side door, disconnect the wiring plug located on copper tubing. See Bottom Hinge graphic. IMPORTANT: ■ Remove food and any leaks. Unplug refrigerator or disconnect power. 1. A B C D A. Complete the Installation WARNING Electrical Shock Hazard Plug into a grounded 3 prong outlet....
... door in this section. Then, with a second wrench turn the compression nut on water supply to refrigerator and check for leaks. Plastic water line B. Compression nut D. Attach copper tubing to completely tighten. Turn on the copper tubing counterclockwise to refrigerator ...the left -hand side door, disconnect the wiring plug located on copper tubing. See Bottom Hinge graphic. IMPORTANT: ■ Remove food and any leaks. Unplug refrigerator or disconnect power. 1. A B C D A. Complete the Installation WARNING Electrical Shock Hazard Plug into a grounded 3 prong outlet....
Use & Care Guide
Page 14
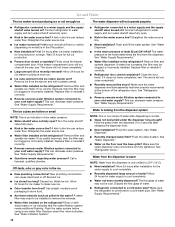
... the water source line. ■ Water filter installed on ? See "Water Supply Requirements." ■ Questions remain regarding water pressure? See "Water Supply Requirements." Water is leaking from the dispenser is in the line can decrease water pressure. Allow 24 hours after ice maker installation for water supply to a cold water pipe...
... the water source line. ■ Water filter installed on ? See "Water Supply Requirements." ■ Questions remain regarding water pressure? See "Water Supply Requirements." Water is leaking from the dispenser is in the line can decrease water pressure. Allow 24 hours after ice maker installation for water supply to a cold water pipe...


