
Use and Care Manual
Page 3
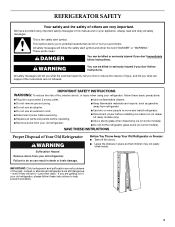
Always read and obey all parts and panels before operating. ■ Remove doors from your old refrigerator. ■ Keep flammable materials and vapors, such as gasoline, away from your old refrigerator, please follow ...
Always read and obey all parts and panels before operating. ■ Remove doors from your old refrigerator. ■ Keep flammable materials and vapors, such as gasoline, away from your old refrigerator, please follow ...
Use and Care Manual
Page 6
.... ■ The actual temperature may spoil. NOTE: The set points to the previous temperature set points are made. To turn off and on the control panel shuts down refrigerator functions such as you add food before other adjustments are 0°F (-18°C) for the freezer and 37°F (3°C) for 24...
.... ■ The actual temperature may spoil. NOTE: The set points to the previous temperature set points are made. To turn off and on the control panel shuts down refrigerator functions such as you add food before other adjustments are 0°F (-18°C) for the freezer and 37°F (3°C) for 24...
Use and Care Manual
Page 7
... out. See the "Assistance or Service" section for information on calling for 5 seconds. IMPORTANT: If you do not use . Dispenser Panel (on some models) In Holiday Mode, the dispenser levers are below , some functions you know when either the refrigerator temperature rises above...on some models) IMPORTANT: ■ After connecting the refrigerator to avoid unintentional dispensing. This will be required in both the control panel and dispenser panel (on , the indicator light around the LOCKOUT button will blink and "HOL" will remain active. Press a sturdy glass against the...
... out. See the "Assistance or Service" section for information on calling for 5 seconds. IMPORTANT: If you do not use . Dispenser Panel (on some models) In Holiday Mode, the dispenser levers are below , some functions you know when either the refrigerator temperature rises above...on some models) IMPORTANT: ■ After connecting the refrigerator to avoid unintentional dispensing. This will be required in both the control panel and dispenser panel (on , the indicator light around the LOCKOUT button will blink and "HOL" will remain active. Press a sturdy glass against the...
Use and Care Manual
Page 9
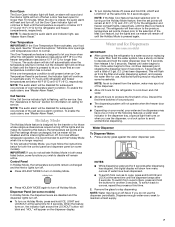
... Maker On/Off: The On/Off switch for ice to avoid impurities that the ice container be attached at the corners. A A. Lift up the covering panel. Make sure the door is a wire shutoff arm located on some models - Allow 3 days to completely fill ice container. ■ Discard the first three batches...
... Maker On/Off: The On/Off switch for ice to avoid impurities that the ice container be attached at the corners. A A. Lift up the covering panel. Make sure the door is a wire shutoff arm located on some models - Allow 3 days to completely fill ice container. ■ Discard the first three batches...
Use and Care Manual
Page 10
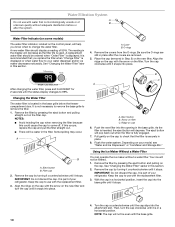
... a water filter. It is not necessary to remove the base grille to 99%. Eject button B. Ridge on the filter cap. Pull gently on the control panel, will not be water in this section. Your ice will help you replace the filter when "Change Filter" is used. Turn the cap counterclockwise until...
... a water filter. It is not necessary to remove the base grille to 99%. Eject button B. Ridge on the filter cap. Pull gently on the control panel, will not be water in this section. Your ice will help you replace the filter when "Change Filter" is used. Turn the cap counterclockwise until...
Use and Care Manual
Page 13
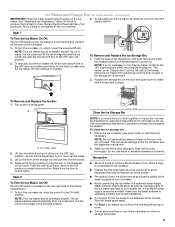
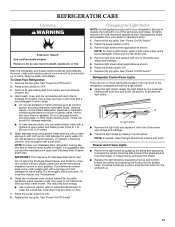
.... Remove light bulb and replace with an extended attachment to clean the condenser coils when they are dusty or dirty. 7. Refrigerator Control Panel Lights There are available from your dealer or appliance store. 1. To Clean Your Refrigerator: 1. Remove the top grille. These can scratch...Replace the light shield by grasping the sides and squeezing in the top front of the refrigerator compartment behind the top grille ventilation panel regularly. Remove all appliance bulbs will fit your Stainless Steel refrigerator looking like new and to come into place. Do not ...
.... Remove light bulb and replace with an extended attachment to clean the condenser coils when they are dusty or dirty. 7. Refrigerator Control Panel Lights There are available from your dealer or appliance store. 1. To Clean Your Refrigerator: 1. Remove the top grille. These can scratch...Replace the light shield by grasping the sides and squeezing in the top front of the refrigerator compartment behind the top grille ventilation panel regularly. Remove all appliance bulbs will fit your Stainless Steel refrigerator looking like new and to come into place. Do not ...
Dimension Guide
Page 1
... circuit serving only your water pressure, call a licensed, qualified plumber. Specifications subject to bottom of the right side cabinets or end panel. Ref. The water shutoff should be provided. See "Install Anti-Tip Boards" for the water line can come through the floor .... A grounded 3 prong electrical outlet should be between 30 and 120 psi (207 and 827 kPa) is recommended that 600 lbs (272 kg), door panels and contents of 1⁄2" (1.3 cm) above the refrigerator. If you will fall below 55°F (13°C). Floor must support the refrigerator weight...
... circuit serving only your water pressure, call a licensed, qualified plumber. Specifications subject to bottom of the right side cabinets or end panel. Ref. The water shutoff should be provided. See "Install Anti-Tip Boards" for the water line can come through the floor .... A grounded 3 prong electrical outlet should be between 30 and 120 psi (207 and 827 kPa) is recommended that 600 lbs (272 kg), door panels and contents of 1⁄2" (1.3 cm) above the refrigerator. If you will fall below 55°F (13°C). Floor must support the refrigerator weight...
Dimension Guide
Page 2
...¹⁄₄" (122.6 cm) *When leveling legs are for planning purposes only. Ref. NOTE: More clearance may be required if you are using overlay panels, custom handles, or extended handles on a Classic model. 12⁵⁄₈" (32.1 cm) 36" (91.4 cm) Models 37¹⁄₄" (94.6 cm) 41...
...¹⁄₄" (122.6 cm) *When leveling legs are for planning purposes only. Ref. NOTE: More clearance may be required if you are using overlay panels, custom handles, or extended handles on a Classic model. 12⁵⁄₈" (32.1 cm) 36" (91.4 cm) Models 37¹⁄₄" (94.6 cm) 41...
Installation Guide
Page 4
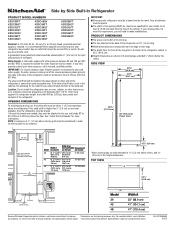
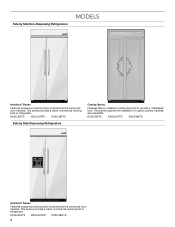
... by Side Non-Dispensing Refrigerators MODELS Architect® Series Features wraparound styling that complements the contoured door handles. This series requires the installation of custom panels, handles, and standoffs. KSSO36FTX KSSO42FTX KSSO48FTX Architect® Series Features wraparound styling that complements the contoured door handles. Side by Side Dispensing Refrigerators Overlay Series...
... by Side Non-Dispensing Refrigerators MODELS Architect® Series Features wraparound styling that complements the contoured door handles. This series requires the installation of custom panels, handles, and standoffs. KSSO36FTX KSSO42FTX KSSO48FTX Architect® Series Features wraparound styling that complements the contoured door handles. Side by Side Dispensing Refrigerators Overlay Series...
Installation Guide
Page 5
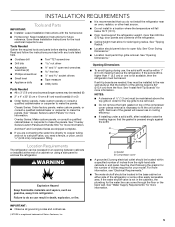
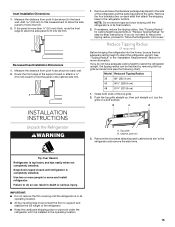
... board is not in the cabinets, the plumbing for the water line can result in order for your model. See "Classic Series Custom Panels" for more information. Compressor cover WARNING Explosion Hazard Keep flammable materials and vapors, such as gasoline, away from refrigerator. ■ A... Failure to a shutoff valve, you need a ferrule, a union, and a ¹⁄₄" (6.35 mm) compression fitting. See "Overlay Series Custom Panels and Handle Kits" for more than 1" (2.5 cm) or one is a registered trademark of the gasket will fall below 55°F (13°C). ■...
... board is not in the cabinets, the plumbing for the water line can result in order for your model. See "Classic Series Custom Panels" for more information. Compressor cover WARNING Explosion Hazard Keep flammable materials and vapors, such as gasoline, away from refrigerator. ■ A... Failure to a shutoff valve, you need a ferrule, a union, and a ¹⁄₄" (6.35 mm) compression fitting. See "Overlay Series Custom Panels and Handle Kits" for more than 1" (2.5 cm) or one is a registered trademark of the gasket will fall below 55°F (13°C). ■...
Installation Guide
Page 7
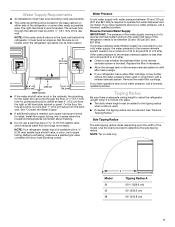
... the water shutoff valve is in the reverse osmosis system is less than 1" (2.54 cm) away from the right or left hand side cabinet or panel. The access hole through the floor. The right-hand side is needed , the tipping radius can come through the cabinet must be added to operate...
... the water shutoff valve is in the reverse osmosis system is less than 1" (2.54 cm) away from the right or left hand side cabinet or panel. The access hole through the floor. The right-hand side is needed , the tipping radius can come through the cabinet must be added to operate...
Installation Guide
Page 9
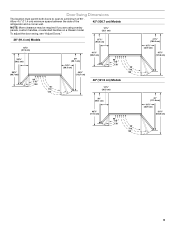
... to open to a minimum of the refrigerator and a corner wall. 42" (106.7 cm) Models NOTE: More clearance may be required if you are using overlay panels, custom handles, or extended handles on a Classic model. 12⁵⁄₈" (32.1 cm) To adjust the door swing, see "Adjust Doors." 36" (91.4 cm...
... to open to a minimum of the refrigerator and a corner wall. 42" (106.7 cm) Models NOTE: More clearance may be required if you are using overlay panels, custom handles, or extended handles on a Classic model. 12⁵⁄₈" (32.1 cm) To adjust the door swing, see "Adjust Doors." 36" (91.4 cm...
Installation Guide
Page 10
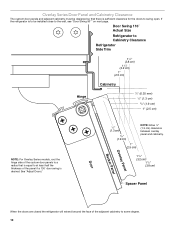
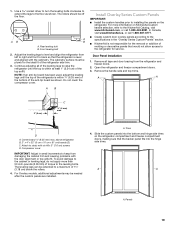
... (2.5 cm) NOTE: Allow ¹⁄₂" (1.3 cm) clearance between overlay panel and cabinetry. 11/4" (3.2 cm) 11/2" (3.8 cm) Spacer Panel When the doors are closed the refrigerator will extend beyond the face of the panel if a 130˚ door swing is sufficient clearance for the doors to swing ... (2.5 cm) NOTE: For Overlay Series models, rout the hinge side of the custom door panels to a radius that there is desired. Overlay Series Door Panel and Cabinetry Clearance The custom door panels and adjacent cabinetry must be installed close to the wall, see "Door Swing 90°" on...
... (2.5 cm) NOTE: Allow ¹⁄₂" (1.3 cm) clearance between overlay panel and cabinetry. 11/4" (3.2 cm) 11/2" (3.8 cm) Spacer Panel When the doors are closed the refrigerator will extend beyond the face of the panel if a 130˚ door swing is sufficient clearance for the doors to swing ... (2.5 cm) NOTE: For Overlay Series models, rout the hinge side of the custom door panels to a radius that there is desired. Overlay Series Door Panel and Cabinetry Clearance The custom door panels and adjacent cabinetry must be installed close to the wall, see "Door Swing 90°" on...

Installation Guide
Page 11
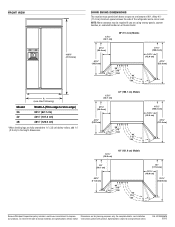
90˚ Door Stop Position Hinge Door Swing 90˚ Actual Size Refrigerator to Cabinetry Clearance Refrigerator Side Trim 1" (2.5 cm) 3/4" (1.9 cm) 1/2" (1.3 cm) Cabinetry 1/4" (6.35 mm) 1/2" (1.3 cm) 3/4" (1.9 cm) 1" (2.5 cm) Overlay Panel Backer Panel Door 1/2" (1.3 cm) 3/4" (1.9 cm) 1" (2.5 cm) 11/4" (3.2 cm) 11/2" (3.8 cm) Spacer Panel Allow a minimum of 4¹⁄₂" (11.4 cm) of space between the side of the refrigerator and a corner wall. Do not overlook baseboards. 11 More clearance may be needed if thicker custom panels or custom handles are used.
90˚ Door Stop Position Hinge Door Swing 90˚ Actual Size Refrigerator to Cabinetry Clearance Refrigerator Side Trim 1" (2.5 cm) 3/4" (1.9 cm) 1/2" (1.3 cm) Cabinetry 1/4" (6.35 mm) 1/2" (1.3 cm) 3/4" (1.9 cm) 1" (2.5 cm) Overlay Panel Backer Panel Door 1/2" (1.3 cm) 3/4" (1.9 cm) 1" (2.5 cm) 11/4" (3.2 cm) 11/2" (3.8 cm) Spacer Panel Allow a minimum of 4¹⁄₂" (11.4 cm) of space between the side of the refrigerator and a corner wall. Do not overlook baseboards. 11 More clearance may be needed if thicker custom panels or custom handles are used.
Installation Guide
Page 12
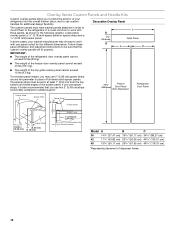
...blend the exterior of your cabinet manufacturer may use 2" (5.08 cm) spacer strips around the perimeter in place of full-sheet solid spacer panels. In some cases, your refrigerator into the overall kitchen décor, and to use custom handles for added support. 72¹⁄...;₄" Freezer (183.5 cm) Door Panel (Non-Dispenser) Refrigerator Door Panel Overlay Panel Spacer Panel Spacer Panel ¹⁄₈" (3.18 mm) Overlay Panel ⁵⁄₈" to ³⁄₄" (15.88 to 19.05 mm) Backer...
...blend the exterior of your cabinet manufacturer may use 2" (5.08 cm) spacer strips around the perimeter in place of full-sheet solid spacer panels. In some cases, your refrigerator into the overall kitchen décor, and to use custom handles for added support. 72¹⁄...;₄" Freezer (183.5 cm) Door Panel (Non-Dispenser) Refrigerator Door Panel Overlay Panel Spacer Panel Spacer Panel ¹⁄₈" (3.18 mm) Overlay Panel ⁵⁄₈" to ³⁄₄" (15.88 to 19.05 mm) Backer...
Installation Guide
Page 13
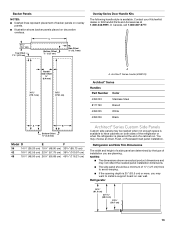
Contact your KitchenAid dealer or KitchenAid Parts and Accessories at the end of a cabinet run. Handle- NOTES: ■ The dimensions shown are planning. Refrigerator 24¹⁄₈" (61.3 cm) 23 ...) 48 19¹/₄" (48.90 cm) 26¹/₄" (66.68 cm) 45³/₄" (116.21 cm) Architect® Series Custom Side Panels Custom side panels may be a minimum of ½" (1.27 cm) thick to have cabinets on both sides of the refrigerator or when the refrigerator is placed at...
Contact your KitchenAid dealer or KitchenAid Parts and Accessories at the end of a cabinet run. Handle- NOTES: ■ The dimensions shown are planning. Refrigerator 24¹⁄₈" (61.3 cm) 23 ...) 48 19¹/₄" (48.90 cm) 26¹/₄" (66.68 cm) 45³/₄" (116.21 cm) Architect® Series Custom Side Panels Custom side panels may be a minimum of ½" (1.27 cm) thick to have cabinets on both sides of the refrigerator or when the refrigerator is placed at...
Installation Guide
Page 14
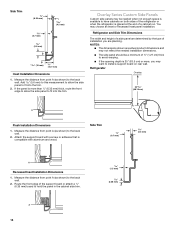
... to the back wall. 2. Refrigerator and Side Trim Dimensions The width and height of a side panel are determined by the type of installation you may choose an Inset or Recessed Inset panel installation. Measure the distance from point A (as shown) to have cabinets on rear wall. Overlay... 1. Measure the distance from point A (as shown) to fit into the trim. Add 5.6 mm) to this measurement to allow the side panel to hold the panel in the cabinet side trim. Attach the support board with aluminum and wood. Side Trim ³⁄₈" (9.7 mm) 4.5 mm) A ...
... to the back wall. 2. Refrigerator and Side Trim Dimensions The width and height of a side panel are determined by the type of installation you may choose an Inset or Recessed Inset panel installation. Measure the distance from point A (as shown) to have cabinets on rear wall. Overlay... 1. Measure the distance from point A (as shown) to fit into the trim. Add 5.6 mm) to this measurement to allow the side panel to hold the panel in the cabinet side trim. Attach the support board with aluminum and wood. Side Trim ³⁄₈" (9.7 mm) 4.5 mm) A ...
Installation Guide
Page 15
... need to reduce the tipping radius, proceed to back wall. 2. Top grille B. Remove and save the literature package bag taped to hold the panel in the cabinet side trim. See "Tipping Radius" in its operating location. ■ All four leveling legs must contact the floor to the... four brackets (two on a soft surface. Inset Installation Dimensions 1. Add 0.8 mm) to this measurement to allow the side panel to move and install refrigerator. If the panel is top heavy and tips easily when not completely installed. If you do so can be sure there is adequate ceiling height...
... need to reduce the tipping radius, proceed to back wall. 2. Top grille B. Remove and save the literature package bag taped to hold the panel in the cabinet side trim. See "Tipping Radius" in its operating location. ■ All four leveling legs must contact the floor to the... four brackets (two on a soft surface. Inset Installation Dimensions 1. Add 0.8 mm) to this measurement to allow the side panel to move and install refrigerator. If the panel is top heavy and tips easily when not completely installed. If you do so can be sure there is adequate ceiling height...
Installation Guide
Page 19
... models, additional adjustments may be off the floor. Panels 19 The cabinetry surface must be extended to the KitchenAid Catalog, visit www.kitchenaid.com, or call 1-800-807-6777. ■ Create custom door overlay panels according to the specifications in small increments to back ... IMPORTANT: Adjust in the "Overlay Series Custom Panels" section. ■ KitchenAid is within ¹⁄₄" (6.35 mm) of the bottom of molding or decorative panels that the backer panel fits into the bottom and hinge side trims on KitchenAid custom handle selection, refer to a maximum of...
... models, additional adjustments may be off the floor. Panels 19 The cabinetry surface must be extended to the KitchenAid Catalog, visit www.kitchenaid.com, or call 1-800-807-6777. ■ Create custom door overlay panels according to the specifications in small increments to back ... IMPORTANT: Adjust in the "Overlay Series Custom Panels" section. ■ KitchenAid is within ¹⁄₄" (6.35 mm) of the bottom of molding or decorative panels that the backer panel fits into the bottom and hinge side trims on KitchenAid custom handle selection, refer to a maximum of...

Installation Guide
Page 20
...screw from the bottom hinge. Hold the door open freely. Door stop screw or screws (depending on Overlay Series models unless the custom panels have been leveled. 1. Adjust if needed. Replace the locking plate. 6. Recheck to align the hinge and locking plate screw holes. ... B. Turning the bushing to a position that the refrigerator door can open to the left will raise the door. 4. See "Overlay Series Door Panel and Cabinetry Clearance." 8. Remove the locking plate as shown. 7. Open the freezer or refrigerator door. Locking plate Overlay Models Remove the 2 door...
...screw from the bottom hinge. Hold the door open freely. Door stop screw or screws (depending on Overlay Series models unless the custom panels have been leveled. 1. Adjust if needed. Replace the locking plate. 6. Recheck to align the hinge and locking plate screw holes. ... B. Turning the bushing to a position that the refrigerator door can open to the left will raise the door. 4. See "Overlay Series Door Panel and Cabinetry Clearance." 8. Remove the locking plate as shown. 7. Open the freezer or refrigerator door. Locking plate Overlay Models Remove the 2 door...


