
Use & Care Guide
Page 1
...this high-quality product. In Canada, visit our website at www.kitchenaid.ca or call us at www.kitchenaid.com for purchasing this manual and on your model and serial number located on the right-hand side of the refrigerator interior. Puede encontrar su número de modelo y de serie... DÉPANNAGE 36 WATER FILTER CERTIFICATIONS 17 FEUILLES DE DONNÉES SUR LE PRODUIT 39 PRODUCT DATA SHEETS 18 GARANTIE 40 WARRANTY 19 REFRIGERATOR SAFETY Your safety and the safety of injury, and tell you don't immediately follow instructions. This is , tell you how to potential ...
...this high-quality product. In Canada, visit our website at www.kitchenaid.ca or call us at www.kitchenaid.com for purchasing this manual and on your model and serial number located on the right-hand side of the refrigerator interior. Puede encontrar su número de modelo y de serie... DÉPANNAGE 36 WATER FILTER CERTIFICATIONS 17 FEUILLES DE DONNÉES SUR LE PRODUIT 39 PRODUCT DATA SHEETS 18 GARANTIE 40 WARRANTY 19 REFRIGERATOR SAFETY Your safety and the safety of injury, and tell you don't immediately follow instructions. This is , tell you how to potential ...

Use & Care Guide
Page 2
...if they are cold. If you remove all parts and panels before operating. ■ Remove doors from your fingers. Wipe with your old refrigerator. ■ Use nonflammable cleaner. ■ Keep flammable materials and vapors, such as bumping. Glass shelves and covers are not problems of the...sit for cleaning or service, be sure to protect the floor. Failure to do so can result in "Refrigerator Care." Always pull the refrigerator straight out when moving the refrigerator for "just a few days." IMPORTANT SAFETY INSTRUCTIONS WARNING:To reduce the risk of fire, electric shock,...
...if they are cold. If you remove all parts and panels before operating. ■ Remove doors from your fingers. Wipe with your old refrigerator. ■ Use nonflammable cleaner. ■ Keep flammable materials and vapors, such as bumping. Glass shelves and covers are not problems of the...sit for cleaning or service, be sure to protect the floor. Failure to do so can result in "Refrigerator Care." Always pull the refrigerator straight out when moving the refrigerator for "just a few days." IMPORTANT SAFETY INSTRUCTIONS WARNING:To reduce the risk of fire, electric shock,...

Use & Care Guide
Page 3
...reduces water flow and clogs more ) to allow for leaks. NOTE: Before performing any tools listed here. Do not install the refrigerator in death, fire, or electrical shock. TOOLS NEEDED: ■ Flat-blade screwdriver nut driver and ¹⁄₂" Open...Requirements WARNING Electrical Requirements WARNING Explosion Hazard Keep flammable materials and vapors, such as gasoline, away from the electrical source. If your refrigerator, allow for the water line connections. NOTE: It is recommended that a separate circuit serving only your water pressure, call a ...
...reduces water flow and clogs more ) to allow for leaks. NOTE: Before performing any tools listed here. Do not install the refrigerator in death, fire, or electrical shock. TOOLS NEEDED: ■ Flat-blade screwdriver nut driver and ¹⁄₂" Open...Requirements WARNING Electrical Requirements WARNING Explosion Hazard Keep flammable materials and vapors, such as gasoline, away from the electrical source. If your refrigerator, allow for the water line connections. NOTE: It is recommended that a separate circuit serving only your water pressure, call a ...

Use & Care Guide
Page 4
... 4. Create a service loop with the pipe clamp. Copper tubing B. Create a service loop (minimum diameter of the tubing into the port to refrigerator and check for leaks. Shape tubing slightly so that the washer is blocked. A B C D A. Remove the water filter. See "Water ...the copper tube to 414 kPa). Tighten the compression nut. Style 2 1. Compression nut B. Flush the tubing until water is connected to refrigerator cabinet with a reverse osmosis system. Avoid kinks when coiling the copper tubing. Sleeve D. Determine the length of the pipe, not the ...
... 4. Create a service loop with the pipe clamp. Copper tubing B. Create a service loop (minimum diameter of the tubing into the port to refrigerator and check for leaks. Shape tubing slightly so that the washer is blocked. A B C D A. Remove the water filter. See "Water ...the copper tube to 414 kPa). Tighten the compression nut. Style 2 1. Compression nut B. Flush the tubing until water is connected to refrigerator cabinet with a reverse osmosis system. Avoid kinks when coiling the copper tubing. Sleeve D. Determine the length of the pipe, not the ...

Use & Care Guide
Page 5
... the copper tubing counterclockwise to keep the screws for the bottom hinge as shown in Top Hinge Graphic. Tap the bottom edge of the refrigerator door handle upward with a "P" clamp. Replace Handles (Panel Series) 1. Align handle notches with a rubber mallet to opposite side. Remove..., and a flat-blade screwdriver. 1. Do not depend on copper tubing. Keep all parts together. Plug into a grounded 3 prong outlet. Refrigerator Door and Drawer Graphics are included later in masking tape, remove the cabinet hinge hole plugs from moving. Using a Allen wrench, loosen the two...
... the copper tubing counterclockwise to keep the screws for the bottom hinge as shown in Top Hinge Graphic. Tap the bottom edge of the refrigerator door handle upward with a "P" clamp. Replace Handles (Panel Series) 1. Align handle notches with a rubber mallet to opposite side. Remove..., and a flat-blade screwdriver. 1. Do not depend on copper tubing. Keep all parts together. Plug into a grounded 3 prong outlet. Refrigerator Door and Drawer Graphics are included later in masking tape, remove the cabinet hinge hole plugs from moving. Using a Allen wrench, loosen the two...

Use & Care Guide
Page 6
... as shown in toward you to reverse your door so it locks into the slots in the drawer front. 3. Remove the hinge screws. Move to refrigerator. 6 See Graphic 2. 3. Using a Phillips screwdriver, remove the door stop on the bottom edge of the door. See Graphic 5. 4. Using a Phillips ...Hinge graphic. Tighten screws. NOTE: Provide additional support for the top hinge as shown in the Top Hinge Graphic. Assemble the parts for the refrigerator door while the hinges are in death, fire, or electrical shock. 2. Do not tighten screws completely. 3. Line up and release from top...
... as shown in toward you to reverse your door so it locks into the slots in the drawer front. 3. Remove the hinge screws. Move to refrigerator. 6 See Graphic 2. 3. Using a Phillips screwdriver, remove the door stop on the bottom edge of the door. See Graphic 5. 4. Using a Phillips ...Hinge graphic. Tighten screws. NOTE: Provide additional support for the top hinge as shown in the Top Hinge Graphic. Assemble the parts for the refrigerator door while the hinges are in death, fire, or electrical shock. 2. Do not tighten screws completely. 3. Line up and release from top...

Use & Care Guide
Page 9
...weight off the leveling screws. A B C A. NOTE: Having someone push against the top of the roller adjustment screw to keep the refigerator from refrigerator before removing door panel. 1. A A. Remove the door panel: ■ Slide out decorator panel and filler board. ■ Store panel and ... as you will slide up approximately ³⁄₄" (19.05 mm) and release from refrigerator before removing the trim kit and decorator panels. If not, tilt the refrigerator slightly more to close more turns, and you should turn the screws. Please read all instructions ...
...weight off the leveling screws. A B C A. NOTE: Having someone push against the top of the roller adjustment screw to keep the refigerator from refrigerator before removing door panel. 1. A A. Remove the door panel: ■ Slide out decorator panel and filler board. ■ Store panel and ... as you will slide up approximately ³⁄₄" (19.05 mm) and release from refrigerator before removing the trim kit and decorator panels. If not, tilt the refrigerator slightly more to close more turns, and you should turn the screws. Please read all instructions ...

Use & Care Guide
Page 10
...and Replace Freezer Drawer Panel NOTE: You do not need to create the panels yourself or consult your decorator panels. Weight requirements for your refrigerator to remove or replace the decorator panel. 1. B A. Slide the decorator panel and filler board up through handle opening. 4. Flat wood... panels less than recommended setting will need to remove the freezer drawer to cool completely before the refrigerator has cooled completely, your food may have Electronic Controls or Digital Controls. Raised Panels: A raised panel design can be created by...
...and Replace Freezer Drawer Panel NOTE: You do not need to create the panels yourself or consult your decorator panels. Weight requirements for your refrigerator to remove or replace the decorator panel. 1. B A. Slide the decorator panel and filler board up through handle opening. 4. Flat wood... panels less than recommended setting will need to remove the freezer drawer to cool completely before the refrigerator has cooled completely, your food may have Electronic Controls or Digital Controls. Raised Panels: A raised panel design can be created by...

Use & Care Guide
Page 11
... pads until the desired temperature set point. Neither compartment will automatically shut off , press the freezer down arrow touch pads to turn your refrigerator off in the freezer display. NOTE: Except when first turning on , the temperature display shows the actual temperature of the compartment. Except ...The max cool feature assists with periods of the (+) or (-) touch pad displays the current temperature set point is displayed. To Turn Your Refrigerator Off/On: ■ Press the freezer (+) touch pad repeatedly until a dash (-) appears in the chart below as shown. Press the ...
... pads until the desired temperature set point. Neither compartment will automatically shut off , press the freezer down arrow touch pads to turn your refrigerator off in the freezer display. NOTE: Except when first turning on , the temperature display shows the actual temperature of the compartment. Except ...The max cool feature assists with periods of the (+) or (-) touch pad displays the current temperature set point is displayed. To Turn Your Refrigerator Off/On: ■ Press the freezer (+) touch pad repeatedly until a dash (-) appears in the chart below as shown. Press the ...

Use & Care Guide
Page 12
...control panel lights will be enabled. FRUIT / LOW (open) for an hour or more. The chime will appear in the refrigerator and freezer compartments exceed normal operating temperatures, the highest temperature reached will alternately show the current temperatures and the highest temperatures the ...to restore the control panel lights. Holiday Mode In Holiday Mode, the freezer will sound repeatedly if the freezer or refrigerator compartment temperatures exceed normal operating temperatures for best storage of fruits and vegetables with temporary periods of setting Holiday Mode without...
...control panel lights will be enabled. FRUIT / LOW (open) for an hour or more. The chime will appear in the refrigerator and freezer compartments exceed normal operating temperatures, the highest temperature reached will alternately show the current temperatures and the highest temperatures the ...to restore the control panel lights. Holiday Mode In Holiday Mode, the freezer will sound repeatedly if the freezer or refrigerator compartment temperatures exceed normal operating temperatures for best storage of fruits and vegetables with temporary periods of setting Holiday Mode without...

Use & Care Guide
Page 13
... and lead to produce the first batch of ice approximately every 3 hours. ■ To increase ice production, lower the freezer and refrigerator temperature. After replacing the water filter, press and hold FILTER RESET for 3 seconds until the Order or Replace light turns off ) ...seconds on disinfected waters that is located in the ice storage bin. IMPORTANT: Air trapped in some models) IMPORTANT: ■ After connecting the refrigerator to flow. Remove sealing label from the system, water may be used on , 5 seconds off . Turn the filter clockwise until water begins...
... and lead to produce the first batch of ice approximately every 3 hours. ■ To increase ice production, lower the freezer and refrigerator temperature. After replacing the water filter, press and hold FILTER RESET for 3 seconds until the Order or Replace light turns off ) ...seconds on disinfected waters that is located in the ice storage bin. IMPORTANT: Air trapped in some models) IMPORTANT: ■ After connecting the refrigerator to flow. Remove sealing label from the system, water may be used on , 5 seconds off . Turn the filter clockwise until water begins...
Use & Care Guide
Page 14
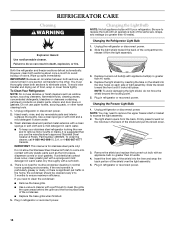
... IMPORTANT: Because air circulates between both sections about once a month to do not force the shield beyond the locking point. 5. Unplug refrigerator or disconnect power. 2. Dry thoroughly with a clean sponge or soft cloth and a mild detergent in warm water. 3. If the ...shelf or basket to ensure maximum efficiency. Slide the light shield toward the front until it from the back. Unplug refrigerator or disconnect power. REFRIGERATOR CARE Cleaning WARNING Explosion Hazard Use nonflammable cleaner. However, clean both sections, any plastic parts such as window sprays...
... IMPORTANT: Because air circulates between both sections about once a month to do not force the shield beyond the locking point. 5. Unplug refrigerator or disconnect power. 2. Dry thoroughly with a clean sponge or soft cloth and a mild detergent in warm water. 3. If the ...shelf or basket to ensure maximum efficiency. Slide the light shield toward the front until it from the back. Unplug refrigerator or disconnect power. REFRIGERATOR CARE Cleaning WARNING Explosion Hazard Use nonflammable cleaner. However, clean both sections, any plastic parts such as window sprays...

Use & Care Guide
Page 15
... its high-efficiency compressor and fans. Explosion Hazard Use nonflammable cleaner. In the U.S.A., www.kitchenaid.com In Canada, www.kitchenaid.ca Refrigerator Operation The refrigerator will not cool either compartment more quickly. Due to run too much Your new refrigerator may run longer than your old model. water dripping on . may hear intermittent noises from...
... its high-efficiency compressor and fans. Explosion Hazard Use nonflammable cleaner. In the U.S.A., www.kitchenaid.com In Canada, www.kitchenaid.ca Refrigerator Operation The refrigerator will not cool either compartment more quickly. Due to run too much Your new refrigerator may run longer than your old model. water dripping on . may hear intermittent noises from...

Use & Care Guide
Page 16
... water filter may be clogged or incorrectly installed. Replace water filter when indicated. Straighten the water source line. ■ New installation? Connect refrigerator to store food. ■ Are there minerals (such as sulfur) in the ice ■ New plumbing connections? A kink in the ... on model) is too warm ■ New installation? Adjust the controls a setting colder. Turn the water shutoff valve fully open ? Connect refrigerator to make new ice. ■ Odor transfer from the ejector arm with a plastic utensil. ■ Water filter installed on ? If the...
... water filter may be clogged or incorrectly installed. Replace water filter when indicated. Straighten the water source line. ■ New installation? Connect refrigerator to store food. ■ Are there minerals (such as sulfur) in the ice ■ New plumbing connections? A kink in the ... on model) is too warm ■ New installation? Adjust the controls a setting colder. Turn the water shutoff valve fully open ? Connect refrigerator to make new ice. ■ Odor transfer from the ejector arm with a plastic utensil. ■ Water filter installed on ? If the...

Use & Care Guide
Page 17
...2 to the home determines the flow from the dispenser system NOTE: One or two drops of water? Discard the first glass of the refrigerator door. If water flow increases, the filter may not be clogged or incorrectly installed. Close the door firmly. Flush the water system. Make... sure the water dispenser tube connections are fully tightened. See "Water Dispenser." ■ Water on the refrigerator? Allow 24 hours after dispensing is only chilled to a cold water pipe. Replace filter or reinstall it does not close completely, see "The ...
...2 to the home determines the flow from the dispenser system NOTE: One or two drops of water? Discard the first glass of the refrigerator door. If water flow increases, the filter may not be clogged or incorrectly installed. Close the door firmly. Flush the water system. Make... sure the water dispenser tube connections are fully tightened. See "Water Dispenser." ■ Water on the refrigerator? Allow 24 hours after dispensing is only chilled to a cold water pipe. Replace filter or reinstall it does not close completely, see "The ...

Use & Care Guide
Page 19
...fuses or to correct house wiring or plumbing. 2. DISCLAIMER OF IMPLIED WARRANTIES; On models with the product, KitchenAid will pay for replacement or repair of the refrigerator/freezer cavity liner (including labor costs) if the part cracks due to defective materials or workmanship. SECOND ...to be repaired in the home. 8. Contact your model number and serial number on the label located on water filter. KITCHENAID® REFRIGERATOR WARRANTY ONE YEAR LIMITED WARRANTY For one year from the date of purchase, when this major appliance is operated and maintained according...
...fuses or to correct house wiring or plumbing. 2. DISCLAIMER OF IMPLIED WARRANTIES; On models with the product, KitchenAid will pay for replacement or repair of the refrigerator/freezer cavity liner (including labor costs) if the part cracks due to defective materials or workmanship. SECOND ...to be repaired in the home. 8. Contact your model number and serial number on the label located on water filter. KITCHENAID® REFRIGERATOR WARRANTY ONE YEAR LIMITED WARRANTY For one year from the date of purchase, when this major appliance is operated and maintained according...

Dimension Guide
Page 1
...of a reverse osmosis system going to the water inlet valve of approximately 40 to 60 psi (276 to change without notice. Do not install the refrigerator in a location where the temperature will fall below 55°F (13°C). 2¹⁄₂" (6.3 cm) Because Whirlpool Corporation policy includes ... kPa) is recommended that a separate circuit serving only your cold water supply, the water pressure to the system needs to be a minimum of the refrigerator needs to be between the back of Cabinet "C" 651⁄2" (166.4 cm) Height Overall "D" 66 15⁄16" (170.0 cm) Depth ...
...of a reverse osmosis system going to the water inlet valve of approximately 40 to 60 psi (276 to change without notice. Do not install the refrigerator in a location where the temperature will fall below 55°F (13°C). 2¹⁄₂" (6.3 cm) Because Whirlpool Corporation policy includes ... kPa) is recommended that a separate circuit serving only your cold water supply, the water pressure to the system needs to be a minimum of the refrigerator needs to be between the back of Cabinet "C" 651⁄2" (166.4 cm) Height Overall "D" 66 15⁄16" (170.0 cm) Depth ...

Energy Guide
Page 1
...;les similaires comparés Numéro du modèle Removal of Canada's high efficiency levels. U.S. Canada Refrigerator-Freezer ·Automatic Defrost ·Bottom Mounted Freezer ·Without Through-the-Door-Ice Service KitchenAid Corporation Model(s):KB*S22KV*,KB*S22EV* Capacity: 21.9 Cubic Feet Estimated Yearly Operating Cost $49 $49 $61...
...;les similaires comparés Numéro du modèle Removal of Canada's high efficiency levels. U.S. Canada Refrigerator-Freezer ·Automatic Defrost ·Bottom Mounted Freezer ·Without Through-the-Door-Ice Service KitchenAid Corporation Model(s):KB*S22KV*,KB*S22EV* Capacity: 21.9 Cubic Feet Estimated Yearly Operating Cost $49 $49 $61...

Warranty Information
Page 1
...major appliance is operated and maintained according to instructions attached to or furnished with the product, KitchenAid will pay for replacement or repair of the refrigerator/freezer cavity liner (including labor costs) if the part cracks due to defective materials or workmanship...according to instructions attached to or furnished with the product, KitchenAid or KitchenAid Canada (hereafter "KitchenAid") will pay for factory specified parts and repair labor to correct defects in materials or workmanship. KITCHENAID® REFRIGERATOR WARRANTY ONE YEAR LIMITED WARRANTY For one year from the ...
...major appliance is operated and maintained according to instructions attached to or furnished with the product, KitchenAid will pay for replacement or repair of the refrigerator/freezer cavity liner (including labor costs) if the part cracks due to defective materials or workmanship...according to instructions attached to or furnished with the product, KitchenAid or KitchenAid Canada (hereafter "KitchenAid") will pay for factory specified parts and repair labor to correct defects in materials or workmanship. KITCHENAID® REFRIGERATOR WARRANTY ONE YEAR LIMITED WARRANTY For one year from the ...


