Instruction Manual
Page 2
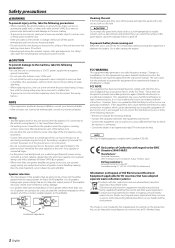
...other wires with a 8 mm² (AWG 8) or more to prevent wire deterioration and damage to the amplifier. 4Ω 4Ω 8Ω 4Ω 4Ω 2Ω Combined impedance Cleaning the unit If the front...as household waste. These limits are less than the total maximum current drawn by one set of the following measures: • Reorient or relocate the receiving antenna. • ...on the production line, nor by turning the equipment off the power immediately and consult your Kenwood dealer. • Do not touch the unit during installation, consult your local authority for ...
...other wires with a 8 mm² (AWG 8) or more to prevent wire deterioration and damage to the amplifier. 4Ω 4Ω 8Ω 4Ω 4Ω 2Ω Combined impedance Cleaning the unit If the front...as household waste. These limits are less than the total maximum current drawn by one set of the following measures: • Reorient or relocate the receiving antenna. • ...on the production line, nor by turning the equipment off the power immediately and consult your Kenwood dealer. • Do not touch the unit during installation, consult your local authority for ...
Instruction Manual
Page 3
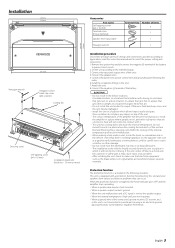
....) or this unit is equipped with it will become hot during use. When the protection function is triggered, the Power indicator goes OFF and the amplifier stops operating. • When a speaker wire may be damaged. • Install this unit in a place where people, resins, and other damage. • ... Otherwise heat build-up occurs and the unit may cause injury or an accident. • After installing the unit, check to select the proper setting and connection. 1.Remove the ignition key and disconnect the negative - Do not mount the unit in a place where the cooling fan and ducts of...
....) or this unit is equipped with it will become hot during use. When the protection function is triggered, the Power indicator goes OFF and the amplifier stops operating. • When a speaker wire may be damaged. • Install this unit in a place where people, resins, and other damage. • ... Otherwise heat build-up occurs and the unit may cause injury or an accident. • After installing the unit, check to select the proper setting and connection. 1.Remove the ignition key and disconnect the negative - Do not mount the unit in a place where the cooling fan and ducts of...
Instruction Manual
Page 4
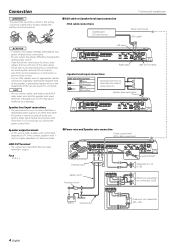
... and leads to connect the power control wire. Do not remove caps from the line input terminal is turned on and off before changing the setting of any switch. • If the fuse blows, check wires for this unit to these terminals. ■ Power wire and Speaker wire connection Power control...
... and leads to connect the power control wire. Do not remove caps from the line input terminal is turned on and off before changing the setting of any switch. • If the fuse blows, check wires for this unit to these terminals. ■ Power wire and Speaker wire connection Power control...
Instruction Manual
Page 5
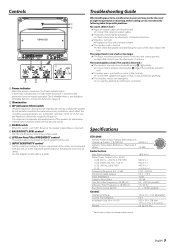
... compensated. 6 LPF(Low-Pass Filter) FREQUENCY control This control adjusts the frequency band output from this unit. 7 INPUT SENSITIVITY control Set this switch is not pinched by anything. ✔ The switches may just be activated. ☞ Check connections by causing distortion, etc....) ✔ The speakers wire are disconnected. ☞ Connect the input (or output) cables. ✔ Protection circuit may be set improperly. ☞ Set switches properly by a subwoofer speaker do not become sound but become sound. 4 PHASE switch When this control according to the maximum ...
... compensated. 6 LPF(Low-Pass Filter) FREQUENCY control This control adjusts the frequency band output from this unit. 7 INPUT SENSITIVITY control Set this switch is not pinched by anything. ✔ The switches may just be activated. ☞ Check connections by causing distortion, etc....) ✔ The speakers wire are disconnected. ☞ Connect the input (or output) cables. ✔ Protection circuit may be set improperly. ☞ Set switches properly by a subwoofer speaker do not become sound but become sound. 4 PHASE switch When this control according to the maximum ...
