
Instruction Manual 2
Page 1
DVD Region Code 4 Area) ENGLISH This instruction manual is used to describe the models listed above. DVD Region Code 3 Area) DDX419BTM (Region 2 - MONITOR WITH DVD RECEIVER INSTRUCTION MANUAL DDX419BT (Region 3 - DVD Region Code 2 Area) DDX4019BT (Region 4 - Model availability and features (functions) may differ depending on the country and sales area. © 2018 JVC KENWOOD Corporation B5A-2608-00 (MN/M2N/XN/A9N)
DVD Region Code 4 Area) ENGLISH This instruction manual is used to describe the models listed above. DVD Region Code 3 Area) DDX419BTM (Region 2 - MONITOR WITH DVD RECEIVER INSTRUCTION MANUAL DDX419BT (Region 3 - DVD Region Code 2 Area) DDX4019BT (Region 4 - Model availability and features (functions) may differ depending on the country and sales area. © 2018 JVC KENWOOD Corporation B5A-2608-00 (MN/M2N/XN/A9N)

Instruction Manual 2
Page 5
Component Names and Operations DDX419BT/DDX419BTM 9 Volume J/K buttons • (Press): Adjusts the audio volume. For details, contact the store where you purchase this unit. • See also on page 28. 6 HOME .... • ATT (Press): Attenuates the sound. 9 CAM button • (Press): Displays the picture from the connected camera. • ATT (Hold): Attenuates the sound. * Only for DDX419BT. ENGLISH 3 DDX4019BT 1 Reset button • Resets the unit. 2 Loading slot 3 Screen (touch panel) 4 Monitor panel 5 Built-in microphone* • You can also connect an external...
Component Names and Operations DDX419BT/DDX419BTM 9 Volume J/K buttons • (Press): Adjusts the audio volume. For details, contact the store where you purchase this unit. • See also on page 28. 6 HOME .... • ATT (Press): Attenuates the sound. 9 CAM button • (Press): Displays the picture from the connected camera. • ATT (Hold): Attenuates the sound. * Only for DDX419BT. ENGLISH 3 DDX4019BT 1 Reset button • Resets the unit. 2 Loading slot 3 Screen (touch panel) 4 Monitor panel 5 Built-in microphone* • You can also connect an external...

Instruction Manual 2
Page 6
...35) by pressing J to increase and pressing K to decrease. • Holding J increases the volume continuously to level 15. Attenuating the sound DDX419BT/DDX419BTM DDX4019BT 2 On the pop-up . On the source/option selection screen, touch as follows: Turning off the power (Hold) Putting the unit ...up short-cut menu, touch as follows: 2 Put the unit in standby 1 Display the source/option selection screen. To cancel attenuation: For DDX419BT/DDX419BTM: Press and hold the same button again. For DDX4019BT: Press the same button again. 4 ENGLISH On the Home screen, touch as follows...
...35) by pressing J to increase and pressing K to decrease. • Holding J increases the volume continuously to level 15. Attenuating the sound DDX419BT/DDX419BTM DDX4019BT 2 On the pop-up . On the source/option selection screen, touch as follows: Turning off the power (Hold) Putting the unit ...up short-cut menu, touch as follows: 2 Put the unit in standby 1 Display the source/option selection screen. To cancel attenuation: For DDX419BT/DDX419BTM: Press and hold the same button again. For DDX4019BT: Press the same button again. 4 ENGLISH On the Home screen, touch as follows...
Instruction Manual 2
Page 24
... be registered in or external) to use. Dialed calls, received calls, and missed calls (up to 10 entries in total) Preparation For DDX419BT: Select the microphone (built-in total. • Two devices for Bluetooth phone and one for some Bluetooth devices. • Connecting conditions...and communicate with Bluetooth 2.0: You need to turn on the Bluetooth version of the navigation screen is switched automatically. Phone book - For DDX419BTM/DDX4019BT: Connect and install the microphone beforehand. For details, see page 34. Connection When you reset the unit. To exit the ...
... be registered in or external) to use. Dialed calls, received calls, and missed calls (up to 10 entries in total) Preparation For DDX419BT: Select the microphone (built-in total. • Two devices for Bluetooth phone and one for some Bluetooth devices. • Connecting conditions...and communicate with Bluetooth 2.0: You need to turn on the Bluetooth version of the navigation screen is switched automatically. Phone book - For DDX419BTM/DDX4019BT: Connect and install the microphone beforehand. For details, see page 34. Connection When you reset the unit. To exit the ...

Instruction Manual 2
Page 26
...: [ ] [ ] Answers a call or earpiece. Rejects a call. • Call information is displayed if acquired. • Phone operation is not available while the picture from the device. DDX419BT/DDX419BTM: Press the volume J/K buttons. Adjusts the noise reduction level. (-5 to 5) Adjusts the echo volume level. (-5 to 5) Adjusts the volume level of the call . BT Connection...
...: [ ] [ ] Answers a call or earpiece. Rejects a call. • Call information is displayed if acquired. • Phone operation is not available while the picture from the device. DDX419BT/DDX419BTM: Press the volume J/K buttons. Adjusts the noise reduction level. (-5 to 5) Adjusts the echo volume level. (-5 to 5) Adjusts the volume level of the call . BT Connection...

Instruction Manual 2
Page 39
... source, etc. • DVD mode: Switch to the instruction manual that is possible that a child swallows the battery, immediately consult a physician. Remote Controller • For DDX419BT/DDX419BTM: This unit can be operated using the remote controller (RC-DV340) supplied with this unit. • For DDX4019BT: Optional remote controller KNA-RCDV331 is indicated...
... source, etc. • DVD mode: Switch to the instruction manual that is possible that a child swallows the battery, immediately consult a physician. Remote Controller • For DDX419BT/DDX419BTM: This unit can be operated using the remote controller (RC-DV340) supplied with this unit. • For DDX4019BT: Optional remote controller KNA-RCDV331 is indicated...

Instruction Manual 2
Page 44
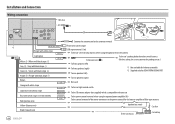
... (× 1) ø Extension wire, 2 m (× 1) π Flat head screws, M5 × 8 mm (× 6) [ Round head screws, M5 x 8 mm (× 6) " Steering remote cable (× 1) Only for DDX419BTM/DDX4019BT ] Microphone, 3 m (× 1) Only for DDX4019BT ' Trim plate (× 1) Installation procedure 1 Remove the key from the ignition and disconnect the · battery. 2 Make the proper...
... (× 1) ø Extension wire, 2 m (× 1) π Flat head screws, M5 × 8 mm (× 6) [ Round head screws, M5 x 8 mm (× 6) " Steering remote cable (× 1) Only for DDX419BTM/DDX4019BT ] Microphone, 3 m (× 1) Only for DDX4019BT ' Trim plate (× 1) Installation procedure 1 Remove the key from the ignition and disconnect the · battery. 2 Make the proper...
Instruction Manual 2
Page 46
... view camera To the car's parking brake detection switch harness PRK SW Extension wire ( ø ) (For best safety, be sure to the power terminal for DDX419BTM/DDX4019BT. To rear speakers (right) MUTE Not used. ILLUMI STEERING WHEEL REMOTE INPUT REMOTE CONT ANT.CONT P.CONT To the car light control switch To...
... view camera To the car's parking brake detection switch harness PRK SW Extension wire ( ø ) (For best safety, be sure to the power terminal for DDX419BTM/DDX4019BT. To rear speakers (right) MUTE Not used. ILLUMI STEERING WHEEL REMOTE INPUT REMOTE CONT ANT.CONT P.CONT To the car light control switch To...

Instruction Manual 2
Page 55
ENGLISH 53 Specifications General Operating Voltage Installation Dimensions (W × H × D) Weight (Main Unit) 12 V DC car battery 178 mm × 100 mm × 162 mm DDX419BT/DDX419BTM: 1.7 kg DDX4019BT: 1.8 kg (including trim plate) Design and specifications are subject to change without notice.
ENGLISH 53 Specifications General Operating Voltage Installation Dimensions (W × H × D) Weight (Main Unit) 12 V DC car battery 178 mm × 100 mm × 162 mm DDX419BT/DDX419BTM: 1.7 kg DDX4019BT: 1.8 kg (including trim plate) Design and specifications are subject to change without notice.