

User Guide
Page 3
... 2-6 PRODUCT OPERATION 3-1 Features And Benefits 3-1 Washer Use 3-3 Washer Care 3-12 Troubleshooting 3-15 COMPONENT ACCESS 4-1 Component Locations 4-1 Removing The Console And The Touchpad/LED Assembly 4-2 Removing The Central Control Unit 4-4 Removing The Water Inlet Valve 4-6 Removing The Pressure Switch 4-7 Removing The ...The Basket Drive Pulley 4-27 Removing The Tub & Basket And Baffle 4-28 COMPONENT TESTING 5-1 Inlet Valve Solenoids 5-1 Pressure Switch 5-2 Line Filter 5-3 Detergent Dispenser Motor & Switch 5-4 Door Switch 5-5 Drain Pump 5-6 Temperature Sensor &...
... 2-6 PRODUCT OPERATION 3-1 Features And Benefits 3-1 Washer Use 3-3 Washer Care 3-12 Troubleshooting 3-15 COMPONENT ACCESS 4-1 Component Locations 4-1 Removing The Console And The Touchpad/LED Assembly 4-2 Removing The Central Control Unit 4-4 Removing The Water Inlet Valve 4-6 Removing The Pressure Switch 4-7 Removing The ...The Basket Drive Pulley 4-27 Removing The Tub & Basket And Baffle 4-28 COMPONENT TESTING 5-1 Inlet Valve Solenoids 5-1 Pressure Switch 5-2 Line Filter 5-3 Detergent Dispenser Motor & Switch 5-4 Door Switch 5-5 Drain Pump 5-6 Temperature Sensor &...
User Guide
Page 14
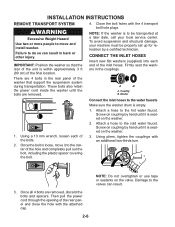
.... Washer Connect the inlet hoses to the valves can result in back or other injury. Using pliers, tighten the couplings with the attached cap. 2-6 NOTE: Do not overtighten or use tape or sealants on the washer. 1. Damage to the water faucets Make sure the washer drum is within approximately 3 ft (90... your machine must be properly set up for relocation by hand until it is seated on the valve. NOTE: If the washer is loose, move and install washer. Coupling B. Screw on the washer. 3. Then pull the power cord through the opening of the hole and completely pull out the...
.... Washer Connect the inlet hoses to the valves can result in back or other injury. Using pliers, tighten the couplings with the attached cap. 2-6 NOTE: Do not overtighten or use tape or sealants on the washer. 1. Damage to the water faucets Make sure the washer drum is within approximately 3 ft (90... your machine must be properly set up for relocation by hand until it is seated on the valve. NOTE: If the washer is loose, move and install washer. Coupling B. Screw on the washer. 3. Then pull the power cord through the opening of the hole and completely pull out the...

User Guide
Page 15
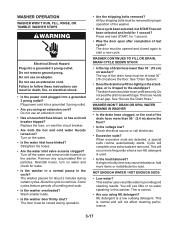
...by hand until it is seated on the washer. 3. Screw on coupling by hand until it is seated on the washer. 2. Using pliers, tighten the couplings with an additional two-thirds turn. Damage to the washer's hot (H) water inlet valve. ROUTE THE DRAIN HOSE Proper routing of ...the drain hose form to the washer's cold (C) water faucet. Cold water inlet 1. Read and follow these instructions. Attach the hot water hose to the...
...by hand until it is seated on the washer. 3. Screw on coupling by hand until it is seated on the washer. 2. Using pliers, tighten the couplings with an additional two-thirds turn. Damage to the washer's hot (H) water inlet valve. ROUTE THE DRAIN HOSE Proper routing of ...the drain hose form to the washer's cold (C) water faucet. Cold water inlet 1. Read and follow these instructions. Attach the hot water hose to the...
User Guide
Page 35
...a grounded 3 prong outlet. Do not use an adapter. Turn off the water and remove inlet hoses from the washer. The top of the drain hose more items or redistribute the load. This washer uses very little water to the standpipe? Reinstall hoses, turn on the water. • Is... grounded 3 prong outlet? Failure to continue. Straighten the hoses. • Are the water inlet valve screens clogged? Allow the cycle to follow these instructions can result in this washer. Wash smaller loads. • Is the washer door firmly shut? The door must be at least 30˝ (76 cm)...
...a grounded 3 prong outlet. Do not use an adapter. Turn off the water and remove inlet hoses from the washer. The top of the drain hose more items or redistribute the load. This washer uses very little water to the standpipe? Reinstall hoses, turn on the water. • Is... grounded 3 prong outlet? Failure to continue. Straighten the hoses. • Are the water inlet valve screens clogged? Allow the cycle to follow these instructions can result in this washer. Wash smaller loads. • Is the washer door firmly shut? The door must be at least 30˝ (76 cm)...
User Guide
Page 39
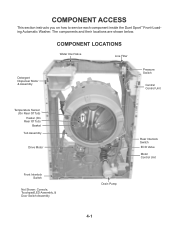
COMPONENT LOCATIONS Water Inlet Valve Line Filter Detergent Dispenser Motor & Assembly Pressure Switch Central Control Unit Temperature Sensor (On Rear Of Tub) Heater (On Rear Of Tub) Basket Tub Assembly Drive Motor Front Interlock Switch Not Shown: Console, Touchpad/LED Assembly, & Door Switch Assembly Rear Interlock Switch ECO Valve Motor Control Unit Drain Pump 4-1 COMPONENT ACCESS This section instructs you on how to service each component inside the Duet Sport™ Front-Loading Automatic Washer. The components and their locations are shown below.
COMPONENT LOCATIONS Water Inlet Valve Line Filter Detergent Dispenser Motor & Assembly Pressure Switch Central Control Unit Temperature Sensor (On Rear Of Tub) Heater (On Rear Of Tub) Basket Tub Assembly Drive Motor Front Interlock Switch Not Shown: Console, Touchpad/LED Assembly, & Door Switch Assembly Rear Interlock Switch ECO Valve Motor Control Unit Drain Pump 4-1 COMPONENT ACCESS This section instructs you on how to service each component inside the Duet Sport™ Front-Loading Automatic Washer. The components and their locations are shown below.
User Guide
Page 44
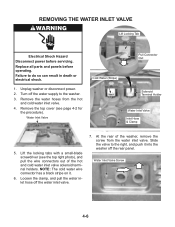
... before operating. Replace all parts and panels before servicing. Unplug washer or disconnect power. 2. At the rear of the hot and cold water inlet valve solenoid terminal holders. Turn off the water inlet valve. 7. Water Inlet Valve Pull Connector Out Cold Water (Stripe) Solenoid Terminal Holder Water Inlet Valve Inlet Hose & Clamp 5. Failure to the right, and push it . 6. Remove...
... before operating. Replace all parts and panels before servicing. Unplug washer or disconnect power. 2. At the rear of the hot and cold water inlet valve solenoid terminal holders. Turn off the water inlet valve. 7. Water Inlet Valve Pull Connector Out Cold Water (Stripe) Solenoid Terminal Holder Water Inlet Valve Inlet Hose & Clamp 5. Failure to the right, and push it . 6. Remove...
User Guide
Page 71
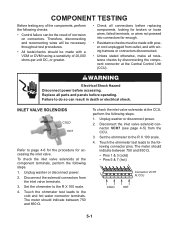
...7 Connector VCH7 At CCU COLD HOT 5-1 Replace all connections before replacing components, looking for accessing the inlet valve. To check the inlet valve solenoids at the component terminals, perform the following connector pins. Unplug washer or disconnect power. 2. Touch the ohmmeter test leads to the R X 100 scale. 4. Touch... in death or electrical shock. Unplug washer or disconnect power. 2. INLET VALVE SOLENOIDS COLD HOT Refer to the R X 100 scale. 4. Disconnect the solenoid connectors from the CCU. 3. To check the inlet valve solenoids at the Central Control Unit (CCU...
...7 Connector VCH7 At CCU COLD HOT 5-1 Replace all connections before replacing components, looking for accessing the inlet valve. To check the inlet valve solenoids at the component terminals, perform the following connector pins. Unplug washer or disconnect power. 2. Touch the ohmmeter test leads to the R X 100 scale. 4. Touch... in death or electrical shock. Unplug washer or disconnect power. 2. INLET VALVE SOLENOIDS COLD HOT Refer to the R X 100 scale. 4. Disconnect the solenoid connectors from the CCU. 3. To check the inlet valve solenoids at the Central Control Unit (CCU...
User Guide
Page 80
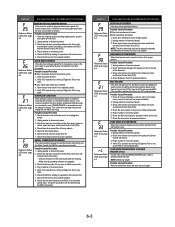
... of heating element, if present on all cycle lights flashing and standing status lights. Unplug washer or disconnect power. 2. Replace CCU board. If there is no water in the inlet valves. - Check the drain hose and make sure the pump is running a Diagnostic Test or any ...Possible Causes/Procedure If there is water in washer or reconnect power 7. Make sure that the pressure switch hose is out of range (23°F to 217°F [-5°C to the Water Temperature Sensor section. Verify inlet valve operation. Verify that both valves at the pump and make sure it ...
... of heating element, if present on all cycle lights flashing and standing status lights. Unplug washer or disconnect power. 2. Replace CCU board. If there is no water in the inlet valves. - Check the drain hose and make sure the pump is running a Diagnostic Test or any ...Possible Causes/Procedure If there is water in washer or reconnect power 7. Make sure that the pressure switch hose is out of range (23°F to 217°F [-5°C to the Water Temperature Sensor section. Verify inlet valve operation. Verify that both valves at the pump and make sure it ...
User Guide
Page 81
...Unit (CCU) is detected inside the drum. Check wire harness connections to its proper position. Plug in washer or reconnect power. 6. LOAD INSIDE DRUM DURING CLEANING WASHER CYCLE If at the MCU is not located near a source of the drive motor. 7. Possible Causes/... and Central Control Unit (CCU). 3. Unplug washer or disconnect power. 3. Check the MCU by running a Diagnostic Test or any cycle. Verify the shipping system including shipping bolts, spacers and cables are engaged. 3. Check the inlet valve for powered rotations. Check wire harness connections to...
...Unit (CCU) is detected inside the drum. Check wire harness connections to its proper position. Plug in washer or reconnect power. 6. LOAD INSIDE DRUM DURING CLEANING WASHER CYCLE If at the MCU is not located near a source of the drive motor. 7. Possible Causes/... and Central Control Unit (CCU). 3. Unplug washer or disconnect power. 3. Check the MCU by running a Diagnostic Test or any cycle. Verify the shipping system including shipping bolts, spacers and cables are engaged. 3. Check the inlet valve for powered rotations. Check wire harness connections to...
User Guide
Page 84
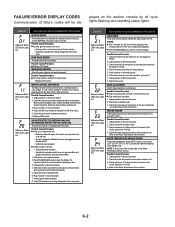
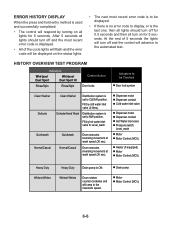
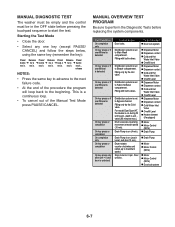
...system Clean Washer Delicate Clean Washer Distribution system is set to Level_wash Quickwash Normal/Casual Quickwash Normal/Casual Drum executes reversing movement at wash speed (30 sec). Dispenser motor Dispenser contact Cold water inlet valve Dispenser motor Dispenser contact Hot Water inlet valve Pressure ...used and successfully completed: • The control will respond by turning on for 5 seconds. Fill by cold water inlet valve (4 liters). Delicate/Hand Wash Distribution system is ON. HISTORY OVERVIEW TEST PROGRAM Indication Whirlpool Duet Sport Whirlpool Duet Sport...
...system Clean Washer Delicate Clean Washer Distribution system is set to Level_wash Quickwash Normal/Casual Quickwash Normal/Casual Drum executes reversing movement at wash speed (30 sec). Dispenser motor Dispenser contact Cold water inlet valve Dispenser motor Dispenser contact Hot Water inlet valve Pressure ...used and successfully completed: • The control will respond by turning on for 5 seconds. Fill by cold water inlet valve (4 liters). Delicate/Hand Wash Distribution system is ON. HISTORY OVERVIEW TEST PROGRAM Indication Whirlpool Duet Sport Whirlpool Duet Sport...
User Guide
Page 85
... MANUAL DIAGNOSTIC TEST The washer must be empty and the control must be Checked Door lock system Dispenser Motor Dispenser contact Cold and Hot Water Inlet Valve Overfill level Dispenser Motor Dispenser contact Cold and Hot Water Inlet Valve Overfill Level Dispenser Motor ...Dispenser contact Cold and Hot Water Inlet Valve Overfill Level Dispenser Motor Dispenser contact Cold Water Inlet Valve Overfill Level Heater element (if equipped...
... MANUAL DIAGNOSTIC TEST The washer must be empty and the control must be Checked Door lock system Dispenser Motor Dispenser contact Cold and Hot Water Inlet Valve Overfill level Dispenser Motor Dispenser contact Cold and Hot Water Inlet Valve Overfill Level Dispenser Motor ...Dispenser contact Cold and Hot Water Inlet Valve Overfill Level Dispenser Motor Dispenser contact Cold Water Inlet Valve Overfill Level Heater element (if equipped...
User Guide
Page 89
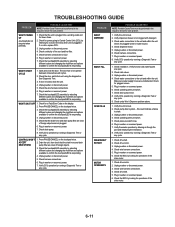
.... 3. See Diagnostic Test. 3. CONTROL WON'T 1. Unplug washer or disconnect power. 5. Verify dispenser drawer is plugged into a working outlet and for operations of foreign objects. 3. Check water connections to CCU. 6. Check inlet valves. 3. Check under Won't Dispense problem above. 1. Check operating.... 6. Check the touchpad/LED assembly by selecting different cycles and changing the modifiers and options available to drain. 3. Unplug washer or disconnect power. 5. Check drive motor. 2. ACCEPT 2. this could indicate a failure to confirm the touchpad/LED is ...
.... 3. See Diagnostic Test. 3. CONTROL WON'T 1. Unplug washer or disconnect power. 5. Verify dispenser drawer is plugged into a working outlet and for operations of foreign objects. 3. Check water connections to CCU. 6. Check inlet valves. 3. Check under Won't Dispense problem above. 1. Check operating.... 6. Check the touchpad/LED assembly by selecting different cycles and changing the modifiers and options available to drain. 3. Unplug washer or disconnect power. 5. Check drive motor. 2. ACCEPT 2. this could indicate a failure to confirm the touchpad/LED is ...
User Guide
Page 91
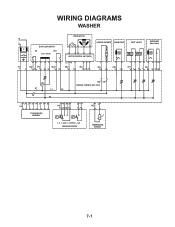
WIRING DIAGRAMS WASHER N L IF DOOR LOCK/SWITCH DS DLS Lock Unlock IF2 DS2 DL3 DLS2 1 2 12 1 2 3 1 2 DRIVE MOTOR MOTOR CONTROL UNIT (MCU) L2 N1 MS2 1 2 MI3 1 2 3 HEATING ELEMENT DRAIN PUMP INLET VALVES DISPENSER Motor Switch VC VH HE2 21 DP2 1 2 VH7 1 3 DI6 571 3 56 DR1 K1 L1 L2 K2 N1 HR2 HR1 CENTRAL CONTROL UNIT (CCU) 12 34 5 6 7 8 UI8 TOUCHPAD/LED ASSEMBLY 6 5 34 PR6 22 24 26 21 2 1 11 14 p> p> L_0 L_wash L_overflow L_sud PRESSURE SWITCH 1 2 TH2 TEMPERATURE SENSOR 7-1
WIRING DIAGRAMS WASHER N L IF DOOR LOCK/SWITCH DS DLS Lock Unlock IF2 DS2 DL3 DLS2 1 2 12 1 2 3 1 2 DRIVE MOTOR MOTOR CONTROL UNIT (MCU) L2 N1 MS2 1 2 MI3 1 2 3 HEATING ELEMENT DRAIN PUMP INLET VALVES DISPENSER Motor Switch VC VH HE2 21 DP2 1 2 VH7 1 3 DI6 571 3 56 DR1 K1 L1 L2 K2 N1 HR2 HR1 CENTRAL CONTROL UNIT (CCU) 12 34 5 6 7 8 UI8 TOUCHPAD/LED ASSEMBLY 6 5 34 PR6 22 24 26 21 2 1 11 14 p> p> L_0 L_wash L_overflow L_sud PRESSURE SWITCH 1 2 TH2 TEMPERATURE SENSOR 7-1


