
User Guide
Page 4
Removal Or Replacement 6-8 Washer Care 6-9 Troubleshooting Guide 6-11 WIRING DIAGRAMS 7-1 Washer 7-1 Grounding System 7-2 - Page DIAGNOSTICS & TROUBLESHOOTING 6-1 Diagnostics 6-1 Diagnostic Guide 6-1 Failure/Error Display Codes 6-2 Diagnostic Test 6-5 Error History Display 6-6 History Overview Test Program 6-6 Manual Diagnostic Test 6-7 Manual Overview Test Program 6-7 Electronic Assemblies - iv -
Removal Or Replacement 6-8 Washer Care 6-9 Troubleshooting Guide 6-11 WIRING DIAGRAMS 7-1 Washer 7-1 Grounding System 7-2 - Page DIAGNOSTICS & TROUBLESHOOTING 6-1 Diagnostics 6-1 Diagnostic Guide 6-1 Failure/Error Display Codes 6-2 Diagnostic Test 6-5 Error History Display 6-6 History Overview Test Program 6-6 Manual Diagnostic Test 6-7 Manual Overview Test Program 6-7 Electronic Assemblies - iv -
User Guide
Page 21
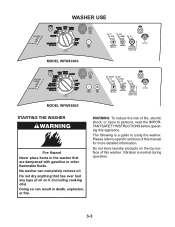
...;re, electric shock, or injury to persons, read the IMPORTANT SAFETY INSTRUCTIONS before operating this manual for more detailed information. Vibration is a guide to specific sections of this washer. WASHER USE MODEL WFW8300S MODEL WFW8500S STARTING THE WASHER Fire Hazard Never place items in death, explosion, or fire. Doing so can completely...
...;re, electric shock, or injury to persons, read the IMPORTANT SAFETY INSTRUCTIONS before operating this manual for more detailed information. Vibration is a guide to specific sections of this washer. WASHER USE MODEL WFW8300S MODEL WFW8500S STARTING THE WASHER Fire Hazard Never place items in death, explosion, or fire. Doing so can completely...
User Guide
Page 23
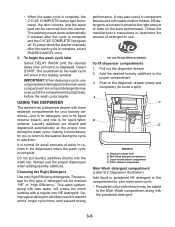
...cycle, use . It may seep out of suds for you to return to the washer during Delay, before the wash cycle begins. • When the wash cycle is displayed. The washer powers down the washer manually after the cycle is complete, select PAUSE/CANCEL once. 8. Dispenser release lever B. The... hours) is complete, the CYCLE COMPLETE status light illuminates, the door unlocks, and the wash load can be marked "HE" or "High Efficiency." USING THE DISPENSER The washer has a dispenser drawer with a regular non-HE detergent. HE detergents are diluted and dispensed automatically...
...cycle, use . It may seep out of suds for you to return to the washer during Delay, before the wash cycle begins. • When the wash cycle is displayed. The washer powers down the washer manually after the cycle is complete, select PAUSE/CANCEL once. 8. Dispenser release lever B. The... hours) is complete, the CYCLE COMPLETE status light illuminates, the door unlocks, and the wash load can be marked "HE" or "High Efficiency." USING THE DISPENSER The washer has a dispenser drawer with a regular non-HE detergent. HE detergents are diluted and dispensed automatically...
User Guide
Page 24
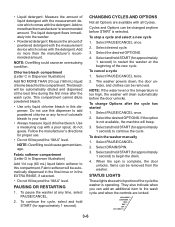
...AND OPTIONS Not all Cycles. Select and hold START (for approximately 1 second) to continue the cycle. PAUSING OR RESTARTING 1. To drain the washer manually 1. When the spin is complete, the door unlocks. Add no more than the manufacturer's recommended amount. To continue the cycle, select and ... any form of colorsafe bleach to restart the washer at the best time during the first rinse after the cycle has started 1. do not guess. Select and hold START (for approximately 1 second) to your load. • Always measure liquid chlorine bleach. • Liquid ...
...AND OPTIONS Not all Cycles. Select and hold START (for approximately 1 second) to continue the cycle. PAUSING OR RESTARTING 1. To drain the washer manually 1. When the spin is complete, the door unlocks. Add no more than the manufacturer's recommended amount. To continue the cycle, select and ... any form of colorsafe bleach to restart the washer at the best time during the first rinse after the cycle has started 1. do not guess. Select and hold START (for approximately 1 second) to your load. • Always measure liquid chlorine bleach. • Liquid ...
User Guide
Page 81
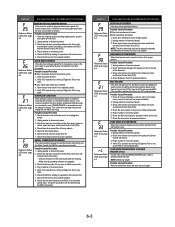
... running a Diagnostic Test or any cycle. Door switch/lock unit failure. 1. See Manually Unlocking The Door Lock System. DISPENSER SYSTEM ERROR When the dispenser motor cannot be to its proper position. Refer to the top of the CLEANING WASHER cycle a load is not mounted upside down . Possible Causes/Procedure Door not opened for...
... running a Diagnostic Test or any cycle. Door switch/lock unit failure. 1. See Manually Unlocking The Door Lock System. DISPENSER SYSTEM ERROR When the dispenser motor cannot be to its proper position. Refer to the top of the CLEANING WASHER cycle a load is not mounted upside down . Possible Causes/Procedure Door not opened for...
User Guide
Page 85
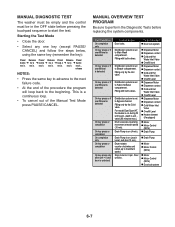
...sec's. Drain Pump is on during fill until Level _wash is on (4 min). Release for 4 sec's. Release for 4 sec's. MANUAL DIAGNOSTIC TEST The washer must be empty and the control must be Checked Door lock system Dispenser Motor Dispenser contact Cold and Hot Water Inlet Valve Overfill ...if equipped) Motor Motor Control (MCU) Drain Pump Drain Pump Motor Motor Control (MCU) Motor Motor Control (MCU) Doorlock system 6-7 MANUAL OVERVIEW TEST PROGRAM Be sure to perform the Diagnostic Tests before pressing the touchpad sequence to Bypass channel. Distribution system is set to Fabric...
...sec's. Drain Pump is on during fill until Level _wash is on (4 min). Release for 4 sec's. Release for 4 sec's. MANUAL DIAGNOSTIC TEST The washer must be empty and the control must be Checked Door lock system Dispenser Motor Dispenser contact Cold and Hot Water Inlet Valve Overfill ...if equipped) Motor Motor Control (MCU) Drain Pump Drain Pump Motor Motor Control (MCU) Motor Motor Control (MCU) Doorlock system 6-7 MANUAL OVERVIEW TEST PROGRAM Be sure to perform the Diagnostic Tests before pressing the touchpad sequence to Bypass channel. Distribution system is set to Fabric...
User Guide
Page 86
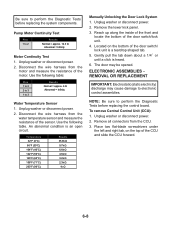
...8486; 9.7k Ω 6.6k Ω 4.6k Ω 3.2k Ω 2.3k Ω 1k Ω Manually Unlocking the Door Lock System 1. Reach up along the inside of the front and locate the bottom of the motor. The door may cause damage to electronic control assemblies. NOTE: Be sure...tab. 5. Remove the lower kick panel. 3. To remove Central Control Unit (CCU): 1. Disconnect the wire harness from the CCU. 3. Unplug washer or disconnect power. 2. Unplug washer or disconnect power. 2. Use the following table: Pins 1 to 2 2 to 3 1 to perform the Diagnostic Tests before replacing the system ...
...8486; 9.7k Ω 6.6k Ω 4.6k Ω 3.2k Ω 2.3k Ω 1k Ω Manually Unlocking the Door Lock System 1. Reach up along the inside of the front and locate the bottom of the motor. The door may cause damage to electronic control assemblies. NOTE: Be sure...tab. 5. Remove the lower kick panel. 3. To remove Central Control Unit (CCU): 1. Disconnect the wire harness from the CCU. 3. Unplug washer or disconnect power. 2. Unplug washer or disconnect power. 2. Use the following table: Pins 1 to 2 2 to 3 1 to perform the Diagnostic Tests before replacing the system ...


