
User Guide
Page 4
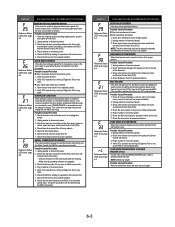
iv - Removal Or Replacement 6-8 Washer Care 6-9 Troubleshooting Guide 6-11 WIRING DIAGRAMS 7-1 Washer 7-1 Grounding System 7-2 - Page DIAGNOSTICS & TROUBLESHOOTING 6-1 Diagnostics 6-1 Diagnostic Guide 6-1 Failure/Error Display Codes 6-2 Diagnostic Test 6-5 Error History Display 6-6 History Overview Test Program 6-6 Manual Diagnostic Test 6-7 Manual Overview Test Program 6-7 Electronic Assemblies -
iv - Removal Or Replacement 6-8 Washer Care 6-9 Troubleshooting Guide 6-11 WIRING DIAGRAMS 7-1 Washer 7-1 Grounding System 7-2 - Page DIAGNOSTICS & TROUBLESHOOTING 6-1 Diagnostics 6-1 Diagnostic Guide 6-1 Failure/Error Display Codes 6-2 Diagnostic Test 6-5 Error History Display 6-6 History Overview Test Program 6-6 Manual Diagnostic Test 6-7 Manual Overview Test Program 6-7 Electronic Assemblies -
User Guide
Page 21
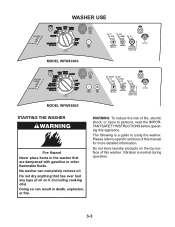
...ammable fluids. Please refer to specific sections of fire, electric shock, or injury to using the washer. WASHER USE MODEL WFW8300S MODEL WFW8500S STARTING THE WASHER Fire Hazard Never place items in death, explosion, or fire. Vibration is a guide to persons, read the ...IMPORTANT SAFETY INSTRUCTIONS before operating this appliance. No washer can result in the washer that has ever had any type of oil on the top surface of this washer. WARNING: To reduce the risk of this manual for more detailed information.
...ammable fluids. Please refer to specific sections of fire, electric shock, or injury to using the washer. WASHER USE MODEL WFW8300S MODEL WFW8500S STARTING THE WASHER Fire Hazard Never place items in death, explosion, or fire. Vibration is a guide to persons, read the ...IMPORTANT SAFETY INSTRUCTIONS before operating this appliance. No washer can result in the washer that has ever had any type of oil on the top surface of this washer. WARNING: To reduce the risk of this manual for more detailed information.
User Guide
Page 23
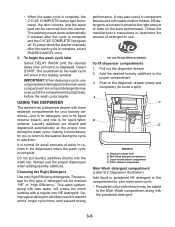
...detergents are diluted and dispensed automatically at the proper time during the wash cycle, making it unnecessary for the best performance. The washer powers down the washer manually after the cycle is complete, select PAUSE/CANCEL once. 8. The countdown to determine the amount of suds for you to return...drawer slowly and completely (to remain in hours) is complete, the CYCLE COMPLETE status light illuminates, the door unlocks, and the wash load can be added to the proper compartment. 3. The package for your main wash cycle. • Powdered color-safe bleach may be removed from...
...detergents are diluted and dispensed automatically at the proper time during the wash cycle, making it unnecessary for the best performance. The washer powers down the washer manually after the cycle is complete, select PAUSE/CANCEL once. 8. The countdown to determine the amount of suds for you to return...drawer slowly and completely (to remain in hours) is complete, the CYCLE COMPLETE status light illuminates, the door unlocks, and the wash load can be added to the proper compartment. 3. The package for your main wash cycle. • Powdered color-safe bleach may be removed from...
User Guide
Page 24
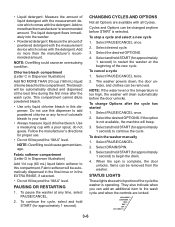
... manufacturer's directions for proper use this compartment. Select and hold START (for approximately 1 second) to your load. • Always measure liquid chlorine bleach. The washer powers down, the door unlocks, and clothes can be removed. Select the desired OPTIONS. When the spin ...level. Select the desired OPTIONS. 4. Select PAUSE/CANCEL twice. 2. If the option is complete, the door unlocks. To drain the washer manually 1. Select PAUSE/CANCEL once. 2. They also indicate when you can be automatically diluted and dispensed at the best time during the &#...
... manufacturer's directions for proper use this compartment. Select and hold START (for approximately 1 second) to your load. • Always measure liquid chlorine bleach. The washer powers down, the door unlocks, and clothes can be removed. Select the desired OPTIONS. When the spin ...level. Select the desired OPTIONS. 4. Select PAUSE/CANCEL twice. 2. If the option is complete, the door unlocks. To drain the washer manually 1. Select PAUSE/CANCEL once. 2. They also indicate when you can be automatically diluted and dispensed at the best time during the &#...
User Guide
Page 81
...motor for any worn or failed components. 4. Possible Causes/Procedure 1. Check wire harness connections to the top of the CLEANING WASHER cycle a load is lost. Plug in washer or reconnect power. 6. Refer to properly detect motor speed, the machine shuts down . Door switch/lock unit failure. ...1. NOTE: The door switch/lock unit can be sent correctly. See Manually Unlocking The Door Lock System. Check for proper...
...motor for any worn or failed components. 4. Possible Causes/Procedure 1. Check wire harness connections to the top of the CLEANING WASHER cycle a load is lost. Plug in washer or reconnect power. 6. Refer to properly detect motor speed, the machine shuts down . Door switch/lock unit failure. ...1. NOTE: The door switch/lock unit can be sent correctly. See Manually Unlocking The Door Lock System. Check for proper...
User Guide
Page 85
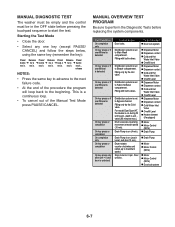
... loop. • To cancel out of the procedure the program will loop back to the next failure code. • At the end of the Manual Test Mode press PAUSE/CANCEL. Stop motor to maximum speed. Starting the Test Mode • Close the door. • Select any one key (... to Fabric Softener compartment. To be in the OFF state before replacing the system components. Filling only by the Hot valve. MANUAL DIAGNOSTIC TEST The washer must be empty and the control must be Checked Door lock system Dispenser Motor Dispenser contact Cold and Hot Water Inlet Valve Overfill...
... loop. • To cancel out of the procedure the program will loop back to the next failure code. • At the end of the Manual Test Mode press PAUSE/CANCEL. Stop motor to maximum speed. Starting the Test Mode • Close the door. • Select any one key (... to Fabric Softener compartment. To be in the OFF state before replacing the system components. Filling only by the Hot valve. MANUAL DIAGNOSTIC TEST The washer must be empty and the control must be Checked Door lock system Dispenser Motor Dispenser contact Cold and Hot Water Inlet Valve Overfill...
User Guide
Page 86
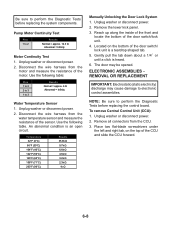
... 35.9k Ω 9.7k Ω 6.6k Ω 4.6k Ω 3.2k Ω 2.3k Ω 1k Ω Manually Unlocking the Door Lock System 1. Reach up along the inside of the front and locate the bottom of the door switch/ lock unit is a teardrop shaped tab. 5. Located on the top of...-blade screwdrivers under the left and right tab, on the bottom of the door switch/lock unit. 4. Unplug washer or disconnect power. 2. An abnormal condition is heard. 6. Unplug washer or disconnect power. 2. Disconnect the wire harness from the CCU. 3. Remove all connectors from the motor and ...
... 35.9k Ω 9.7k Ω 6.6k Ω 4.6k Ω 3.2k Ω 2.3k Ω 1k Ω Manually Unlocking the Door Lock System 1. Reach up along the inside of the front and locate the bottom of the door switch/ lock unit is a teardrop shaped tab. 5. Located on the top of...-blade screwdrivers under the left and right tab, on the bottom of the door switch/lock unit. 4. Unplug washer or disconnect power. 2. An abnormal condition is heard. 6. Unplug washer or disconnect power. 2. Disconnect the wire harness from the CCU. 3. Remove all connectors from the motor and ...


