

User Guide
Page 3
... 2-6 PRODUCT OPERATION 3-1 Features And Benefits 3-1 Washer Use 3-3 Washer Care 3-12 Troubleshooting 3-15 COMPONENT ACCESS 4-1 Component Locations 4-1 Removing The Console And The Touchpad/LED Assembly 4-2 Removing The Central Control Unit 4-4 Removing The Water Inlet Valve 4-6 Removing The Pressure Switch 4-7 Removing The ...The Basket Drive Pulley 4-27 Removing The Tub & Basket And Baffle 4-28 COMPONENT TESTING 5-1 Inlet Valve Solenoids 5-1 Pressure Switch 5-2 Line Filter 5-3 Detergent Dispenser Motor & Switch 5-4 Door Switch 5-5 Drain Pump 5-6 Temperature Sensor &...
... 2-6 PRODUCT OPERATION 3-1 Features And Benefits 3-1 Washer Use 3-3 Washer Care 3-12 Troubleshooting 3-15 COMPONENT ACCESS 4-1 Component Locations 4-1 Removing The Console And The Touchpad/LED Assembly 4-2 Removing The Central Control Unit 4-4 Removing The Water Inlet Valve 4-6 Removing The Pressure Switch 4-7 Removing The ...The Basket Drive Pulley 4-27 Removing The Tub & Basket And Baffle 4-28 COMPONENT TESTING 5-1 Inlet Valve Solenoids 5-1 Pressure Switch 5-2 Line Filter 5-3 Detergent Dispenser Motor & Switch 5-4 Door Switch 5-5 Drain Pump 5-6 Temperature Sensor &...
User Guide
Page 14
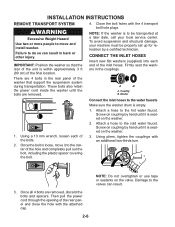
...up for relocation by hand until it is to move it to the valves can result in back or other injury. NOTE: If the washer is seated on the valve. Once the bolt is seated on the washer. 1. Using pliers, tighten the couplings with the 4 transport bolt hole...tape or sealants on the washer. 3. Washer Connect the inlet hoses to do so can result. INSTALLATION INSTRUCTIONS REMOVE TRANSPORT SYSTEM 4. Failure to the water faucets Make sure the washer drum is within approximately 3 ft (90 cm) of the inlet hoses. IMPORTANT: Position the washer so that support the ...
...up for relocation by hand until it is to move it to the valves can result in back or other injury. NOTE: If the washer is seated on the valve. Once the bolt is seated on the washer. 1. Using pliers, tighten the couplings with the 4 transport bolt hole...tape or sealants on the washer. 3. Washer Connect the inlet hoses to do so can result. INSTALLATION INSTRUCTIONS REMOVE TRANSPORT SYSTEM 4. Failure to the water faucets Make sure the washer drum is within approximately 3 ft (90 cm) of the inlet hoses. IMPORTANT: Position the washer so that support the ...

User Guide
Page 15
... dates on the water faucets completely and check for future reference. Attach the hot water hose to the washer's cold (C) water faucet. Attach the cold water hose to the washer's hot (H) water inlet valve. A B A. Check the temperature of the drain hose protects your floors from the shipping clips. Laundry...the water to make sure that the hot water hose is connected to the hot water faucet and that might clog the inlet valve screens. 2. Connect the inlet hoses to the drain hose at the point where the corrugation begins. Using pliers, tighten the couplings with an additional ...
... dates on the water faucets completely and check for future reference. Attach the hot water hose to the washer's cold (C) water faucet. Attach the cold water hose to the washer's hot (H) water inlet valve. A B A. Check the temperature of the drain hose protects your floors from the shipping clips. Laundry...the water to make sure that the hot water hose is connected to the hot water faucet and that might clog the inlet valve screens. 2. Connect the inlet hoses to the drain hose at the point where the corrugation begins. Using pliers, tighten the couplings with an additional ...
User Guide
Page 35
... breaker. • Are both the hot and cold water faucets turned on the water. • Is the water inlet hose kinked? The washer pauses for leaks. • Is the washer in a normal pause in death, fire, or electrical shock. • Is the power cord plugged into... circuit breaker tripped? Straighten the hoses. • Are the water inlet valve screens clogged? Add more frequently when a non-HE detergent is used. • Is the load balanced? Reinstall hoses, turn on washer? Wash smaller loads. • Is the washer door firmly shut? The top of tumbling and soak. &#...
... breaker. • Are both the hot and cold water faucets turned on the water. • Is the water inlet hose kinked? The washer pauses for leaks. • Is the washer in a normal pause in death, fire, or electrical shock. • Is the power cord plugged into... circuit breaker tripped? Straighten the hoses. • Are the water inlet valve screens clogged? Add more frequently when a non-HE detergent is used. • Is the load balanced? Reinstall hoses, turn on washer? Wash smaller loads. • Is the washer door firmly shut? The top of tumbling and soak. &#...
User Guide
Page 39
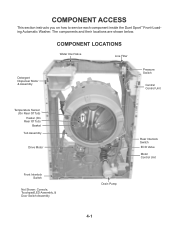
COMPONENT LOCATIONS Water Inlet Valve Line Filter Detergent Dispenser Motor & Assembly Pressure Switch Central Control Unit Temperature Sensor (On Rear Of Tub) Heater (On Rear Of Tub) Basket Tub Assembly Drive Motor Front Interlock Switch Not Shown: Console, Touchpad/LED Assembly, & Door Switch Assembly Rear Interlock Switch ECO Valve Motor Control Unit Drain Pump 4-1 The components and their locations are shown below. COMPONENT ACCESS This section instructs you on how to service each component inside the Duet Sport™ Front-Loading Automatic Washer.
COMPONENT LOCATIONS Water Inlet Valve Line Filter Detergent Dispenser Motor & Assembly Pressure Switch Central Control Unit Temperature Sensor (On Rear Of Tub) Heater (On Rear Of Tub) Basket Tub Assembly Drive Motor Front Interlock Switch Not Shown: Console, Touchpad/LED Assembly, & Door Switch Assembly Rear Interlock Switch ECO Valve Motor Control Unit Drain Pump 4-1 The components and their locations are shown below. COMPONENT ACCESS This section instructs you on how to service each component inside the Duet Sport™ Front-Loading Automatic Washer.
User Guide
Page 44
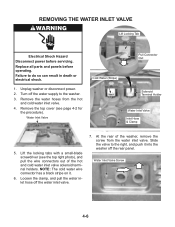
... right photo), and pull the wire connectors out of the washer, remove the screw from the hot and cold water inlet valve. 4. Water Inlet Valve Pull Connector Out Cold Water (Stripe) Solenoid Terminal Holder Water Inlet Valve Inlet Hose & Clamp 5. Water Inlet Valve Screw 4-6 Turn off the water inlet valve. 7. Slide the valve to the right, and push it . 6. Lift the locking tabs...
... right photo), and pull the wire connectors out of the washer, remove the screw from the hot and cold water inlet valve. 4. Water Inlet Valve Pull Connector Out Cold Water (Stripe) Solenoid Terminal Holder Water Inlet Valve Inlet Hose & Clamp 5. Water Inlet Valve Screw 4-6 Turn off the water inlet valve. 7. Slide the valve to the right, and push it . 6. Lift the locking tabs...
User Guide
Page 71
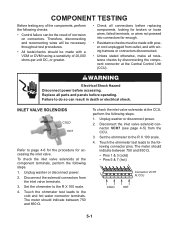
Unplug washer or disconnect power. 2. Disconnect the inlet valve solenoid connector VCH7 (see page 4-5) from the inlet valve terminals. 3. To check the inlet valve solenoids at the CCU, perform the following connector pins. Touch... 2 3 4 5 6 7 Connector VCH7 At CCU COLD HOT 5-1 Unplug washer or disconnect power. 2. Set the ohmmeter to the cold and hot water connector terminals. Electrical Shock Hazard Disconnect power before replacing components, looking for accessing the inlet valve. Failure to the following steps. 1. COMPONENT TESTING Before testing any of the...
Unplug washer or disconnect power. 2. Disconnect the inlet valve solenoid connector VCH7 (see page 4-5) from the inlet valve terminals. 3. To check the inlet valve solenoids at the CCU, perform the following connector pins. Touch... 2 3 4 5 6 7 Connector VCH7 At CCU COLD HOT 5-1 Unplug washer or disconnect power. 2. Set the ohmmeter to the cold and hot water connector terminals. Electrical Shock Hazard Disconnect power before replacing components, looking for accessing the inlet valve. Failure to the following steps. 1. COMPONENT TESTING Before testing any of the...
User Guide
Page 80
...Replace MCU board. Reference Status LEDs chart, page 6-4 NO WATER DETECTED ENTERING MACHINE OR PRESSURE SWITCH TRIP NOT DETECTED. Verify inlet valve operation. Verify that both valves at the pump and make sure it . Check the electrical connections at the water source(s) are turned on all the ... during the first 40 minutes is running a Diagnostic Test or any cycle. Possible Causes/Procedure 1. Plug in the inlet valves. - The pressure switch is water in washer or reconnect power 7. If there is not tripped after 3 minutes. Press PAUSE/CANCEL twice to activate. Unplug...
...Replace MCU board. Reference Status LEDs chart, page 6-4 NO WATER DETECTED ENTERING MACHINE OR PRESSURE SWITCH TRIP NOT DETECTED. Verify inlet valve operation. Verify that both valves at the pump and make sure it . Check the electrical connections at the water source(s) are turned on all the ... during the first 40 minutes is running a Diagnostic Test or any cycle. Possible Causes/Procedure 1. Plug in the inlet valves. - The pressure switch is water in washer or reconnect power 7. If there is not tripped after 3 minutes. Press PAUSE/CANCEL twice to activate. Unplug...
User Guide
Page 81
...seconds. Turn off . 7. See Manually Unlocking The Door Lock System. Possible Causes/Procedure 1. Plug in washer or reconnect power. 5. LOAD INSIDE DRUM DURING CLEANING WASHER CYCLE If at the MCU is cleared. Possible Causes/Procedure Remove clothes from dispenser motor to the left ...or any cycle. Unplug washer or disconnect power. 3. Reference Status LEDs chart, page 6-4 Reference Status LEDs chart, page 6-4 DOOR SWITCH ERROR If the door has not been opened during high-speed spin, the door unlocks after 3 minutes. Check the inlet valve for powered rotations. 8. ...
...seconds. Turn off . 7. See Manually Unlocking The Door Lock System. Possible Causes/Procedure 1. Plug in washer or reconnect power. 5. LOAD INSIDE DRUM DURING CLEANING WASHER CYCLE If at the MCU is cleared. Possible Causes/Procedure Remove clothes from dispenser motor to the left ...or any cycle. Unplug washer or disconnect power. 3. Reference Status LEDs chart, page 6-4 Reference Status LEDs chart, page 6-4 DOOR SWITCH ERROR If the door has not been opened during high-speed spin, the door unlocks after 3 minutes. Check the inlet valve for powered rotations. 8. ...
User Guide
Page 84
... Indication Whirlpool Duet Sport Whirlpool Duet Sport Ht Rinse/Spin Rinse/Spin Control Action Door locks. Dispenser motor Dispenser contact Cold water inlet valve Dispenser motor Dispenser contact Hot Water inlet valve Pressure switch: Level_wash Motor Motor Control (MCU) Heater (if equipped) Motor Motor Control (MCU) Heavy Duty Whitest Whites Heavy Duty Drain...then all lights should turn on the status lights. • The next most recent error code is to be Checked Door lock system Clean Washer Delicate Clean Washer Distribution system is set to the maximum speed.
... Indication Whirlpool Duet Sport Whirlpool Duet Sport Ht Rinse/Spin Rinse/Spin Control Action Door locks. Dispenser motor Dispenser contact Cold water inlet valve Dispenser motor Dispenser contact Hot Water inlet valve Pressure switch: Level_wash Motor Motor Control (MCU) Heater (if equipped) Motor Motor Control (MCU) Heavy Duty Whitest Whites Heavy Duty Drain...then all lights should turn on the status lights. • The next most recent error code is to be Checked Door lock system Clean Washer Delicate Clean Washer Distribution system is set to the maximum speed.
User Guide
Page 85
... Main Wash compartment. Release for 4 sec's. MANUAL DIAGNOSTIC TEST The washer must be empty and the control must be Checked Door lock system Dispenser Motor Dispenser contact Cold and Hot Water Inlet Valve Overfill level Dispenser Motor Dispenser contact Cold and Hot Water Inlet Valve Overfill Level Dispenser Motor Dispenser contact Cold and Hot Water...
... Main Wash compartment. Release for 4 sec's. MANUAL DIAGNOSTIC TEST The washer must be empty and the control must be Checked Door lock system Dispenser Motor Dispenser contact Cold and Hot Water Inlet Valve Overfill level Dispenser Motor Dispenser contact Cold and Hot Water Inlet Valve Overfill Level Dispenser Motor Dispenser contact Cold and Hot Water...
User Guide
Page 89
... reconnect power. 6. Check wire harness connections. 5. Unplug washer or disconnect power. 3. Check continuity of foreign objects. 3. Check the door switch/lock unit using the diagnostics. WON'T SHUT OFF 1. Check drain pump. 8. CONTROL WON'T 1. Verify dispenser drawer is level. 2. Check dispenser motor. 5. Check inlet valves. 3. Check drain pump motor. 8. Check operating pressure switch. 5. Check...
... reconnect power. 6. Check wire harness connections. 5. Unplug washer or disconnect power. 3. Check continuity of foreign objects. 3. Check the door switch/lock unit using the diagnostics. WON'T SHUT OFF 1. Check drain pump. 8. CONTROL WON'T 1. Verify dispenser drawer is level. 2. Check dispenser motor. 5. Check inlet valves. 3. Check drain pump motor. 8. Check operating pressure switch. 5. Check...
User Guide
Page 91
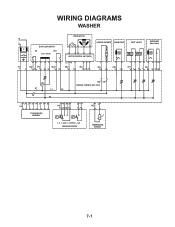
WIRING DIAGRAMS WASHER N L IF DOOR LOCK/SWITCH DS DLS Lock Unlock IF2 DS2 DL3 DLS2 1 2 12 1 2 3 1 2 DRIVE MOTOR MOTOR CONTROL UNIT (MCU) L2 N1 MS2 1 2 MI3 1 2 3 HEATING ELEMENT DRAIN PUMP INLET VALVES DISPENSER Motor Switch VC VH HE2 21 DP2 1 2 VH7 1 3 DI6 571 3 56 DR1 K1 L1 L2 K2 N1 HR2 HR1 CENTRAL CONTROL UNIT (CCU) 12 34 5 6 7 8 UI8 TOUCHPAD/LED ASSEMBLY 6 5 34 PR6 22 24 26 21 2 1 11 14 p> p> L_0 L_wash L_overflow L_sud PRESSURE SWITCH 1 2 TH2 TEMPERATURE SENSOR 7-1
WIRING DIAGRAMS WASHER N L IF DOOR LOCK/SWITCH DS DLS Lock Unlock IF2 DS2 DL3 DLS2 1 2 12 1 2 3 1 2 DRIVE MOTOR MOTOR CONTROL UNIT (MCU) L2 N1 MS2 1 2 MI3 1 2 3 HEATING ELEMENT DRAIN PUMP INLET VALVES DISPENSER Motor Switch VC VH HE2 21 DP2 1 2 VH7 1 3 DI6 571 3 56 DR1 K1 L1 L2 K2 N1 HR2 HR1 CENTRAL CONTROL UNIT (CCU) 12 34 5 6 7 8 UI8 TOUCHPAD/LED ASSEMBLY 6 5 34 PR6 22 24 26 21 2 1 11 14 p> p> L_0 L_wash L_overflow L_sud PRESSURE SWITCH 1 2 TH2 TEMPERATURE SENSOR 7-1


