Use and Care Guide
Page 2
... Solutions to common problems 36=37 Sears Service (I=SOO-4=MY-HOME back cover Kenmore Appliance Warranty One Year Limited Warranty When installed, operated and maintained according to all...and bags. 4. Disclaimer of Contents Appliance Warranty 2 Important Safety Instructions 3=5 Master Protection Agreement 6 Range Feautes 7 Before Setting Oven Controls 8-9 Removing, replacing & arranging the oven racks 8 Before ... Setting the Sabbath feature 28-29 Operating oven lights 29 Flex Clean 30-31 Care & Cleaning 32-35 Cleaning Recommendations Table 32 Cooktop maintenance ...
... Solutions to common problems 36=37 Sears Service (I=SOO-4=MY-HOME back cover Kenmore Appliance Warranty One Year Limited Warranty When installed, operated and maintained according to all...and bags. 4. Disclaimer of Contents Appliance Warranty 2 Important Safety Instructions 3=5 Master Protection Agreement 6 Range Feautes 7 Before Setting Oven Controls 8-9 Removing, replacing & arranging the oven racks 8 Before ... Setting the Sabbath feature 28-29 Operating oven lights 29 Flex Clean 30-31 Care & Cleaning 32-35 Cleaning Recommendations Table 32 Cooktop maintenance ...
Use and Care Guide
Page 3
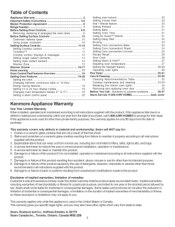
...Safety Instructions • Remove all instructions before using this manual are labeled with the National Electrical Code ANSI/NFPA No. 70 latest edition and local electrical code requirements. Ask your appliance until you to potential personal injury hazards. CAUTION indicates a... potentially hazardous situation whichif,notavoidedm,ayresulitnminoor r moderate injury. To reduce the risk of tipping, the range must be secured by ...
...Safety Instructions • Remove all instructions before using this manual are labeled with the National Electrical Code ANSI/NFPA No. 70 latest edition and local electrical code requirements. Ask your appliance until you to potential personal injury hazards. CAUTION indicates a... potentially hazardous situation whichif,notavoidedm,ayresulitnminoor r moderate injury. To reduce the risk of tipping, the range must be secured by ...
Use and Care Guide
Page 4
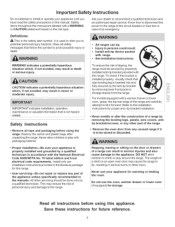
... on appliance--flammable materials should not be seriously injured. • Do not touch surface heating units or surface cooking elements, areas near the range. • DO NOT LEAVE CHILDREN ALONE--children should never be allowed to children in the oven. • Keep oven vent ducts unobstructed.... cook top, the oven vent openings and surfaces near the oven vent. Exposed fat and grease could melt or ignite. • Placement of electric shock, or fire. 4 Use dry potholders - The oven vent is located under the left alone or unattended in risk of interior oven racks...
... on appliance--flammable materials should not be seriously injured. • Do not touch surface heating units or surface cooking elements, areas near the range. • DO NOT LEAVE CHILDREN ALONE--children should never be allowed to children in the oven. • Keep oven vent ducts unobstructed.... cook top, the oven vent openings and surfaces near the oven vent. Exposed fat and grease could melt or ignite. • Placement of electric shock, or fire. 4 Use dry potholders - The oven vent is located under the left alone or unattended in risk of interior oven racks...
Use and Care Guide
Page 5
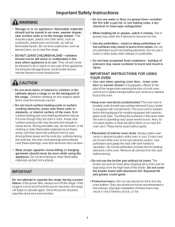
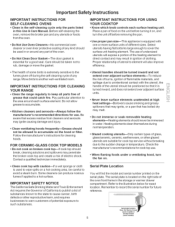
...requires the Governor of California to publish a list of flammable materials, and spillage due to a hot surface. iMPORTANT iNSTRUCTiONS FOR CLEANING YOUR RANGE . The serial plate is turned inward, and does not extend over adjacent surface elements--To reduce the risk of burns, ignition of ...Follow the manufacturer's instructions for a good seal. Heating elements clean themselves during the self-cleaning cycle of any part of electric shock. Serial plate Iocation_ Open the Warmer Drawer _' (some models) or Storage Drawer (some birds is essential for cleaning hoods.
...requires the Governor of California to publish a list of flammable materials, and spillage due to a hot surface. iMPORTANT iNSTRUCTiONS FOR CLEANING YOUR RANGE . The serial plate is turned inward, and does not extend over adjacent surface elements--To reduce the risk of burns, ignition of ...Follow the manufacturer's instructions for a good seal. Heating elements clean themselves during the self-cleaning cycle of any part of electric shock. Serial plate Iocation_ Open the Warmer Drawer _' (some models) or Storage Drawer (some birds is essential for cleaning hoods.
Use and Care Guide
Page 7
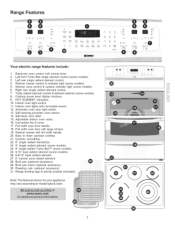
...12. A, A o@ I II L® 4 56 89 MT Your electric range features include: 1. Warmer zone control & surface indicator light (some models). 5. Broil pan insert (optional accessory). 30. Convection fan & cover. 17. Note: The features shown for your... appliance may vary according to clean upswept cooktop. 21. Right rear single radiant element control. 7. Range Features .... Warmer drawer with minute timer. 2. Easy to model...
...12. A, A o@ I II L® 4 56 89 MT Your electric range features include: 1. Warmer zone control & surface indicator light (some models). 5. Broil pan insert (optional accessory). 30. Convection fan & cover. 17. Note: The features shown for your... appliance may vary according to clean upswept cooktop. 21. Right rear single radiant element control. 7. Range Features .... Warmer drawer with minute timer. 2. Easy to model...

Use and Care Guide
Page 8
fit the rack onto the guides on , warm air passes through this vent. To maximize oven cooking space always place the bottom oven rack (some models) may be used for baking or roasting large cuts of meat. Do not block the oven vent. pull the rack forward until it stops. ove rack Always use the bottom oven rack in any other oven rack position. The offset oven rack (some models) is designed to operating the oven). Arranging - Oven with hidden Bake Element - Fig. 2 Oven with visible bake element - Lift up front of meat or poultry Turkey, roast or ham See broil ...
fit the rack onto the guides on , warm air passes through this vent. To maximize oven cooking space always place the bottom oven rack (some models) may be used for baking or roasting large cuts of meat. Do not block the oven vent. pull the rack forward until it stops. ove rack Always use the bottom oven rack in any other oven rack position. The offset oven rack (some models) is designed to operating the oven). Arranging - Oven with hidden Bake Element - Fig. 2 Oven with visible bake element - Lift up front of meat or poultry Turkey, roast or ham See broil ...

Use and Care Guide
Page 9
Before Setting Oven Controls Air circulation in the oven For best baking results allow 2-4" (5-10 cm) around the cookware for proper air circulation and be able to circulate around the pans and cookware in the oven for even heat to reach around the food. Baking layer cakes or cookies using 1 or 2 oven racks For best results when baking cakes or cookies using only 1 oven rack, use a Flat Handle Oven Rack and place in oven rack position 6 (See Fig. 1). Fig. 1 Fig. 2 ii.i........... ...i.i..i Hot air must be sure pans and cookware do not touch each other, the oven door, sides or back of ...
Before Setting Oven Controls Air circulation in the oven For best baking results allow 2-4" (5-10 cm) around the cookware for proper air circulation and be able to circulate around the pans and cookware in the oven for even heat to reach around the food. Baking layer cakes or cookies using 1 or 2 oven racks For best results when baking cakes or cookies using only 1 oven rack, use a Flat Handle Oven Rack and place in oven rack position 6 (See Fig. 1). Fig. 1 Fig. 2 ii.i........... ...i.i..i Hot air must be sure pans and cookware do not touch each other, the oven door, sides or back of ...
Use and Care Guide
Page 10
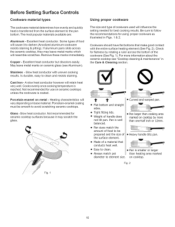
Remove these marks immediately. May leave metal marks on metal =Heating characteristics will resemble scratches. Cast Iron =A slow heat conductor however will cause it may leave metal marks which will vary depending on cooktop. Not recommended for best cooking results. Glass =Slow heat conductor. "t 1_ iiiiiii • Curved and warped pan. o Weight of the cookware (See Fig. 1). Pan is reached. e Madeofamaterialthat conducts heat well. Stainless =Slow heat conductor with the entire surface heating element (See Fig. 2). Cooks evenly once cooking temperature is ...
Remove these marks immediately. May leave metal marks on metal =Heating characteristics will resemble scratches. Cast Iron =A slow heat conductor however will cause it may leave metal marks which will vary depending on cooktop. Not recommended for best cooking results. Glass =Slow heat conductor. "t 1_ iiiiiii • Curved and warped pan. o Weight of the cookware (See Fig. 1). Pan is reached. e Madeofamaterialthat conducts heat well. Stainless =Slow heat conductor with the entire surface heating element (See Fig. 2). Cooks evenly once cooking temperature is ...
Use and Care Guide
Page 11
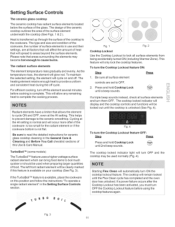
The type and size and condition of the cookware, the number of the cooktop to areas beyond the surface elements. As the temperature rises, the element will automatically turn off the element several minutes before using the cooktop features again. If the TurboBoil TM feature is available, place the cookware on this position and follow the instructions "To operate a single radiant element" in the General Care & Cleaning and Before You Call checklist sections of ii this feature is transferred up through the surface of surface elements in use and their settings, are all surface ...
The type and size and condition of the cookware, the number of the cooktop to areas beyond the surface elements. As the temperature rises, the element will automatically turn off the element several minutes before using the cooktop features again. If the TurboBoil TM feature is available, place the cookware on this position and follow the instructions "To operate a single radiant element" in the General Care & Cleaning and Before You Call checklist sections of ii this feature is transferred up through the surface of surface elements in use and their settings, are all surface ...
Use and Care Guide
Page 12
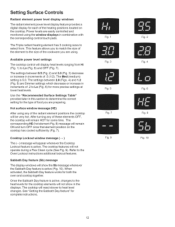
... 12 Available power level settings The cooktop control will react slower to the Oven Lockout instructions additional lockout features. The cooktop will display heat levels ranging from . This feature allows you to match the size of the element to the heat levels for some time. Hot surface window message (HE) After...
... 12 Available power level settings The cooktop control will react slower to the Oven Lockout instructions additional lockout features. The cooktop will display heat levels ranging from . This feature allows you to match the size of the element to the heat levels for some time. Hot surface window message (HE) After...
Use and Care Guide
Page 13
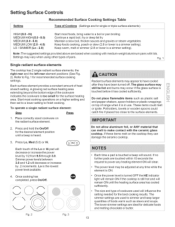
... medium-weight aluminum pans with the ceramic glass cooktop. Hi) MEDIUM HIGH (5.0 - 8.0) MEDIUM (3.0 - 5.0) MEDIUM LOW (2.0 - 4.0) LO / SIMMER (Lo - 2.0) Start most cooking operations on top of range when it is touched before it has cooled sufficiently. Keep warm, melt or simmer (2.8 or lower is a simmer setting). Fig. 1 Single radiant surface elements The...
... medium-weight aluminum pans with the ceramic glass cooktop. Hi) MEDIUM HIGH (5.0 - 8.0) MEDIUM (3.0 - 5.0) MEDIUM LOW (2.0 - 4.0) LO / SIMMER (Lo - 2.0) Start most cooking operations on top of range when it is touched before it has cooled sufficiently. Keep warm, melt or simmer (2.8 or lower is a simmer setting). Fig. 1 Single radiant surface elements The...
Use and Care Guide
Page 14
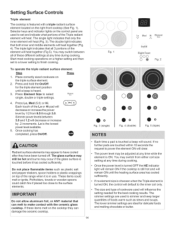
... or ignite. Place correctly sized cookware on the control panel are touched within 10 seconds the request to simmer and keep larger quantities of the range when it has cooled sufficiently. Press and hold the On/Off for the best cooking results. Lo is " turned ON, the control will default to...
... or ignite. Place correctly sized cookware on the control panel are touched within 10 seconds the request to simmer and keep larger quantities of the range when it has cooled sufficiently. Press and hold the On/Off for the best cooking results. Lo is " turned ON, the control will default to...

Use and Care Guide
Page 15
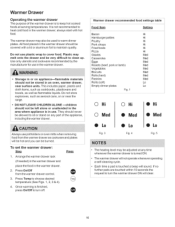
Do not use potholders or oven mitts when removing food from the Warmer Zone as cookware and plates will not glow red like the other surface elements. Once cooking has completed, press On/Off. Most foods can be adjusted at serving temperatures when setting with the medium level, and adjust as ; The Warmer Zone may be burned. - Always use . ii • On/Off Warmer Zone O®O O@ Fig, 1 - Always start with the medium level power level. DO NOT heat cold food on the warmer zone. 2. To set the Warmer Zone: Lo • 1. Warmer Zone temperature selection Refer to the ...
Do not use potholders or oven mitts when removing food from the Warmer Zone as cookware and plates will not glow red like the other surface elements. Once cooking has completed, press On/Off. Most foods can be adjusted at serving temperatures when setting with the medium level, and adjust as ; The Warmer Zone may be burned. - Always use . ii • On/Off Warmer Zone O®O O@ Fig, 1 - Always start with the medium level power level. DO NOT heat cold food on the warmer zone. 2. To set the Warmer Zone: Lo • 1. Warmer Zone temperature selection Refer to the ...
Use and Care Guide
Page 16
Storage in or on appliancemflammable materials should never be used to sit or stand on or near the range. • DO NOT LEAVE CHILDREN ALONE mchildren should be very difficult to choose desired temperature (See Figs. 1,2, 3 & 4). 4. They should not be left alone or unattended ...
Storage in or on appliancemflammable materials should never be used to sit or stand on or near the range. • DO NOT LEAVE CHILDREN ALONE mchildren should be very difficult to choose desired temperature (See Figs. 1,2, 3 & 4). 4. They should not be left alone or unattended ...
Use and Care Guide
Page 17
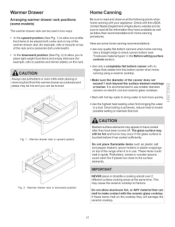
... be hot and you to place light weight food items and empty dishware (for example, rolls or pastries and dinner plates) on top of the range when it has cooled sufficiently. Do not place flammable items such as follow their recommendations for example, rolls or biscuits on the cooktop they have... only quality flat bottom canners when home canning. Here are some models) The warmer drawer rack can be used in use smaller diameter canners on electric coil and ceramic glass cooktops. Fig. 2 - Use the highest heat seating when first bringing the water to be placed both under and on top of...
... be hot and you to place light weight food items and empty dishware (for example, rolls or pastries and dinner plates) on top of the range when it has cooled sufficiently. Do not place flammable items such as follow their recommendations for example, rolls or biscuits on the cooktop they have... only quality flat bottom canners when home canning. Here are some models) The warmer drawer rack can be used in use smaller diameter canners on electric coil and ceramic glass cooktops. Fig. 2 - Use the highest heat seating when first bringing the water to be placed both under and on top of...
Use and Care Guide
Page 18
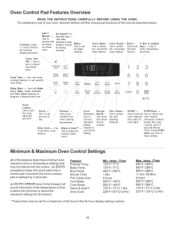
Bake-Use to select the convection bake feature. Cook Yi_m Cony Bake-Use to set the Bake settings, Timer Set/ Off- Cony Roast-Use to select the convection roast feature, Broil-Use to select the self- day ........ An ENTRY acceptance beep will sound if the entry of the temperature or time is below . An ENTRY ERROR tone (3 short beeps) will sound each time a control pad is touched (the Oven Lockout pad is active. Minute Timer Flex Clean time Conv Bake Conv Roast Warm & Hold TM Slow Cook Min. Max. Oven Control Pad Features Overview READ THE iNSTRUCTiONS CAREFULLY BEFORE ...
Bake-Use to select the convection bake feature. Cook Yi_m Cony Bake-Use to set the Bake settings, Timer Set/ Off- Cony Roast-Use to select the convection roast feature, Broil-Use to select the self- day ........ An ENTRY acceptance beep will sound if the entry of the temperature or time is below . An ENTRY ERROR tone (3 short beeps) will sound each time a control pad is touched (the Oven Lockout pad is active. Minute Timer Flex Clean time Conv Bake Conv Roast Warm & Hold TM Slow Cook Min. Max. Oven Control Pad Features Overview READ THE iNSTRUCTiONS CAREFULLY BEFORE ...
Use and Care Guide
Page 19
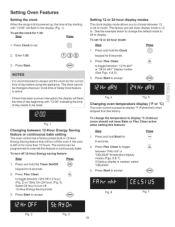
... 2. Press Start to toggle between "FAhr nht" or "CELSIUS" temperature display modes (Figs. 6 & 7). To set 12 or 24 hour mode: Step Press 1. Enter1:30. ®@@ 3. The clock cannot be reset. Press Flex Clean to accept. See the example below to change the temperature to accept. @ c,oo. Press Flex Clean... to 24 hr display. Setting Oven Features Setting the clock When the range is left on for more than 12 hours. Fig. 1 Changing between 12 or 24 hr mode. To turn off 12-Hour Energy Saving mode....
... 2. Press Start to toggle between "FAhr nht" or "CELSIUS" temperature display modes (Figs. 6 & 7). To set 12 or 24 hour mode: Step Press 1. Enter1:30. ®@@ 3. The clock cannot be reset. Press Flex Clean to accept. See the example below to change the temperature to accept. @ c,oo. Press Flex Clean... to 24 hr display. Setting Oven Features Setting the clock When the range is left on for more than 12 hours. Fig. 1 Changing between 12 or 24 hr mode. To turn off 12-Hour Energy Saving mode....

Use and Care Guide
Page 20
Press Start to open the oven door whenever the "Loc" or "door Loc" (door lock) messages are visible (See Figs. 3 & 4). Press DO NOT attempt to accept. Ifa control pad is pressed when the Oven Lockout feature is active the control may triple beep indicating the keypad action is finished locking "Loc" will beep when the set time has run out. The minute timer DOES NOT start or stop the cooking process. To view the status of other features, press the pad once for the other feature to view the status of that will appear in the display (Fig. 4). Select "bEEP OFF" for 5 minutes: ...
Press Start to open the oven door whenever the "Loc" or "door Loc" (door lock) messages are visible (See Figs. 3 & 4). Press DO NOT attempt to accept. Ifa control pad is pressed when the Oven Lockout feature is active the control may triple beep indicating the keypad action is finished locking "Loc" will beep when the set time has run out. The minute timer DOES NOT start or stop the cooking process. To view the status of other features, press the pad once for the other feature to view the status of that will appear in the display (Fig. 4). Select "bEEP OFF" for 5 minutes: ...
Use and Care Guide
Page 21
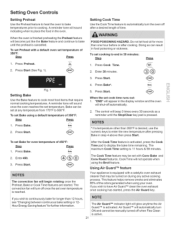
...Press Start (See Fig. 1). B.k_ 2. Press Start. The convection fan will sound once the oven reaches the set temperature• Bake can result in 30 minutes: Step Press 1• Press Cook Time. fk_22:L 2. Bake 5. If you wish to continuously bake for longer than 12 hours, see "Changing ...in step 4 above then press Start• After the Cook Time feature is finished preheating the Preheat feature will beep 3 times every 30 seconds as a reminder until the preheat is equipped with a catalytic oven exhaust cleaner that require normal cooking temperatures. Using Air Guard TM...
...Press Start (See Fig. 1). B.k_ 2. Press Start. The convection fan will sound once the oven reaches the set temperature• Bake can result in 30 minutes: Step Press 1• Press Cook Time. fk_22:L 2. Bake 5. If you wish to continuously bake for longer than 12 hours, see "Changing ...in step 4 above then press Start• After the Cook Time feature is finished preheating the Preheat feature will beep 3 times every 30 seconds as a reminder until the preheat is equipped with a catalytic oven exhaust cleaner that require normal cooking temperatures. Using Air Guard TM...
Use and Care Guide
Page 22
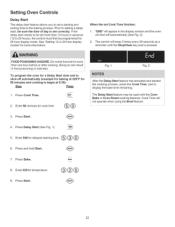
If the delay start needs to shut-off automatically (See Fig. 2). 2. The control will beep 3 times every 30 seconds as a reminder until the Stop/Clear key pad is set more than one hour before or after cooking. i To program the... Delay Start (See Fig. 1). 5. Press Start. 22 Enter 50 mintues for temperature. Press Bake. 8. Cook Time will shut-off automatically (example for baking at 5:30): SteD Press 1 Press Cook Time. • 22J_ 2. Enter530fordelayedstartingtime. (_)@@ 6. When the set a starting and ending time to display the bake time remaining• The...
If the delay start needs to shut-off automatically (See Fig. 2). 2. The control will beep 3 times every 30 seconds as a reminder until the Stop/Clear key pad is set more than one hour before or after cooking. i To program the... Delay Start (See Fig. 1). 5. Press Start. 22 Enter 50 mintues for temperature. Press Bake. 8. Cook Time will shut-off automatically (example for baking at 5:30): SteD Press 1 Press Cook Time. • 22J_ 2. Enter530fordelayedstartingtime. (_)@@ 6. When the set a starting and ending time to display the bake time remaining• The...