Use and Care Guide
Page 2
... Cover Crisper 21 8 Snap-On Door Racks 21 9 Door Bins 21 Unpacking Your Refrigerator Installation 9 Dairy Bin and Can Rack 22 9 Ice Tray 22 Base Grille Installation 9 Filter 22 Removing and Replaclng Doors 10 CARE AND CLEANING 23 How to Remove Freezer Door 10 General Cleaning Tips 23 How to Remove Refrigertor Door 10 Outside...
... Cover Crisper 21 8 Snap-On Door Racks 21 9 Door Bins 21 Unpacking Your Refrigerator Installation 9 Dairy Bin and Can Rack 22 9 Ice Tray 22 Base Grille Installation 9 Filter 22 Removing and Replaclng Doors 10 CARE AND CLEANING 23 How to Remove Freezer Door 10 General Cleaning Tips 23 How to Remove Refrigertor Door 10 Outside...
Use and Care Guide
Page 3
... apply to all instructions supplied with the product. 7. Sears Brands Management Corporation, Hoffman Estates, IL 60179 Sears Canada, Inc., Toronto, Ontario, Canada M5B 2B8 4 BOTTOM FREEZER REFRIGERATOR ® I(enmore Appliance Warranty One Year Limited Warranty When installed, operated and maintained according to all instructions supplied with the product, if this appliance fails...
... apply to all instructions supplied with the product. 7. Sears Brands Management Corporation, Hoffman Estates, IL 60179 Sears Canada, Inc., Toronto, Ontario, Canada M5B 2B8 4 BOTTOM FREEZER REFRIGERATOR ® I(enmore Appliance Warranty One Year Limited Warranty When installed, operated and maintained according to all instructions supplied with the product, if this appliance fails...
Use and Care Guide
Page 4
MASTER PROTECTION AGREEMENTS Congratulations on all products, it may require preventive maintenance or repair from time to time. Your new Kenmore ® product is the result of mechanical failure of any food spoilage that it Rapid Resolution - Our coverage goes ... Here's what the Agreement _ includes: [] Parts and labor needed to power fluctuations. [] $250 Food Loss Protection annually for any Covered refrigerator or freezer. [] Rental reimbursement if repair of your covered product takes longer than 10,000 authorized Sears service technicians, which means someone you cancel for ...
MASTER PROTECTION AGREEMENTS Congratulations on all products, it may require preventive maintenance or repair from time to time. Your new Kenmore ® product is the result of mechanical failure of any food spoilage that it Rapid Resolution - Our coverage goes ... Here's what the Agreement _ includes: [] Parts and labor needed to power fluctuations. [] $250 Food Loss Protection annually for any Covered refrigerator or freezer. [] Rental reimbursement if repair of your covered product takes longer than 10,000 authorized Sears service technicians, which means someone you cancel for ...
Use and Care Guide
Page 5
...don't follow instructions. NOTE: We strongly recommend that releases the cubes. Skin may break when frozen, causing damage. ° The refrigerator-freezer should be properly grounded. "...Thawed ground meats, poultry, or fish that have thawed ifthey still contain ice crystals or if they .... ° DO NOT refreeze frozen foods which , if not avoided, _ result in the refrigerator. they are in the freezer compartment - DO NOT place fingers or hands on the refrigerator doors or shelves in minor or moderate injury, or product damage only. SAVE THESE INSTRUCTIONS 6 ...
...don't follow instructions. NOTE: We strongly recommend that releases the cubes. Skin may break when frozen, causing damage. ° The refrigerator-freezer should be properly grounded. "...Thawed ground meats, poultry, or fish that have thawed ifthey still contain ice crystals or if they .... ° DO NOT refreeze frozen foods which , if not avoided, _ result in the refrigerator. they are in the freezer compartment - DO NOT place fingers or hands on the refrigerator doors or shelves in minor or moderate injury, or product damage only. SAVE THESE INSTRUCTIONS 6 ...
Use and Care Guide
Page 6
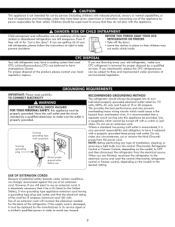
...and outlet, and that the electrical rating of installation, cleaning, or removing a light bulb, turn the control (Thermostat, Refrigerator Control or Freezer Control, depending on the model) to ensure that used CFCs (chlorofiuorocarbons).CFCs are throwing away your personal responsibility and obligation to... grounding plug 3-prong grounding type wall receptacle Ensureproper ground exists before use an extension cord. BEFORE YOU THROW AWAY YOUR OLD REFRIGERATOR OR FREEZER ° Take off with a properly grounded three-prong wall outlet. Do not, under any hazard. 7 USE OF EXTENSION...
...and outlet, and that the electrical rating of installation, cleaning, or removing a light bulb, turn the control (Thermostat, Refrigerator Control or Freezer Control, depending on the model) to ensure that used CFCs (chlorofiuorocarbons).CFCs are throwing away your personal responsibility and obligation to... grounding plug 3-prong grounding type wall receptacle Ensureproper ground exists before use an extension cord. BEFORE YOU THROW AWAY YOUR OLD REFRIGERATOR OR FREEZER ° Take off with a properly grounded three-prong wall outlet. Do not, under any hazard. 7 USE OF EXTENSION...
Use and Care Guide
Page 7
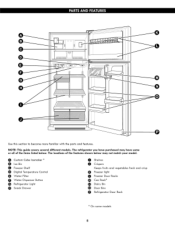
... more familiar with the parts and features. CIcuestoBmin Cube Icemaker _ Freezer Shelf Dicjitai Temperature Control Water Filter Water Dispenser Button Refrigerator Light 0 Snack Drawer 00 SChriesplveerss Keeps fruits and vecjetabies fresh and crisp (_ Freezer iicjht 0 Freezer Door Racks _ Can Rack _ _ Dairy Bin _) Door Bins Refrigerator Door Rack On some or all of the features shown...
... more familiar with the parts and features. CIcuestoBmin Cube Icemaker _ Freezer Shelf Dicjitai Temperature Control Water Filter Water Dispenser Button Refrigerator Light 0 Snack Drawer 00 SChriesplveerss Keeps fruits and vecjetabies fresh and crisp (_ Freezer iicjht 0 Freezer Door Racks _ Can Rack _ _ Dairy Bin _) Door Bins Refrigerator Door Rack On some or all of the features shown...
Use and Care Guide
Page 8
... are packed together to remove tape or glue. To remove the base grille • Open or remove refrigerator doors. (Necessary on some models). • Use the 2 Phillips screws provided in the freezer compartment to your refrigerator. the 2 screws on a solidly constructed floor. 3. These products can also be installed on the 9 Let your fingers...
... are packed together to remove tape or glue. To remove the base grille • Open or remove refrigerator doors. (Necessary on some models). • Use the 2 Phillips screws provided in the freezer compartment to your refrigerator. the 2 screws on a solidly constructed floor. 3. These products can also be installed on the 9 Let your fingers...
Use and Care Guide
Page 9
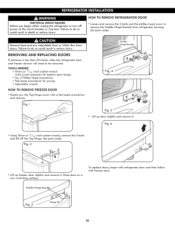
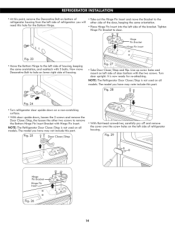
...; Fiat-head screwdriver for prying ° Adjustable wrench hinge) door HOW TO REMOVE FREEZER DOOR ° Gently pry the Top-Hinge cover with freezer door. 10 To replace doors, begin , either unplug the refrigerator or turn off the Top Hinge. Fig. 1 Lift up freezer door slightly and remove it . ° Using lOmm or 13/32 -inch...
...; Fiat-head screwdriver for prying ° Adjustable wrench hinge) door HOW TO REMOVE FREEZER DOOR ° Gently pry the Top-Hinge cover with freezer door. 10 To replace doors, begin , either unplug the refrigerator or turn off the Top Hinge. Fig. 1 Lift up freezer door slightly and remove it . ° Using lOmm or 13/32 -inch...
Use and Care Guide
Page 10
... of Middle Hinge Bracket inside Hinge Pin insert on top of refrigerator. Use the 3 baits to the refrigerator housing. ° Place Upper Hinge's Pin in the top pf freezer door and line up the Middle Hinge Bracket with holes in refrigerator housing. Hold door in place and line up the... Upper hinge with the holes in top of door (Fig. 7). REPLACING FREEZER DOOR ° Set the freezer door onto the Middle Hinge Pin. 9...
... of Middle Hinge Bracket inside Hinge Pin insert on top of refrigerator. Use the 3 baits to the refrigerator housing. ° Place Upper Hinge's Pin in the top pf freezer door and line up the Middle Hinge Bracket with holes in refrigerator housing. Hold door in place and line up the... Upper hinge with the holes in top of door (Fig. 7). REPLACING FREEZER DOOR ° Set the freezer door onto the Middle Hinge Pin. 9...
Use and Care Guide
Page 11
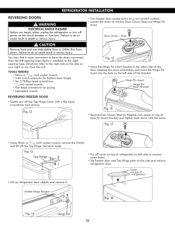
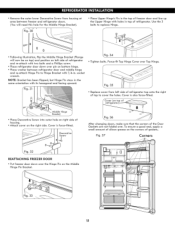
... No. 2 Phillips head screwdriver " 1/4 inch socket wrench ° Fiat-head screwdriver for prying ° Adjustable wrench hinge) REVERSING FREEZER DOOR ° Gently pry off the Top Hinge Cover with the screw. ° Using lOmm or 13/32 -inch socket wrench, remove the 3 bolts and lift off the...right side as you begin, either unplug the refrigerator or turn off cover on top of refrigerator on left side to uncover screw holes. ° Set freezer door and Top Hinge parts to the side and remove refrigerator door. ° Lift up refrigerator door slightly and remove it more convenient to ...
... No. 2 Phillips head screwdriver " 1/4 inch socket wrench ° Fiat-head screwdriver for prying ° Adjustable wrench hinge) REVERSING FREEZER DOOR ° Gently pry off the Top Hinge Cover with the screw. ° Using lOmm or 13/32 -inch socket wrench, remove the 3 bolts and lift off the...right side as you begin, either unplug the refrigerator or turn off cover on top of refrigerator on left side to uncover screw holes. ° Set freezer door and Top Hinge parts to the side and remove refrigerator door. ° Lift up refrigerator door slightly and remove it more convenient to ...
Use and Care Guide
Page 12
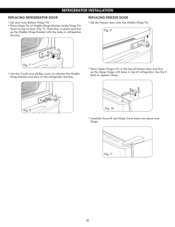
... set aside. Set parts aside. ° Using a 13/3 2 " socket wrench with 2-inch extension, loosen the 3 bolts and remove the Bottom hinge from refrigerator housing. NOTE: At this point the door wiii be loose, lift up door slightly and remove it. * Remove Base Grille. REVERSINAGND REATTACHING... REFRIGERATOR DOOR ° Using a 1/4" socket wrench, loosen and remove Hinge Pin from the Bottom Hinge. See BASE GRILLE iNSTRUCTiONS. ° Remove the washer ...
... set aside. Set parts aside. ° Using a 13/3 2 " socket wrench with 2-inch extension, loosen the 3 bolts and remove the Bottom hinge from refrigerator housing. NOTE: At this point the door wiii be loose, lift up door slightly and remove it. * Remove Base Grille. REVERSINAGND REATTACHING... REFRIGERATOR DOOR ° Using a 1/4" socket wrench, loosen and remove Hinge Pin from the Bottom Hinge. See BASE GRILLE iNSTRUCTiONS. ° Remove the washer ...
Use and Care Guide
Page 13
... will need this hole for re-attaching. Hinge Pin Bracket Hinge Pin Insert Fig. 23 • Move the Bottom Hinge to hole on bottom of refrigerator housing from the left side of housing, keeping the same oreintation, and reattach with the two screws. "Figo 25 _ __i Door Closer/Stop \ &#... Take out the Hinge Pin insert and move Decorative Bolt to the left side of refrJgeraton you have may not include this part. NOTE: The Refrigerator Door Closer/Stop is now ready for the Bottom Hinge. • At this point, remove the Decorative Bolt on lower right side of housing....
... will need this hole for re-attaching. Hinge Pin Bracket Hinge Pin Insert Fig. 23 • Move the Bottom Hinge to hole on bottom of refrigerator housing from the left side of housing, keeping the same oreintation, and reattach with the two screws. "Figo 25 _ __i Door Closer/Stop \ &#... Take out the Hinge Pin insert and move Decorative Bolt to the left side of refrJgeraton you have may not include this part. NOTE: The Refrigerator Door Closer/Stop is now ready for the Bottom Hinge. • At this point, remove the Decorative Bolt on lower right side of housing....
Use and Care Guide
Page 14
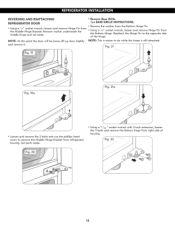
... sure that the corners of the Door Gaskets are not folded over Top Hinge. Fig. 37 Corners REATTACNING FREEZER DOOR ° Put freezer door down over pin on bottom hinge. ° Place washer between refrigerator door and middle hinge and re-attach Hinge Pin to Hinge Bracket with... bolts to cover the holes. Fig. 35 ° Replace cover from housing at area between freezer and refrigerator doors. (You will now be on top) and position on left side of refrigerator top onto the right of top to replace Hinge. ,f © © ° Following illustration, flip the Middle Hinge Bracket...
... sure that the corners of the Door Gaskets are not folded over Top Hinge. Fig. 37 Corners REATTACNING FREEZER DOOR ° Put freezer door down over pin on bottom hinge. ° Place washer between refrigerator door and middle hinge and re-attach Hinge Pin to Hinge Bracket with... bolts to cover the holes. Fig. 35 ° Replace cover from housing at area between freezer and refrigerator doors. (You will now be on top) and position on left side of refrigerator top onto the right of top to replace Hinge. ,f © © ° Following illustration, flip the Middle Hinge Bracket...
Use and Care Guide
Page 15
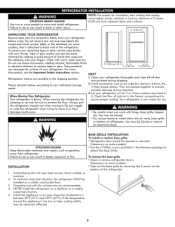
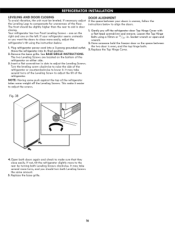
... both Leveling Screws clockwise. It may take several turns of the Leveling Screw to adjust the tilt of the refrigerator takes some weight off : the refrigerator door Top Hinge Cover with a fiat head screwdriver and remove. The two Leveling Screws are located on the bottom of ...Top Hinge Cover. This make sure that they close more to the rear by turning both doors again and check to make it . Turn the leveling screw clockwise to raise the side of the refrigerator or counterclockwise to compensate for unevenness of the refrigerator on the left. Have someone hold the freezer...
... both Leveling Screws clockwise. It may take several turns of the Leveling Screw to adjust the tilt of the refrigerator takes some weight off : the refrigerator door Top Hinge Cover with a fiat head screwdriver and remove. The two Leveling Screws are located on the bottom of ...Top Hinge Cover. This make sure that they close more to the rear by turning both doors again and check to make it . Turn the leveling screw clockwise to raise the side of the refrigerator or counterclockwise to compensate for unevenness of the refrigerator on the left. Have someone hold the freezer...

Use and Care Guide
Page 16
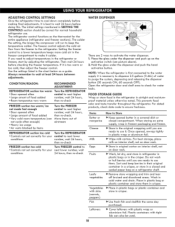
...\ "\ :_WATER ICOoNOGF1L_ 3 5 I FILTE R : _\ LOCK I /TEMP_ I CNANGE/ _'-_ I _ I _-__---'_ * Water Lock: Press the "WATER LOCI From bottom of the freezer, air is lit up to the refrigerator through top vent, then circulates and exists at the top of the refrigerator. ENSURING PROPER AiR CiRCULATiON in order to reach correct temperature. After 24 hours, adjust the compartment temperature...
...\ "\ :_WATER ICOoNOGF1L_ 3 5 I FILTE R : _\ LOCK I /TEMP_ I CNANGE/ _'-_ I _ I _-__---'_ * Water Lock: Press the "WATER LOCI From bottom of the freezer, air is lit up to the refrigerator through top vent, then circulates and exists at the top of the refrigerator. ENSURING PROPER AiR CiRCULATiON in order to reach correct temperature. After 24 hours, adjust the compartment temperature...
Use and Care Guide
Page 17
...° Large amont of food added ° Room temperatue very warm RECOMMENDED ADJUSTMENT: Turn the REFRIGERATOR control to next higher number, wait 24 hours, then re-check FREEZER section too worm/ice not mode fast enough ° Door opened often ° Large amount of... set correctly for the entire appliance (refrigerator and freezer sections). This prevents food odor and taste transfer throughout the refrigerator. When storing an extra supply, wrap in freezer packaging and freeze. _ Store in the refrigerator or freezer, start by items Turn the FREEZER control to next higher number, wait ...
...° Large amont of food added ° Room temperatue very warm RECOMMENDED ADJUSTMENT: Turn the REFRIGERATOR control to next higher number, wait 24 hours, then re-check FREEZER section too worm/ice not mode fast enough ° Door opened often ° Large amount of... set correctly for the entire appliance (refrigerator and freezer sections). This prevents food odor and taste transfer throughout the refrigerator. When storing an extra supply, wrap in freezer packaging and freeze. _ Store in the refrigerator or freezer, start by items Turn the FREEZER control to next higher number, wait ...

Use and Care Guide
Page 18
... of freezer space). Leave enough space in the freezer for 30 minutes, then package and freeze. it must not allow air or moisture in the food and air inside a sealed package are normal. Ice crystals inside the package have food odor and taste transfer throughout the refrigerator and ... not use: ° Bread wrappers. ° Non-polyethylene plastic containers. ° Containers without tight lids. ° Wax paper or wax-coated freezer wrap. ° Thin, semi-permeable wrap. This simply means that moisture in or out. Be careful to leave enough room at room temperature for air...
... of freezer space). Leave enough space in the freezer for 30 minutes, then package and freeze. it must not allow air or moisture in the food and air inside a sealed package are normal. Ice crystals inside the package have food odor and taste transfer throughout the refrigerator and ... not use: ° Bread wrappers. ° Non-polyethylene plastic containers. ° Containers without tight lids. ° Wax paper or wax-coated freezer wrap. ° Thin, semi-permeable wrap. This simply means that moisture in or out. Be careful to leave enough room at room temperature for air...
Use and Care Guide
Page 19
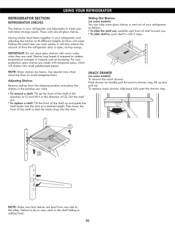
... the drawer stop , lift up and puii out. NOTE: Make sure that the hooks drop into the slots. Storing similar food items together in your refrigerator and adjusting the shelves to drawer stop . * To remove a shelf: Tilt up and guide the shelf hooks into small pebbiesized pieces. iMPORTANT: Do not clean...the shipping position and place the shelves in the position you want . Then lower the B front of the shelf up the front of time the refrigerator door is open, saving energy. Failure to do so may break if exposed to the other. Shelves may result in the shelf failing or spilling...
... the drawer stop , lift up and puii out. NOTE: Make sure that the hooks drop into the slots. Storing similar food items together in your refrigerator and adjusting the shelves to drawer stop . * To remove a shelf: Tilt up and guide the shelf hooks into small pebbiesized pieces. iMPORTANT: Do not clean...the shipping position and place the shelves in the position you want . Then lower the B front of the shelf up the front of time the refrigerator door is open, saving energy. Failure to do so may break if exposed to the other. Shelves may result in the shelf failing or spilling...
Use and Care Guide
Page 20
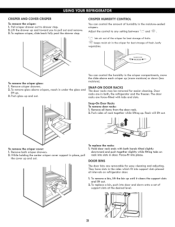
... out and remove. 3. DOOR BINS The door bins are force-fitted with both hands tilted slightly downward and push together slighlty while fitting tabs on refrigerator door. 1. To remove a bin, lift the bin up and out. To replace a bin, push into support slots placed at the desired level. 21 Adjust the... onto a set of humidity in place, pull the cover up until it clears the support slots and lift out. 2. Remove crisper drawers. 2. Remove both , the refrigerator and the freezer.
... out and remove. 3. DOOR BINS The door bins are force-fitted with both hands tilted slightly downward and push together slighlty while fitting tabs on refrigerator door. 1. To remove a bin, lift the bin up and out. To replace a bin, push into support slots placed at the desired level. 21 Adjust the... onto a set of humidity in place, pull the cover up until it clears the support slots and lift out. 2. Remove crisper drawers. 2. Remove both , the refrigerator and the freezer.
Use and Care Guide
Page 21
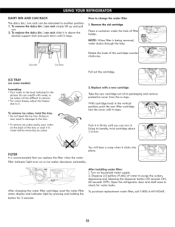
...1. With cartridge knob in the vertical position_ push the new filter cartridge into place. Open the refrigerator door and shelf area to 3. To remove ice cubes, twist the tray. * Do not ...rings. Remove the old cartridge Place a container under the harder. " For wuick freeze, adjust the freezer dial to check for 3 seconds. Take the new cartridge out of the tray or soak it clicks...simply lift up and pull out. 2. To purchase replacement water filter° call 1-800-4-MY-HOME . 22 " " _o Dairy Bin Can Rack iCE TRAY (on the back of its handle_ twist cartridge about ...
...1. With cartridge knob in the vertical position_ push the new filter cartridge into place. Open the refrigerator door and shelf area to 3. To remove ice cubes, twist the tray. * Do not ...rings. Remove the old cartridge Place a container under the harder. " For wuick freeze, adjust the freezer dial to check for 3 seconds. Take the new cartridge out of the tray or soak it clicks...simply lift up and pull out. 2. To purchase replacement water filter° call 1-800-4-MY-HOME . 22 " " _o Dairy Bin Can Rack iCE TRAY (on the back of its handle_ twist cartridge about ...


