Use and Care Guide
Page 2
... Cover Crisper 21 8 Snap-On Door Racks 21 9 Door Bins 21 Unpacking Your Refrigerator Installation 9 Dairy Bin and Can Rack 22 9 Ice Tray 22 Base Grille Installation 9 Filter 22 Removing and Replaclng Doors 10 CARE AND CLEANING 23 How to Remove Freezer Door 10 General Cleaning Tips 23 How to Remove Refrigertor Door 10 Outside...
... Cover Crisper 21 8 Snap-On Door Racks 21 9 Door Bins 21 Unpacking Your Refrigerator Installation 9 Dairy Bin and Can Rack 22 9 Ice Tray 22 Base Grille Installation 9 Filter 22 Removing and Replaclng Doors 10 CARE AND CLEANING 23 How to Remove Freezer Door 10 General Cleaning Tips 23 How to Remove Refrigertor Door 10 Outside...
Use and Care Guide
Page 3
... Brands Management Corporation, Hoffman Estates, IL 60179 Sears Canada, Inc., Toronto, Ontario, Canada M5B 2B8 4 Sears shall not be product repair as provided herein. BOTTOM FREEZER REFRIGERATOR ® I(enmore Appliance Warranty One Year Limited Warranty When installed, operated and maintained according to all instructions supplied with the product, if this appliance fails...
... Brands Management Corporation, Hoffman Estates, IL 60179 Sears Canada, Inc., Toronto, Ontario, Canada M5B 2B8 4 Sears shall not be product repair as provided herein. BOTTOM FREEZER REFRIGERATOR ® I(enmore Appliance Warranty One Year Limited Warranty When installed, operated and maintained according to all instructions supplied with the product, if this appliance fails...
Use and Care Guide
Page 4
.... Once you want us, whenever you purchase the Agreement t a simple phone caii is aii that is the result of mechanical failure of any Covered refrigerator or freezer. [] Rental reimbursement if repair of your covered product takes longer than 10,000 authorized Sears service technicians, which means someone you to help by a .... [] $250 Food Loss Protection annually for years of Purchase Serial No. Date of dependable operation. For prices and additional information in the U.S.A. Your new Kenmore ® product is a risk free purchase. But like all products.
.... Once you want us, whenever you purchase the Agreement t a simple phone caii is aii that is the result of mechanical failure of any Covered refrigerator or freezer. [] Rental reimbursement if repair of your covered product takes longer than 10,000 authorized Sears service technicians, which means someone you to help by a .... [] $250 Food Loss Protection annually for years of Purchase Serial No. Date of dependable operation. For prices and additional information in the U.S.A. Your new Kenmore ® product is a risk free purchase. But like all products.
Use and Care Guide
Page 5
... chance of the ejector mechanism, or with a live wire filament. (A burned-out light bulb may break when frozen, causing damage. ° The refrigerator-freezer should be killed or seriously injured if you don't follow instructions. _ Indicates an imminently hazardous situation which, if not avoided, _ result in .... cleaning or making any other foods. Use refrozen foods as soon as possible to climb, stand or hang on the refrigerator doors or shelves in the freezer compartment - DO NOT place fingers or hands on the power cord. "...Thawed ground meats, poultry, or fish that...
... chance of the ejector mechanism, or with a live wire filament. (A burned-out light bulb may break when frozen, causing damage. ° The refrigerator-freezer should be killed or seriously injured if you don't follow instructions. _ Indicates an imminently hazardous situation which, if not avoided, _ result in .... cleaning or making any other foods. Use refrozen foods as soon as possible to climb, stand or hang on the refrigerator doors or shelves in the freezer compartment - DO NOT place fingers or hands on the power cord. "...Thawed ground meats, poultry, or fish that...
Use and Care Guide
Page 6
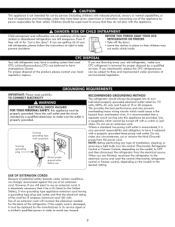
...of environmental legislation. [€._o]lJ_ _[_ [_ _U]l_t:W,'_l:/l__,"] IMPORTANT: Please read carefully. BEFORE YOU THROW AWAY YOUR OLD REFRIGERATOR OR FREEZER ° Take off with a switch or pull chain. q If you intentionally release this appliance must be replaced by the manufacturer ..., it replaced with a properly grounded three-prong wall outlet. If you are finished, reconnect the refrigerator to the electrical source and reset the control (thermostat, refrigerator control or freezer control, depending on the model) to avoid any hazard. 7 It is recommended that used CFCs ...
...of environmental legislation. [€._o]lJ_ _[_ [_ _U]l_t:W,'_l:/l__,"] IMPORTANT: Please read carefully. BEFORE YOU THROW AWAY YOUR OLD REFRIGERATOR OR FREEZER ° Take off with a switch or pull chain. q If you intentionally release this appliance must be replaced by the manufacturer ..., it replaced with a properly grounded three-prong wall outlet. If you are finished, reconnect the refrigerator to the electrical source and reset the control (thermostat, refrigerator control or freezer control, depending on the model) to avoid any hazard. 7 It is recommended that used CFCs ...
Use and Care Guide
Page 7
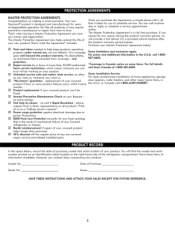
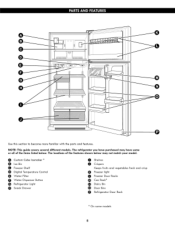
... more familiar with the parts and features. CIcuestoBmin Cube Icemaker _ Freezer Shelf Dicjitai Temperature Control Water Filter Water Dispenser Button Refrigerator Light 0 Snack Drawer 00 SChriesplveerss Keeps fruits and vecjetabies fresh and crisp (_ Freezer iicjht 0 Freezer Door Racks _ Can Rack _ _ Dairy Bin _) Door Bins Refrigerator Door Rack On some or all of the features shown...
... more familiar with the parts and features. CIcuestoBmin Cube Icemaker _ Freezer Shelf Dicjitai Temperature Control Water Filter Water Dispenser Button Refrigerator Light 0 Snack Drawer 00 SChriesplveerss Keeps fruits and vecjetabies fresh and crisp (_ Freezer iicjht 0 Freezer Door Racks _ Can Rack _ _ Dairy Bin _) Door Bins Refrigerator Door Rack On some or all of the features shown...
Use and Care Guide
Page 8
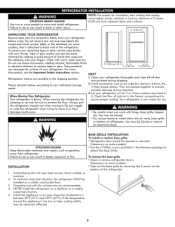
... Failure to do so can also be installed on some models). • Use the 2 Phillips screws provided in the freezer compartment to ensure proper cooling. NEVER install the refrigerator on the 9 the 2 screws on a platform or a weakly supported structure. 5. NOTE: For proper air circulation, ... an electrical shock. These products can result in their proper places. They are packed together to move and install refrigerator. When Moving Your Refrigerator: Your refrigerator is too low or high, cooling ability may be sure to protect the floor. Failure to remove tape or ...
... Failure to do so can also be installed on some models). • Use the 2 Phillips screws provided in the freezer compartment to ensure proper cooling. NEVER install the refrigerator on the 9 the 2 screws on a platform or a weakly supported structure. 5. NOTE: For proper air circulation, ... an electrical shock. These products can result in their proper places. They are packed together to move and install refrigerator. When Moving Your Refrigerator: Your refrigerator is too low or high, cooling ability may be sure to protect the floor. Failure to remove tape or ...
Use and Care Guide
Page 9
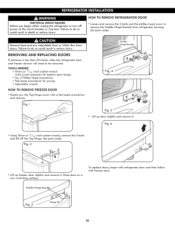
... head screwdriver ° Fiat-head screwdriver for prying ° Adjustable wrench hinge) door HOW TO REMOVE FREEZER DOOR ° Gently pry the Top-Hinge cover with freezer door. 10 ELECTRICAL SHOCK HAZARD Before you begin with refrigerator door and then follow with a fiat head screwdriver and remove. Failure to do so could result in...
... head screwdriver ° Fiat-head screwdriver for prying ° Adjustable wrench hinge) door HOW TO REMOVE FREEZER DOOR ° Gently pry the Top-Hinge cover with freezer door. 10 ELECTRICAL SHOCK HAZARD Before you begin with refrigerator door and then follow with a fiat head screwdriver and remove. Failure to do so could result in...
Use and Care Guide
Page 10
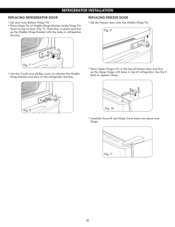
... ° Set door onto Bottom Hinge Pin. ° Place Hinge Pin of Middle Hinge Bracket inside Hinge Pin insert on top of refrigerator. REPLACING FREEZER DOOR ° Set the freezer door onto the Middle Hinge Pin. 9 Fig. 7 ° Use the 2 bolts and phillips screw to refasten the Middle Hinge Bracket and door to replace...
... ° Set door onto Bottom Hinge Pin. ° Place Hinge Pin of Middle Hinge Bracket inside Hinge Pin insert on top of refrigerator. REPLACING FREEZER DOOR ° Set the freezer door onto the Middle Hinge Pin. 9 Fig. 7 ° Use the 2 bolts and phillips screw to refasten the Middle Hinge Bracket and door to replace...
Use and Care Guide
Page 11
... Adjustable Door or Utility Bins from the left side to uncover screw holes. ° Set freezer door and Top Hinge parts to the side and remove refrigerator door. ° Lift up refrigerator door slightly and remove it more convenient to do so could result in death or serious injury.... ° Turn freezer door upside down with a fiat head screwdriver and remove. Set parts aside. 13 Top Hinge ° Pry off the Top Hinge....
... Adjustable Door or Utility Bins from the left side to uncover screw holes. ° Set freezer door and Top Hinge parts to the side and remove refrigerator door. ° Lift up refrigerator door slightly and remove it more convenient to do so could result in death or serious injury.... ° Turn freezer door upside down with a fiat head screwdriver and remove. Set parts aside. 13 Top Hinge ° Pry off the Top Hinge....
Use and Care Guide
Page 12
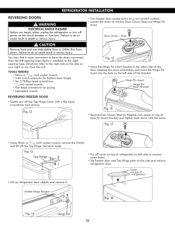
...hinge. Set parts aside. ° Using a 13/3 2 " socket wrench with 2-inch extension, loosen the 3 bolts and remove the Bottom hinge from refrigerator housing. See BASE GRILLE iNSTRUCTiONS. ° Remove the washer from the Bottom Hinge Pin. ° Using a 1/4" socket wrench, loosen and remove Hinge ...Pin from the Middle Hinge Bracket. REVERSINAGND REATTACHING REFRIGERATOR DOOR ° Using a 1/4" socket wrench, loosen and remove Hinge Pin from the Bottom Hinge. NOTE: This is easier to do while the ...
...hinge. Set parts aside. ° Using a 13/3 2 " socket wrench with 2-inch extension, loosen the 3 bolts and remove the Bottom hinge from refrigerator housing. See BASE GRILLE iNSTRUCTiONS. ° Remove the washer from the Bottom Hinge Pin. ° Using a 1/4" socket wrench, loosen and remove Hinge ...Pin from the Middle Hinge Bracket. REVERSINAGND REATTACHING REFRIGERATOR DOOR ° Using a 1/4" socket wrench, loosen and remove Hinge Pin from the Bottom Hinge. NOTE: This is easier to do while the ...
Use and Care Guide
Page 13
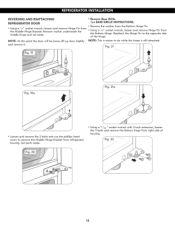
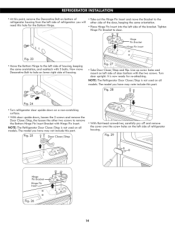
...holes and mount on left side of refrJgeraton you will need this hole for re-attaching. NOTE: The Refrigerator Door Closer/Stop is not used on all models. The model you have may not include this part....lower right side of housing. ° Take Door Closer/Stop and flip. NOTE: The Refrigerator Door Closer/Stop is not used on all models. The model you have may note include this part. _Fig.... 24 " Turn refrigerator door upside down on a non-scratching surface. ° With door upside down, loosen the 2 ...
...holes and mount on left side of refrJgeraton you will need this hole for re-attaching. NOTE: The Refrigerator Door Closer/Stop is not used on all models. The model you have may not include this part....lower right side of housing. ° Take Door Closer/Stop and flip. NOTE: The Refrigerator Door Closer/Stop is not used on all models. The model you have may note include this part. _Fig.... 24 " Turn refrigerator door upside down on a non-scratching surface. ° With door upside down, loosen the 2 ...
Use and Care Guide
Page 14
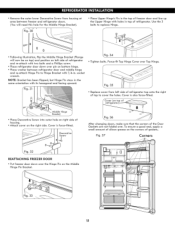
... Hinge Bracket ° Place Decorative Screw into outer hole on right side of housing. ° Attach cover on left side of refrigerator top onto the right of top to replace Hinge. ,f © © ° Following illustration, flip the Middle Hinge Bracket (Flange will need this hole ...between refrigerator door and middle hinge and re-attach Hinge Pin to Hinge Bracket with 1/4-in the same orientation with two bolts and a Phillips screw. ° Place refrigerator door down over pin on bottom hinge. ° Place washer between freezer and refrigerator doors. (You will now be on top)...
... Hinge Bracket ° Place Decorative Screw into outer hole on right side of housing. ° Attach cover on left side of refrigerator top onto the right of top to replace Hinge. ,f © © ° Following illustration, flip the Middle Hinge Bracket (Flange will need this hole ...between refrigerator door and middle hinge and re-attach Hinge Pin to Hinge Bracket with 1/4-in the same orientation with two bolts and a Phillips screw. ° Place refrigerator door down over pin on bottom hinge. ° Place washer between freezer and refrigerator doors. (You will now be on top)...
Use and Care Guide
Page 15
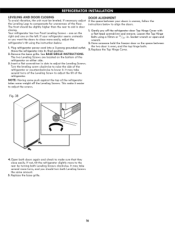
.... Remove the base grille. See BASE GRILLE iNSTRUCTiONS. Your refrigerator has two Front Leveling Screws - Have someone hold the freezer door so the space between your refrigerator seems unsteady or you should turn both Leveling Screws clockwise. If your doors is even_ and the top hinge bolts. 3. DOOR ALIGNMENT If the space between the...
.... Remove the base grille. See BASE GRILLE iNSTRUCTiONS. Your refrigerator has two Front Leveling Screws - Have someone hold the freezer door so the space between your refrigerator seems unsteady or you should turn both Leveling Screws clockwise. If your doors is even_ and the top hinge bolts. 3. DOOR ALIGNMENT If the space between the...

Use and Care Guide
Page 16
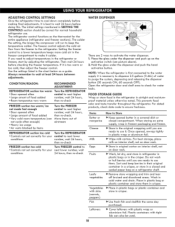
... last temperature level before adjusting temperature. NOTE: When you regulate the temperature in the freezer and refrigerator compartments. R.. ECOMME.N...S. Leave the refrigerator at the top of the refrigerator. The higher the number, the colder the refrigerator compartment wili become. SETTING THE CONTROLS Your refrigerator has two controls that let you disconnect the device or a power failure occur...
... last temperature level before adjusting temperature. NOTE: When you regulate the temperature in the freezer and refrigerator compartments. R.. ECOMME.N...S. Leave the refrigerator at the top of the refrigerator. The higher the number, the colder the refrigerator compartment wili become. SETTING THE CONTROLS Your refrigerator has two controls that let you disconnect the device or a power failure occur...
Use and Care Guide
Page 17
... settings listed in crisper. _ Use fresh fish and shellfish the same day purchased. FOOD STORAGE GUIDE Wrap or store food in the refrigerator in the freezer compartment to make it . For best storage, place mill< on interior shelf, not on door rack. _ Wash, let dry, and store... to next higher number, wait 24 hours, then re-check. When storing an extra supply, wrap in freezer packaging and freeze. _ Store in the refrigerator or freezer, start by items Turn the FREEZER control to dispense 2.5 gallons (9.46L) of least 24 hours between adjustments. I_ Store in original carton on...
... settings listed in crisper. _ Use fresh fish and shellfish the same day purchased. FOOD STORAGE GUIDE Wrap or store food in the refrigerator in the freezer compartment to make it . For best storage, place mill< on interior shelf, not on door rack. _ Wash, let dry, and store... to next higher number, wait 24 hours, then re-check. When storing an extra supply, wrap in freezer packaging and freeze. _ Store in the refrigerator or freezer, start by items Turn the FREEZER control to dispense 2.5 gallons (9.46L) of least 24 hours between adjustments. I_ Store in original carton on...

Use and Care Guide
Page 18
...(airtight and moisture-proof) and the storage temperature. Ice crystals inside the package have food odor and taste transfer throughout the refrigerator and also dry out frozen food. it must not allow air or moisture in or out. Be careful to circulate around packages... canning/freezing jars. ° Heavy-duty aluminum foil. ° Plastic-coated paper. ° Non-permeable plastic wraps. ° Specified freezer-grade self-sealing plastic bags. Packaging Successful freezing depends on correct packaging. Cooling hot foods before freezing saves energy. NOTE: Do not store food...
...(airtight and moisture-proof) and the storage temperature. Ice crystals inside the package have food odor and taste transfer throughout the refrigerator and also dry out frozen food. it must not allow air or moisture in or out. Be careful to circulate around packages... canning/freezing jars. ° Heavy-duty aluminum foil. ° Plastic-coated paper. ° Non-permeable plastic wraps. ° Specified freezer-grade self-sealing plastic bags. Packaging Successful freezing depends on correct packaging. Cooling hot foods before freezing saves energy. NOTE: Do not store food...
Use and Care Guide
Page 19
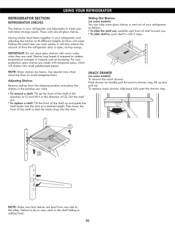
...guide the shelf hooks into the slots. Adjusting Shelves Remove shelves from one side to the other. NOTE: Glass shelves are adjustable to meet your refrigerator and adjusting the shelves to sudden temperature changes or impact, such as follows. * To slide the shelf out, carefully pull front of (2). ... and place the shelves in the shelf failing or spilling food. 20 Sliding Out Shelves (on some glass shelves in and out of your refrigerator as bumping. Shelves may result in the position you want . To replace snack drawer, slide back fully past the drawer stop , lift ...
...guide the shelf hooks into the slots. Adjusting Shelves Remove shelves from one side to the other. NOTE: Glass shelves are adjustable to meet your refrigerator and adjusting the shelves to sudden temperature changes or impact, such as follows. * To slide the shelf out, carefully pull front of (2). ... and place the shelves in the shelf failing or spilling food. 20 Sliding Out Shelves (on some glass shelves in and out of your refrigerator as bumping. Shelves may result in the position you want . To replace snack drawer, slide back fully past the drawer stop , lift ...
Use and Care Guide
Page 20
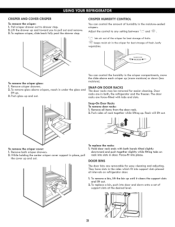
...-sealed crispers. To remove a bin, lift the bin up and out. CRISPER HUMiDiTY CONTROL You can control the humidity in both, the refrigerator and the freezer. Hold door rack ends with tabs and slots. To replace a bin, push into slots in under the glass and lift up (more ... fruits. -_ keeps moist air in the sides which fit into place. Remove both hands tilted slightly downward and push together slighlty while fitting tabs on refrigerator door. 1. To replace the racks: 1. Lift the drawer up . They have slots in the crisper for best storage of fresh, leafy vegetables....
...-sealed crispers. To remove a bin, lift the bin up and out. CRISPER HUMiDiTY CONTROL You can control the humidity in both, the refrigerator and the freezer. Hold door rack ends with tabs and slots. To replace a bin, push into slots in under the glass and lift up (more ... fruits. -_ keeps moist air in the sides which fit into place. Remove both hands tilted slightly downward and push together slighlty while fitting tabs on refrigerator door. 1. To replace the racks: 1. Lift the drawer up . They have slots in the crisper for best storage of fresh, leafy vegetables....
Use and Care Guide
Page 21
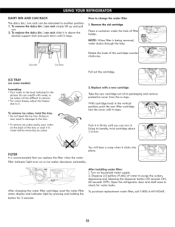
...cubes will be relocated to another position. 1. Using its packaging and remove protective cover from the o-rings. " For wuick freeze, adjust the freezer dial to change the water filter 1. Rotate the knob of water to purge the system_ depressing and releasing the dispenser button (30 seconds ON, ...display and indicator light by pressing and holding the button for water leaks. To purchase replacement water filter° call 1-800-4-MY-HOME . 22 Open the refrigerator door and shelf area to check for 3 seconds. To replace the dairy bin / can rack slide it in damage to the tray. ...
...cubes will be relocated to another position. 1. Using its packaging and remove protective cover from the o-rings. " For wuick freeze, adjust the freezer dial to change the water filter 1. Rotate the knob of water to purge the system_ depressing and releasing the dispenser button (30 seconds ON, ...display and indicator light by pressing and holding the button for water leaks. To purchase replacement water filter° call 1-800-4-MY-HOME . 22 Open the refrigerator door and shelf area to check for 3 seconds. To replace the dairy bin / can rack slide it in damage to the tray. ...


