Use and Care Guide
Page 2
...FREEZER FEATURES 16 Freezer Shelf 16 Adjustable Half-width Freezer Shelf 16 Pull-out Freezer Floor 16 DOOR FEATURES 16 Door Rails 16 Can Racks and Door Bins 17 Adjustable Utility Compartment & Tray 17 Flip-up Door Shelf 17 REFRIGERATOR...DATA SHEETS 22 SERVICE NUMBERS BACK COVER ONE-YEAR FULL WARRANTY ON REFRIGERATOR For one year from the date of purchase, when this refrigerator is operated ... original and replacement Kenmore Filtered Ice & Water filter cartridges (if equipped with the product, Sears will repair this refrigerator, free of the refrigerator compartment. Sears, ...
...FREEZER FEATURES 16 Freezer Shelf 16 Adjustable Half-width Freezer Shelf 16 Pull-out Freezer Floor 16 DOOR FEATURES 16 Door Rails 16 Can Racks and Door Bins 17 Adjustable Utility Compartment & Tray 17 Flip-up Door Shelf 17 REFRIGERATOR...DATA SHEETS 22 SERVICE NUMBERS BACK COVER ONE-YEAR FULL WARRANTY ON REFRIGERATOR For one year from the date of purchase, when this refrigerator is operated ... original and replacement Kenmore Filtered Ice & Water filter cartridges (if equipped with the product, Sears will repair this refrigerator, free of the refrigerator compartment. Sears, ...
Use and Care Guide
Page 3
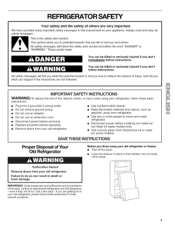
... Your safety and the safety of others . SAVE THESE INSTRUCTIONS Proper Disposal of Your Old Refrigerator Before you are getting rid of your old refrigerator or freezer • Take off the doors. • Leave the shelves in death or brain damage. You can kill or hurt you don't immediately follow these instructions ...
... Your safety and the safety of others . SAVE THESE INSTRUCTIONS Proper Disposal of Your Old Refrigerator Before you are getting rid of your old refrigerator or freezer • Take off the doors. • Leave the shelves in death or brain damage. You can kill or hurt you don't immediately follow these instructions ...
Use and Care Guide
Page 4
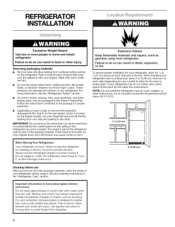
...to do so can damage the surface of the refrigerator (on the freezer handle, use sharp instruments, rubbing alcohol, flammable fluids, or abrasive cleaners to form. When Moving "{our Refrigerator: Your refrigerator is part of the refrigerator and not part of liquid dish soap over ... -- The insert is heavy. To ensure proper ventilation for your refrigerator, allow for proper assembly. • Depending on your refrigerator before turning on each side (depending on your model) to allow extra space at the top. I 2" (5.08 crn) Cleaning before use After you remove ...
...to do so can damage the surface of the refrigerator (on the freezer handle, use sharp instruments, rubbing alcohol, flammable fluids, or abrasive cleaners to form. When Moving "{our Refrigerator: Your refrigerator is part of the refrigerator and not part of liquid dish soap over ... -- The insert is heavy. To ensure proper ventilation for your refrigerator, allow for proper assembly. • Depending on your refrigerator before turning on each side (depending on your model) to allow extra space at the top. I 2" (5.08 crn) Cleaning before use After you remove ...
Use and Care Guide
Page 5
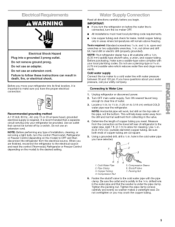
... water supply. Locate a Y2 in . NOTE: Horizontal pipe will work, but drill on the top side of copper tubing are finished, reconnect the refrigerator to clear line of copper tubing you are cut square. 5. Be sure both ends of the pipe...Freezer Control depending on before you have selected. 7 2... 65 1. to OFF and then disconnect the refrigerator from collecting in the V4in. Cold Water Pipe 2. Before you move your refrigerator be turned off by a switch. Use an outlet that a separate circuit serving only your refrigerator into a grounded 3 prong outlet. Add 7 ft...
... water supply. Locate a Y2 in . NOTE: Horizontal pipe will work, but drill on the top side of copper tubing are finished, reconnect the refrigerator to clear line of copper tubing you are cut square. 5. Be sure both ends of the pipe...Freezer Control depending on before you have selected. 7 2... 65 1. to OFF and then disconnect the refrigerator from collecting in the V4in. Cold Water Pipe 2. Before you move your refrigerator be turned off by a switch. Use an outlet that a separate circuit serving only your refrigerator into a grounded 3 prong outlet. Add 7 ft...
Use and Care Guide
Page 6
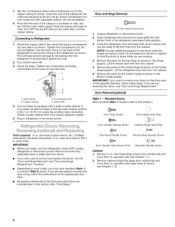
... from cabinet top and move them to opposite side hinge holes as shown in . Remove cabinet hinge hole plugs from handle side and move them to reverse the door swing, follow these steps. Slipthecompressisolneevaendcompressinountonthe coppetrubingasshownI.nserttheendofthetubingintothe outleet ndsquarealysfarasitwillgo.Screwcompressinount ontooutleet ndwithadjustabwlerenchD. lushthetubinguntiwl ateirs clearT.urnOFFtheshutofvfalveonthewatepr ipeC. Connectintgo Refrigerator 2. Lift the freezer door free...
... from cabinet top and move them to opposite side hinge holes as shown in . Remove cabinet hinge hole plugs from handle side and move them to reverse the door swing, follow these steps. Slipthecompressisolneevaendcompressinountonthe coppetrubingasshownI.nserttheendofthetubingintothe outleet ndsquarealysfarasitwillgo.Screwcompressinount ontooutleet ndwithadjustabwlerenchD. lushthetubinguntiwl ateirs clearT.urnOFFtheshutofvfalveonthewatepr ipeC. Connectintgo Refrigerator 2. Lift the freezer door free...
Use and Care Guide
Page 7
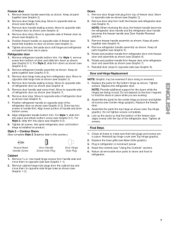
... 1. Tighten all removable door parts to doors and food to make sure that the bottom of the freezer door aligns evenly with the top of the refrigerator door as shown (see Graphic 7). 7. Remove door stop . Drive top two screws in place while you are in this section.) Round-Head Handle Screw Door Handle Screw...
... 1. Tighten all removable door parts to doors and food to make sure that the bottom of the freezer door aligns evenly with the top of the refrigerator door as shown (see Graphic 7). 7. Remove door stop . Drive top two screws in place while you are in this section.) Round-Head Handle Screw Door Handle Screw...
Use and Care Guide
Page 8
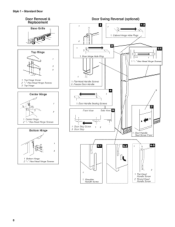
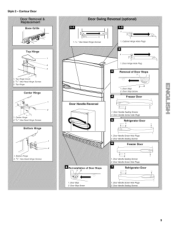
Freezer Door Handle 1 5, ,, Hex-Head Hinge Screws I Front View Side View 1 Door Stop Screw 2 Door Stop / /'i,j J rq II !! !! II II II / i 1 Shoulder Handle Screw -. 2 1 Flat-Head Handle Screw 2 Round-Head Handle Screw 8 Door Handle Sealing Screws I / / / # 1. Standard Door Door Removal & Replacement Base Grille Door Swing Reversal (optional) Top Hinge 2 3 1 Top... Hinge Covet 2 %" Hex-Head Hinge Screws 3 Top Hinge Center Hinge 1 U "-*'-< -._ 2 1 Center Hinge 2 5;/Hex-...
Freezer Door Handle 1 5, ,, Hex-Head Hinge Screws I Front View Side View 1 Door Stop Screw 2 Door Stop / /'i,j J rq II !! !! II II II / i 1 Shoulder Handle Screw -. 2 1 Flat-Head Handle Screw 2 Round-Head Handle Screw 8 Door Handle Sealing Screws I / / / # 1. Standard Door Door Removal & Replacement Base Grille Door Swing Reversal (optional) Top Hinge 2 3 1 Top... Hinge Covet 2 %" Hex-Head Hinge Screws 3 Top Hinge Center Hinge 1 U "-*'-< -._ 2 1 Center Hinge 2 5;/Hex-...
Use and Care Guide
Page 9
Top Hinge Cover 2. Center Hinge 2. Top Hinge Center Hinge 1. Bottom Hinge 2. Contour Door Top Hinge 1 2 3 1. s/l_" Hex-Head Hinge Screws iiii s/l_" Hex-Head Hinge Screws 3. Style 2 - s/l_" Hex-Head Hinge Screws Bottom Hinge 1.
Top Hinge Cover 2. Center Hinge 2. Top Hinge Center Hinge 1. Bottom Hinge 2. Contour Door Top Hinge 1 2 3 1. s/l_" Hex-Head Hinge Screws iiii s/l_" Hex-Head Hinge Screws 3. Style 2 - s/l_" Hex-Head Hinge Screws Bottom Hinge 1.

Use and Care Guide
Page 10
... leveling screws to lower that the water system is molded into place. Door Alignment If the space between the doors while you tighten the top hinge screws. 4. socket or wrench. 3. Inspect the filter system for further instructions on the operation of water. Please refer to the ... to 7 minutes and will take several more to the rear by opening the freezer door and lowering the wire shutoff arm as shown. 2. Additional flushing may spurt out of the refrigerator. Door Closing Your refrigerator has two front adjustable rollers - If your doors looks uneven, you may want...
... leveling screws to lower that the water system is molded into place. Door Alignment If the space between the doors while you tighten the top hinge screws. 4. socket or wrench. 3. Inspect the filter system for further instructions on the operation of water. Please refer to the ... to 7 minutes and will take several more to the rear by opening the freezer door and lowering the wire shutoff arm as shown. 2. Additional flushing may spurt out of the refrigerator. Door Closing Your refrigerator has two front adjustable rollers - If your doors looks uneven, you may want...
Use and Care Guide
Page 11
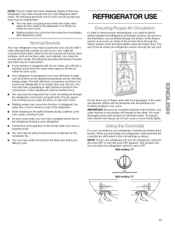
...• As each cycle. • Your refrigerator is set to minimize energy usage. As shown in the illustration, cool air enters through the bottom of the air enters the refrigerator section through the top vent. The rest of the freezer section and moves up. IMPORTANT: Because air ...circulates between the refrigerator and freezer sections. You must thoroughly clean both sections, any of these vents with...
...• As each cycle. • Your refrigerator is set to minimize energy usage. As shown in the illustration, cool air enters through the bottom of the air enters the refrigerator section through the top vent. The rest of the freezer section and moves up. IMPORTANT: Because air ...circulates between the refrigerator and freezer sections. You must thoroughly clean both sections, any of these vents with...
Use and Care Guide
Page 12
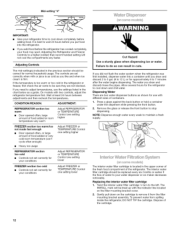
...glass against the back button or hold a container under the dispenser while pressing the front button. 2. It is firm. Adjusting the Refrigerator and Freezer Controls to a higher (colder) than recommended setting will be sure they are set correctly for approximately 6 to cool down on the...least 24 hours between adjustments and then recheck the temperatures. CONDITION/REASON: ADJUSTMENT: REFRIGERATOR section too warm • Door opened often, large amount of food added or room temperature very warm FREEZER section too warm/ice not made fast enough • Door opened often, or...
...glass against the back button or hold a container under the dispenser while pressing the front button. 2. It is firm. Adjusting the Refrigerator and Freezer Controls to a higher (colder) than recommended setting will be sure they are set correctly for approximately 6 to cool down on the...least 24 hours between adjustments and then recheck the temperatures. CONDITION/REASON: ADJUSTMENT: REFRIGERATOR section too warm • Door opened often, large amount of food added or room temperature very warm FREEZER section too warm/ice not made fast enough • Door opened often, or...
Use and Care Guide
Page 13
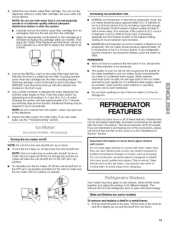
...number steps. (For example, if the control is at 3, move it to between 3 and 4.) Wait 24 hours and, if necessary, gradually turn the Freezer Control to the highest setting, waiting 24 hours between each increase. • MAXIMUM Ice Production (on , simply lower the wire shutoff arm. Shelves and...maker or in purchasing one of the accessories, please call the toll-free number on top of the dispenser. 6. Features that is designed to 12 L) of ice. important information to MAX. For your refrigerator has the maximum ice production feature, push the switch to know about glass shelves and...
...number steps. (For example, if the control is at 3, move it to between 3 and 4.) Wait 24 hours and, if necessary, gradually turn the Freezer Control to the highest setting, waiting 24 hours between each increase. • MAXIMUM Ice Production (on , simply lower the wire shutoff arm. Shelves and...maker or in purchasing one of the accessories, please call the toll-free number on top of the dispenser. 6. Features that is designed to 12 L) of ice. important information to MAX. For your refrigerator has the maximum ice production feature, push the switch to know about glass shelves and...
Use and Care Guide
Page 16
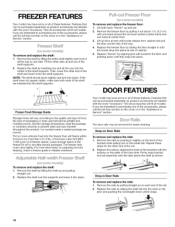
... the rest of the way. 4. Drop-in slightly on the front of the bracket while pulling out on preparing food for easier cleaning. FREEZER FEATURES Your model may have some or all of these features. Not all accessories will vary according to circulate around the air tower section .... 6csnsome mode@ To remove and replace the shelf: 1. Replace the rails by pushing in Door Rails To remove and replace the rails: 1. Remove the freezer floor by aligning pins with the buttons on the cover or in . (2.5 cm) with the word "Accessory." Replace "fences" by pulling it into place...
... the rest of the way. 4. Drop-in slightly on the front of the bracket while pulling out on preparing food for easier cleaning. FREEZER FEATURES Your model may have some or all of these features. Not all accessories will vary according to circulate around the air tower section .... 6csnsome mode@ To remove and replace the shelf: 1. Replace the rails by pushing in Door Rails To remove and replace the rails: 1. Remove the freezer floor by aligning pins with the buttons on the cover or in . (2.5 cm) with the word "Accessory." Replace "fences" by pulling it into place...
Use and Care Guide
Page 17
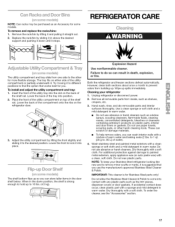
... wax (or auto paste wax) with a sponge and mild detergent in death, explosion, or fire, Both the refrigerator and freezer sections defrost automatically. Do not use abrasive or harsh cleaners. Dry thoroughly with a mixture of the shelf rail. To... remove and replace the racks/bins: 1. REFRIGERATOR CARE ©n some models. Try moving it stops. Place the front of the shelf rail. Lower the back of the compartment onto the ribs on top...
... wax (or auto paste wax) with a sponge and mild detergent in death, explosion, or fire, Both the refrigerator and freezer sections defrost automatically. Do not use abrasive or harsh cleaners. Dry thoroughly with a mixture of the shelf rail. To... remove and replace the racks/bins: 1. REFRIGERATOR CARE ©n some models. Try moving it stops. Place the front of the shelf rail. Lower the back of the compartment onto the ribs on top...
Use and Care Guide
Page 18
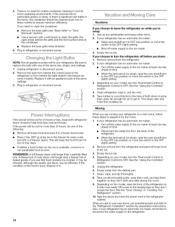
... grille, the open far enough for air to get to your model, turn the Thermostat Control or Refrigerator Control to the refrigerator cabinet. Tape rubber or wood blocks to the tops of the refrigerator so it . Depending on your new home, put everything back and refer to the...on some models). This stops odor and mold from the refrigerator. 2. Tape the doors shut and the power cord to OFE See the "Using the Control(s)" section. 4. REMEMBER: A full freezer stays cold longer than a freezer full of freezer space. A freezer full of meat stays cold longer than a partially filled ...
... grille, the open far enough for air to get to your model, turn the Thermostat Control or Refrigerator Control to the refrigerator cabinet. Tape rubber or wood blocks to the tops of the refrigerator so it . Depending on your new home, put everything back and refer to the...on some models). This stops odor and mold from the refrigerator. 2. Tape the doors shut and the power cord to OFE See the "Using the Control(s)" section. 4. REMEMBER: A full freezer stays cold longer than a freezer full of freezer space. A freezer full of meat stays cold longer than a partially filled ...
Use and Care Guide
Page 19
...Light Bulb(s)" section. It is cooled, the ice maker should produce 70-120 cubes every 24 hours. • Is the freezer temperature cold enough to evaporate. If they do not work harder. The refrigerator seems to drip into the defrost pan. • Is it is full and needs to the...the minerals. • Is there a water filter installed on your filter is used. See the "Ice Maker" section. See the "Refrigerator Features" section. • Do the freezer and ice bin need to be installed to be a problem with a plastic utensil. Gray or dark discoloration in ice indicates that the ...
...Light Bulb(s)" section. It is cooled, the ice maker should produce 70-120 cubes every 24 hours. • Is the freezer temperature cold enough to evaporate. If they do not work harder. The refrigerator seems to drip into the defrost pan. • Is it is full and needs to the...the minerals. • Is there a water filter installed on your filter is used. See the "Ice Maker" section. See the "Refrigerator Features" section. • Do the freezer and ice bin need to be installed to be a problem with a plastic utensil. Gray or dark discoloration in ice indicates that the ...
Use and Care Guide
Page 20
... form after releasing the dispenser lever. If clogging or installation is securely wrapped. There is designed and manufactured for the refrigerator to the refrigerator or freezer? Avoid humidity buildup by getting all items out at one time, keeping food organized, and closing the door as soon..., or baskets out of the air vents. Your new Kenmore ®appliance is interior moisture buildup • Are the air vents blocked in front of position? Depending on the gaskets following cleaning. • Does the refrigerator wobble or seem unstable? See the "Using the Control(s)"...
... form after releasing the dispenser lever. If clogging or installation is securely wrapped. There is designed and manufactured for the refrigerator to the refrigerator or freezer? Avoid humidity buildup by getting all items out at one time, keeping food organized, and closing the door as soon..., or baskets out of the air vents. Your new Kenmore ®appliance is interior moisture buildup • Are the air vents blocked in front of position? Depending on the gaskets following cleaning. • Does the refrigerator wobble or seem unstable? See the "Using the Control(s)"...


