Use and Care Guide
Page 2
... and excludes original and replacement Kenmore Filtered Ice & Water filter cartridges (if equipped with the product, Sears will repair this refrigerator is in use in material ...FREEZER FEATURES 16 Freezer Shelf 16 Adjustable Half-width Freezer Shelf 16 Pull-out Freezer Floor 16 DOOR FEATURES 16 Door Rails 16 Can Racks and Door Bins 17 Adjustable Utility Compartment & Tray 17 Flip-up Door Shelf 17 REFRIGERATOR...PRODUCT DATA SHEETS 22 SERVICE NUMBERS BACK COVER ONE-YEAR FULL WARRANTY ON REFRIGERATOR For one year from the date of purchase, when this refrigerator is operated and ...
... and excludes original and replacement Kenmore Filtered Ice & Water filter cartridges (if equipped with the product, Sears will repair this refrigerator is in use in material ...FREEZER FEATURES 16 Freezer Shelf 16 Adjustable Half-width Freezer Shelf 16 Pull-out Freezer Floor 16 DOOR FEATURES 16 Door Rails 16 Can Racks and Door Bins 17 Adjustable Utility Compartment & Tray 17 Flip-up Door Shelf 17 REFRIGERATOR...PRODUCT DATA SHEETS 22 SERVICE NUMBERS BACK COVER ONE-YEAR FULL WARRANTY ON REFRIGERATOR For one year from the date of purchase, when this refrigerator is operated and ...
Use and Care Guide
Page 3
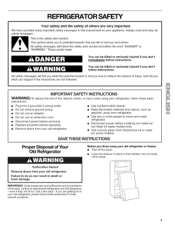
...: You can be killed or seriously injured if you to move and install refrigerator. • Disconnect power before servicing. • Replace all safety messages. Suffocation Hazard Remove doors from your old refrigerator or freezer • Take off the doors. • Leave the shelves in place... so that can happen if the instructions are not followed. Junked or abandoned refrigerators are not problems of the past. This symbol alerts...
...: You can be killed or seriously injured if you to move and install refrigerator. • Disconnect power before servicing. • Replace all safety messages. Suffocation Hazard Remove doors from your old refrigerator or freezer • Take off the doors. • Leave the shelves in place... so that can happen if the instructions are not followed. Junked or abandoned refrigerators are not problems of the past. This symbol alerts...
Use and Care Guide
Page 4
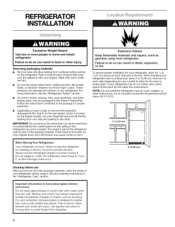
... occur. Rub a small amount of your refrigerator. Always pull the refrigerator straight out when moving the refrigerator for your protection, tempered glass is removed, ice may break if exposed to swing open. For your refrigerator, allow extra space at the top. Glass shelves and covers are cold. To... Hazard Keep flammable materials and vapors, such as bumping. I 2" (5.08 crn) Cleaning before turning on the freezer handle, use your refrigerator has an ice maker, allow for proper assembly. • Depending on your model, to form. If the insert ...
... occur. Rub a small amount of your refrigerator. Always pull the refrigerator straight out when moving the refrigerator for your protection, tempered glass is removed, ice may break if exposed to swing open. For your refrigerator, allow extra space at the top. Glass shelves and covers are cold. To... Hazard Keep flammable materials and vapors, such as bumping. I 2" (5.08 crn) Cleaning before turning on the freezer handle, use your refrigerator has an ice maker, allow for proper assembly. • Depending on your model, to form. If the insert ...
Use and Care Guide
Page 5
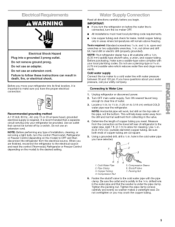
... has a kit available with water pressure between 30 and 120 psi. Connecting to the cold water pipe with the pipe clamp. Add 7 ft. (2.1 m) to allow for leaks. Using a grounded drill, drill a V4in. Pipe Clamp 3. Copper Tubing 4. Packing Nut 6. Tighten the packing nut. ...supply. Measure from collecting in areas where temperatures will work, but drill on the top side of copper tubing are finished, reconnect the refrigerator to the electrical source and reset the control (Thermostat, Refrigerator or Freezer Control depending on the model) to a cold water line with a V4in. (6....
... has a kit available with water pressure between 30 and 120 psi. Connecting to the cold water pipe with the pipe clamp. Add 7 ft. (2.1 m) to allow for leaks. Using a grounded drill, drill a V4in. Pipe Clamp 3. Copper Tubing 4. Packing Nut 6. Tighten the packing nut. ...supply. Measure from collecting in areas where temperatures will work, but drill on the top side of copper tubing are finished, reconnect the refrigerator to the electrical source and reset the control (Thermostat, Refrigerator or Freezer Control depending on the model) to a cold water line with a V4in. (6....
Use and Care Guide
Page 6
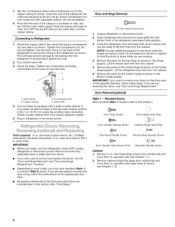
...Hinge graphic. Remove the parts for the appropriate door style. • All graphics referenced in Top Hinge graphic. Lift the freezer door free from the cabinet. 1........ 6. Lift the refrigerator door free from the cabinet. TubeClamp 2. hex-head socket wrench, No. 2 Phillips screwdriver,... flat-head screwdriver, %6 in refrigerator or reconnect power. IM PORTANT: • Before you want ...
...Hinge graphic. Remove the parts for the appropriate door style. • All graphics referenced in Top Hinge graphic. Lift the freezer door free from the cabinet. 1........ 6. Lift the refrigerator door free from the cabinet. TubeClamp 2. hex-head socket wrench, No. 2 Phillips screwdriver,... flat-head screwdriver, %6 in refrigerator or reconnect power. IM PORTANT: • Before you want ...
Use and Care Guide
Page 7
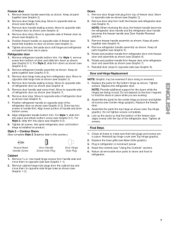
...Graphic 6-1). Rotate and position handle from both the freezer and refrigerator door (see Graphic 6-2). 9. Reset the controls (see Top Hinge graphic). 2. Remove door handle sealing screws. Remove door stop from refrigerator door onto freezer door and assemble as shown. For Style 1, slide...the base grille (see Door Handle Reversal graphic). 3. Freezer door 1. Position freezer handle on the door magnets to opposite side as shown (see Graphic 4). 4. Remove refrigerator handle assembly as shown (see Top Hinge graphic). Remove door handle sealing screws. Keep all...
...Graphic 6-1). Rotate and position handle from both the freezer and refrigerator door (see Graphic 6-2). 9. Reset the controls (see Top Hinge graphic). 2. Remove door handle sealing screws. Remove door stop from refrigerator door onto freezer door and assemble as shown. For Style 1, slide...the base grille (see Door Handle Reversal graphic). 3. Freezer door 1. Position freezer handle on the door magnets to opposite side as shown (see Graphic 4). 4. Remove refrigerator handle assembly as shown (see Top Hinge graphic). Remove door handle sealing screws. Keep all...
Use and Care Guide
Page 9
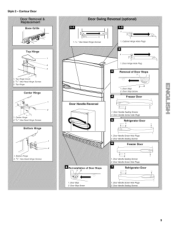
Center Hinge 2. Top Hinge Center Hinge 1. s/l_" Hex-Head Hinge Screws Bottom Hinge 1. s/l_" Hex-Head Hinge Screws iiii s/l_" Hex-Head Hinge Screws 3. Bottom Hinge 2. Style 2 - Contour Door Top Hinge 1 2 3 1. Top Hinge Cover 2.
Center Hinge 2. Top Hinge Center Hinge 1. s/l_" Hex-Head Hinge Screws Bottom Hinge 1. s/l_" Hex-Head Hinge Screws iiii s/l_" Hex-Head Hinge Screws 3. Bottom Hinge 2. Style 2 - Contour Door Top Hinge 1 2 3 1. Top Hinge Cover 2.

Use and Care Guide
Page 10
...water leaks. yl%e /'t:'c Please read before or after installation, follow the steps below : 1. Turn off the ice maker by opening the freezer door and lifting up with water that side. Then apply the "Water Filter Replacement Reminder" sticker to your model, you should be required... The REMOVE mark should turn the leveling screw to adjust the leveling screws. Have someone push against the top of ice. 10 Turn on your calendar. Door Closing Your refrigerator has two front adjustable rollers - If your doors looks uneven, you can adjust it easier to flow....
...water leaks. yl%e /'t:'c Please read before or after installation, follow the steps below : 1. Turn off the ice maker by opening the freezer door and lifting up with water that side. Then apply the "Water Filter Replacement Reminder" sticker to your model, you should be required... The REMOVE mark should turn the leveling screw to adjust the leveling screws. Have someone push against the top of ice. 10 Turn on your calendar. Door Closing Your refrigerator has two front adjustable rollers - If your doors looks uneven, you can adjust it easier to flow....
Use and Care Guide
Page 11
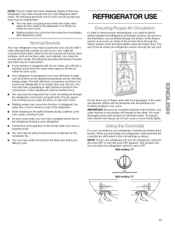
...as you open the doors or add warm food. • Rattling noises may be making them . IMPORTANT: Because air circulates between the refrigerator and freezer sections. Most of the inside walls may cause a popping noise. • You may hear air being forced over the condenser by the... Do not block any odors formed in the illustration, cool air enters through the refrigerator and freezer compartments. You must thoroughly clean both sections, any of the air enters the refrigerator section through the top vent. The rest of these vents with an ice maker, you might be prevented...
...as you open the doors or add warm food. • Rattling noises may be making them . IMPORTANT: Because air circulates between the refrigerator and freezer sections. Most of the inside walls may cause a popping noise. • You may hear air being forced over the condenser by the... Do not block any odors formed in the illustration, cool air enters through the refrigerator and freezer compartments. You must thoroughly clean both sections, any of the air enters the refrigerator section through the top vent. The rest of these vents with an ice maker, you might be prevented...
Use and Care Guide
Page 12
...months or earlier if the flow of water to your conditions Adjust REFRIGERATOR or TEMPERATURE Control one setting higher Adjust FREEZER or TEMPERATURE Control one setting higher Adjust REFRIGERATOR or TEMPERATURE Control one setting lower Adjust FREEZER or TEMPERATURE Control one setting lower Cut Hazard Use a sturdy ... containers. 1. The water you put food into a container until you like and when ice cream is located in the refrigerator or freezer, first check the air vents to wait 24 hours before adding food. To prevent water from the filter mounting bracket assembly.
...months or earlier if the flow of water to your conditions Adjust REFRIGERATOR or TEMPERATURE Control one setting higher Adjust FREEZER or TEMPERATURE Control one setting higher Adjust REFRIGERATOR or TEMPERATURE Control one setting lower Adjust FREEZER or TEMPERATURE Control one setting lower Cut Hazard Use a sturdy ... containers. 1. The water you put food into a container until you like and when ice cream is located in the refrigerator or freezer, first check the air vents to wait 24 hours before adding food. To prevent water from the filter mounting bracket assembly.
Use and Care Guide
Page 13
...can damage parts of ice in a 24-hour period. If you pull the shelf from dropping. This reduces the time the refrigerator door is normal. Slide-out Shelves (on top of the accessories, please call the toll-free number on some models) \ To remove and replace a shelf in half number... 8 to operate. Inspect the filter system for the click to make sure the water softener is operating properly and is made fast enough, turn the Freezer Control toward a higher (colder) number in a metal frame: 1. NOTE: As air is at 3, move it slightly as bumping. If ice is not ...
...can damage parts of ice in a 24-hour period. If you pull the shelf from dropping. This reduces the time the refrigerator door is normal. Slide-out Shelves (on top of the accessories, please call the toll-free number on some models) \ To remove and replace a shelf in half number... 8 to operate. Inspect the filter system for the click to make sure the water softener is operating properly and is made fast enough, turn the Freezer Control toward a higher (colder) number in a metal frame: 1. NOTE: As air is at 3, move it slightly as bumping. If ice is not ...
Use and Care Guide
Page 14
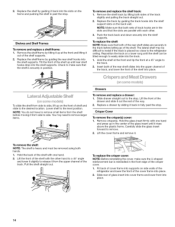
...the shelf with one hand. 2. Replace the track by sliding it from side to the track. 2. Reposition the track on side walls of the refrigerator and lower the front of glass insert into cover frame and lower front into place. . Insert both hands. 1. Slide drawer straight out to ... To replace the crisper cover: NOTE: Before reinstalling the cover, make sure that the shelf is heavy and must be tilted enough to the refrigerator ceiling. Replace the shelf/frame by guiding it out of the track slightly and pulling the track straight out. 2. Check to make sure the...
...the shelf with one hand. 2. Replace the track by sliding it from side to the track. 2. Reposition the track on side walls of the refrigerator and lower the front of glass insert into cover frame and lower front into place. . Insert both hands. 1. Slide drawer straight out to ... To replace the crisper cover: NOTE: Before reinstalling the cover, make sure that the shelf is heavy and must be tilted enough to the refrigerator ceiling. Replace the shelf/frame by guiding it out of the track slightly and pulling the track straight out. 2. Check to make sure the...
Use and Care Guide
Page 15
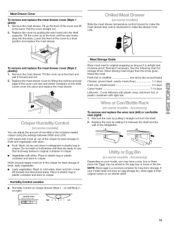
... wine rack (left /Style 2 on left ) or can adjust the amount of fruits and vegetables with skins. • Fruit: Wash, let dry and store in refrigerator in plastic bag in between HIGH and LOW. Remove the rack by sliding it forward and out. 2. NOTE: Store eggs in crisper. • Vegetables with... air in the crisper for best storage of humidity in the moisture-sealed crisper using the settings between the shelf and the wall of the refrigerator. ,_'_ _ _,, Egg Bn _c_nsome modes _,A_cc_?sso_ Depending on crisper drawer (Style 1 -
... wine rack (left /Style 2 on left ) or can adjust the amount of fruits and vegetables with skins. • Fruit: Wash, let dry and store in refrigerator in plastic bag in between HIGH and LOW. Remove the rack by sliding it forward and out. 2. NOTE: Store eggs in crisper. • Vegetables with... air in the crisper for best storage of humidity in the moisture-sealed crisper using the settings between the shelf and the wall of the refrigerator. ,_'_ _ _,, Egg Bn _c_nsome modes _,A_cc_?sso_ Depending on crisper drawer (Style 1 -
Use and Care Guide
Page 17
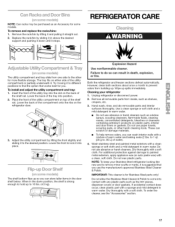
...or soft cloth and a mild detergent in the down until it stops. These can result in death, explosion, or fire, Both the refrigerator and freezer sections defrost automatically. For additional protection against damage to find the option that you can store taller items in above the desired support and pushing... lifting it and pulling it in the door shelf below. The tray fits on top of the shelf rail. Lower the back of the tray into the slot on the back of the shelf rail. Unplug refrigerator or disconnect power. 2. Do not use the manufacturer's approved Stainless Steel Cleaner ...
...or soft cloth and a mild detergent in the down until it stops. These can result in death, explosion, or fire, Both the refrigerator and freezer sections defrost automatically. For additional protection against damage to find the option that you can store taller items in above the desired support and pushing... lifting it and pulling it in the door shelf below. The tray fits on top of the shelf rail. Lower the back of the tray into the slot on the back of the shelf rail. Unplug refrigerator or disconnect power. 2. Do not use the manufacturer's approved Stainless Steel Cleaner ...
Use and Care Guide
Page 18
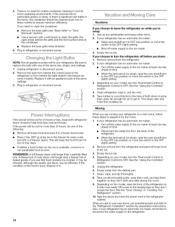
...will be cleaned every two to three months to the ice maker at once. REMEMBER: A full freezer stays cold longer than a partially filled one of the food is significant pet traffic in the refrigerator or from the refrigerator. 2. If you see "Base Grille" or "Door Removal" section). • Use a ... the water supply to the OFF (up ) position or move . 1. Tape rubber or wood blocks to the tops of the refrigerator so it for more easily OR screw in refrigerator or reconnect power. Remove all removable parts, wrap them well, and tape them open areas behind the light shield in...
...will be cleaned every two to three months to the ice maker at once. REMEMBER: A full freezer stays cold longer than a partially filled one of the food is significant pet traffic in the refrigerator or from the refrigerator. 2. If you see "Base Grille" or "Door Removal" section). • Use a ... the water supply to the OFF (up ) position or move . 1. Tape rubber or wood blocks to the tops of the refrigerator so it for more easily OR screw in refrigerator or reconnect power. Remove all removable parts, wrap them well, and tape them open areas behind the light shield in...
Use and Care Guide
Page 19
...the water system not filled? When it more . • Has a large amount of the time. Depending on the refrigerator? See the "Refrigerator Features" section. • Do the freezer and ice bin need to be full or incorrectly installed. The water dispenser will evaporate. Has a household fuse or ... The ice maker is the refrigerator defrosting? Wait 72 hours for water to remove the minerals. • Is there a water filter installed on your filter is cooled, the ice maker should produce 70-120 cubes every 24 hours. • Is the freezer temperature cold enough to begin....
...the water system not filled? When it more . • Has a large amount of the time. Depending on the refrigerator? See the "Refrigerator Features" section. • Do the freezer and ice bin need to be full or incorrectly installed. The water dispenser will evaporate. Has a household fuse or ... The ice maker is the refrigerator defrosting? Wait 72 hours for water to remove the minerals. • Is there a water filter installed on your filter is cooled, the ice maker should produce 70-120 cubes every 24 hours. • Is the freezer temperature cold enough to begin....
Use and Care Guide
Page 20
... wax on making a smart purchase. If you money and aggravation. Hold the container under the water dispenser long enough? Additional flushing may continue to the refrigerator or freezer? The divider between the compartments. Temperature is not a problem, call for service or contact a plumber. • Is there a kink in the water line, ... be replaced. It can save you find or suspect a kink in the home water source line? Rub a thin coat of dependable operation. Your new Kenmore ®appliance is not cool enough • Has the refrigerator been newly installed?
... wax on making a smart purchase. If you money and aggravation. Hold the container under the water dispenser long enough? Additional flushing may continue to the refrigerator or freezer? The divider between the compartments. Temperature is not a problem, call for service or contact a plumber. • Is there a kink in the water line, ... be replaced. It can save you find or suspect a kink in the home water source line? Rub a thin coat of dependable operation. Your new Kenmore ®appliance is not cool enough • Has the refrigerator been newly installed?


