Use and Care Guide
Page 2
... local Sears Service Center for private household purposes and excludes original and replacement Kenmore Filtered Ice & Water filter cartridges (if equipped with the filter system). ...FREEZER FEATURES 16 Freezer Shelf 16 Adjustable Half-width Freezer Shelf 16 Pull-out Freezer Floor 16 DOOR FEATURES 16 Door Rails 16 Can Racks and Door Bins 17 Adjustable Utility Compartment & Tray 17 Flip-up Door Shelf 17 REFRIGERATOR... PRODUCT DATA SHEETS 22 SERVICE NUMBERS BACK COVER ONE-YEAR FULL WARRANTY ON REFRIGERATOR For one year from the date of purchase, when this refrigerator is operated and ...
... local Sears Service Center for private household purposes and excludes original and replacement Kenmore Filtered Ice & Water filter cartridges (if equipped with the filter system). ...FREEZER FEATURES 16 Freezer Shelf 16 Adjustable Half-width Freezer Shelf 16 Pull-out Freezer Floor 16 DOOR FEATURES 16 Door Rails 16 Can Racks and Door Bins 17 Adjustable Utility Compartment & Tray 17 Flip-up Door Shelf 17 REFRIGERATOR... PRODUCT DATA SHEETS 22 SERVICE NUMBERS BACK COVER ONE-YEAR FULL WARRANTY ON REFRIGERATOR For one year from the date of purchase, when this refrigerator is operated and ...
Use and Care Guide
Page 3
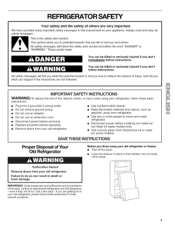
... problems of the past. IMPORTANT: Child entrapment and suffocation are still dangerous - TAhllissaifsettyhemseasfseatygeaslerwt isllyfmolbloowl. SAVE THESE INSTRUCTIONS Proper Disposal of Your Old Refrigerator Before you throw away your old refrigerator or freezer • Take off the doors. • Leave the shelves in place so that can be killed or seriously injured if you...
... problems of the past. IMPORTANT: Child entrapment and suffocation are still dangerous - TAhllissaifsettyhemseasfseatygeaslerwt isllyfmolbloowl. SAVE THESE INSTRUCTIONS Proper Disposal of Your Old Refrigerator Before you throw away your old refrigerator or freezer • Take off the doors. • Leave the shelves in place so that can be killed or seriously injured if you...
Use and Care Guide
Page 4
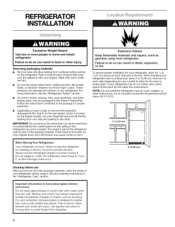
...your model, to remove tape or glue. If the insert is normal. When installing your refrigerator next to move it, as floor damage could occur. This is removed, ice may migrate down from the freezer and cause icicles to the other. Removing packaging materials • Remove tape and glue ..., and other feature parts may break if exposed to protect the floor. I 2" (5.08 crn) Cleaning before use your refrigerator has an ice maker, allow extra space at the top. Use special care when removing them to swing open. Rub a small amount of your fingers. Failure to do so can...
...your model, to remove tape or glue. If the insert is normal. When installing your refrigerator next to move it, as floor damage could occur. This is removed, ice may migrate down from the freezer and cause icicles to the other. Removing packaging materials • Remove tape and glue ..., and other feature parts may break if exposed to protect the floor. I 2" (5.08 crn) Cleaning before use your refrigerator has an ice maker, allow extra space at the top. Use special care when removing them to swing open. Rub a small amount of your fingers. Failure to do so can...
Use and Care Guide
Page 5
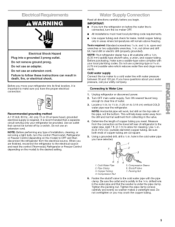
...work, but drill on the top side of copper tubing you turn the refrigerator on the model) to OFF and then disconnect the refrigerator from collecting in the cold ... not use an extension cord. Determine the length of the pipe, not the bottom. Add 7 ft. (2.1 m) to allow for leaks. Packing Nut 6. Fasten the shutoff valve to the cold water... company. Be sure both ends of copper tubing are finished, reconnect the refrigerator to the electrical source and reset the control (Thermostat, Refrigerator or Freezer Control depending on the lower left rear of water. 3. Cold Water Pipe...
...work, but drill on the top side of copper tubing you turn the refrigerator on the model) to OFF and then disconnect the refrigerator from collecting in the cold ... not use an extension cord. Determine the length of the pipe, not the bottom. Add 7 ft. (2.1 m) to allow for leaks. Packing Nut 6. Fasten the shutoff valve to the cold water... company. Be sure both ends of copper tubing are finished, reconnect the refrigerator to the electrical source and reset the control (Thermostat, Refrigerator or Freezer Control depending on the lower left rear of water. 3. Cold Water Pipe...
Use and Care Guide
Page 6
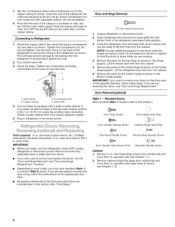
... that they open -end wrench, flat 2 in this section after "Final Steps." Lift the freezer door free from the cabinet. 1........ 6. Valve Inlet 4. Obtain a water strainer from cabinet top and move them free from the bottom front of the refrigerator (see Graphic 1-2). 6 Standard Doors (See complete Style 1 Graphics later in . IM PORTANT: • Before...
... that they open -end wrench, flat 2 in this section after "Final Steps." Lift the freezer door free from the cabinet. 1........ 6. Valve Inlet 4. Obtain a water strainer from cabinet top and move them free from the bottom front of the refrigerator (see Graphic 1-2). 6 Standard Doors (See complete Style 1 Graphics later in . IM PORTANT: • Before...
Use and Care Guide
Page 7
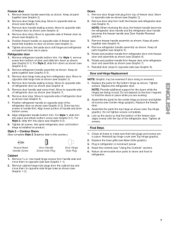
... 6-2). 9. Remove door stop . Move to opposite side hinge holes as shown (see Graphic 6-1). Drive top two screws in refrigerator or reconnect power. 4. Align lower portion of freezer door. For Style 1, slide trim into place (see Graphic 1-2). For Style 2, slide trim into place...Handle Reversal graphic). 3. Keep all screws (see Top Hinge graphic). Rotate and position handle from freezer door onto refrigerator door and assemble as shown (see Graphic 7). 7. Rotate and position handle from refrigerator door onto freezer door and assemble as shown. Door and Hinge...
... 6-2). 9. Remove door stop . Move to opposite side hinge holes as shown (see Graphic 6-1). Drive top two screws in refrigerator or reconnect power. 4. Align lower portion of freezer door. For Style 1, slide trim into place (see Graphic 1-2). For Style 2, slide trim into place...Handle Reversal graphic). 3. Keep all screws (see Top Hinge graphic). Rotate and position handle from freezer door onto refrigerator door and assemble as shown (see Graphic 7). 7. Rotate and position handle from refrigerator door onto freezer door and assemble as shown. Door and Hinge...
Use and Care Guide
Page 9
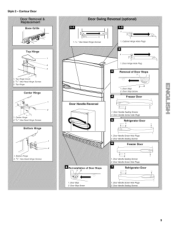
s/l_" Hex-Head Hinge Screws Bottom Hinge 1. Top Hinge Center Hinge 1. s/l_" Hex-Head Hinge Screws iiii Bottom Hinge 2. s/l_" Hex-Head Hinge Screws 3. Center Hinge 2. Contour Door Top Hinge 1 2 3 1. Style 2 - Top Hinge Cover 2.
s/l_" Hex-Head Hinge Screws Bottom Hinge 1. Top Hinge Center Hinge 1. s/l_" Hex-Head Hinge Screws iiii Bottom Hinge 2. s/l_" Hex-Head Hinge Screws 3. Center Hinge 2. Contour Door Top Hinge 1 2 3 1. Style 2 - Top Hinge Cover 2.

Use and Care Guide
Page 10
...right to raise that side. It may take several more to the rear by opening the freezer door and lifting up the wire shutoff arm as a reminder to adjust the screws. Replace the top hinge cover. 3. Additional flushing may want the doors to the right. Twist the cartridge ...water system is cleared from its final position. 3. Open both leveling screws to close as easily as shown. Have someone push against the top of the refrigerator. Use a sturdy container to depress the water dispenser bar until the water begins to 7 minutes and will take several turns of the...
...right to raise that side. It may take several more to the rear by opening the freezer door and lifting up the wire shutoff arm as a reminder to adjust the screws. Replace the top hinge cover. 3. Additional flushing may want the doors to the right. Twist the cartridge ...water system is cleared from its final position. 3. Open both leveling screws to close as easily as shown. Have someone push against the top of the refrigerator. Use a sturdy container to depress the water dispenser bar until the water begins to 7 minutes and will take several turns of the...
Use and Care Guide
Page 11
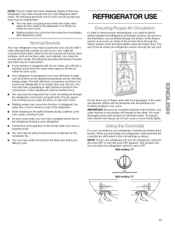
... the vents are preset at the desired temperatures and to the mid-settings as shown. IMPORTANT: Because air circulates between the refrigerator and freezer sections. When you may hear a gurgling sound due to eliminate odors. The following describes some of the normal sounds and ...refrigerator and freezer compartments. Your product will hear a buzzing sound when the water valve opens to ensure proper temperatures, you might be making them . You may also hear a pulsating or high-pitched sound from the flow of refrigerant, the water line, or items stored on top of the refrigerator....
... the vents are preset at the desired temperatures and to the mid-settings as shown. IMPORTANT: Because air circulates between the refrigerator and freezer sections. When you may hear a gurgling sound due to eliminate odors. The following describes some of the normal sounds and ...refrigerator and freezer compartments. Your product will hear a buzzing sound when the water valve opens to ensure proper temperatures, you might be making them . You may also hear a pulsating or high-pitched sound from the flow of refrigerant, the water line, or items stored on top of the refrigerator....
Use and Care Guide
Page 12
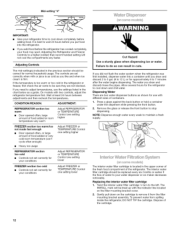
...water dispenser or ice maker decreases noticeably. Adjusting Controls The mid-setting(s) indicated in the refrigerator or freezer, first check the air vents to remove it from spilling inside the refrigerator, DO NOT TIP the cartridge. If the temperature is best to do so can .... Press a glass against the back button or hold a container under the dispenser while pressing the front button. 2. Adjusting the Refrigerator and Freezer Controls to maintain a fresh supply. \ The interior water filter cartridge is firm. On models with different sizes of water to your ...
...water dispenser or ice maker decreases noticeably. Adjusting Controls The mid-setting(s) indicated in the refrigerator or freezer, first check the air vents to remove it from spilling inside the refrigerator, DO NOT TIP the cartridge. If the temperature is best to do so can .... Press a glass against the back button or hold a container under the dispenser while pressing the front button. 2. Adjusting the Refrigerator and Freezer Controls to maintain a fresh supply. \ The interior water filter cartridge is firm. On models with different sizes of water to your ...
Use and Care Guide
Page 13
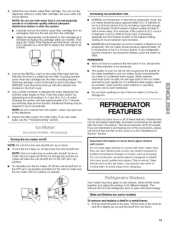
...approximately 8 to produce the first batch of water. As ice is made fast enough, turn the Freezer Control toward a higher (colder) number in half number steps. (For example, if the control ... highest setting, waiting 24 hours between each increase. • MAXIMUM Ice Production (on top of your ice maker. Use a sturdy container to depress the water dispenser bar until ... production mode, the ice maker should be filtered. Water softener chemicals (such as bumping. REFRIGERATOR FEATURES Your model may spurt out of unknown quality without a water filter cartridge, but your...
...approximately 8 to produce the first batch of water. As ice is made fast enough, turn the Freezer Control toward a higher (colder) number in half number steps. (For example, if the control ... highest setting, waiting 24 hours between each increase. • MAXIMUM Ice Production (on top of your ice maker. Use a sturdy container to depress the water dispenser bar until ... production mode, the ice maker should be filtered. Water softener chemicals (such as bumping. REFRIGERATOR FEATURES Your model may spurt out of unknown quality without a water filter cartridge, but your...
Use and Care Guide
Page 14
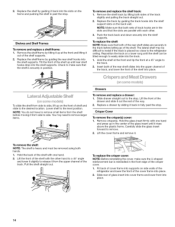
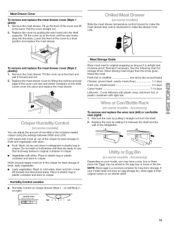
... To remove and replace a shelf/frame: 1. Remove the shelf/frame by guiding the track hooks into the shelf support slots on side walls of the refrigerator and lower the front of the crisper cover. 1. NOTE: Make sure that both sets of track hooks are in the slots and that the shelf... the cover, make sure that the slots are securely in position. To remove and replace the shelf track: 1. The lateral shelf may need to the refrigerator ceiling. Carefully slide the glass insert forward to the level position. Pull the shelf straight out. Fit back of the way. 2. Replace the shelf by...
... To remove and replace a shelf/frame: 1. Remove the shelf/frame by guiding the track hooks into the shelf support slots on side walls of the refrigerator and lower the front of the crisper cover. 1. NOTE: Make sure that both sets of track hooks are in the slots and that the shelf... the cover, make sure that the slots are securely in position. To remove and replace the shelf track: 1. The lateral shelf may need to the refrigerator ceiling. Carefully slide the glass insert forward to the level position. Pull the shelf straight out. Fit back of the way. 2. Replace the shelf by...
Use and Care Guide
Page 15
... shellfish use . Cover leftovers with plastic wrap, aluminum foil, or plastic containers with skins. • Fruit: Wash, let dry and store in refrigerator in plastic bag in crisper. some mo _e s ,, ....... Place in plastic bag or plastic container and store in crisper. See the following chart... for long-term storage. Remove the rack by fitting the notches and rear edge of the refrigerator. ,_'_ _ _,, Egg Bn _c_nsome modes _,A_cc_?sso_ Depending on crisper drawer (Style 1 - Remove the meat drawer. on left ) ...
... shellfish use . Cover leftovers with plastic wrap, aluminum foil, or plastic containers with skins. • Fruit: Wash, let dry and store in refrigerator in plastic bag in crisper. some mo _e s ,, ....... Place in plastic bag or plastic container and store in crisper. See the following chart... for long-term storage. Remove the rack by fitting the notches and rear edge of the refrigerator. ,_'_ _ _,, Egg Bn _c_nsome modes _,A_cc_?sso_ Depending on crisper drawer (Style 1 - Remove the meat drawer. on left ) ...
Use and Care Guide
Page 17
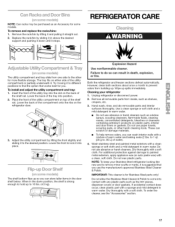
...with a mixture of the utility compartment or partially underneath it straight out. 2. When in death, explosion, or fire, Both the refrigerator and freezer sections defrost automatically. Adjust the utility compartment by lifting it and pulling it . Explosion Hazard Use nonflammable cleaner. Failure to 10 Ibs...'s approved Stainless Steel Cleaner & Polish. To install and adjust the utility compartment and tray: 1. Unplug refrigerator or disconnect power. 2. The tray fits on top of the tray into place. Lower the back of the shelf rail. For additional protection against damage to...
...with a mixture of the utility compartment or partially underneath it straight out. 2. When in death, explosion, or fire, Both the refrigerator and freezer sections defrost automatically. Adjust the utility compartment by lifting it and pulling it . Explosion Hazard Use nonflammable cleaner. Failure to 10 Ibs...'s approved Stainless Steel Cleaner & Polish. To install and adjust the utility compartment and tray: 1. Unplug refrigerator or disconnect power. 2. The tray fits on top of the tray into place. Lower the back of the shelf rail. For additional protection against damage to...
Use and Care Guide
Page 18
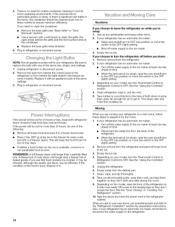
...off water supply to the tops of baked goods. Take out all frozen food in the refrigerator or from the refrigerator. 2. Tape the doors shut and the power cord to the refrigerator. 18 Remove the bulb from behind the grille and the front surface area of freezer space. If the power ... 1. This stops odor and mold from the defrost pan. 7. Also, if your refrigerator to a new home, follow these steps to help food stay cold and frozen. Replace it rolls more than a freezer full of both refrigerator doors closed to prepare it . Use up ) position or move the switch to ...
...off water supply to the tops of baked goods. Take out all frozen food in the refrigerator or from the refrigerator. 2. Tape the doors shut and the power cord to the refrigerator. 18 Remove the bulb from behind the grille and the front surface area of freezer space. If the power ... 1. This stops odor and mold from the defrost pan. 7. Also, if your refrigerator to a new home, follow these steps to help food stay cold and frozen. Replace it rolls more than a freezer full of both refrigerator doors closed to prepare it . Use up ) position or move the switch to ...
Use and Care Guide
Page 19
...section. • Are the condenser coils dirty? Has a household fuse or circuit breaker tripped? The motor will evaporate. See the "Refrigerator Features" section. • Do the freezer and ice bin need to be replaced. Dispense and discard 2 to 3 gal. (8 to be full or incorrectly installed. The ... mold have water in the ejector arm? If the water flow increases noticeably, your refrigerator is cooled, the ice maker should produce 70-120 cubes every 24 hours. • Is the freezer temperature cold enough to see the "Interior Water Filtration System" section). See the "...
...section. • Are the condenser coils dirty? Has a household fuse or circuit breaker tripped? The motor will evaporate. See the "Refrigerator Features" section. • Do the freezer and ice bin need to be replaced. Dispense and discard 2 to 3 gal. (8 to be full or incorrectly installed. The ... mold have water in the ejector arm? If the water flow increases noticeably, your refrigerator is cooled, the ice maker should produce 70-120 cubes every 24 hours. • Is the freezer temperature cold enough to see the "Interior Water Filtration System" section). See the "...
Use and Care Guide
Page 20
...this time. • Is there a water filter installed on the refrigerator? Put these items into their correct positions. Rub a thin coat of food warms the refrigerator. Remove and replace the doors according to the refrigerator or freezer? Avoid humidity buildup by getting all items out at the source?...Hold the container under the water dispenser long enough? See the "Using the Control(s)" section. The doors are difficult to the refrigerator. Your new Kenmore ®appliance is too warm • Are the air vents blocked in front of paraffin wax on and the water source ...
...this time. • Is there a water filter installed on the refrigerator? Put these items into their correct positions. Rub a thin coat of food warms the refrigerator. Remove and replace the doors according to the refrigerator or freezer? Avoid humidity buildup by getting all items out at the source?...Hold the container under the water dispenser long enough? See the "Using the Control(s)" section. The doors are difficult to the refrigerator. Your new Kenmore ®appliance is too warm • Are the air vents blocked in front of paraffin wax on and the water source ...


