Use and Care Guide
Page 2
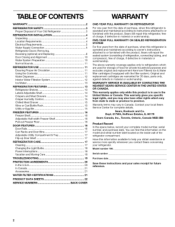
... 2 REFRIGERATOR SAFETY 3 Proper Disposal of Your Old Refrigerator 3 REFRIGERATOR INSTALLATION 4 Unpacking 4 Location Requirements 4 Electrical Requirements 5 Water Supply Connection 5 Refrigerator Doors: Removing, Reversing (optional) and Replacing 6 Door Closing and Alignment 10 Water System Preparation 10 Normal Sounds 11 REFRIGERATOR USE ...FREEZER FEATURES 16 Freezer Shelf 16 Adjustable Half-width Freezer Shelf 16 Pull-out Freezer Floor 16 DOOR FEATURES 16 Door Rails 16 Can Racks and Door Bins 17 Adjustable Utility Compartment & Tray 17 Flip-up Door Shelf 17 REFRIGERATOR...
... 2 REFRIGERATOR SAFETY 3 Proper Disposal of Your Old Refrigerator 3 REFRIGERATOR INSTALLATION 4 Unpacking 4 Location Requirements 4 Electrical Requirements 5 Water Supply Connection 5 Refrigerator Doors: Removing, Reversing (optional) and Replacing 6 Door Closing and Alignment 10 Water System Preparation 10 Normal Sounds 11 REFRIGERATOR USE ...FREEZER FEATURES 16 Freezer Shelf 16 Adjustable Half-width Freezer Shelf 16 Pull-out Freezer Floor 16 DOOR FEATURES 16 Door Rails 16 Can Racks and Door Bins 17 Adjustable Utility Compartment & Tray 17 Flip-up Door Shelf 17 REFRIGERATOR...
Use and Care Guide
Page 6
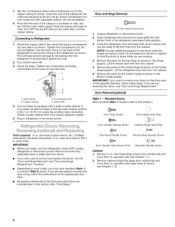
... want to reverse the door swing, follow these steps. hex-head hinge screws from the bottom front of the refrigerator (see "Door and Hinge Replacement." 4 1. Open refrigerator door and remove base grille from handle side and move them free from the cabinet. 1........ 6. Close the refrigerator door and keep both doors closed until you are included later in Top Hinge graphic...
... want to reverse the door swing, follow these steps. hex-head hinge screws from the bottom front of the refrigerator (see "Door and Hinge Replacement." 4 1. Open refrigerator door and remove base grille from handle side and move them free from the cabinet. 1........ 6. Close the refrigerator door and keep both doors closed until you are included later in Top Hinge graphic...
Use and Care Guide
Page 7
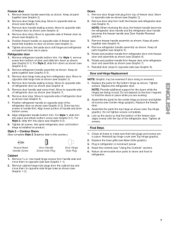
... plug from top of freezer door. Drive top two screws in place. Align lower portion of freezer door. Tighten all removable door parts to doors and food to opposite side of refrigerator door as shown (see Graphic 7). 6. Remove freezer handle assembly as shown (see Graphic 4). 4. Keep all parts together (see Door Handle Reversal graphic). 3. Door and Hinge Replacement NOTE: Graphic may be reversed if door swing...
... plug from top of freezer door. Drive top two screws in place. Align lower portion of freezer door. Tighten all removable door parts to doors and food to opposite side of refrigerator door as shown (see Graphic 7). 6. Remove freezer handle assembly as shown (see Graphic 4). 4. Keep all parts together (see Door Handle Reversal graphic). 3. Door and Hinge Replacement NOTE: Graphic may be reversed if door swing...
Use and Care Guide
Page 9
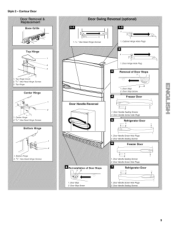
Contour Door Top Hinge 1 2 3 1. Top Hinge Center Hinge 1. Center Hinge 2. Top Hinge Cover 2. Bottom Hinge 2. s/l_" Hex-Head Hinge Screws iiii s/l_" Hex-Head Hinge Screws Bottom Hinge 1. s/l_" Hex-Head Hinge Screws 3. Style 2 -
Contour Door Top Hinge 1 2 3 1. Top Hinge Center Hinge 1. Center Hinge 2. Top Hinge Cover 2. Bottom Hinge 2. s/l_" Hex-Head Hinge Screws iiii s/l_" Hex-Head Hinge Screws Bottom Hinge 1. s/l_" Hex-Head Hinge Screws 3. Style 2 -


