Use and Care Guide
Page 1
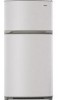
® TOP FREEZER REFRIGERATOR CONGELADOR SUPERIOR REFRIGERADOR CONGI_LATEUR SUPI_RIEUR REFRIGI_RATEUR Models / Modelos / ModUles 795.6997_, 795.7997_, 795.6937_, 795.7937_, 795.6991 795.7991 795.6929_ 795.7929_ = color number, n_mero de color, num_ro de couleur m Z _3 r" m cn z m Z_ O r=, =11 Z m MFL61920622 Printed in Mexico Sears Brands Management Corporation, Hoffman Estates, IL 60179 www.sears.com
® TOP FREEZER REFRIGERATOR CONGELADOR SUPERIOR REFRIGERADOR CONGI_LATEUR SUPI_RIEUR REFRIGI_RATEUR Models / Modelos / ModUles 795.6997_, 795.7997_, 795.6937_, 795.7937_, 795.6991 795.7991 795.6929_ 795.7929_ = color number, n_mero de color, num_ro de couleur m Z _3 r" m cn z m Z_ O r=, =11 Z m MFL61920622 Printed in Mexico Sears Brands Management Corporation, Hoffman Estates, IL 60179 www.sears.com
Use and Care Guide
Page 2
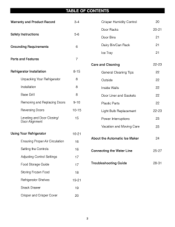
... Replacing Doors Reversing Doors Leveling and Door Closing/ Door Alignment 8-15 8 8 8 9-10 10-15 15 Using Your Refrigerator Ensuring Proper Air Circulation Setting the Controls Adjusting Control Settings Food Storage Guide Storing Frozen Food Refrigerator Shelves Snack Drawer Crisper and Crisper Cover 16-21 16 16 17 17 18 19-21 19... Bulb Replacement Power Interruptions Vacation and Moving Care About the Automatic Ice Maker Connecting the Water Line Troubleshooting Guide 2O 20-21 21 21 21 22-23 22 22 22 22 22 22-23 23 23 24 25-27 28-31
... Replacing Doors Reversing Doors Leveling and Door Closing/ Door Alignment 8-15 8 8 8 9-10 10-15 15 Using Your Refrigerator Ensuring Proper Air Circulation Setting the Controls Adjusting Control Settings Food Storage Guide Storing Frozen Food Refrigerator Shelves Snack Drawer Crisper and Crisper Cover 16-21 16 16 17 17 18 19-21 19... Bulb Replacement Power Interruptions Vacation and Moving Care About the Automatic Ice Maker Connecting the Water Line Troubleshooting Guide 2O 20-21 21 21 21 22-23 22 22 22 22 22 22-23 23 23 24 25-27 28-31
Use and Care Guide
Page 3
... Corporation, Hoffman Estates, IL 60179 Sears Canada, Inc., Toronto, Ontario, Canada MSB2B8 This Warranty covers only defects in correct product installation, operation or maintenance. 3. TOP FREEZER REFRIGERATOR ® Kenmore Appliance Warranty lone Year Limited Warranty When installed, operated and maintained according to all instructions supplied with the product, if this appliance fails due to...
... Corporation, Hoffman Estates, IL 60179 Sears Canada, Inc., Toronto, Ontario, Canada MSB2B8 This Warranty covers only defects in correct product installation, operation or maintenance. 3. TOP FREEZER REFRIGERATOR ® Kenmore Appliance Warranty lone Year Limited Warranty When installed, operated and maintained according to all instructions supplied with the product, if this appliance fails due to...
Use and Care Guide
Page 4
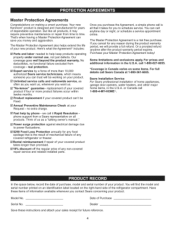
..., and other major home items, in the U.S.A. But like all that is designed and manufactured for any covered refrigerator or freezer. [] Rental reimbursement if repair of the refrigerator compartment. No deductibles, no extra charge. [] Fast help keep products operating properly under normal use, not just ... coverage = real protection. [] Expert service by phone = we will provide a full refund. Purchase your product. Model No. Your new Kenmor# _ product is the result of mechanical failure of any reason during the product warranty period, we cal! If you money and aggravation....
..., and other major home items, in the U.S.A. But like all that is designed and manufactured for any covered refrigerator or freezer. [] Rental reimbursement if repair of the refrigerator compartment. No deductibles, no extra charge. [] Fast help keep products operating properly under normal use, not just ... coverage = real protection. [] Expert service by phone = we will provide a full refund. Purchase your product. Model No. Your new Kenmor# _ product is the result of mechanical failure of any reason during the product warranty period, we cal! If you money and aggravation....
Use and Care Guide
Page 5
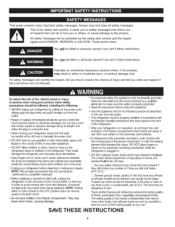
..., vegetables and prepared foods. Be careful closing doors when children are in the freezer compartment when hands are not followed. Unplug your refrigerator before using your refrigerator is affected less than that any repairs. If the odor or color of any... could damage the refrigerator and seriously injure themselves. - Thisguidecontainsmanyimportanst afetymessagesA.lwaysreadandobeyall safetymessages. Thisis thesafetyalertsymbolI.t alerts you to the light circuit. • Do not store bottles in the freezer compartment - You can happen if the instructions are damp or wet....
..., vegetables and prepared foods. Be careful closing doors when children are in the freezer compartment when hands are not followed. Unplug your refrigerator before using your refrigerator is affected less than that any repairs. If the odor or color of any... could damage the refrigerator and seriously injure themselves. - Thisguidecontainsmanyimportanst afetymessagesA.lwaysreadandobeyall safetymessages. Thisis thesafetyalertsymbolI.t alerts you to the light circuit. • Do not store bottles in the freezer compartment - You can happen if the instructions are damp or wet....
Use and Care Guide
Page 6
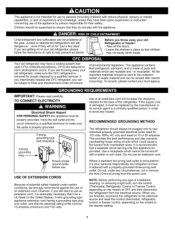
...To recycle, please contact your personal responsibility and obligation to make sure the CFC refrigerant is removed for "just a few days". However, if you throw away your old Refrigerator or freezer: • Take off with a properly grounded three-prong wall outlet. This provides...an extension cord, it must be provided. Child entrapment and suffocation are finished, reconnect the refrigerator to the electrical source and reset the control (thermostat, refrigerator control or freezer control, depending on the model) to help prevent accidents. IMPORTANT: Please read carefully. TO...
...To recycle, please contact your personal responsibility and obligation to make sure the CFC refrigerant is removed for "just a few days". However, if you throw away your old Refrigerator or freezer: • Take off with a properly grounded three-prong wall outlet. This provides...an extension cord, it must be provided. Child entrapment and suffocation are finished, reconnect the refrigerator to the electrical source and reset the control (thermostat, refrigerator control or freezer control, depending on the model) to help prevent accidents. IMPORTANT: Please read carefully. TO...
Use and Care Guide
Page 7
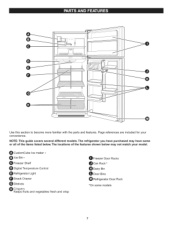
...: This guide covers several different models. © Use this section to become more familiar with the parts and features. O CustomCube Ice maker * O Ice Bin * Freezer Shelf _ Digital Temperature Control Refrigerator Light _t Snack Drawer Shelves Crispers Keeps fruits and vegetables fresh and crisp OFreezer Door Racks OCan Rack* ODairy Bin O Door Bins...
...: This guide covers several different models. © Use this section to become more familiar with the parts and features. O CustomCube Ice maker * O Ice Bin * Freezer Shelf _ Digital Temperature Control Refrigerator Light _t Snack Drawer Shelves Crispers Keeps fruits and vegetables fresh and crisp OFreezer Door Racks OCan Rack* ODairy Bin O Door Bins...

Use and Care Guide
Page 8
...the shipping position. To install or replace Base Grille: 1. Reattach screws to move it . Always pull the refrigerator straight out when moving the refrigerator for cleaning or service, be injured. • Do not put hands or metal sticks into position and ...etc. NOTE: For proper air circulation, best cooling and energy consumption results, maintain a minimum distance of Refrigerator. 3. ExcessiveWeightHazard Usetwoor morepeopleto moveandinstall refrigerator. UNPACKING YOUR REFRIGERATOR Remove tape and any warning-type labels or the model and serial number label. Do not remove any...
...the shipping position. To install or replace Base Grille: 1. Reattach screws to move it . Always pull the refrigerator straight out when moving the refrigerator for cleaning or service, be injured. • Do not put hands or metal sticks into position and ...etc. NOTE: For proper air circulation, best cooling and energy consumption results, maintain a minimum distance of Refrigerator. 3. ExcessiveWeightHazard Usetwoor morepeopleto moveandinstall refrigerator. UNPACKING YOUR REFRIGERATOR Remove tape and any warning-type labels or the model and serial number label. Do not remove any...

Use and Care Guide
Page 9
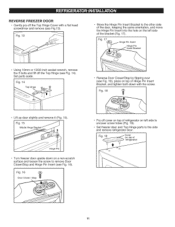
...: • 10mmor 13/32-incshockewt rench (with2-inchextensionfor bottomdoorhinge) • No.2 Phillipsheadscrewdriver • Flat-headscrewdrivefrorprying REMOVE FREEZER DOOR • Gently pry off the Top Hinge (see Fig 1). Fig. 6 Lift freezer door slightly and remove it . Fig. 1 REMOVE REFRIGERATOR DOOR • Loosen and remove the 2 bolts and the phillips head screw to remove the Middle...
...: • 10mmor 13/32-incshockewt rench (with2-inchextensionfor bottomdoorhinge) • No.2 Phillipsheadscrewdriver • Flat-headscrewdrivefrorprying REMOVE FREEZER DOOR • Gently pry off the Top Hinge (see Fig 1). Fig. 6 Lift freezer door slightly and remove it . Fig. 1 REMOVE REFRIGERATOR DOOR • Loosen and remove the 2 bolts and the phillips head screw to remove the Middle...

Use and Care Guide
Page 10
...Pin Insert on your right as the side on top of refrigerator. Directions refer to the right side as you begin, either unplug the refrigerator or turn off power at the circuit breaker or fuse box. I Fig. 11 REPLACE FREEZER DOOR • Set the freezer door onto the Middle Hinge Pin (Fig. ...or serious injury. Remove food and any Adjustable Door or Utility Bins from the left-opening type (factory installed) to the refrigerator housing. (Fig. 8). • Carefully force-fit Top Hinge Cover back into place over Hinge (Fig.11 ). Use the 3 bolts to do so could result in place ...
...Pin Insert on your right as the side on top of refrigerator. Directions refer to the right side as you begin, either unplug the refrigerator or turn off power at the circuit breaker or fuse box. I Fig. 11 REPLACE FREEZER DOOR • Set the freezer door onto the Middle Hinge Pin (Fig. ...or serious injury. Remove food and any Adjustable Door or Utility Bins from the left-opening type (factory installed) to the refrigerator housing. (Fig. 8). • Carefully force-fit Top Hinge Cover back into place over Hinge (Fig.11 ). Use the 3 bolts to do so could result in place ...
Use and Care Guide
Page 11
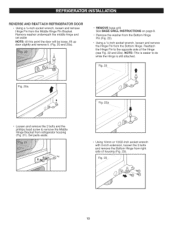
...by flipping over (see Fig. 16). Fig. 16 Door Closer / Stop • Pry off cover on top of refrigerator on top of _ i refrigerator) & 11 REVERSE FREEZER DOOR ° Gently pry off the Top Hinge Cover with the screw. Fig. 17 i_ Hinge PHiningtnesePrtin insert Bracket Using 10mm or 13/32-inch ...Fig. 13 • Move the Hinge Pin insert Bracket to the side and remove refrigerator door. Fi- 1_' Y" _ -- Cover (on the left side to uncover screw holes (Fig. 19). • Set freezer door and Top Hinge parts to the other side of the door, keeping the same orientation, and ...
...by flipping over (see Fig. 16). Fig. 16 Door Closer / Stop • Pry off cover on top of refrigerator on top of _ i refrigerator) & 11 REVERSE FREEZER DOOR ° Gently pry off the Top Hinge Cover with the screw. Fig. 17 i_ Hinge PHiningtnesePrtin insert Bracket Using 10mm or 13/32-inch ...Fig. 13 • Move the Hinge Pin insert Bracket to the side and remove refrigerator door. Fi- 1_' Y" _ -- Cover (on the left side to uncover screw holes (Fig. 19). • Set freezer door and Top Hinge parts to the other side of the door, keeping the same orientation, and ...
Use and Care Guide
Page 12
...NOTE: This is easier to the opposite side of housing (Fig. 23). 12 See BASE GRILL INSTRUCTIONS on page 8. • Remove the washer from refrigerator housing (Fig. 21). Using 10mm or 13/32-inch socket wrench with 2-inch extension, loosen the 3 bolts and remove the Bottom Hinge from the ... Pin Bracket. REVERSEAND REATTACHREFRIGERATORDOOR • Using a 1A-inch socket wrench, loosen and remove Hinge Pin from right side of the Hinge (see Fig. 22 and 22a). Reattach the Hinge Pin to do while the Hinge is still attached. o Using a 1A-inch socket wrench, loosen and remove the Hinge...
...NOTE: This is easier to the opposite side of housing (Fig. 23). 12 See BASE GRILL INSTRUCTIONS on page 8. • Remove the washer from refrigerator housing (Fig. 21). Using 10mm or 13/32-inch socket wrench with 2-inch extension, loosen the 3 bolts and remove the Bottom Hinge from the ... Pin Bracket. REVERSEAND REATTACHREFRIGERATORDOOR • Using a 1A-inch socket wrench, loosen and remove Hinge Pin from right side of the Hinge (see Fig. 22 and 22a). Reattach the Hinge Pin to do while the Hinge is still attached. o Using a 1A-inch socket wrench, loosen and remove the Hinge...

Use and Care Guide
Page 13
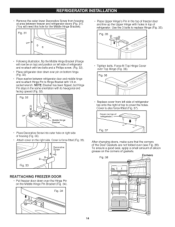
...upside down on lower right side of housing keeping the same orientation, and reattach with Hinge Pin Insert (see Fig. 29). Fig. 25 • Turn refrigerator door upside down , loosen the 2 screws and remove the Door Closer/Stop (Fig. 26), then loosen the other side of the door, keeping the ...Fig. 28 Hinge Pin Bracket • Move the Bottom Hinge to door (Fig. 28). The model you have may not include this part. NOTE: The Refrigerator Door Closer/Stop is not used on the left side of housing. Fig. 29 ?? • With flat-head screwdriver, carefully pry off and remove the...
...upside down on lower right side of housing keeping the same orientation, and reattach with Hinge Pin Insert (see Fig. 29). Fig. 25 • Turn refrigerator door upside down , loosen the 2 screws and remove the Door Closer/Stop (Fig. 26), then loosen the other side of the door, keeping the ...Fig. 28 Hinge Pin Bracket • Move the Bottom Hinge to door (Fig. 28). The model you have may not include this part. NOTE: The Refrigerator Door Closer/Stop is not used on the left side of housing. Fig. 29 ?? • With flat-head screwdriver, carefully pry off and remove the...
Use and Care Guide
Page 14
...-_ ..... /J / I I Decorative €l S_rew After changing doors, make sure that the corners of gaskets. Fig. 38 Corners \ / REATTACHING FREEZER DOOR • Put freezer door down over the Hinge Pin on the Middle Hinge Pin Bracket (Fig. 34). NOTE: Bracket has been flipped, but Hinge Pin stays in..., flip the Middle Hinge Bracket (Flange will now be on top) and position on left side of refrigerator top onto the right of silicon grease on bottom hinge. (Fig. 32). • Place washer between refrigerator door and middle hinge and re-attach Hinge Pin to Hinge Bracket...
...-_ ..... /J / I I Decorative €l S_rew After changing doors, make sure that the corners of gaskets. Fig. 38 Corners \ / REATTACHING FREEZER DOOR • Put freezer door down over the Hinge Pin on the Middle Hinge Pin Bracket (Fig. 34). NOTE: Bracket has been flipped, but Hinge Pin stays in..., flip the Middle Hinge Bracket (Flange will now be on top) and position on left side of refrigerator top onto the right of silicon grease on bottom hinge. (Fig. 32). • Place washer between refrigerator door and middle hinge and re-attach Hinge Pin to Hinge Bracket...

Use and Care Guide
Page 15
... for unevenness of the weight off the Top Hinge Cover with a flat head screwdriver and remove. Loosen the Top Hinge Bolts using the instructions below to align the doors: 1. Open both Leveling Screws clockwise. NOTE: Having someone hold the freezer door so the space between your refrigerator seems unsteady or you want the doors...
... for unevenness of the weight off the Top Hinge Cover with a flat head screwdriver and remove. Loosen the Top Hinge Bolts using the instructions below to align the doors: 1. Open both Leveling Screws clockwise. NOTE: Having someone hold the freezer door so the space between your refrigerator seems unsteady or you want the doors...
Use and Care Guide
Page 16
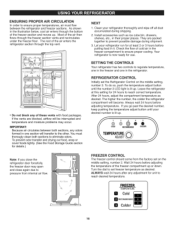
...use. Most of the air then flows through the top vent. • Do not block any odors formed in one in their proper places. iMPORTANT." Check the flow of cold air in it. REFRIGERATOR CONTROL Initially set freezer temperature as desired. After 24 hours, adjust the... both sections to eliminate odors. Wait 24 hours before adjusting the temperature of the freezer compartment up . Leave the refrigerator at least 2 or 3 hours before adjusting temperature. SETTING THE CONTROLS Your refrigerator has two controls to regulate temperature, one in the illustration below, cool air enters...
...use. Most of the air then flows through the top vent. • Do not block any odors formed in one in their proper places. iMPORTANT." Check the flow of cold air in it. REFRIGERATOR CONTROL Initially set freezer temperature as desired. After 24 hours, adjust the... both sections to eliminate odors. Wait 24 hours before adjusting the temperature of the freezer compartment up . Leave the refrigerator at least 2 or 3 hours before adjusting temperature. SETTING THE CONTROLS Your refrigerator has two controls to regulate temperature, one in the illustration below, cool air enters...

Use and Care Guide
Page 17
... before making final adjustments. The controls are ready to use them. Then wait 24 hours before checking the freezer temperature. CONDITION/ REASON: RECOMMENDED ADJUSTMENT: m REFRIGERATOR section too warm - Door opened often - When storing an extra supply, wrap in original carton or Egg... on interior shelf, not on door shelf. Eggs Fruit Store in freezer packaging and freeze. ADJUSTING CONTROL SETTINGS Give the refrigerator time to wait 24 hours before doing this. Setting the freezer control to a lower temperature keeps more cold air in a covered dish...
... before making final adjustments. The controls are ready to use them. Then wait 24 hours before checking the freezer temperature. CONDITION/ REASON: RECOMMENDED ADJUSTMENT: m REFRIGERATOR section too warm - Door opened often - When storing an extra supply, wrap in original carton or Egg... on interior shelf, not on door shelf. Eggs Fruit Store in freezer packaging and freeze. ADJUSTING CONTROL SETTINGS Give the refrigerator time to wait 24 hours before doing this. Setting the freezer control to a lower temperature keeps more cold air in a covered dish...
Use and Care Guide
Page 18
... • Plastic-coated paper • Non-permeable plastic wraps • Specified freezer-grade self-sealing plastic bags Follow package or container instructions for freezing or food storage times, check a freezer guide or a reliable cookbook. Be careful to leave enough room at room temperature... freezing depends on correct packaging. If it does, you could have food odor and taste transferred throughout the refrigerator and freezer, and food in the freezer compartment. Storage times will vary according to circulate around packages. Cooling hot foods before freezing saves energy. They...
... • Plastic-coated paper • Non-permeable plastic wraps • Specified freezer-grade self-sealing plastic bags Follow package or container instructions for freezing or food storage times, check a freezer guide or a reliable cookbook. Be careful to leave enough room at room temperature... freezing depends on correct packaging. If it does, you could have food odor and taste transferred throughout the refrigerator and freezer, and food in the freezer compartment. Storage times will vary according to circulate around packages. Cooling hot foods before freezing saves energy. They...
Use and Care Guide
Page 19
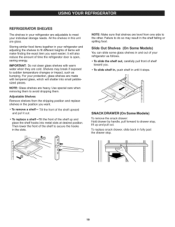
... back in fully past the drawer stop , lift up and place the shelf hooks into small pebblesized pieces. Storing similar food items together in your refrigerator as bumping. Use special care when removing them to drawer stop . 19 Slide Out Shelves (On Some Models) You can slide some glass shelves ... position you . , To slide shelf in, push shelf in until it stops. NOTE: Glass shelves are glass. Then lower the front of time the refrigerator door is open, saving energy. iMPORTANT: Do not clean glass shelves with tempered glass, which will also reduce the amount of the shelf to secure...
... back in fully past the drawer stop , lift up and place the shelf hooks into small pebblesized pieces. Storing similar food items together in your refrigerator as bumping. Use special care when removing them to drawer stop . 19 Slide Out Shelves (On Some Models) You can slide some glass shelves ... position you . , To slide shelf in, push shelf in until it stops. NOTE: Glass shelves are glass. Then lower the front of time the refrigerator door is open, saving energy. iMPORTANT: Do not clean glass shelves with tempered glass, which will also reduce the amount of the shelf to secure...
Use and Care Guide
Page 20
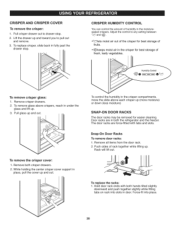
To replace crisper, slide back in fully past the drawer stop . 2. Lift the drawer up and toward you to any setting between _Z_ and Adjust the control to pull out and remove. 3. Pullcrisper drawer out to drawer stop . \ CRISPER HUMiDiTY CONTROL You can control the amount of humidity in the moisturesealed crispers. CRISPER AND CRISPER COVER To remove the crisper: 1.
To replace crisper, slide back in fully past the drawer stop . 2. Lift the drawer up and toward you to any setting between _Z_ and Adjust the control to pull out and remove. 3. Pullcrisper drawer out to drawer stop . \ CRISPER HUMiDiTY CONTROL You can control the amount of humidity in the moisturesealed crispers. CRISPER AND CRISPER COVER To remove the crisper: 1.


