Use and Care Guide
Page 2
...Kenmore Elite Appliance Warranty One Year Limited Warranty When installed, operated and maintained according to a defect in all instructions supplied with the product. 9. A service technician to clean or maintain this appliance... 28 • Setting Stow Cook 29 • Setting the Sabbath Feature 30-31 • Setting Warm & Hold 31 Self-Cleaning 3.2.-3.4........... Some states and... than its intended purpose. 8. Table of Contents Freestanding Range Warranty 2 IMPORTANTSAFETYINSTRUCTIONS 3-5 Before Using Your Range 5 • Assembly of implied warranties; Adjusting Oven ...
...Kenmore Elite Appliance Warranty One Year Limited Warranty When installed, operated and maintained according to a defect in all instructions supplied with the product. 9. A service technician to clean or maintain this appliance... 28 • Setting Stow Cook 29 • Setting the Sabbath Feature 30-31 • Setting Warm & Hold 31 Self-Cleaning 3.2.-3.4........... Some states and... than its intended purpose. 8. Table of Contents Freestanding Range Warranty 2 IMPORTANTSAFETYINSTRUCTIONS 3-5 Before Using Your Range 5 • Assembly of implied warranties; Adjusting Oven ...
Use and Care Guide
Page 3
...instructions. ,, If you to tilt it !on or near surface burners or in this appliance. Destroy the carton and plastic bags after unpacking the range. Stepping, leaning or sitting on to the range. Do not store explosives, such as flammable liquids. important Safety instructions Read all instructions given... gas supplier. Do not use any otherappliance. -- Never Use Your Appliance for storage. Do not store or use in combination with each other flammable vapors and liquids in conjunction with the National Fuel Gas Code ANSI Z223.latest ed it forward. Refer to tip, ...
...instructions. ,, If you to tilt it !on or near surface burners or in this appliance. Destroy the carton and plastic bags after unpacking the range. Stepping, leaning or sitting on to the range. Do not store explosives, such as flammable liquids. important Safety instructions Read all instructions given... gas supplier. Do not use any otherappliance. -- Never Use Your Appliance for storage. Do not store or use in combination with each other flammable vapors and liquids in conjunction with the National Fuel Gas Code ANSI Z223.latest ed it forward. Refer to tip, ...
Use and Care Guide
Page 4
...keep all utensils from the rack before turning on the power to the range manufacturer's instructions for cleaning. * Kitchen cleaners and aerosolsmAIways follow the manufacturer's recommended directions for cooktop use. Refer to the appliance. Care should be moved while oven is turned inward, and does ...and result in temperatures. important Safety instructions , Do Not Leave Children AlonemChildren should not be left alone or unattended in the area where appliance is in the oven. * Keep Oven Vent Ducts Unobstructed. During and after use . Let hot air or steam escape before removing ...
...keep all utensils from the rack before turning on the power to the range manufacturer's instructions for cleaning. * Kitchen cleaners and aerosolsmAIways follow the manufacturer's recommended directions for cooktop use. Refer to the appliance. Care should be moved while oven is turned inward, and does ...and result in temperatures. important Safety instructions , Do Not Leave Children AlonemChildren should not be left alone or unattended in the area where appliance is in the oven. * Keep Oven Vent Ducts Unobstructed. During and after use . Let hot air or steam escape before removing ...
Use and Care Guide
Page 5
... Burner Heads. Replace the Burner Heads and Caps on the cooktop. The L.P. For personal safety, the range must lign into slot for this appliance to satisfactorily meet the application needs must be plugged into slot of substances known to the state to cause... note: Models with a right front double ring burner are not marked with a double right front gas burner are not L.P. c. Gas) The natural gas range is located on Burner Skirts with Burner Heads and Burner Caps (See Fig. 1). Burner "::_'P 2)_!'_!;_\ Head / _b_f j_:/iJj : L::::: ii.i........... ...i.i..i Fig...
... Burner Heads. Replace the Burner Heads and Caps on the cooktop. The L.P. For personal safety, the range must lign into slot for this appliance to satisfactorily meet the application needs must be plugged into slot of substances known to the state to cause... note: Models with a right front double ring burner are not marked with a double right front gas burner are not L.P. c. Gas) The natural gas range is located on Burner Skirts with Burner Heads and Burner Caps (See Fig. 1). Burner "::_'P 2)_!'_!;_\ Head / _b_f j_:/iJj : L::::: ii.i........... ...i.i..i Fig...

Use and Care Guide
Page 13
...occur and result n serious injury or death. Pull the drawer away from electric GlAde power before cleaning and servicing the Warmer Drawer. Disconnect appliance from the range. This will nearly double in volume. The recommended length of the chassis glide (See Fig. 3). 2. Arrange the Warmer Drawer Rack ...in the Warmer Drawer is about 45-60 minutes. Right Glide Push down on the range. 3. If you do not hear the levers "click" or the bearing glides do not feel seated remove the drawer and repeat steps 1 thru...
...occur and result n serious injury or death. Pull the drawer away from electric GlAde power before cleaning and servicing the Warmer Drawer. Disconnect appliance from the range. This will nearly double in volume. The recommended length of the chassis glide (See Fig. 3). 2. Arrange the Warmer Drawer Rack ...in the Warmer Drawer is about 45-60 minutes. Right Glide Push down on the range. 3. If you do not hear the levers "click" or the bearing glides do not feel seated remove the drawer and repeat steps 1 thru...
Use and Care Guide
Page 20
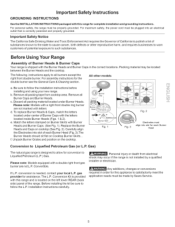
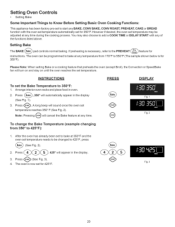
... automatically appear in oven. 2. Press (_ (See Fig. 3). 4. Setting Oven Controls • Setting Bake Some Important Things to Know Before Setting Basic Oven Cooking Functions: This appliance has been factory pre-set to start any BAKE, CONV BAKE, CONV ROAST, PREHEAT, CAKE or BREAD function with any of the functions listed above...
... automatically appear in oven. 2. Press (_ (See Fig. 3). 4. Setting Oven Controls • Setting Bake Some Important Things to Know Before Setting Basic Oven Cooking Functions: This appliance has been factory pre-set to start any BAKE, CONV BAKE, CONV ROAST, PREHEAT, CAKE or BREAD function with any of the functions listed above...
Use and Care Guide
Page 25
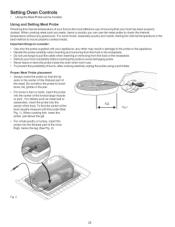
...part of the food visually measure with your food has been properly cooked. Proper Meat Probe placement • Always insert the probe so that your appliance; Do not allow the probe to insure properly cooked meats. When cooking fish, insert the probe just above the gill. • For whole poultry.... Important things to avoid damaging probe. • Never leave or store the probe inside the oven when not in damage to the probe or the appliance. • Handle the probe carefully when inserting and removing from the food or the receptacle. • Do not use . • To prevent the ...
...part of the food visually measure with your food has been properly cooked. Proper Meat Probe placement • Always insert the probe so that your appliance; Do not allow the probe to insure properly cooked meats. When cooking fish, insert the probe just above the gill. • For whole poultry.... Important things to avoid damaging probe. • Never leave or store the probe inside the oven when not in damage to the probe or the appliance. • Handle the probe carefully when inserting and removing from the food or the receptacle. • Do not use . • To prevent the ...
Use and Care Guide
Page 32
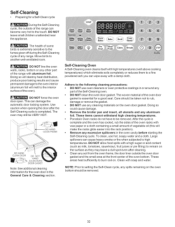
... NOTE: Prior to a fine powdered ash you can become very hot to the fumes given offduring the Self-Cleaning cycle of any part of the range with a damp cloth. Self=Cleaning Oven A Self-Cleaning oven cleans itself with high temperatures (well above cooking temperatures) which eliminate soils completely or...any other part of the Self-Cleaning oven. • DO NOT clean the oven door gasket. DO NOT leave small children unattended near the appliance. After the cycle is complete and the oven has cooled, rub the sides of the oven). DO NOT allow food spills with wax paper ...
... NOTE: Prior to a fine powdered ash you can become very hot to the fumes given offduring the Self-Cleaning cycle of any part of the range with a damp cloth. Self=Cleaning Oven A Self-Cleaning oven cleans itself with high temperatures (well above cooking temperatures) which eliminate soils completely or...any other part of the Self-Cleaning oven. • DO NOT clean the oven door gasket. DO NOT leave small children unattended near the appliance. After the cycle is complete and the oven has cooled, rub the sides of the oven). DO NOT allow food spills with wax paper ...
Use and Care Guide
Page 33
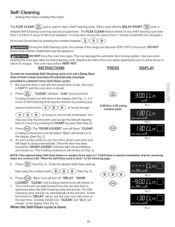
...=Clean cycle is a default 3 hour Self=Clean cycle): 1. You may also skip the time entry and accept the default cleaning time of the range can damage the automatic door locking system. This can become VERY HOT to determine when the Self-Cleaning cycle should end. Press _,_ . During the... steps 5-7. Stand to the side of time from 2 (2:00) to 4 hours (4:00) to close automatically. DO NOT leave small children unattended near the appliance. DO NOT force the oven door open. The Cooktop locked icon will remain on automatically at the set start time, Cooktop locked icon, "CLEAN" and...
...=Clean cycle is a default 3 hour Self=Clean cycle): 1. You may also skip the time entry and accept the default cleaning time of the range can damage the automatic door locking system. This can become VERY HOT to determine when the Self-Cleaning cycle should end. Press _,_ . During the... steps 5-7. Stand to the side of time from 2 (2:00) to 4 hours (4:00) to close automatically. DO NOT leave small children unattended near the appliance. DO NOT force the oven door open. The Cooktop locked icon will remain on automatically at the set start time, Cooktop locked icon, "CLEAN" and...
Use and Care Guide
Page 34
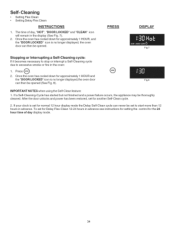
... to start more than 12 hours in the display (See Fig. 7). 2. If a Self-Cleaning-Cycle has started but not finished and a power failure occurs, the appliance may be opened . The time of day display mode. 34 Fig.8 iMPORTANT NOTES when using the Self-Clean feature: 1.
... to start more than 12 hours in the display (See Fig. 7). 2. If a Self-Cleaning-Cycle has started but not finished and a power failure occurs, the appliance may be opened . The time of day display mode. 34 Fig.8 iMPORTANT NOTES when using the Self-Clean feature: 1.
Use and Care Guide
Page 36
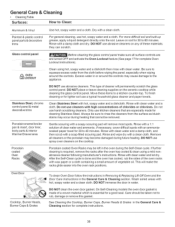
...Removing & Replacing Lift-Off Oven and the Door Care Instructions in the oven during the Self-Clean cycle. Care should be sure to the appliance. See Cleaning the Cooktop, Burner Caps, Burner Heads & Grates in or around the controls. Clean Stainless Steel with an ammoniasoaked paper towel .... DO NOT use kitchen cleaners that cannot be left in the General Care & Cleaning section. Excess water in the General Care & Cleaning section for 30 to a kitchen counter-top. DO NOT use hot, soapy water and a cloth. Rinse with clean water and let dry. General Care & Cleaning ...
...Removing & Replacing Lift-Off Oven and the Door Care Instructions in the oven during the Self-Clean cycle. Care should be sure to the appliance. See Cleaning the Cooktop, Burner Caps, Burner Heads & Grates in or around the controls. Clean Stainless Steel with an ammoniasoaked paper towel .... DO NOT use kitchen cleaners that cannot be left in the General Care & Cleaning section. Excess water in the General Care & Cleaning section for 30 to a kitchen counter-top. DO NOT use hot, soapy water and a cloth. Rinse with clean water and let dry. General Care & Cleaning ...
Use and Care Guide
Page 38
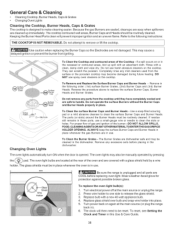
...improper ignition and an uneven flame. The cooktop contoured well areas, Burner Caps and Heads should be routinely cleaned. Rinse with a new 40 watt appliance bulb. 4. The ports (or slots) around the Burner Heads must be in place whenever the oven is in the dishwasher. ALWAYS keep the ... . jl JJ jJ Changing Oven Lights To Clean the surface Burner Caps and Burner Heads - Do not attempt to make cleaning easier. Be sure the range is unplugged and all parts are COOL before placing in use . General Care & Cleaning • Cleaning Cooktop, Burner Heads, Caps & Grates •...
...improper ignition and an uneven flame. The cooktop contoured well areas, Burner Caps and Heads should be routinely cleaned. Rinse with a new 40 watt appliance bulb. 4. The ports (or slots) around the Burner Heads must be in place whenever the oven is in the dishwasher. ALWAYS keep the ... . jl JJ jJ Changing Oven Lights To Clean the surface Burner Caps and Burner Heads - Do not attempt to make cleaning easier. Be sure the range is unplugged and all parts are COOL before placing in use . General Care & Cleaning • Cleaning Cooktop, Burner Heads, Caps & Grates •...
Use and Care Guide
Page 39
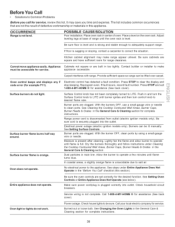
... to operate a few minutes until the oven rack is full. Electrical power outage (electric ignition models only). OCCURRENCE Range is present after cleaning. Carpet interferes with range. See Setting Oven Controls or Entire Appliance Does Not Operate (see below). Moisture is not level. POSSIBLE CAUSE/SOLUTiON Poor installation. Allow the burner to clean...
... to operate a few minutes until the oven rack is full. Electrical power outage (electric ignition models only). OCCURRENCE Range is present after cleaning. Carpet interferes with range. See Setting Oven Controls or Entire Appliance Does Not Operate (see below). Moisture is not level. POSSIBLE CAUSE/SOLUTiON Poor installation. Allow the burner to clean...

Use and Care Guide
Page 42
...LE..FOYERMC (1-800-533-6937) ..... (1-888-784=6427) www.sears.ca ® Registered Trademark / TMTrademark / SM Service Mark of home appliances iiiiiiiiiii iiiiiiiiiii and items like vacuums, lawn equipment, and electronics, call or go on-line for the location of your home - iiiiiiiiiii iiiiiiiiiiiiiiiiiiiii For... Brands, LLC MC Marque de commerce / M9 Marque d6pos6e de Sears Brands, LLC © Sears Brands, LLC of all major brand appliances, lawn and garden equipment, or heating and cooling systems, iiiiiiiiiii .omatter who made it, no matter who sold it =yourself. in ...
...LE..FOYERMC (1-800-533-6937) ..... (1-888-784=6427) www.sears.ca ® Registered Trademark / TMTrademark / SM Service Mark of home appliances iiiiiiiiiii iiiiiiiiiii and items like vacuums, lawn equipment, and electronics, call or go on-line for the location of your home - iiiiiiiiiii iiiiiiiiiiiiiiiiiiiii For... Brands, LLC MC Marque de commerce / M9 Marque d6pos6e de Sears Brands, LLC © Sears Brands, LLC of all major brand appliances, lawn and garden equipment, or heating and cooling systems, iiiiiiiiiii .omatter who made it, no matter who sold it =yourself. in ...
Installation Instructions
Page 1
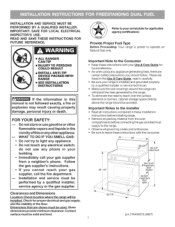
...these instructions with your Use & Care Guide for future reference. = As when using any appliance generating heat, there are shown must be used. important Notes to the range. Be sure to leave these installation instructions before connecting the gas and electrical supply to the... a qualified installer, service agency or the gas supplier. Check for applicable agency certifications Provide Proper Fuel Type Before Proceeding: Your range is preset to your gas supplier, call your range is not followed exactly, a fire or I explosion may result causing property I damage, personal ...
...these instructions with your Use & Care Guide for future reference. = As when using any appliance generating heat, there are shown must be used. important Notes to the range. Be sure to leave these installation instructions before connecting the gas and electrical supply to the... a qualified installer, service agency or the gas supplier. Check for applicable agency certifications Provide Proper Fuel Type Before Proceeding: Your range is preset to your gas supplier, call your range is not followed exactly, a fire or I explosion may result causing property I damage, personal ...
Installation Instructions
Page 2
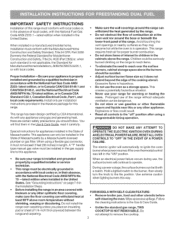
...the oven as a storage space. To eliminate the need to this appliance. = Be sure your range is installed and grounded properly by a qualified installer or service technician. = This range must be lit with the National Fuel Gas Code ANSI Z223= latest edition, or in Canada CAN/CGA... operation. Children could result. Install only per installation instructions provided in the literature package for appliances installed in the State of the cooking utensil. Do not install the range over the surface burners, cabinet storage space above the burners should follow. FOR MODELS WITH ...
...the oven as a storage space. To eliminate the need to this appliance. = Be sure your range is installed and grounded properly by a qualified installer or service technician. = This range must be lit with the National Fuel Gas Code ANSI Z223= latest edition, or in Canada CAN/CGA... operation. Children could result. Install only per installation instructions provided in the literature package for appliances installed in the State of the cooking utensil. Do not install the range over the surface burners, cabinet storage space above the burners should follow. FOR MODELS WITH ...
Installation Instructions
Page 3
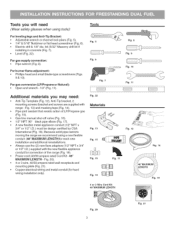
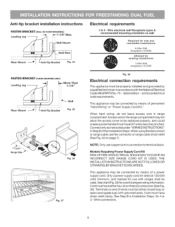
...will need : = Anti-Tip Template (Fig. 12), Anti-Tip bracket, 2 mounting screws (bracket and screws are supplied with the new flexible appliance conduit for connection of LP/Propane gas (Fig. 15). Power cord (40/50 ampere rated Cord Kit - 48" MAXIMUM LENGTH - Gas ... Level (Fig. 22). For burner flame adjustment: Phillips head and small blade-type screwdrivers (Figs. 9& 10). A new flexible metal appliance conduit (1/2" N PT x 3/4" or 1/2" I .D.) supplied with range - For gas conversion (LP/Propane or Natural): Open end wrench - 1/2" (Fig. 11). Tools you may need (Wear safety glasses ...
...will need : = Anti-Tip Template (Fig. 12), Anti-Tip bracket, 2 mounting screws (bracket and screws are supplied with the new flexible appliance conduit for connection of LP/Propane gas (Fig. 15). Power cord (40/50 ampere rated Cord Kit - 48" MAXIMUM LENGTH - Gas ... Level (Fig. 22). For burner flame adjustment: Phillips head and small blade-type screwdrivers (Figs. 9& 10). A new flexible metal appliance conduit (1/2" N PT x 3/4" or 1/2" I .D.) supplied with range - For gas conversion (LP/Propane or Natural): Open end wrench - 1/2" (Fig. 11). Tools you may need (Wear safety glasses ...
Installation Instructions
Page 6
...replaced properly, and could create a potential electrical hazard if wires become pinched. When using flexibleconduit or range cable use with the National Electrical CodeANSVNFPA No. 70-- This appliance may not allow the access cover to be used. Terminals on end of wires must be properly ...installed and grounded by a qualified technician in the range compartment may be connected by means of the Installation Steps...
...replaced properly, and could create a potential electrical hazard if wires become pinched. When using flexibleconduit or range cable use with the National Electrical CodeANSVNFPA No. 70-- This appliance may not allow the access cover to be used. Terminals on end of wires must be properly ...installed and grounded by a qualified technician in the range compartment may be connected by means of the Installation Steps...
Installation Instructions
Page 7
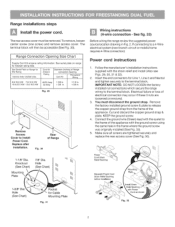
...Pocket for kilowatt rating data. The terminal block will then be removed. Fig. 30 Rear of the appliance. If connecting to the terminal block. Remove the factory installed ground screw & plate to the frame of Range connection Opening Cord Kit Permanent Wiring 8.8-16.5 KW 7.9-12.5 KW 16.6-22.5.... 33) Before wiring the range review the suggested power source location drawing in . You must be accessible (See Fig. 30). Insert the end connectors for KW Rating 120/240 Volts 120/208 Volts Cord Kit Ampere Rating Diameter (inches) of the appliance with the strain relief and install...
...Pocket for kilowatt rating data. The terminal block will then be removed. Fig. 30 Rear of the appliance. If connecting to the terminal block. Remove the factory installed ground screw & plate to the frame of Range connection Opening Cord Kit Permanent Wiring 8.8-16.5 KW 7.9-12.5 KW 16.6-22.5.... 33) Before wiring the range review the suggested power source location drawing in . You must be accessible (See Fig. 30). Insert the end connectors for KW Rating 120/240 Volts 120/208 Volts Cord Kit Ampere Rating Diameter (inches) of the appliance with the strain relief and install...
Installation Instructions
Page 9
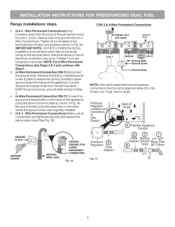
... ground strap from the ends of electrical connection may occur if these 3 nuts are tightened securely and replace the rear access cover (See Fig. 30). Electrical failure or loss of the permanent wiring for Line 1, Line 2, Neutral (also strip ground wire on 4Wire Connections). Pressure Regulator Location and... GROUND WIRE LEAD PROPER GROUND FOR 4-WIRE ND PERMANENT CONNECTION Fig. 36 FOR 3 & 4-Wire Permanent Connections _=Tighten all connections are loosened or removed. Range installations steps 2. (3 & 4 - Always use 10 ga. range oo ) Flexible Appliance Conduit (9 .........A...d.
... ground strap from the ends of electrical connection may occur if these 3 nuts are tightened securely and replace the rear access cover (See Fig. 30). Electrical failure or loss of the permanent wiring for Line 1, Line 2, Neutral (also strip ground wire on 4Wire Connections). Pressure Regulator Location and... GROUND WIRE LEAD PROPER GROUND FOR 4-WIRE ND PERMANENT CONNECTION Fig. 36 FOR 3 & 4-Wire Permanent Connections _=Tighten all connections are loosened or removed. Range installations steps 2. (3 & 4 - Always use 10 ga. range oo ) Flexible Appliance Conduit (9 .........A...d.