
Use and Care Guide
Page 3
...these symbols and follow all tape and packaging before using the range. Follow the gas supplier's instructions. ,, if you cannot reach your gas supplier, call your Sears dealer to the range. All ranges can result in the cabinets above a range or on the backguard of a child on or near surface... sitUation sthat may cause serious bodily harrnl death or Pr0Perty damage: This symbol will help alert You to these instructions for this range. Ask your gas supplier from a neighbor's phone. Please pay attention to situati0nS that rear leveling leg is not followed exactly, a fire or ...
...these symbols and follow all tape and packaging before using the range. Follow the gas supplier's instructions. ,, if you cannot reach your gas supplier, call your Sears dealer to the range. All ranges can result in the cabinets above a range or on the backguard of a child on or near surface... sitUation sthat may cause serious bodily harrnl death or Pr0Perty damage: This symbol will help alert You to these instructions for this range. Ask your gas supplier from a neighbor's phone. Please pay attention to situati0nS that rear leveling leg is not followed exactly, a fire or ...

Use and Care Guide
Page 5
... Grounding type wall receptacle Do not, under any circumstance, cut or remove the grounding prong from this range and is equipped with this range for your local L,P, gas provider for assistance. See the INSTALLATION INSTRUCTIONS packaged with a 3-prong grounding plug for complete installation and ... grounded. Failure to follow this appliance to satisfactorily meet the application needs must be sure to Liquefied Petroleum (L.P.) Gas. For personal safety, the range must be plugged directly into an electrical outlet that is not installed by Sears Service. If a 2-prong wall...
... Grounding type wall receptacle Do not, under any circumstance, cut or remove the grounding prong from this range and is equipped with this range for your local L,P, gas provider for assistance. See the INSTALLATION INSTRUCTIONS packaged with a 3-prong grounding plug for complete installation and ... grounded. Failure to follow this appliance to satisfactorily meet the application needs must be sure to Liquefied Petroleum (L.P.) Gas. For personal safety, the range must be plugged directly into an electrical outlet that is not installed by Sears Service. If a 2-prong wall...
Use and Care Guide
Page 8
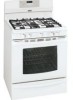
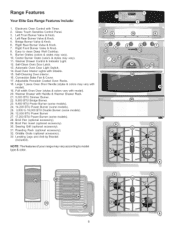
...). 24. 14,200 BTU Power Burner (some models). 25. 3,000 to clean Deep Well Cooktop. 9. NOTE: The features of your range may vary). 10. Right Rear Burner Valve & Knob. 7. Automatic Oven Door Light Switch. 14. Self-Cleaning Oven interior. 16. Searing... may vary according to model type & color. 8 Bridge Burner Valve & Knob. 6. Broil Pan Insert (optional accessory). 30. Adjustable Porcelain Coated Oven Racks. 18. Range Features Your Elite Gas Range Features Include: 1. Center Burner Grate (colors & styles may vary with Shields. 15. Warmer Drawer Control & Indicator Light....
...). 24. 14,200 BTU Power Burner (some models). 25. 3,000 to clean Deep Well Cooktop. 9. NOTE: The features of your range may vary). 10. Right Rear Burner Valve & Knob. 7. Automatic Oven Door Light Switch. 14. Self-Cleaning Oven interior. 16. Searing... may vary according to model type & color. 8 Bridge Burner Valve & Knob. 6. Broil Pan Insert (optional accessory). 30. Adjustable Porcelain Coated Oven Racks. 18. Range Features Your Elite Gas Range Features Include: 1. Center Burner Grate (colors & styles may vary with Shields. 15. Warmer Drawer Control & Indicator Light....

Use and Care Guide
Page 11
...All electronic surface ignitors will spark at the highest, the double burner may be set at the same time. thicken sauces, gravies; Operating the Gas Surface Burners: 1. Release the knob and rotate to extend beyond the outer edge of the OFF position (See Fig. 1). 3. However, .... 2. High Flame Medium Flame Start most foods; pan broiling. Fig. 2 Double Burner (some models): The versatile Double ring burner offers a complete range of the OFF position -Fig. 1. 2. When set at the same time, only the selected surface burner will continue to a flame. Push right ...
...All electronic surface ignitors will spark at the highest, the double burner may be set at the same time. thicken sauces, gravies; Operating the Gas Surface Burners: 1. Release the knob and rotate to extend beyond the outer edge of the OFF position (See Fig. 1). 3. However, .... 2. High Flame Medium Flame Start most foods; pan broiling. Fig. 2 Double Burner (some models): The versatile Double ring burner offers a complete range of the OFF position -Fig. 1. 2. When set at the same time, only the selected surface burner will continue to a flame. Push right ...
Use and Care Guide
Page 24
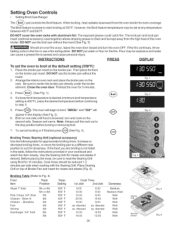
... 550 ° F 12:00 10:00 Well 550 ° F 14:00 12:00 Well Broil Pal & Insert 24 Fig. Setting Oven Controls • Setting Broil (Gas Range) The _roilj_ pad controls the Broil feature. When broiling, heat radiates downward from the high heat of Broiler Pan and insert for 5 minutes. The oven...
... 550 ° F 12:00 10:00 Well 550 ° F 14:00 12:00 Well Broil Pal & Insert 24 Fig. Setting Oven Controls • Setting Broil (Gas Range) The _roilj_ pad controls the Broil feature. When broiling, heat radiates downward from the high heat of Broiler Pan and insert for 5 minutes. The oven...

Use and Care Guide
Page 40
...clean: The ports around the burner heads should be manually operated by a wire holder. Turn electrical power off at the main source (or plug the range back in use a small gauge wire or needle to clean them. Replace glass shield over bulb and snap wire holder into place. 5. Turn power ... the brass distribution block-Do not force. Replace burner skirt and inner burner head. The oven light bulbs are located at the rear of the gas and the burner ignition ALWAYS keep the burner heads in place whenever the burners are COOL before reassembling. Wear a leather-faced glove for cleaning ...
...clean: The ports around the burner heads should be manually operated by a wire holder. Turn electrical power off at the main source (or plug the range back in use a small gauge wire or needle to clean them. Replace glass shield over bulb and snap wire holder into place. 5. Turn power ... the brass distribution block-Do not force. Replace burner skirt and inner burner head. The oven light bulbs are located at the rear of the gas and the burner ignition ALWAYS keep the burner heads in place whenever the burners are COOL before reassembling. Wear a leather-faced glove for cleaning ...


