Owners Manual
Page 6
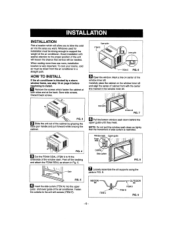
...sash down so tightly that service wi_tbe needed, When cooling more than one room, instalta_on location is very important. your morns, cold sir must be blown from the sir conditioner in a straight path. HOW TO INSTALL if the air conditioner is restricted= FiG. 4 _Cut the FOAM SEAL {iTEM 1) to fit... step 19 o_npage 8 befo_e bsglnnlng to install _]1 Flemove the screws which fasten the cabinet at both sides and at the back. To coo! INSTALLATION Pick a location wh_h wi_l allow you to blow the cold air into the upper guide and towsr guide of side curla_n is blacked by gdpping ...
...sash down so tightly that service wi_tbe needed, When cooling more than one room, instalta_on location is very important. your morns, cold sir must be blown from the sir conditioner in a straight path. HOW TO INSTALL if the air conditioner is restricted= FiG. 4 _Cut the FOAM SEAL {iTEM 1) to fit... step 19 o_npage 8 befo_e bsglnnlng to install _]1 Flemove the screws which fasten the cabinet at both sides and at the back. To coo! INSTALLATION Pick a location wh_h wi_l allow you to blow the cold air into the upper guide and towsr guide of side curla_n is blacked by gdpping ...
Owners Manual
Page 7
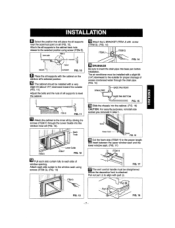
..., 11 W Attach _ cabinet to the inner sill by driving the screws (ITEM F) through the Lower Guide i_o the window inner sili (FIG. 12). _ DRAINAGE Be sure to the outside (FIG. Puli out... security purposes, reinstall side screws you removed In step 1. supports with the cabinet on sill (FIG. 10). FiG. 1B -7- l f _ _TEMB _-_ kow0rGuide FIG. 12 _Pull each side curtainfully to the ...the outermost point on ;the window sill's selected position. []The cabinet should be installed with part _3. The air conditfoner must be inSt_lted with a very slight tilt (about 1!4") downward toward the...
..., 11 W Attach _ cabinet to the inner sill by driving the screws (ITEM F) through the Lower Guide i_o the window inner sili (FIG. 12). _ DRAINAGE Be sure to the outside (FIG. Puli out... security purposes, reinstall side screws you removed In step 1. supports with the cabinet on sill (FIG. 10). FiG. 1B -7- l f _ _TEMB _-_ kow0rGuide FIG. 12 _Pull each side curtainfully to the ...the outermost point on ;the window sill's selected position. []The cabinet should be installed with part _3. The air conditfoner must be inSt_lted with a very slight tilt (about 1!4") downward toward the...
Owners Manual
Page 10
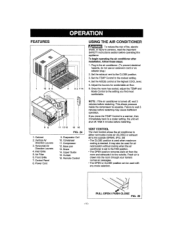
...10, Condenser 11. Compressor '_2.5ass pan _3, Brace "_4.Upper Guide I5. if you find most comfortable. PULL OPEN / PUSH CLOSE FIG. 25 -_0- Air FHter 6. Set the exhaust vent to the coolest setting. 4. Set the MODE con+rot at the highest COOL level. 5. Fresh air is set in the air conditioner... the air condltlorterafter installation, foJ!ow these steps: t. Plug in the FAN position. * The OPEN position removes sta_e air from the room and exhausts it to the outside . Curtain 16, Remote Control NOTE : If the air conditioner is turned off . Horizontal Air Direction ...
...10, Condenser 11. Compressor '_2.5ass pan _3, Brace "_4.Upper Guide I5. if you find most comfortable. PULL OPEN / PUSH CLOSE FIG. 25 -_0- Air FHter 6. Set the exhaust vent to the coolest setting. 4. Set the MODE con+rot at the highest COOL level. 5. Fresh air is set in the air conditioner... the air condltlorterafter installation, foJ!ow these steps: t. Plug in the FAN position. * The OPEN position removes sta_e air from the room and exhausts it to the outside . Curtain 16, Remote Control NOTE : If the air conditioner is turned off . Horizontal Air Direction ...