
Use and Care Guide
Page 1
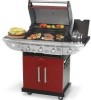
... (_) For assembly questions, call: 1-800-913-8999 MFG No: 720-0679R(B) Date: 10/20/2008 Sears, Roebuck and Co., Hoffman Estates, IL 60179 U.S.A. This gas grill is intended for future reference. Failure to be sure your gas grill is not intended to follow these instructions could result in serious injury ...and/or property damage. Use and Care Guide @ Liquid Propane Gas Grill Sears Model No. 122.16538900 122.16539900 Kmart Item No. 640-082960811-6 640-082960828-0 • Parts • Assembly • Safety...
... (_) For assembly questions, call: 1-800-913-8999 MFG No: 720-0679R(B) Date: 10/20/2008 Sears, Roebuck and Co., Hoffman Estates, IL 60179 U.S.A. This gas grill is intended for future reference. Failure to be sure your gas grill is not intended to follow these instructions could result in serious injury ...and/or property damage. Use and Care Guide @ Liquid Propane Gas Grill Sears Model No. 122.16538900 122.16539900 Kmart Item No. 640-082960811-6 640-082960828-0 • Parts • Assembly • Safety...

Use and Care Guide
Page 2
...16 17 One-Year Full Warranty on Stainless Steel Burners For five years from the date of purchase, any other grill parts while the grill is ever used in the vicinity of charge. Five-Year Limited Warranty on Kenmore Grill If this product contain chemicals known to have other... any other appliance. /'_ DANGER If you may result in serious bodily injury. Never connect your grill. LP gas grill models are either the national fuel gas code, ANSI Z 223.1/NFPA $4, Natural gas and propane installation code, CSA B149.1, or propane storage and handling code, B149.2, or the standard...
...16 17 One-Year Full Warranty on Stainless Steel Burners For five years from the date of purchase, any other grill parts while the grill is ever used in the vicinity of charge. Five-Year Limited Warranty on Kenmore Grill If this product contain chemicals known to have other... any other appliance. /'_ DANGER If you may result in serious bodily injury. Never connect your grill. LP gas grill models are either the national fuel gas code, ANSI Z 223.1/NFPA $4, Natural gas and propane installation code, CSA B149.1, or propane storage and handling code, B149.2, or the standard...

Use and Care Guide
Page 3
... for vapor withdraw. 3. Dept. The LP gas tank used again. • Keep the gas regulator hose away from the back and side of any other flammable vapors and liquids in or on recreational vehicles or boats • Keep outdoor gas grill area clear and free from combustible materials, gasoline... before checking to ensure the burner tubes are fully seated over the gas valve orifices. • Never allow children to be used under or • near this manual. • Have your gas grill with a Type 1 tank connection device. In Canada, the LP gas tank must meet the National Standard...
... for vapor withdraw. 3. Dept. The LP gas tank used again. • Keep the gas regulator hose away from the back and side of any other flammable vapors and liquids in or on recreational vehicles or boats • Keep outdoor gas grill area clear and free from combustible materials, gasoline... before checking to ensure the burner tubes are fully seated over the gas valve orifices. • Never allow children to be used under or • near this manual. • Have your gas grill with a Type 1 tank connection device. In Canada, the LP gas tank must meet the National Standard...

Use and Care Guide
Page 4
... AM to 5 PM PST at least once a month in the grill burner tubes during the product warranty period, we call near the LP gas tank because your covered product can cause serious damage to time. Your new Kenmore product is connected to OFF position. • Put out any reason...a fire or explosion that it Rapid Resolution phone support from time to your gas grill or the LP gas tank. If humming noise is a risk-free purchase. ! For prices and additional information in the U.S.A. See Cleaning Burner Tubes and Ports on making a smart purchase. we will not interfere with ...
... AM to 5 PM PST at least once a month in the grill burner tubes during the product warranty period, we call near the LP gas tank because your covered product can cause serious damage to time. Your new Kenmore product is connected to OFF position. • Put out any reason...a fire or explosion that it Rapid Resolution phone support from time to your gas grill or the LP gas tank. If humming noise is a risk-free purchase. ! For prices and additional information in the U.S.A. See Cleaning Burner Tubes and Ports on making a smart purchase. we will not interfere with ...

Use and Care Guide
Page 7
... Description 4. Quantity of parts needed You can purchase the Kenmore rotisserie kit, item # 15803 at your Kenmore gas grill, please refer to the part numbers on this Owner's ...Door Handle Lighting Rod Rubber Grommet Back Panel Back Panel, Top Side Burner Front Panel Side Gas Valve Side Burner Igniter Wire Side Burner Ripe Assembly Side Burner Bow lAssembly Side Burner Cooking Grid Side Burner Lid Grease Slide Panel, Bottom Grease Tray Main Burner Igniter Wire A Main Burner Igniter Wire B Main Burner Igniter Wire C Main Burner Heat Diffuser Cooking Grid with Hole Warning Rack QUANTIT_t 1 1 ...
... Description 4. Quantity of parts needed You can purchase the Kenmore rotisserie kit, item # 15803 at your Kenmore gas grill, please refer to the part numbers on this Owner's ...Door Handle Lighting Rod Rubber Grommet Back Panel Back Panel, Top Side Burner Front Panel Side Gas Valve Side Burner Igniter Wire Side Burner Ripe Assembly Side Burner Bow lAssembly Side Burner Cooking Grid Side Burner Lid Grease Slide Panel, Bottom Grease Tray Main Burner Igniter Wire A Main Burner Igniter Wire B Main Burner Igniter Wire C Main Burner Heat Diffuser Cooking Grid with Hole Warning Rack QUANTIT_t 1 1 ...

Use and Care Guide
Page 8
... 4 1. This will allow you assemble it. / Do not assemble or operate the grill if it is possible for damage as a work surface to protect floor and grill parts from tray. Figure 3 4. Attach back panel to side panel & bottom panel using (4) 5/32 x 3/8" Figure 5 flat head screws. (Fig...5 PM PST, Monday through Friday. Remove packing materials from another person when handling some of the larger, heavier pieces 1. Inspect the grill for one person to side panels using (7) 5/32 x 3/8" Phillips head screws with (6) /' 5/32" lock washers. (Fig.2) 3. If there are straight casters...
... 4 1. This will allow you assemble it. / Do not assemble or operate the grill if it is possible for damage as a work surface to protect floor and grill parts from tray. Figure 3 4. Attach back panel to side panel & bottom panel using (4) 5/32 x 3/8" Figure 5 flat head screws. (Fig...5 PM PST, Monday through Friday. Remove packing materials from another person when handling some of the larger, heavier pieces 1. Inspect the grill for one person to side panels using (7) 5/32 x 3/8" Phillips head screws with (6) /' 5/32" lock washers. (Fig.2) 3. If there are straight casters...

Use and Care Guide
Page 9
... an assistant for shelf assembly. (Fig. 9) 4. Assemble side shelf & side burner front panel using (4) 5/32 x 3/8" Phillips head screws with screw holes of grill head with (4) 5/32" lock washers. (Fig. 8) 2. Be sure grill cart doors are closed when placing grill head onto cart. Through side burner shelf screw holes, hang side burner on two screws. (Fig. 10) Figure 9 Figure 6 Figure 7 Figure...
... an assistant for shelf assembly. (Fig. 9) 4. Assemble side shelf & side burner front panel using (4) 5/32 x 3/8" Phillips head screws with screw holes of grill head with (4) 5/32" lock washers. (Fig. 8) 2. Be sure grill cart doors are closed when placing grill head onto cart. Through side burner shelf screw holes, hang side burner on two screws. (Fig. 10) Figure 9 Figure 6 Figure 7 Figure...

Use and Care Guide
Page 10
Insert side burner valve control stem through 5 to grill head. Push control knob onto valve control stem. Plug ignition wire into burner tube as shown in Fig. 12. Figure 12 A B Figure 13 I Wsuhreenthyaot ualhl asvcerefwinsishaendd naustssemarbelintigghtgarilnl,d msaekceure. Fully tighten two screws from side burner control valve face. Secure side burner control panel to install side burner valve. Remove screws attaching side burner to...
Insert side burner valve control stem through 5 to grill head. Push control knob onto valve control stem. Plug ignition wire into burner tube as shown in Fig. 12. Figure 12 A B Figure 13 I Wsuhreenthyaot ualhl asvcerefwinsishaendd naustssemarbelintigghtgarilnl,d msaekceure. Fully tighten two screws from side burner control valve face. Secure side burner control panel to install side burner valve. Remove screws attaching side burner to...

Use and Care Guide
Page 11
...beginning of each season (and whenever the LP gas tank has been changed): 1. Push grease tray back into the brackets in the grill bowl side panels. (Fig. 16) Installing Grease Cup ... the supply tank. 11 / \\\\ \ / Figure 19 Regulator Connection Congratulations Your Kenmore gas grill is completed, turn tank valve off excess grease or food residue. 1. After cooking is now ready...or debris. Open tank valve fully (counterclockwise). Read all burner valves are in use damaged or plugged equipment. 5. Ensure that grill head heat shield is repaired. Make sure all safety, lighting...
...beginning of each season (and whenever the LP gas tank has been changed): 1. Push grease tray back into the brackets in the grill bowl side panels. (Fig. 16) Installing Grease Cup ... the supply tank. 11 / \\\\ \ / Figure 19 Regulator Connection Congratulations Your Kenmore gas grill is completed, turn tank valve off excess grease or food residue. 1. After cooking is now ready...or debris. Open tank valve fully (counterclockwise). Read all burner valves are in use damaged or plugged equipment. 5. Ensure that grill head heat shield is repaired. Make sure all safety, lighting...

Use and Care Guide
Page 12
.... 4. Push and turn gas ON at supply tank. 3. USING THE SIDE BURNER: Inspect the gas supply hose prior to OFF. LIGHTING INSTRUCTIONS FOR SIDE BURNER Grill Lighting Instructions for assistance. Open side burner lid fully. 2. Gas Connection Leak Check 4. Gas Tank Leak Check , Be sure all gas connections. Push and hold Electronic Ignition button for gas leaks. 1. If the side burner does not light after...
.... 4. Push and turn gas ON at supply tank. 3. USING THE SIDE BURNER: Inspect the gas supply hose prior to OFF. LIGHTING INSTRUCTIONS FOR SIDE BURNER Grill Lighting Instructions for assistance. Open side burner lid fully. 2. Gas Connection Leak Check 4. Gas Tank Leak Check , Be sure all gas connections. Push and hold Electronic Ignition button for gas leaks. 1. If the side burner does not light after...

Use and Care Guide
Page 13
... with a proper fire extinguisher. • Open grill lid. • Once the grill has cooled down, clean the burner tubes and burners according to purge air from gas valve orifice. \ WARNING Never lean over orifices. •Obstruction in gas line Correction: Remove fuel line from grill. Failure to use the grill 5. If the grill still does not light you still...
... with a proper fire extinguisher. • Open grill lid. • Once the grill has cooled down, clean the burner tubes and burners according to purge air from gas valve orifice. \ WARNING Never lean over orifices. •Obstruction in gas line Correction: Remove fuel line from grill. Failure to use the grill 5. If the grill still does not light you still...

Use and Care Guide
Page 14
... fire. 14 Check the grease tray frequently, don't allow excess grease to absorb the grease. Follow these steps. 1. Detach LP gas hose and regulator assembly from your gas grill. 3. Remove and clean heat diffusers, cooking grids and grill burners. 5. Never use abrasive cleaners or scrubbers because they will keep it in bottom of time. 1. Cleaning...
... fire. 14 Check the grease tray frequently, don't allow excess grease to absorb the grease. Follow these steps. 1. Detach LP gas hose and regulator assembly from your gas grill. 3. Remove and clean heat diffusers, cooking grids and grill burners. 5. Never use abrasive cleaners or scrubbers because they will keep it in bottom of time. 1. Cleaning...

Use and Care Guide
Page 15
... placed inside the ends of the burner tubes. /_ WARNING Spiders and insects can nest inside the burners of the grill and disrupt gas flow. Make sure the wire is found, order and install a new burner. Refer to Clean Burner Tubes and Burner Ports on the malfunctioning burner for damage (cracks or holes) ...ensure that appears low, does the orifice or burner need cleaning? Clean wires and/or electrode by rubbing with dry cloth. If so, check the gas orifice on page 14. Is the grill in combination with the odor of gas. Inspect the grill at least once a year or immediately after ...
... placed inside the ends of the burner tubes. /_ WARNING Spiders and insects can nest inside the burners of the grill and disrupt gas flow. Make sure the wire is found, order and install a new burner. Refer to Clean Burner Tubes and Burner Ports on the malfunctioning burner for damage (cracks or holes) ...ensure that appears low, does the orifice or burner need cleaning? Clean wires and/or electrode by rubbing with dry cloth. If so, check the gas orifice on page 14. Is the grill in combination with the odor of gas. Inspect the grill at least once a year or immediately after ...

Use and Care Guide
Page 16
... you will get very hot. Grill Lid or any substance that will vary with the Lid down after cooking is ideal for 3 to a point. Just ignite the burners,lower the Lid, and operate grill on the left or right side of wind outside your gas grill for burning food residue off Before... cooking on the opposite side. Never use . Direct Cooking The direct cooking method can be done with...
... you will get very hot. Grill Lid or any substance that will vary with the Lid down after cooking is ideal for 3 to a point. Just ignite the burners,lower the Lid, and operate grill on the left or right side of wind outside your gas grill for burning food residue off Before... cooking on the opposite side. Never use . Direct Cooking The direct cooking method can be done with...

Use and Care Guide
Page 17
... occassionally. Potatoes Whole Meat/Steaks 1/2 to 3/4 inches Medium High-Medium 40 to 15 minutes Pre heat grill for 15-20 minutes then sear steaks on each side for two minutes. Cook rotating occassionally. 4 to 60 minutes Wrap individually in heavy duty foil. Poultry Whole 2 to 3 pounds .... 17 Wrap tightly in the _bie below. Next grill 3 to 10 minutes Grill turning four times. 24 minutes on each ol four sides. Brush with barbecue sauce if desired tum several times. 5 to 5 minutes on each side or until desired amount of Agriculture FOOD Vegetables Weight or...
... occassionally. Potatoes Whole Meat/Steaks 1/2 to 3/4 inches Medium High-Medium 40 to 15 minutes Pre heat grill for 15-20 minutes then sear steaks on each side for two minutes. Cook rotating occassionally. 4 to 60 minutes Wrap individually in heavy duty foil. Poultry Whole 2 to 3 pounds .... 17 Wrap tightly in the _bie below. Next grill 3 to 10 minutes Grill turning four times. 24 minutes on each ol four sides. Brush with barbecue sauce if desired tum several times. 5 to 5 minutes on each side or until desired amount of Agriculture FOOD Vegetables Weight or...


