
Use and Care Guide
Page 1
www.sears.cem ® TOP FREEZER REFRIGERATOR i CONGELADOR SUPERIOR REFRIGERADOR CONGI_LATEUR SUPI_RIEUR REFRIGI_RATEUR Models / Modelos / Mod_les 795.6997_,795.6991_ 795.7997_,795.7991_ 795.6937_,795.6929_ 795.7937_,795.7929_ = color number, n_mero de colo_ num_ro de couleur tl1 Z O t=, m cn z m Z_ O r=,, "13 Z m MFL61920619 Printed in Mexico Sears, Roebuck and Co., Hoffman Estates, IL 60179 U.S.A.
www.sears.cem ® TOP FREEZER REFRIGERATOR i CONGELADOR SUPERIOR REFRIGERADOR CONGI_LATEUR SUPI_RIEUR REFRIGI_RATEUR Models / Modelos / Mod_les 795.6997_,795.6991_ 795.7997_,795.7991_ 795.6937_,795.6929_ 795.7937_,795.7929_ = color number, n_mero de colo_ num_ro de couleur tl1 Z O t=, m cn z m Z_ O r=,, "13 Z m MFL61920619 Printed in Mexico Sears, Roebuck and Co., Hoffman Estates, IL 60179 U.S.A.
Use and Care Guide
Page 2
... Replacing Doors Reversing Doors Leveling and Door Closing/ Door Alignment 8-15 8 8 8 9-10 10-15 15 Using Your Refrigerator Ensuring Proper Air Circulation Setting the Controls Adjusting Control Settings Food Storage Guide Storing Frozen Food Refrigerator Shelves Snack Drawer Crisper and Crisper Cover 16-21 16 16 17 17 18 19-21 19... Bulb Replacement Power Interruptions Vacation and Moving Care About the Automatic Ice Maker Connecting the Water Line Troubleshooting Guide 2O 20-21 21 21 21 22-23 22 22 22 22 22 22-23 23 23 24 25-27 28-31
... Replacing Doors Reversing Doors Leveling and Door Closing/ Door Alignment 8-15 8 8 8 9-10 10-15 15 Using Your Refrigerator Ensuring Proper Air Circulation Setting the Controls Adjusting Control Settings Food Storage Guide Storing Frozen Food Refrigerator Shelves Snack Drawer Crisper and Crisper Cover 16-21 16 16 17 17 18 19-21 19... Bulb Replacement Power Interruptions Vacation and Moving Care About the Automatic Ice Maker Connecting the Water Line Troubleshooting Guide 2O 20-21 21 21 21 22-23 22 22 22 22 22 22-23 23 23 24 25-27 28-31
Use and Care Guide
Page 3
... other rights which vary from the date of purchase. Damage to or failure of this product. This warranty gives you specific legal rights, and you . TOP FREEZER REFRIGERATOR ® Kenrnore Appliance Warranty forte Year Limited Warranty When installed, operated and maintained according to all instructions supplied with the product, if this appliance fails...
... other rights which vary from the date of purchase. Damage to or failure of this product. This warranty gives you specific legal rights, and you . TOP FREEZER REFRIGERATOR ® Kenrnore Appliance Warranty forte Year Limited Warranty When installed, operated and maintained according to all instructions supplied with the product, if this appliance fails...
Use and Care Guide
Page 4
... day or night, or schedule a service appointment online. Master Protection Agreements Congratulations on the right-hand side of the refrigerator compartment. Your new Kenmor# _ product is a risk free purchase. The Master Protection Agreement also helps extend the life of home appliances, garage...service technicians, which means someone you can save you to power fluctuations. [] $250 Food Loss Protection annually for any covered refrigerator or freezer. [] Rental reimbursement if repair of your Master Protection Agreement today! No deductibles, no extra charge. [] Fast help keep ...
... day or night, or schedule a service appointment online. Master Protection Agreements Congratulations on the right-hand side of the refrigerator compartment. Your new Kenmor# _ product is a risk free purchase. The Master Protection Agreement also helps extend the life of home appliances, garage...service technicians, which means someone you can save you to power fluctuations. [] $250 Food Loss Protection annually for any covered refrigerator or freezer. [] Rental reimbursement if repair of your Master Protection Agreement today! No deductibles, no extra charge. [] Fast help keep ...
Use and Care Guide
Page 5
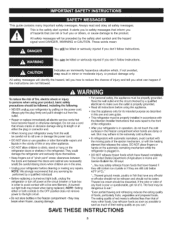
...not remove power to make sure the outlet is in operation, do not touch the cold surfaces in the freezer compartment - Before replacing a burned-out light bulb, unplug the refrigerator or turn off -color should not be refrozen and should be preceded by a qualified electrician to the ...light circuit. • Do not store bottles in the freezer compartment when hands are damp or wet. they are necessarily ...
...not remove power to make sure the outlet is in operation, do not touch the cold surfaces in the freezer compartment - Before replacing a burned-out light bulb, unplug the refrigerator or turn off -color should not be refrozen and should be preceded by a qualified electrician to the ...light circuit. • Do not store bottles in the freezer compartment when hands are damp or wet. they are necessarily ...
Use and Care Guide
Page 6
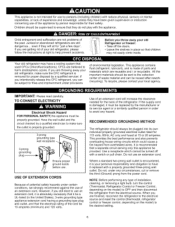
... the use an extension cord. Your old refrigerator may not easily climb inside. To recycle, please contact your old Refrigerator or freezer: • Take off with a switch or pull chain. RECOMMENDED GROUNDING METHOD The refrigerator should always be provided. Do not use ...extension cord, it is recommended that used CFCs (chlorofluorocarbons). CFCs are finished, reconnect the refrigerator to the electrical source and reset the control (thermostat, refrigerator control or freezer control, depending on the model) to avoid any hazard. TO CONNECT ELECTRICITY Electrical Shock...
... the use an extension cord. Your old refrigerator may not easily climb inside. To recycle, please contact your old Refrigerator or freezer: • Take off with a switch or pull chain. RECOMMENDED GROUNDING METHOD The refrigerator should always be provided. Do not use ...extension cord, it is recommended that used CFCs (chlorofluorocarbons). CFCs are finished, reconnect the refrigerator to the electrical source and reset the control (thermostat, refrigerator control or freezer control, depending on the model) to avoid any hazard. TO CONNECT ELECTRICITY Electrical Shock...

Use and Care Guide
Page 7
... several different models. The locations of the items listed below. The refrigerator you have purchased may not match your convenience. O CustomCube Ice maker * O Ice Bin * Freezer Shelf _ Digital Temperature Control Refrigerator Light _t Snack Drawer Shelves Crispers Keeps fruits and vegetables fresh and ...crisp OFreezer Door Racks OCan Rack* ODairy Bin O Door Bins Refrigerator Door Rack *On some or all of the ...
... several different models. The locations of the items listed below. The refrigerator you have purchased may not match your convenience. O CustomCube Ice maker * O Ice Bin * Freezer Shelf _ Digital Temperature Control Refrigerator Light _t Snack Drawer Shelves Crispers Keeps fruits and vegetables fresh and ...crisp OFreezer Door Racks OCan Rack* ODairy Bin O Door Bins Refrigerator Door Rack *On some or all of the ...
Use and Care Guide
Page 8
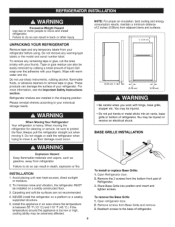
... area briskly with hinge, base grille, stopper etc. These products can result in death, explosion or fire. Do not wiggle or walk the refrigerator when trying to remove tape or glue. Carpeting and soft tile surfaces are installed in an area where the temperature is between 55 °F ...is heavy. To remove the Base Grille 1. Tape or glue residue can also be sure to do so can damage the surface of refrigerator. BASE GRILLE INSTALLATION Explosion Hazard Keep flammable materials and vapors, such as floor damage could occur. Failure to protect the floor. NEVER install...
... area briskly with hinge, base grille, stopper etc. These products can result in death, explosion or fire. Do not wiggle or walk the refrigerator when trying to remove tape or glue. Carpeting and soft tile surfaces are installed in an area where the temperature is between 55 °F ...is heavy. To remove the Base Grille 1. Tape or glue residue can also be sure to do so can damage the surface of refrigerator. BASE GRILLE INSTALLATION Explosion Hazard Keep flammable materials and vapors, such as floor damage could occur. Failure to protect the floor. NEVER install...

Use and Care Guide
Page 9
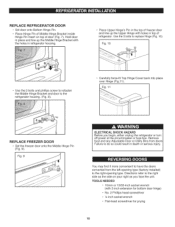
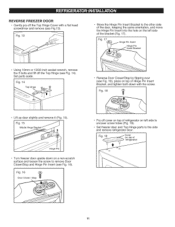
...-incshockewt rench (with2-inchextensionfor bottomdoorhinge) • No.2 Phillipsheadscrewdriver • Flat-headscrewdrivefrorprying REMOVE FREEZER DOOR • Gently pry off the Top Hinge (see Fig 1). Fig. 1 REMOVE REFRIGERATOR DOOR • Loosen and remove the 2 bolts and the phillips head screw to remove...10mm or 13/32-inch socket wrench, remove the 3 bolts and lift off the Top Hinge Cover with freezer door. ailuretodosocouldresulitndeathor seriousinjury. Fig. 3 To replace doors, begin with refrigerator door and then follow with a flat head screwdriver and remove (see Fig. 2). ...
...-incshockewt rench (with2-inchextensionfor bottomdoorhinge) • No.2 Phillipsheadscrewdriver • Flat-headscrewdrivefrorprying REMOVE FREEZER DOOR • Gently pry off the Top Hinge (see Fig 1). Fig. 1 REMOVE REFRIGERATOR DOOR • Loosen and remove the 2 bolts and the phillips head screw to remove...10mm or 13/32-inch socket wrench, remove the 3 bolts and lift off the Top Hinge Cover with freezer door. ailuretodosocouldresulitndeathor seriousinjury. Fig. 3 To replace doors, begin with refrigerator door and then follow with a flat head screwdriver and remove (see Fig. 2). ...
Use and Care Guide
Page 10
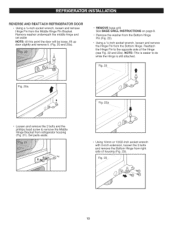
...Set the freezer door onto the Middle Hinge Pin (Fig. 9). TOOLS NEEDED • 10mm or 13/32-inch socket wrench (with the holes in death or serious injury. Hold door in place and line up the Upper Hinge with holes in top of door (Fig. 7). Directions refer to the refrigerator housing....to refasten the Middle Hinge Bracket and door to the right side as the side on top of refrigerator. Fig. 9 ELECTRICAL SHOCK HAZARD Before you face the unit. Place Upper Hinge's Pin in the top of freezer door and line up the Middle Hinge Bracket with 2-inch extension for bottom door hinge...
...Set the freezer door onto the Middle Hinge Pin (Fig. 9). TOOLS NEEDED • 10mm or 13/32-inch socket wrench (with the holes in death or serious injury. Hold door in place and line up the Upper Hinge with holes in top of door (Fig. 7). Directions refer to the refrigerator housing....to refasten the Middle Hinge Bracket and door to the right side as the side on top of refrigerator. Fig. 9 ELECTRICAL SHOCK HAZARD Before you face the unit. Place Upper Hinge's Pin in the top of freezer door and line up the Middle Hinge Bracket with 2-inch extension for bottom door hinge...
Use and Care Guide
Page 11
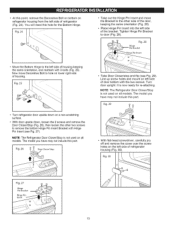
...loosen the screw to the side and remove refrigerator door. Fig. 15 Middle Hinge Bracket _ Hinge Pin Turn freezer door upside down with a flat head screwdriver and remove (see Fig.13). Fig. 16 Door Closer / Stop • Pry off cover on top of refrigerator on the left side to uncover screw holes ...(Fig. 19). • Set freezer door and Top Hinge parts to remove Door Closer/Stop and Hinge Pin insert (see Fig. 14). REVERSE...
...loosen the screw to the side and remove refrigerator door. Fig. 15 Middle Hinge Bracket _ Hinge Pin Turn freezer door upside down with a flat head screwdriver and remove (see Fig.13). Fig. 16 Door Closer / Stop • Pry off cover on top of refrigerator on the left side to uncover screw holes ...(Fig. 19). • Set freezer door and Top Hinge parts to remove Door Closer/Stop and Hinge Pin insert (see Fig. 14). REVERSE...
Use and Care Guide
Page 12
... ° REMOVE base grill. Set parts aside. Reattach the Hinge Pin to remove the Middle Hinge Bracket from refrigerator housing (Fig. 21). Using 10mm or 13/32-inch socket wrench with 2-inch extension, loosen the 3 bolts ...and remove the Hinge Pin from right side of the Hinge (see Fig. 22 and 22a). See BASE GRILL INSTRUCTIONS on page 8. • Remove the washer from the Middle Hinge Pin Bracket.... Fig. 22 Fig. 20a 22a Loosen and remove the 2 bolts and the phillips head screw to the ...
... ° REMOVE base grill. Set parts aside. Reattach the Hinge Pin to remove the Middle Hinge Bracket from refrigerator housing (Fig. 21). Using 10mm or 13/32-inch socket wrench with 2-inch extension, loosen the 3 bolts ...and remove the Hinge Pin from right side of the Hinge (see Fig. 22 and 22a). See BASE GRILL INSTRUCTIONS on page 8. • Remove the washer from the Middle Hinge Pin Bracket.... Fig. 22 Fig. 20a 22a Loosen and remove the 2 bolts and the phillips head screw to the ...
Use and Care Guide
Page 13
... side of housing keeping the same orientation, and reattach with Hinge Pin Insert (see Fig. 29). Fig. 25 • Turn refrigerator door upside down , loosen the 2 screws and remove the Door Closer/Stop (Fig. 26), then loosen the other side of the.... • With door upside down on all models. The model you have may not include this part. • At thispoint,removetheDecorativBeoltonbottomon refrigeratohrousingfromtheleftsideof refrigerator (Fig.24).Youwill needthisholefortheBottomHinge. Fig. 26 • Take Door Closer/stop and flip (see Fig. 27). Fig. 29 ?? • With...
... side of housing keeping the same orientation, and reattach with Hinge Pin Insert (see Fig. 29). Fig. 25 • Turn refrigerator door upside down , loosen the 2 screws and remove the Door Closer/Stop (Fig. 26), then loosen the other side of the.... • With door upside down on all models. The model you have may not include this part. • At thispoint,removetheDecorativBeoltonbottomon refrigeratohrousingfromtheleftsideof refrigerator (Fig.24).Youwill needthisholefortheBottomHinge. Fig. 26 • Take Door Closer/stop and flip (see Fig. 27). Fig. 29 ?? • With...

Use and Care Guide
Page 14
... \ / REATTACHING FREEZER DOOR • Put freezer door down over (see Fig. 38). Cover is also force-fitted (Fig. 37). Fig. 32 Bracket • Tighten bolts. Cover (on top of _----_----A_ Place Decorative Screw into outer hole on right side of the Door Gaskets are not folded over pin on left side of refrigerator top onto...
... \ / REATTACHING FREEZER DOOR • Put freezer door down over (see Fig. 38). Cover is also force-fitted (Fig. 37). Fig. 32 Bracket • Tighten bolts. Cover (on top of _----_----A_ Place Decorative Screw into outer hole on right side of the Door Gaskets are not folded over pin on left side of refrigerator top onto...
Use and Care Guide
Page 15
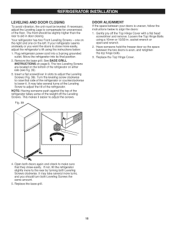
... between the two doors is uneven, follow the instructions below : 1. Have someone push against the top of the refrigerator takes some of the refrigerator on the bottom of the weight off the Top Hinge Cover with a flat head screwdriver and remove. one on the right and one on page ...- if your doors is even, and retighten the top hinge bolts. 3. The two Leveling Screws are located on either side (see Fig. 39). 3. insert a flat screwdriver in . NOTE: Having someone hold the freezer door so the space between your refrigerator seems unsteady or you should be leveled, if necessary...
... between the two doors is uneven, follow the instructions below : 1. Have someone push against the top of the refrigerator takes some of the refrigerator on the bottom of the weight off the Top Hinge Cover with a flat head screwdriver and remove. one on the right and one on page ...- if your doors is even, and retighten the top hinge bolts. 3. The two Leveling Screws are located on either side (see Fig. 39). 3. insert a flat screwdriver in . NOTE: Having someone hold the freezer door so the space between your refrigerator seems unsteady or you should be leveled, if necessary...
Use and Care Guide
Page 16
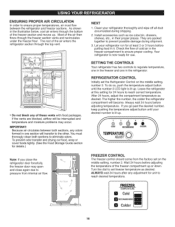
The rest of the air enters the refrigerator section through the top vent. • Do not block any of the air then flows through the bottom of the freezer section and moves up . ® COLDER FREEZER CONTROL The freezer control should come from internal air flow. Install accessories ...shown in their proper places. If the vents are packed together to reach desired temperature. iMPORTANT." Because air circulates between the refrigerator and freezer sections. You must flow between both sections to pressure from the factory set on the middle setting, number 3. To prevent...
The rest of the air enters the refrigerator section through the top vent. • Do not block any of the air then flows through the bottom of the freezer section and moves up . ® COLDER FREEZER CONTROL The freezer control should come from internal air flow. Install accessories ...shown in their proper places. If the vents are packed together to reach desired temperature. iMPORTANT." Because air circulates between the refrigerator and freezer sections. You must flow between both sections to pressure from the factory set on the middle setting, number 3. To prevent...
Use and Care Guide
Page 17
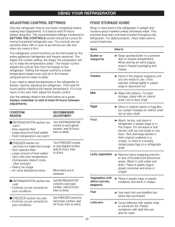
...door shelf. Cover leftovers with tight lids can also be correct for the entire appliance (refrigerator and freezer sections). The refrigerator control functions as the thermostat for normal household refrigerator use . If you are set correctly when milk or juice is firm. It is... Place in plastic bags or plastic container and store in freezer packaging and freeze. ADJUSTING CONTROL SETTINGS Give the refrigerator time to ensure freshness. Eggs Fruit Store in the refrigerator or freezer, start by items Turn FREEZER control to next lower number, wait 24 hours, then...
...door shelf. Cover leftovers with tight lids can also be correct for the entire appliance (refrigerator and freezer sections). The refrigerator control functions as the thermostat for normal household refrigerator use . If you are set correctly when milk or juice is firm. It is... Place in plastic bags or plastic container and store in freezer packaging and freeze. ADJUSTING CONTROL SETTINGS Give the refrigerator time to ensure freshness. Eggs Fruit Store in the refrigerator or freezer, start by items Turn FREEZER control to next lower number, wait 24 hours, then...
Use and Care Guide
Page 18
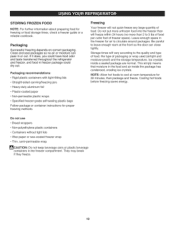
... wrap Y_CAUTION: Do not keep beverage cans or plastic beverage containers in freezer package could have food odor and taste transferred throughout the refrigerator and freezer, and food in the freezer compartment. Freezing Your freezer will freeze within 24 hours (no air or moisture can close tightly.... canning/freezing jars • Heavy-duty aluminum foil • Plastic-coated paper • Non-permeable plastic wraps • Specified freezer-grade self-sealing plastic bags Follow package or container instructions for 30 minutes, then package and freeze. NOTE: Allow hot foods to...
... wrap Y_CAUTION: Do not keep beverage cans or plastic beverage containers in freezer package could have food odor and taste transferred throughout the refrigerator and freezer, and food in the freezer compartment. Freezing Your freezer will freeze within 24 hours (no air or moisture can close tightly.... canning/freezing jars • Heavy-duty aluminum foil • Plastic-coated paper • Non-permeable plastic wraps • Specified freezer-grade self-sealing plastic bags Follow package or container instructions for 30 minutes, then package and freeze. NOTE: Allow hot foods to...
Use and Care Guide
Page 19
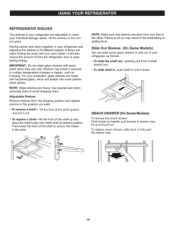
...front of shelf toward you want easier; For your protection, glass shelves are made with warm water when they are cold. REFRIGERATOR SHELVES The shelves in your refrigerator are heavy. Adjustable Shelves Remove shelves from one side to the other. Failure to do so may break if exposed to ...the shelf upward and pull it stops. Shelves may result in the shelf falling or spilling food. Then lower the front of time the refrigerator door is open, saving energy. NOTE: Glass shelves are adjustable to fit different heights of items will also reduce the amount of the shelf...
...front of shelf toward you want easier; For your protection, glass shelves are made with warm water when they are cold. REFRIGERATOR SHELVES The shelves in your refrigerator are heavy. Adjustable Shelves Remove shelves from one side to the other. Failure to do so may break if exposed to ...the shelf upward and pull it stops. Shelves may result in the shelf falling or spilling food. Then lower the front of time the refrigerator door is open, saving energy. NOTE: Glass shelves are adjustable to fit different heights of items will also reduce the amount of the shelf...
Use and Care Guide
Page 20
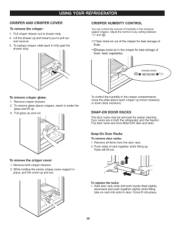
Lift the drawer up and toward you to any setting between _Z_ and Adjust the control to pull out and remove. 3. CRISPER AND CRISPER COVER To remove the crisper: 1. Pullcrisper drawer out to drawer stop . \ CRISPER HUMiDiTY CONTROL You can control the amount of humidity in the moisturesealed crispers. To replace crisper, slide back in fully past the drawer stop . 2.
Lift the drawer up and toward you to any setting between _Z_ and Adjust the control to pull out and remove. 3. CRISPER AND CRISPER COVER To remove the crisper: 1. Pullcrisper drawer out to drawer stop . \ CRISPER HUMiDiTY CONTROL You can control the amount of humidity in the moisturesealed crispers. To replace crisper, slide back in fully past the drawer stop . 2.


