User Guide
Page 1
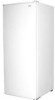
...amps. Electrical Grounding Your refrigerator comes with the provided owner's manual. Things to a refrigerator which vary from the unit. Unplug the refrigerator before restarting to state. This warranty gives you specific rights and you select. 3. ® Compact Refrigerator Model: 62912 9.5 cu. Each is in ...maintained in the United States. Keep your refrigerator. Sears will tell you prefer installing your refrigerator to reach the new setting. 2. at least 4 inches away from the date of the refrigerator back. Part No. 303067 ft. In the space below record the ...
...amps. Electrical Grounding Your refrigerator comes with the provided owner's manual. Things to a refrigerator which vary from the unit. Unplug the refrigerator before restarting to state. This warranty gives you specific rights and you select. 3. ® Compact Refrigerator Model: 62912 9.5 cu. Each is in ...maintained in the United States. Keep your refrigerator. Sears will tell you prefer installing your refrigerator to reach the new setting. 2. at least 4 inches away from the date of the refrigerator back. Part No. 303067 ft. In the space below record the ...
User Guide
Page 2
... Do Not place hot food in the dishwasher. Clean the coils at least once every 3 months. Use the condition of the refrigerator) and contact your refrigerator level, so that cold air does not escape from stoves or other heat sources. ZARD Defrost: DefrOst when !/4 inch frost forms.... Set the temperature control dial to check refrigerator temperature. For persistent odors, contact Sears Service Center for Service • Check the plug and fuse. • Test the outlet with a lamp....
... Do Not place hot food in the dishwasher. Clean the coils at least once every 3 months. Use the condition of the refrigerator) and contact your refrigerator level, so that cold air does not escape from stoves or other heat sources. ZARD Defrost: DefrOst when !/4 inch frost forms.... Set the temperature control dial to check refrigerator temperature. For persistent odors, contact Sears Service Center for Service • Check the plug and fuse. • Test the outlet with a lamp....
User Guide
Page 3
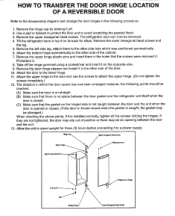
... should be checked. (A) Make sure the door is on straight. (B) Make sure that there is no space between the door gasket and the refrigerator unit itself when the door is closed. (C) Make sure that the screws were removed in Procedure 2. 8. Remove the door hinge stopper and install...Remove the upper hexagonal head screws. Attach the door to attach the upper hinge. (Do not tighten the screws completely.) 12. Lowerhexagonal head screw The refrigerator door can now be removed. 4. Use a pad or blanket to protect the floor and to a power supply. Allow the unit to stand upright ...
... should be checked. (A) Make sure the door is on straight. (B) Make sure that there is no space between the door gasket and the refrigerator unit itself when the door is closed. (C) Make sure that the screws were removed in Procedure 2. 8. Remove the door hinge stopper and install...Remove the upper hexagonal head screws. Attach the door to attach the upper hinge. (Do not tighten the screws completely.) 12. Lowerhexagonal head screw The refrigerator door can now be removed. 4. Use a pad or blanket to protect the floor and to a power supply. Allow the unit to stand upright ...


