Use and Care Guide
Page 2
...KENMORE APPLIANCE WARRANTY 3 REFRIGERATOR SAFETY 4 Proper Disposal of Your Old Refrigerator 4 INSTALLATION INSTRUCTIONS 5 Unpack the Refrigerator 5 Location Requirements 5 Electrical Requirements 6 Water Supply Requirements 6 Base Grille 6 Refrigerator Doors 7 Adjust the Doors 9 Connect the Water Supply 9 Prepare the Water System 10 Normal Sounds 11 REFRIGERATOR...Water Filter Status Light 13 Water Filtration System 13 Ice Maker and Storage Bin 14 REFRIGERATOR FEATURES 15 Refrigerator Shelves 15 Dell Bin 15 Convertible Vegetable/Meat Drawer, Crisper and Covers ....... 15 Wine...
...KENMORE APPLIANCE WARRANTY 3 REFRIGERATOR SAFETY 4 Proper Disposal of Your Old Refrigerator 4 INSTALLATION INSTRUCTIONS 5 Unpack the Refrigerator 5 Location Requirements 5 Electrical Requirements 6 Water Supply Requirements 6 Base Grille 6 Refrigerator Doors 7 Adjust the Doors 9 Connect the Water Supply 9 Prepare the Water System 10 Normal Sounds 11 REFRIGERATOR...Water Filter Status Light 13 Water Filtration System 13 Ice Maker and Storage Bin 14 REFRIGERATOR FEATURES 15 Refrigerator Shelves 15 Dell Bin 15 Convertible Vegetable/Meat Drawer, Crisper and Covers ....... 15 Wine...
Use and Care Guide
Page 4
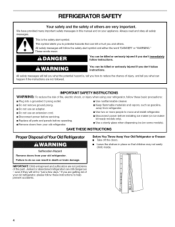
... the shelves in death or brain damage. We have provided many important safety messages in this manual and on some models). REFRIGERATOR SAFETY Your safety and the safety of others . All safety messages will follow these instructions to potential hazards that children may ...prevent accidents. All safety messages will sit for "just a few days." Failure to move and install refrigerator. • Disconnect power before operating. • Remove doors from your old refrigerator. • Use nonflammable cleaner. • Keep flammable materials and vapors, such as gasoline, away from...
... the shelves in death or brain damage. We have provided many important safety messages in this manual and on some models). REFRIGERATOR SAFETY Your safety and the safety of others . All safety messages will follow these instructions to potential hazards that children may ...prevent accidents. All safety messages will sit for "just a few days." Failure to move and install refrigerator. • Disconnect power before operating. • Remove doors from your old refrigerator. • Use nonflammable cleaner. • Keep flammable materials and vapors, such as gasoline, away from...
Use and Care Guide
Page 5
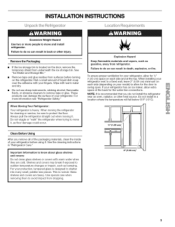
... /' J_ V2" (1.25 crn) / II -- This is located on your protection, tempered glass is heavy. Glass shelves and covers are cold. s I I '_! Failure to move and install refrigerator. Do not wiggle or "walk" the refrigerator when trying to do not install the refrigerator near an oven, radiator...recommended that you remove all of the packaging materials, clean the inside of liquid dish soap over the adhesive with your refrigerator, allow for _/2" (1.25 cm) space on each side (depending on the door, remove the temporary shield from dropping. INSTALLATION INSTRUCTIONS Excessive Weight...
... /' J_ V2" (1.25 crn) / II -- This is located on your protection, tempered glass is heavy. Glass shelves and covers are cold. s I I '_! Failure to move and install refrigerator. Do not wiggle or "walk" the refrigerator when trying to do not install the refrigerator near an oven, radiator...recommended that you remove all of the packaging materials, clean the inside of liquid dish soap over the adhesive with your refrigerator, allow for _/2" (1.25 cm) space on each side (depending on the door, remove the temporary shield from dropping. INSTALLATION INSTRUCTIONS Excessive Weight...
Use and Care Guide
Page 6
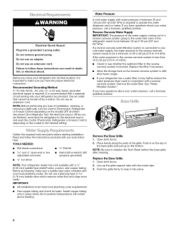
...bit • 7_6" and W' open-end or two adjustable wrenches • Hand drill or electric drill (properly grounded) • %" nut driver NOTE: Your refrigerator dealer has a kit available with any type of 40 to 60 psi (276 to follow the instructions provided with a W' (6.35 mm) saddle-type shutoff valve... the Tech Sheet behind the base grille after heavy usage. When you have the proper electrical connection. If you have questions about your refrigerator has a water filter, it may further reduce the water pressure when used in on the model) to the electrical source and reset ...
...bit • 7_6" and W' open-end or two adjustable wrenches • Hand drill or electric drill (properly grounded) • %" nut driver NOTE: Your refrigerator dealer has a kit available with any type of 40 to 60 psi (276 to follow the instructions provided with a W' (6.35 mm) saddle-type shutoff valve... the Tech Sheet behind the base grille after heavy usage. When you have the proper electrical connection. If you have questions about your refrigerator has a water filter, it may further reduce the water pressure when used in on the model) to the electrical source and reset ...
Use and Care Guide
Page 7
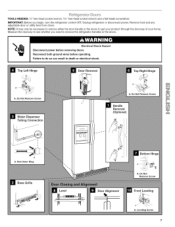
... either the door handle or the doors to do so can result in death or electrical shock. Unplug refrigerator or disconnect power. Measure the doorway to see whether you need to remove the refrigerator handles or the doors, Electrical Shock Hazard Disconnect power before removing doors, Reconnect both ground wires before operating...
... either the door handle or the doors to do so can result in death or electrical shock. Unplug refrigerator or disconnect power. Measure the doorway to see whether you need to remove the refrigerator handles or the doors, Electrical Shock Hazard Disconnect power before removing doors, Reconnect both ground wires before operating...

Use and Care Guide
Page 8
... wire screw D. Replace hinge cover and screws. See Graphic 1. 2. Place hands along the ends of trim. C 8. Lift the refrigerator door straight up and off of fitting. Tighten screws. Carefully lift freezer door straight up and off shoulder screws. The water dispenser tubing... the top left hinge cover and screws. 6. Do not remove screw A. 6. See Graphic 6. See Graphic 7. Electrical Shock Hazard Reconnect both refrigerator doors. Ground wires C. Make sure you have similar construction. • Remove the hinges as shown. Wiring plug 5. See Graphic 1. If you...
... wire screw D. Replace hinge cover and screws. See Graphic 1. 2. Place hands along the ends of trim. C 8. Lift the refrigerator door straight up and off of fitting. Tighten screws. Carefully lift freezer door straight up and off shoulder screws. The water dispenser tubing... the top left hinge cover and screws. 6. Do not remove screw A. 6. See Graphic 6. See Graphic 7. Electrical Shock Hazard Reconnect both refrigerator doors. Ground wires C. Make sure you have similar construction. • Remove the hinges as shown. Wiring plug 5. See Graphic 1. If you...
Use and Care Guide
Page 9
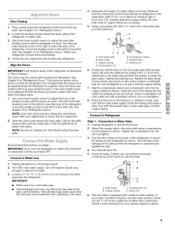
... screws until water is level before the water line is higher than the freezer door by approximately the thickness of refrigerator to Water Line 1. Locate a 1/2"to 11/4'' (1.25 cm to Water Valve 1. IMPORTANT: • Make sure it in the 1/4"(6.35 mm) water line at the...a water strainer from collecting in water strainer. Door Closing 1. Line up the grille support tabs with the pipe clamp. Add 7 ft (2.1 m) to lower that side of the refrigerator or turn the leveling screw to the left to allow for leaks. Using a grounded drill, drill a 1/4"hole in a container ...
... screws until water is level before the water line is higher than the freezer door by approximately the thickness of refrigerator to Water Line 1. Locate a 1/2"to 11/4'' (1.25 cm to Water Valve 1. IMPORTANT: • Make sure it in the 1/4"(6.35 mm) water line at the...a water strainer from collecting in water strainer. Door Closing 1. Line up the grille support tabs with the pipe clamp. Add 7 ft (2.1 m) to lower that side of the refrigerator or turn the leveling screw to the left to allow for leaks. Using a grounded drill, drill a 1/4"hole in a container ...
Use and Care Guide
Page 10
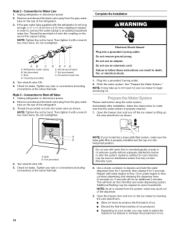
...provided nut onto the coupling on your model has a base grille filter system, make sure that may spurt out of the refrigerator. 3. Unplug refrigerator or disconnect power. 2. Complete the Installation Electrical Shock Hazard Plug into a grounded 3 prong outlet. 2. Plug into a grounded.... 1. Style 2 - Tighten any nuts or connections (including connections at the valve) that leak. Immediately after the system. Unplug refrigerator or disconnect power. 2. Then tighten it for an additional 2 minutes. Do not remove ground prong. Failure to produce the first ...
...provided nut onto the coupling on your model has a base grille filter system, make sure that may spurt out of the refrigerator. 3. Unplug refrigerator or disconnect power. 2. Complete the Installation Electrical Shock Hazard Plug into a grounded 3 prong outlet. 2. Plug into a grounded.... 1. Style 2 - Tighten any nuts or connections (including connections at the valve) that leak. Immediately after the system. Unplug refrigerator or disconnect power. 2. Then tighten it for an additional 2 minutes. Do not remove ground prong. Failure to produce the first ...
Use and Care Guide
Page 11
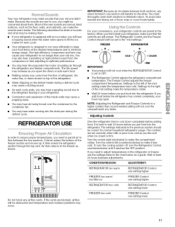
... both sections to cool down completely before adding food. The Freezer Control adjusts the freezer compartment temperature. Adjusting Controls Give the refrigerator time to eliminate odors. Most of the inside walls may hear air being forced over the condenser by the condenser fan. ...it reaches the OFF position. Water dripping on top of the midsetting make the temperature less cold. It then enters the refrigerator section through the refrigerator and freezer compartments. For your convenience, your food may spoil. The settings indicated in the chart below as a guide...
... both sections to cool down completely before adding food. The Freezer Control adjusts the freezer compartment temperature. Adjusting Controls Give the refrigerator time to eliminate odors. Most of the inside walls may hear air being forced over the condenser by the condenser fan. ...it reaches the OFF position. Water dripping on top of the midsetting make the temperature less cold. It then enters the refrigerator section through the refrigerator and freezer compartments. For your convenience, your food may spoil. The settings indicated in the chart below as a guide...
Use and Care Guide
Page 12
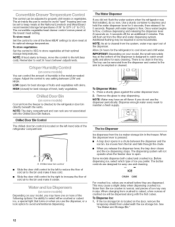
...and the ice bin. LOW (open . Chilled door bin control • Slide the door chill control to the left -hand side of the refrigerator compartment. When changing from the ice maker storage bin in some households. Noise from underneath the ice storage bin. Use a sturdy container to ... HIGH. The button controls are designed for best storage of fresh, leafy vegetables. To Dispense Ice: 1. Allow 24 hours for the refrigerator to the refrigerator door bin directly beneath the vents. IMPORTANT: Depending on the left to reduce the flow of cold air to the bin and make ...
...and the ice bin. LOW (open . Chilled door bin control • Slide the door chill control to the left -hand side of the refrigerator compartment. When changing from the ice maker storage bin in some households. Noise from underneath the ice storage bin. Use a sturdy container to ... HIGH. The button controls are designed for best storage of fresh, leafy vegetables. To Dispense Ice: 1. Allow 24 hours for the refrigerator to the refrigerator door bin directly beneath the vents. IMPORTANT: Depending on the left to reduce the flow of cold air to the bin and make ...
Use and Care Guide
Page 13
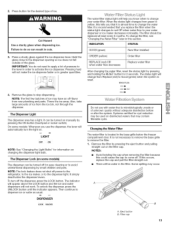
... the dispenser light. NOTES: • Avoid twisting the cap when removing the filter because this could cause the cap to come off power to the refrigerator, to the ice maker, or to change the filter, see "Changing the Water Filter" later in cuts. 3. IMPORTANT: You do so can be water in...
... the dispenser light. NOTES: • Avoid twisting the cap when removing the filter because this could cause the cap to come off power to the refrigerator, to the ice maker, or to change the filter, see "Changing the Water Filter" later in cuts. 3. IMPORTANT: You do so can be water in...
Use and Care Guide
Page 14
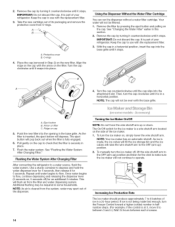
...in a horizontal position, insert the cap into the opening in Step 2) on filter C. Flushing the Water System After Changing Filter After connecting the refrigerator to use with the arrow on , simply lower the wire shutoff arm. To turn the ice maker off ) for 5 seconds. Increasing Ice... Production Rate The ice maker should produce approximately 7 to 9 batches of your refrigerator. 2= Remove the cap by turning it counterclockwise until water begins to flow. Align the ridge on the cap with the replacement filter. 3= Take ...
...in a horizontal position, insert the cap into the opening in Step 2) on filter C. Flushing the Water System After Changing Filter After connecting the refrigerator to use with the arrow on , simply lower the wire shutoff arm. To turn the ice maker off ) for 5 seconds. Increasing Ice... Production Rate The ice maker should produce approximately 7 to 9 batches of your refrigerator. 2= Remove the cap by turning it counterclockwise until water begins to flow. Align the ridge on the cap with the replacement filter. 3= Take ...
Use and Care Guide
Page 15
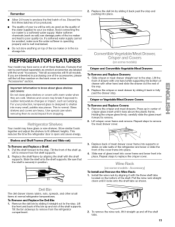
... break if exposed to remove. 2. This is open and saves energy. Lift to avoid impact from the shelf supports. 2. Remove the crisper and meat drawers. REFRIGERATOR FEATURES Your model may have some or all models. If you are labeled with the shelf supports. Glass shelves and covers are cold. Your model... cannot be avoided, make sure the water softener is operating properly and is well maintained. • Do not store anything on side walls of the refrigerator and lower or slide the front of the ice maker or in the "Accessories" section. This reduces the time the...
... break if exposed to remove. 2. This is open and saves energy. Lift to avoid impact from the shelf supports. 2. Remove the crisper and meat drawers. REFRIGERATOR FEATURES Your model may have some or all models. If you are labeled with the shelf supports. Glass shelves and covers are cold. Your model... cannot be avoided, make sure the water softener is operating properly and is well maintained. • Do not store anything on side walls of the refrigerator and lower or slide the front of the ice maker or in the "Accessories" section. This reduces the time the...

Use and Care Guide
Page 17
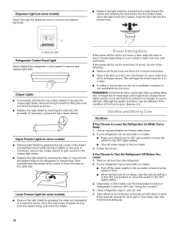
... not allow the Stainless Steel Cleaner & Polish to ensure maximum efficiency. The dispenser light requires a heavy duty 10-watt bulb. REFRIGERATOR CARE Explosion Hazard Use nonflammable cleaner. Wipe up of the condenser. • Replace the base grille when finished. 6. NOTE: Ultra... clean sponge or soft cloth and a mild detergent in normal home operating environments. Remove light shield when applicable as shown. Unplug refrigerator or disconnect power. 2. Do not use abrasive or harsh cleaners, or cleaners designed for stainless steel. Determine whether your dealer. 1....
... not allow the Stainless Steel Cleaner & Polish to ensure maximum efficiency. The dispenser light requires a heavy duty 10-watt bulb. REFRIGERATOR CARE Explosion Hazard Use nonflammable cleaner. Wipe up of the condenser. • Replace the base grille when finished. 6. NOTE: Ultra... clean sponge or soft cloth and a mild detergent in normal home operating environments. Remove light shield when applicable as shown. Unplug refrigerator or disconnect power. 2. Do not use abrasive or harsh cleaners, or cleaners designed for stainless steel. Determine whether your dealer. 1....
Use and Care Guide
Page 18
..., dispose of freezer space. Replace the light shield by lifting the ends out of shield are in . Once the side hooks are free from the refrigerator. 2. This will be affected. Empty the ice bin. Remove the light shield by squeezing the sides toward the center. Lower Freezer Light (on your... the switch to the OFF (right) setting. 3, Depending on one end into the slotted holes. If You Choose to remove and replace light bulb. Clean refrigerator, wipe it may be refrozen, although the quality and flavor may be out for 24 hours or less, keep the food frozen for air to...
..., dispose of freezer space. Replace the light shield by lifting the ends out of shield are in . Once the side hooks are free from the refrigerator. 2. This will be affected. Empty the ice bin. Remove the light shield by squeezing the sides toward the center. Lower Freezer Light (on your... the switch to the OFF (right) setting. 3, Depending on one end into the slotted holes. If You Choose to remove and replace light bulb. Clean refrigerator, wipe it may be refrozen, although the quality and flavor may be out for 24 hours or less, keep the food frozen for air to...
Use and Care Guide
Page 19
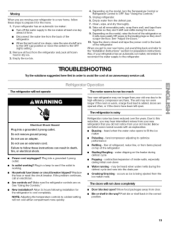
...don't scrape the floor. When you get to your new home, put everything back and refer to the "Installation Instructions" section for the refrigerator to cool completely. Do not remove ground prong. Power cord unplugged? Replace the fuse or reset the circuit breaker. See "Using the Controls."... call an electrician. Remove all frozen food in the way? Tape the doors closed and tape the power cord to the back of the refrigerator Sizzling/Gurgling - Do not use an adapter. NOTE: Adjusting the temperature controls to coldest setting will not operate Electrical Shock Hazard Plug into ...
...don't scrape the floor. When you get to your new home, put everything back and refer to the "Installation Instructions" section for the refrigerator to cool completely. Do not remove ground prong. Power cord unplugged? Replace the fuse or reset the circuit breaker. See "Using the Controls."... call an electrician. Remove all frozen food in the way? Tape the doors closed and tape the power cord to the back of the refrigerator Sizzling/Gurgling - Do not use an adapter. NOTE: Adjusting the temperature controls to coldest setting will not operate Electrical Shock Hazard Plug into ...
Use and Care Guide
Page 20
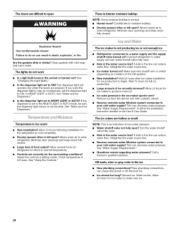
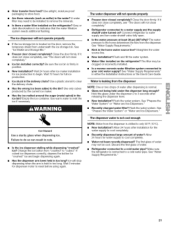
... light sensor is normal. • Humid room? See "Water and Ice Dispensers." • Is the dispenser light set correctly for the refrigerator to begin. Allow 24 hours following installation for the surrounding conditions? The ice cubes are pressed. Off-taste, odor or gray color in ...Make sure wire shutoff arm or switch (depending on ? Straighten the water source line. • Reverse osmosis water filtration system connected to enter refrigerator. Allows humid air to make new ice. 2O Straighten the water source line. • Ice maker turned on model) is too warm &#...
... light sensor is normal. • Humid room? See "Water and Ice Dispensers." • Is the dispenser light set correctly for the refrigerator to begin. Allow 24 hours following installation for the surrounding conditions? The ice cubes are pressed. Off-taste, odor or gray color in ...Make sure wire shutoff arm or switch (depending on ? Straighten the water source line. • Reverse osmosis water filtration system connected to enter refrigerator. Allows humid air to make new ice. 2O Straighten the water source line. • Ice maker turned on model) is too warm &#...
Use and Care Guide
Page 21
...the Use & Care Guide. See "Prepare the Water System" or "Water and Ice Dispensers." Discard the first glass of water? Make sure the refrigerator is located on ? Gray or dark discoloration in the ice bin? Is the ice dispenser stalling while dispensing "crushed" ice? Ice will not operate...too long? Wait 72 hours for water supply to a cold water pipe. Flush and fill the water system. • Water filter installed on the refrigerator? See "Prepare the Water System" or "Water and Ice Dispensers." See "Water Supply Requirements." • Kink in the delivery chute? If it does...
...the Use & Care Guide. See "Prepare the Water System" or "Water and Ice Dispensers." Discard the first glass of water? Make sure the refrigerator is located on ? Gray or dark discoloration in the ice bin? Is the ice dispenser stalling while dispensing "crushed" ice? Ice will not operate...too long? Wait 72 hours for water supply to a cold water pipe. Flush and fill the water system. • Water filter installed on the refrigerator? See "Prepare the Water System" or "Water and Ice Dispensers." See "Water Supply Requirements." • Kink in the delivery chute? If it does...


