
Operating Instructions
Page 1
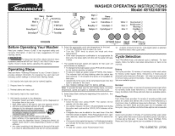
...be righted. ,, A forgotten item can be added to the detergent compartment. Select Delay Start to ensure best washing results. 1. The washer will not operate with every cycle. 8. Remove items when cycle ends. Cycle Selection Turn PROGRAM knob until the indicator for factory settings... Select the appropriate cycle and temperature for cottons and blends with this cycle. Perm Press Perm Press Cycle provides 10 minutes of a high efficiency detergent to the wash drum if the Add Garment indicator is selected. Heavy Soil/Stain and Extra Rinse options can be laundered quickly...
...be righted. ,, A forgotten item can be added to the detergent compartment. Select Delay Start to ensure best washing results. 1. The washer will not operate with every cycle. 8. Remove items when cycle ends. Cycle Selection Turn PROGRAM knob until the indicator for factory settings... Select the appropriate cycle and temperature for cottons and blends with this cycle. Perm Press Perm Press Cycle provides 10 minutes of a high efficiency detergent to the wash drum if the Add Garment indicator is selected. Heavy Soil/Stain and Extra Rinse options can be laundered quickly...
Operating Instructions
Page 2
...sound at the same time and hold OPTIONS and Select for your delicate items, a hot water wash is much faster than High Speed in the washer. Note: Wusaisnhgincghlowrionoel gbalermacehntscanlabresleudlt "inDrpyerCmlaenaenntOndlya"maogr e. Handwash Select the Handwash Cycle for 10 minutes. Add half the detergent dose and a... 4, 8 or 12 hours. (Control Lock) To avoid having someone accidentally start or stop the washer, press OPTIONS and Select at the end of wash load. For example, High Speed in the Normal cycle is not available. The load will vary from the body. The...
...sound at the same time and hold OPTIONS and Select for your delicate items, a hot water wash is much faster than High Speed in the washer. Note: Wusaisnhgincghlowrionoel gbalermacehntscanlabresleudlt "inDrpyerCmlaenaenntOndlya"maogr e. Handwash Select the Handwash Cycle for 10 minutes. Add half the detergent dose and a... 4, 8 or 12 hours. (Control Lock) To avoid having someone accidentally start or stop the washer, press OPTIONS and Select at the end of wash load. For example, High Speed in the Normal cycle is not available. The load will vary from the body. The...

Operating Instructions
Page 3
Estimated Cycle Duration ** Temperatures Cold/Cold Warm/Cold Warm/Warm Hot/Cold Speed High Spin Medium Spin Low Spin Hang Dry No Spin Options Cycle Signal Heavy Normal Perm Press Quick Delicate Wool Handwash Touch Up Soak Sport Drain ... settings ** Estimated cycle duration is based on factory settings and does not include water fill times, out-of-balance or oversudsing corrections. PN 134906700 (0706) WASHER SETTINGS CHART The following chart shows the temperatures, spin speeds and options available for each cycle.
Estimated Cycle Duration ** Temperatures Cold/Cold Warm/Cold Warm/Warm Hot/Cold Speed High Spin Medium Spin Low Spin Hang Dry No Spin Options Cycle Signal Heavy Normal Perm Press Quick Delicate Wool Handwash Touch Up Soak Sport Drain ... settings ** Estimated cycle duration is based on factory settings and does not include water fill times, out-of-balance or oversudsing corrections. PN 134906700 (0706) WASHER SETTINGS CHART The following chart shows the temperatures, spin speeds and options available for each cycle.

Installation Instructions
Page 1
..., building or area of life. - Contents S UBJECT Pre-lnstallation Requirements Electrical Requirements Grounding Requirements Water Supply Requirements Drain Requirements Rough-In Dimensions Location Of Your Washer Unpacking Installation Replacement Parts PAGE 2 2 2 2 2 3 4 4-5 5-6 6 Installation and service must be performed by a Sears, Roebuck and Co., ...do not use gasoline or other appliance. - WHAT TO DO IF YOU SMELL GAS • Do not try to the washer must conform with local codes and ordinances and the latest edition of this manual must be followed to minimize the risk of ...
..., building or area of life. - Contents S UBJECT Pre-lnstallation Requirements Electrical Requirements Grounding Requirements Water Supply Requirements Drain Requirements Rough-In Dimensions Location Of Your Washer Unpacking Installation Replacement Parts PAGE 2 2 2 2 2 3 4 4-5 5-6 6 Installation and service must be performed by a Sears, Roebuck and Co., ...do not use gasoline or other appliance. - WHAT TO DO IF YOU SMELL GAS • Do not try to the washer must conform with local codes and ordinances and the latest edition of this manual must be followed to minimize the risk of ...
Installation Instructions
Page 2
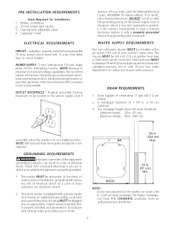
...The faucets MUST be 3/4 inch (1.9 cm) garden hose type so inlet hoses can result in . (229 cm) high standpipe. l II NOTE: Drain hose attached to the washer can advise you are in . (244 cm) Max. Channel-lock adjustable pliers. 4. Carpenter's level. branch circuit ...Installation: I. NOTE: Because of potential inconsistent voltage capabilities, the use hose P/N 134359410, available from an authorized parts distributor. Since your washer is equipped with a properly grounded three prong grounding type receptacle. In situations where a two-slot receptacle is present, it with a ...
...The faucets MUST be 3/4 inch (1.9 cm) garden hose type so inlet hoses can result in . (229 cm) high standpipe. l II NOTE: Drain hose attached to the washer can advise you are in . (244 cm) Max. Channel-lock adjustable pliers. 4. Carpenter's level. branch circuit ...Installation: I. NOTE: Because of potential inconsistent voltage capabilities, the use hose P/N 134359410, available from an authorized parts distributor. Since your washer is equipped with a properly grounded three prong grounding type receptacle. In situations where a two-slot receptacle is present, it with a ...
Installation Instructions
Page 4
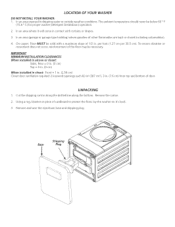
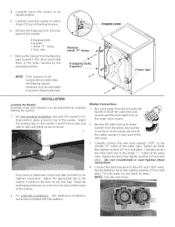
...of 1/2 in. In an area (garage or garage-type building) where gasoline of the floor may be necessary. On carpet. LOCATION OF YOUR WASHER DO NOT INSTALL YOUR WASHER: I in. (2.54 cm) Closet door ventilation required: 2 Iouvered openings each 60 in2(387 cm2), 3 in. (7.6 cm) from top ...the styrofoam base and shipping plug. In an area where it 's back. 3. Floor MUST be below 60 ° F (15.6 ° C) for proper washer (detergent breakdown) operation. 2. Base Shipping Plug Cut the shipping carton along the dotted line along the bottom. Using a rug, blanket or piece of cardboard to...
...of 1/2 in. In an area (garage or garage-type building) where gasoline of the floor may be necessary. On carpet. LOCATION OF YOUR WASHER DO NOT INSTALL YOUR WASHER: I in. (2.54 cm) Closet door ventilation required: 2 Iouvered openings each 60 in2(387 cm2), 3 in. (7.6 cm) from top ...the styrofoam base and shipping plug. In an area where it 's back. 3. Floor MUST be below 60 ° F (15.6 ° C) for proper washer (detergent breakdown) operation. 2. Base Shipping Plug Cut the shipping carton along the dotted line along the bottom. Using a rug, blanket or piece of cardboard to...
Installation Instructions
Page 5
... the holes vacated by the packaging spacers. Do not crossthread or over-tighten connections. NOTE: Use only new hoses. 2. Carefully move the washer to the outside "H" outlet of the water valve. Remove the following from the plastic bag located in the drum of the final location. .... Remove: metal "P" clamp 4 shipping_bbolts, 4 spacers. Washer Connections I metal "P" clamp, 2 hose clips. . Run some water from the literature pack located in the drum and install them in each end of the...
... the holes vacated by the packaging spacers. Do not crossthread or over-tighten connections. NOTE: Use only new hoses. 2. Carefully move the washer to the outside "H" outlet of the water valve. Remove the following from the plastic bag located in the drum of the final location. .... Remove: metal "P" clamp 4 shipping_bbolts, 4 spacers. Washer Connections I metal "P" clamp, 2 hose clips. . Run some water from the literature pack located in the drum and install them in each end of the...
Installation Instructions
Page 6
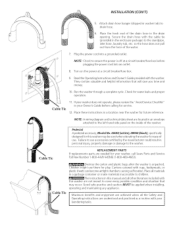
...suffocation. Placethese instructions in the drain opening. Failure to ensure the power is unpacked. Cable Tie Destroy the carton and plastic bags after the washer is off at a circuit breaker/fuse box. 9. Attach drain hose hanger (shipped in the enclosure package) to drain hose. so the ...hose does not pull out from the force of the drain hose in a location near the washer for water leaks and proper operation. iNSTALLATiON (CON'T) 5. Cable Tie REPLACEMENT PARTS If replacements parts are understood and practiced as a routine with...
...suffocation. Placethese instructions in the drain opening. Failure to ensure the power is unpacked. Cable Tie Destroy the carton and plastic bags after the washer is off at a circuit breaker/fuse box. 9. Attach drain hose hanger (shipped in the enclosure package) to drain hose. so the ...hose does not pull out from the force of the drain hose in a location near the washer for water leaks and proper operation. iNSTALLATiON (CON'T) 5. Cable Tie REPLACEMENT PARTS If replacements parts are understood and practiced as a routine with...


