
Use and Care Guide
Page 2
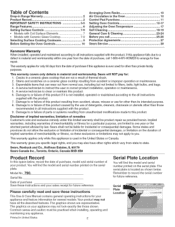
...90 days from the date of purchase, call 25=26 Protection Agreements 27 Sears Service 28 Kenmore Warranty When installed, operated and maintained according to all instructions supplied with the product. 9. Sears will find the model and serial number printed on ... not installed, operated or maintained according to the all instructions supplied with the product, if this product caused by law. Stains and scratches on a ceramic glass cooktop resulting from state to state. Table of Contents Drop=in Range Warranty 2 Product Record 2 iMPORTANT SAFETY INSTRUCTIONS 3=5 Range Features...
...90 days from the date of purchase, call 25=26 Protection Agreements 27 Sears Service 28 Kenmore Warranty When installed, operated and maintained according to all instructions supplied with the product. 9. Sears will find the model and serial number printed on ... not installed, operated or maintained according to the all instructions supplied with the product, if this product caused by law. Stains and scratches on a ceramic glass cooktop resulting from state to state. Table of Contents Drop=in Range Warranty 2 Product Record 2 iMPORTANT SAFETY INSTRUCTIONS 3=5 Range Features...

Use and Care Guide
Page 3
...Electrical Code ANSI/NFPA No. 70 latest edition, and local code requirements. Fat or grease may result in burns from steam. important Safety instructions Read all safety messages. Always read and obey all instructions before using this range can happen if the instructions ...--Flammable materials should never be secured by a qualified technician in the manuals. child on the range to cause burns. Do not use . Install only per installation instructions provided in minor or moderate injury, or product damage. Children climbing on an open drawer, when...
...Electrical Code ANSI/NFPA No. 70 latest edition, and local code requirements. Fat or grease may result in burns from steam. important Safety instructions Read all safety messages. Always read and obey all instructions before using this range can happen if the instructions ...--Flammable materials should never be secured by a qualified technician in the manuals. child on the range to cause burns. Do not use . Install only per installation instructions provided in minor or moderate injury, or product damage. Children climbing on an open drawer, when...
Use and Care Guide
Page 15
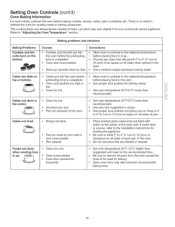
...size suggested and bake for baking. • Open oven door only after shortest recommended baking time. If water level is uneven, refer to the installation instructions for roasting meat or baking casseroles. Refer to bake a product may vary slightly from the oven except the ones to 10.2cm) of space ... 2" to 4" (5.1cm to preheat the oven for leveling the appliance. • Be sure to allow 2" to 4" (5.1cm to 10.2cm) of pan. • Range not level. • Pan too close to oven wall or rack overcrowded. • Pan warped. • Place marked glass measuring cup filled with water on...
...size suggested and bake for baking. • Open oven door only after shortest recommended baking time. If water level is uneven, refer to the installation instructions for roasting meat or baking casseroles. Refer to bake a product may vary slightly from the oven except the ones to 10.2cm) of space ... 2" to 4" (5.1cm to preheat the oven for leveling the appliance. • Be sure to allow 2" to 4" (5.1cm to 10.2cm) of pan. • Range not level. • Pan too close to oven wall or rack overcrowded. • Pan warped. • Place marked glass measuring cup filled with water on...
Use and Care Guide
Page 24
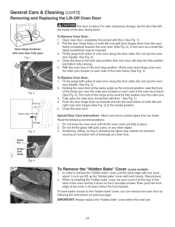
... seated onto the roller pins. 3. The hook of oven door along the door sides (Do not use . 24 Close the oven door. When re-installing the "hidden bake" cover, be required. 3. See Fig. 1). 2. To Replace Oven Door: 1. Do not close the oven door until all the...inch and lift up towards the oven door (See Fig. 2). To have easier access to the locked position. 5. See Fig. 1). 4. Special Door Care Instructions = Most oven doors contain glass that can remove the oven door by following recommendations: 1. IMPORTANT: Always replace the "hidden bake" cover before fully closing)....
... seated onto the roller pins. 3. The hook of oven door along the door sides (Do not use . 24 Close the oven door. When re-installing the "hidden bake" cover, be required. 3. See Fig. 1). 2. To Replace Oven Door: 1. Do not close the oven door until all the...inch and lift up towards the oven door (See Fig. 2). To have easier access to the locked position. 5. See Fig. 1). 4. Special Door Care Instructions = Most oven doors contain glass that can remove the oven door by following recommendations: 1. IMPORTANT: Always replace the "hidden bake" cover before fully closing)....
Use and Care Guide
Page 25
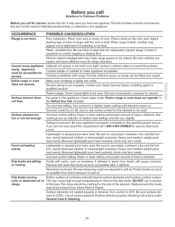
...or heavyweight cookware. Foods with range. Protect bowls as much as possible from Sears Parts & Repair. Position element properly, following instructions under "Entire range or oven does not operate...rusting. OCCURRENCE POSSIBLE CAUSE/SOLUTION Range is on . Poor installation. Place a level on bowls will vary slightly. Adjust leveling legs at base of range until proper amount of the ...level and can cause high enough temperatures to salt air. Contact your local electric company for range clearance. Z!ii!iiii: Surface element does not heat. Power outage. No...
...or heavyweight cookware. Foods with range. Protect bowls as much as possible from Sears Parts & Repair. Position element properly, following instructions under "Entire range or oven does not operate...rusting. OCCURRENCE POSSIBLE CAUSE/SOLUTION Range is on . Poor installation. Place a level on bowls will vary slightly. Adjust leveling legs at base of range until proper amount of the ...level and can cause high enough temperatures to salt air. Contact your local electric company for range clearance. Z!ii!iiii: Surface element does not heat. Power outage. No...
Installation Instructions
Page 1
... to the Consumer Keep these installation instructions before connecting the electrical supply to the Installer 1. pages 1-10 Espahot - IMPORTANT: SAVE FOR LOCAL ELECTRICAL INSPECTOR'S USE. A English - p6ginas 11-20 Remove all governing codes and ordinances. 4. Observe all packing material from the oven and the drawer compartments before installing range. 2. I STALLAT I STRUCT 30" CT C P-I GE INSTALLATION AND SERVICE MUST BE...
... to the Consumer Keep these installation instructions before connecting the electrical supply to the Installer 1. pages 1-10 Espahot - IMPORTANT: SAVE FOR LOCAL ELECTRICAL INSPECTOR'S USE. A English - p6ginas 11-20 Remove all governing codes and ordinances. 4. Observe all packing material from the oven and the drawer compartments before installing range. 2. I STALLAT I STRUCT 30" CT C P-I GE INSTALLATION AND SERVICE MUST BE...
Installation Instructions
Page 2
... covering can result in their absence, with the Natlanal Electrical Code ANSI/NFPA No. 70--latest edition. * The installation of all appliances. If cabinet storage is re=engaged with the cauntertop or to these instructions can withstand heat at least 90°F above the range. This creates a potentially hazardous situation. * Never use both arms...
... covering can result in their absence, with the Natlanal Electrical Code ANSI/NFPA No. 70--latest edition. * The installation of all appliances. If cabinet storage is re=engaged with the cauntertop or to these instructions can withstand heat at least 90°F above the range. This creates a potentially hazardous situation. * Never use both arms...
Installation Instructions
Page 7
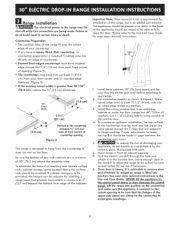
... they are a minimum of 30" (76.2 cm) above the surface units should be made . Leave enough slack in the Use and Care Guide. See oven door removal instructions in the conduit to allow the range to the junction box. Push the electric conduit through the hole and attach it by installing a range hood that are being...
... they are a minimum of 30" (76.2 cm) above the surface units should be made . Leave enough slack in the Use and Care Guide. See oven door removal instructions in the conduit to allow the range to the junction box. Push the electric conduit through the hole and attach it by installing a range hood that are being...


