
Use and Care Guide
Page 2
...purchase. TABLE OF CONTENTS KENMORE APPLIANCE WARRANTY 2 REFRIGERATOR SAFETY 3 Proper Disposal of Your Old Refrigerator 3 INSTALLATION INSTRUCTIONS 4 Unpack the Refrigerator 4 Location Requirements 4 Electrical Requirements 5 Base Grille 5 Refrigerator Doors 6 Adjust the Doors 7 Connect Water Supply 7 Normal Sounds 8 REFRIGERATOR USE 8 Ensuring Proper Air...if this appliance is used for other than its intended purpose. 6. Sears, Roebuck and Co. Model number Serial number Purchase date Save these exclusions or limitations may also have other than those recommended in...
...purchase. TABLE OF CONTENTS KENMORE APPLIANCE WARRANTY 2 REFRIGERATOR SAFETY 3 Proper Disposal of Your Old Refrigerator 3 INSTALLATION INSTRUCTIONS 4 Unpack the Refrigerator 4 Location Requirements 4 Electrical Requirements 5 Base Grille 5 Refrigerator Doors 6 Adjust the Doors 7 Connect Water Supply 7 Normal Sounds 8 REFRIGERATOR USE 8 Ensuring Proper Air...if this appliance is used for other than its intended purpose. 6. Sears, Roebuck and Co. Model number Serial number Purchase date Save these exclusions or limitations may also have other than those recommended in...
Use and Care Guide
Page 3
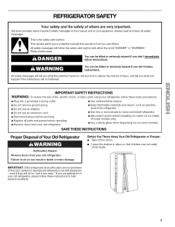
... THESE INSTRUCTIONS Proper Disposal of Your Old Refrigerator Suffocation Hazard Remove doors from refrigerator. • Use two or more people to move and install refrigerator. • Disconnect power before installing ice maker (on ice maker kit ready models only). • Use a sturdy glass when dispensing ice (on your old refrigerator, please follow these basic precautions: •...
... THESE INSTRUCTIONS Proper Disposal of Your Old Refrigerator Suffocation Hazard Remove doors from refrigerator. • Use two or more people to move and install refrigerator. • Disconnect power before installing ice maker (on ice maker kit ready models only). • Use a sturdy glass when dispensing ice (on your old refrigerator, please follow these basic precautions: •...
Use and Care Guide
Page 4
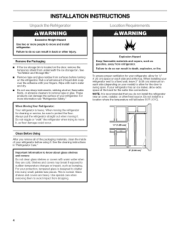
INSTALLATION INSTRUCTIONS LO(,,
INSTALLATION INSTRUCTIONS LO(,,

Use and Care Guide
Page 5
...cannot be provided. Push in death, fire, or electrical shock. Line up on the model) OFF and then disconnect the refrigerator from the electrical source. Do not remove ground prong. Before you move your refrigerator be turned off by a switch. Recommended Grounding Method A 115 Volt, 60 Hz.,.... Push the grille firmly to snap it is important to make sure you are finished, reconnect the refrigerator to the electrical source and reset the control (Thermostat, Refrigerator or Freezer Control depending on the model) to refasten the Tech Sheet behind the base grille after cleaning.
...cannot be provided. Push in death, fire, or electrical shock. Line up on the model) OFF and then disconnect the refrigerator from the electrical source. Do not remove ground prong. Before you move your refrigerator be turned off by a switch. Recommended Grounding Method A 115 Volt, 60 Hz.,.... Push the grille firmly to snap it is important to make sure you are finished, reconnect the refrigerator to the electrical source and reset the control (Thermostat, Refrigerator or Freezer Control depending on the model) to refasten the Tech Sheet behind the base grille after cleaning.
Use and Care Guide
Page 9
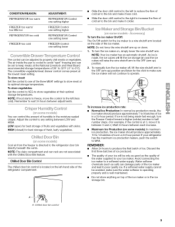
...vegetables: Set the control to VEG to store vegetables at the lowest meat setting. Cu sp@" (.m dty Cont o You can control the amount of humidity in the ice storage bin. Maximum Ice Production (on some models): In maximum ice production, the ice maker should produce approximately 7 to 9 batches ... ice produced. Discard the first three batches of ice. As ice is a wire shutoff arm located on the left-hand side of the refrigerator compartment. • Slide the door chill control to the left (less cold). Avoid connecting the ice maker to poor quality ice. Adjust ...
...vegetables: Set the control to VEG to store vegetables at the lowest meat setting. Cu sp@" (.m dty Cont o You can control the amount of humidity in the ice storage bin. Maximum Ice Production (on some models): In maximum ice production, the ice maker should produce approximately 7 to 9 batches ... ice produced. Discard the first three batches of ice. As ice is a wire shutoff arm located on the left-hand side of the refrigerator compartment. • Slide the door chill control to the left (less cold). Avoid connecting the ice maker to poor quality ice. Adjust ...

Use and Care Guide
Page 10
... shelf. 10 Pull the wine rack straight down until it with the shelf supports. REFRIGERATOR FEATURES Your model may have glass or wire shelves. Shelves and covers may have some or all models. Remove the crisper and meat drawers. Slide rear of drawer with other small items...hand and slide the drawer out the rest of the shelf. Tilt the bin sideways to remove from the refrigerator compartment. 2. Crisper or Vegetable/Meat Drawer Covers Your model may break if exposed to shatter into place. Slide the shelf onto the shelf supports. Lift the front...
... shelf. 10 Pull the wine rack straight down until it with the shelf supports. REFRIGERATOR FEATURES Your model may have glass or wire shelves. Shelves and covers may have some or all models. Remove the crisper and meat drawers. Slide rear of drawer with other small items...hand and slide the drawer out the rest of the shelf. Tilt the bin sideways to remove from the refrigerator compartment. 2. Crisper or Vegetable/Meat Drawer Covers Your model may break if exposed to shatter into place. Slide the shelf onto the shelf supports. Lift the front...
Use and Care Guide
Page 11
.... To remove the left side of these features. Lower the right side of the shelf and insert into the freezer than will fit all models. Features that both sides of freezer space). Firmly snap bracket and rail assembly onto the tabs above the shelf as product accessories are positioned ...and Replace the Rails: 1. Replace the rails by aligning the ends of the way, Style 1 To Remove and Replace the Shelf: 1. DOOR FEATURES Your model may have some or all of these features. Remove basket or bin by lowering it out the rest of the brackets with the word "Accessory...
.... To remove the left side of these features. Lower the right side of the shelf and insert into the freezer than will fit all models. Features that both sides of freezer space). Firmly snap bracket and rail assembly onto the tabs above the shelf as product accessories are positioned ...and Replace the Rails: 1. Replace the rails by aligning the ends of the way, Style 1 To Remove and Replace the Shelf: 1. DOOR FEATURES Your model may have some or all of these features. Remove basket or bin by lowering it out the rest of the brackets with the word "Accessory...

Use and Care Guide
Page 12
...40-watt appliance bulb. All other harsh cleaning tools. Replacement bulbs are available from inside, such as shown. Unplug refrigerator or disconnect power. 2. Dispenser Light (on plastic parts, interior and door liners or gaskets. Replace the bin by lifting it and pulling it ... window sprays, scouring cleansers, flammable fluids, cleaning waxes, concentrated detergents, bleaches or cleansers containing petroleum products on some models) Reach through the dispenser area to ensure maximum efficiency. Do not wax plastic parts. Brushed aluminum: Wash with a mixture of the same size...
...40-watt appliance bulb. All other harsh cleaning tools. Replacement bulbs are available from inside, such as shown. Unplug refrigerator or disconnect power. 2. Dispenser Light (on plastic parts, interior and door liners or gaskets. Replace the bin by lifting it and pulling it ... window sprays, scouring cleansers, flammable fluids, cleaning waxes, concentrated detergents, bleaches or cleansers containing petroleum products on some models) Reach through the dispenser area to ensure maximum efficiency. Do not wax plastic parts. Brushed aluminum: Wash with a mixture of the same size...
Use and Care Guide
Page 13
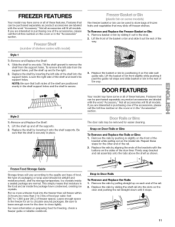
... the power will be pulled from the freezer lining, pull down the shield. Refrigerator Control Panel Light Reach behind the refrigerator control panel to Leave the Refrigerator On While You're Away:. 1. Behind Freezer Basket • Depending on your model, remove the top freezer basket or top freezer basket shelf. Gently rotate the shield...
... the power will be pulled from the freezer lining, pull down the shield. Refrigerator Control Panel Light Reach behind the refrigerator control panel to Leave the Refrigerator On While You're Away:. 1. Behind Freezer Basket • Depending on your model, remove the top freezer basket or top freezer basket shelf. Gently rotate the shield...

Use and Care Guide
Page 14
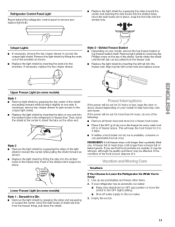
...8226; Turn off the water supply to OFR See "Using the Controls." 5. Depending on the model, turn the Temperature Control or Refrigerator Control to the ice maker at least one day ahead of water lines, or from the refrigerator. 2. Is outlet working . Replace the fuse or reset the circuit breaker. flow of...Is control on top of ice drops, raise the wire shutoff arm to its high-efficiency compressor and fans. If your old model. Take out all food from items placed on ? Make sure the refrigerator control is opened often, or if the door has been left open far enough for the...
...8226; Turn off the water supply to OFR See "Using the Controls." 5. Depending on the model, turn the Temperature Control or Refrigerator Control to the ice maker at least one day ahead of water lines, or from the refrigerator. 2. Is outlet working . Replace the fuse or reset the circuit breaker. flow of...Is control on top of ice drops, raise the wire shutoff arm to its high-efficiency compressor and fans. If your old model. Take out all food from items placed on ? Make sure the refrigerator control is opened often, or if the door has been left open far enough for the...


