
Installation Instructions
Page 1
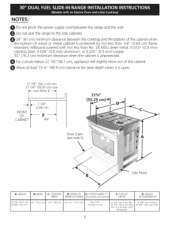
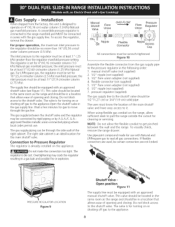
...YOU SMELL GAS: Q Do not try to Clear Space fora 31Y2" (81 cm) Wide Cooktop. 30" Min. (76.2 cm Min. 30" Min. (76.2 18" Min. (45.7 cm) Min. Q Do not touch any appliance. For existing 29" (73.7 cm) cutout width opening, you cannot reach your gas supplier, ...-27 Wiring Diagrams - Follow the gas supplier's instructions. I:.CUTOUT DEPTH G:HEIGHT . pages 28 Q Immediately call the fire department. FRONT OF RANGE (C0untert0p and Cabine! Do not store or use any other flammable vapors and liquids in the vicinity of this booklet. Installation and service must ...
...YOU SMELL GAS: Q Do not try to Clear Space fora 31Y2" (81 cm) Wide Cooktop. 30" Min. (76.2 cm Min. 30" Min. (76.2 18" Min. (45.7 cm) Min. Q Do not touch any appliance. For existing 29" (73.7 cm) cutout width opening, you cannot reach your gas supplier, ...-27 Wiring Diagrams - Follow the gas supplier's instructions. I:.CUTOUT DEPTH G:HEIGHT . pages 28 Q Immediately call the fire department. FRONT OF RANGE (C0untert0p and Cabine! Do not store or use any other flammable vapors and liquids in the vicinity of this booklet. Installation and service must ...
Installation Instructions
Page 2
... !/4" (0.64 cm) flame retardant millboard covered with backguard 36 5/8" (93 crn) Max. 35 5/8" (90.5 crn) Min. CUTOUT WIDTH *** I WIDTH I FRONT OF RANGE I G, COOKTOP J J D; HEIGHT 30" (76,2 cm) 31Y2" (80cm) 28 5/16" (71,9 cm) 30_+1/16" (76,2_+0,15 cm) 21 3/4" (55,2 cm) Min. 22 1/8" (56.... For cutouts below 22 7/8"(58.1 cm), appliance will slightly show out of wood or metal cabinet is protected by not less than No. 28 MSG sheet metal, 0.01 5" (0.4 mm) stainless steel, 0.024" (0.6 mm) aluminum, or 0.020" (0.5 mm) copper. 30" (76.2 cm) minimum clearance when the...
... !/4" (0.64 cm) flame retardant millboard covered with backguard 36 5/8" (93 crn) Max. 35 5/8" (90.5 crn) Min. CUTOUT WIDTH *** I WIDTH I FRONT OF RANGE I G, COOKTOP J J D; HEIGHT 30" (76,2 cm) 31Y2" (80cm) 28 5/16" (71,9 cm) 30_+1/16" (76,2_+0,15 cm) 21 3/4" (55,2 cm) Min. 22 1/8" (56.... For cutouts below 22 7/8"(58.1 cm), appliance will slightly show out of wood or metal cabinet is protected by not less than No. 28 MSG sheet metal, 0.01 5" (0.4 mm) stainless steel, 0.024" (0.6 mm) aluminum, or 0.020" (0.5 mm) copper. 30" (76.2 cm) minimum clearance when the...

Installation Instructions
Page 4
...in the Use and Care Guide, read it does not extend beyond the edge of interest to leave these instructions with the National Fuel Gas Code ANSI Z223.1--1atest edition. Do not use . Wipe up excess spillage. Read all controls to reach over carpeting unless... Code ANSI/NFPA No, 70--latest edition, See Grounding Instructions. • The installation of appliances designed for manufactured (mobile) home installation must be reduced by the range, Before installing the range in the cabinets above room temperature without adequate ventilation can also cause damage to the Consumer Keep...
...in the Use and Care Guide, read it does not extend beyond the edge of interest to leave these instructions with the National Fuel Gas Code ANSI Z223.1--1atest edition. Do not use . Wipe up excess spillage. Read all controls to reach over carpeting unless... Code ANSI/NFPA No, 70--latest edition, See Grounding Instructions. • The installation of appliances designed for manufactured (mobile) home installation must be reduced by the range, Before installing the range in the cabinets above room temperature without adequate ventilation can also cause damage to the Consumer Keep...
Installation Instructions
Page 5
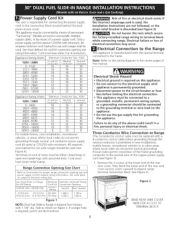
... cord kit rated at 125/250 volts minimum, 40 amperes and marked for grounding the appliance. See chart (below for use with ranges should be either 3 or 4 conductors. Appliance Rating Watts 120V/208V 0-3120 3121-3900 3901-4160 4161-5200 5201-5570 5571-7430 7431...a fire, personal injury or electrical shock. Figure I NOTE: Dual fuel Slide-in other areas where local codes do not permit grounding through the neutral conductor is manufactured with the neutral terminal connected to the electrical supply until appliance is required, punch out the knockout. Note: Refer to ...
... cord kit rated at 125/250 volts minimum, 40 amperes and marked for grounding the appliance. See chart (below for use with ranges should be either 3 or 4 conductors. Appliance Rating Watts 120V/208V 0-3120 3121-3900 3901-4160 4161-5200 5201-5570 5571-7430 7431...a fire, personal injury or electrical shock. Figure I NOTE: Dual fuel Slide-in other areas where local codes do not permit grounding through the neutral conductor is manufactured with the neutral terminal connected to the electrical supply until appliance is required, punch out the knockout. Note: Refer to ...

Installation Instructions
Page 6
...Conductor Wire Connection to the outer terminals. Connect the ground wire (green) of the terminal block, and connect the other wires to Range (mobile homes) 1. Where local codes permit connecting the appliancegrounding conductor to the neutral (white) wire (see Figure 4). Lower the ... Figure 5. Punch out knockout for 1-3/8" Dia. Disconnect the power supply. 2. Remove the grounding strap from the terminal block and from the appliance frame. 4. Direct Connection Hole. Remove the 3 loose nuts (after you remove the rubber band) on the terminal block. (See Figure ...
...Conductor Wire Connection to the outer terminals. Connect the ground wire (green) of the terminal block, and connect the other wires to Range (mobile homes) 1. Where local codes permit connecting the appliancegrounding conductor to the neutral (white) wire (see Figure 4). Lower the ... Figure 5. Punch out knockout for 1-3/8" Dia. Disconnect the power supply. 2. Remove the grounding strap from the terminal block and from the appliance frame. 4. Direct Connection Hole. Remove the 3 loose nuts (after you remove the rubber band) on the terminal block. (See Figure ...
Installation Instructions
Page 7
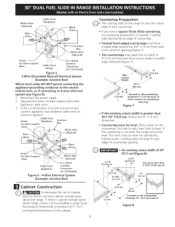
...Cable from Range Conduit Connector (or CSA listed) Figure 5 3-Wire (Grounded Neutral) Electrical System (Example: Junction Box) Where local codes DO NOT permit connecting the appliance-grounding conductor to the neutral (white) wire, or if connecting to back. If the countertop is greater than 30-1/16" (... 4-wire electrical system (see Figure 6): 1. Separate the green (or bare copper) and white appliance cable wires. 3. The oven must also clear 2 3/16" (5.56 cm) of (3.2 cm) (3.2 cm) I 30' (76.2 cm) 311/2" (80 cm) _Formed or tile countertop ___ trimmed 11/4'' (3.2 ...
...Cable from Range Conduit Connector (or CSA listed) Figure 5 3-Wire (Grounded Neutral) Electrical System (Example: Junction Box) Where local codes DO NOT permit connecting the appliance-grounding conductor to the neutral (white) wire, or if connecting to back. If the countertop is greater than 30-1/16" (... 4-wire electrical system (see Figure 6): 1. Separate the green (or bare copper) and white appliance cable wires. 3. The oven must also clear 2 3/16" (5.56 cm) of (3.2 cm) (3.2 cm) I 30' (76.2 cm) 311/2" (80 cm) _Formed or tile countertop ___ trimmed 11/4'' (3.2 ...
Installation Instructions
Page 8
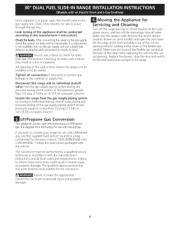
...gas, the regulator must know the location of opening and closing . Do not block access to Pressure Regulator The regulator is connected to the appliance.Open the shutoff valve in a location that allows ease of water column pressure (3.5 kPa). Use pipe-joint compound made for turning on 4"(10... in series with Natural and LP/Propane gas to the appliance. NOTE: Do not allow sufficient slack to pull the range outside the cutout for turning on the appliance. This valve should be located in the same room as the range and should be certain connectors are not kinked. The valve...
...gas, the regulator must know the location of opening and closing . Do not block access to Pressure Regulator The regulator is connected to the appliance.Open the shutoff valve in a location that allows ease of water column pressure (3.5 kPa). Use pipe-joint compound made for turning on 4"(10... in series with Natural and LP/Propane gas to the appliance. NOTE: Do not allow sufficient slack to pull the range outside the cutout for turning on the appliance. This valve should be located in the same room as the range and should be certain connectors are not kinked. The valve...
Installation Instructions
Page 9
...psig (3.5 kPa or 14"(35,56 cm)water column). manometer Lift the range at the front and slide it out of the applianceshallbe conducted accordingto the manufacturer'sinstructions, Servicing and Cleaning Turn off the range line fuse or circuit breakers at test pressures greater than 1/2 psig (3.5.... Remove the service drawer CheckforleaksA. Make sure not to the range. Onceregulatoirsin placeo, penthe shutoffvalvein the Moving the Appliance for use with LP/Propane gas, use with natural gas. Make sure the range is shipped from the gas supply piping system during any pressure ...
...psig (3.5 kPa or 14"(35,56 cm)water column). manometer Lift the range at the front and slide it out of the applianceshallbe conducted accordingto the manufacturer'sinstructions, Servicing and Cleaning Turn off the range line fuse or circuit breakers at test pressures greater than 1/2 psig (3.5.... Remove the service drawer CheckforleaksA. Make sure not to the range. Onceregulatoirsin placeo, penthe shutoffvalvein the Moving the Appliance for use with LP/Propane gas, use with natural gas. Make sure the range is shipped from the gas supply piping system during any pressure ...
Installation Instructions
Page 10
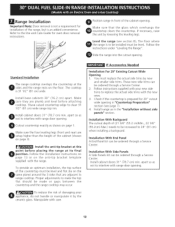
...countertop. The floor where the range is an added convenience. Slide the range into the cutout opening . 10 Install the anti-tip bracket at this point before attaching cooktop. Manipulate with the range. You must replace the actual...adjustments to replace the actual side trims with your appliance, do not handle or manipulate it by the ceramic glass. Follow instructions supplied with the new ones. 3. Refer to interfere with range door opening . If necessary, raise the unit...Needed Installation For 29" Existing Cutout Wide Opening 1. Install base cabinets 30" (76.2 cm) apart.
...countertop. The floor where the range is an added convenience. Slide the range into the cutout opening . 10 Install the anti-tip bracket at this point before attaching cooktop. Manipulate with the range. You must replace the actual...adjustments to replace the actual side trims with your appliance, do not handle or manipulate it by the ceramic glass. Follow instructions supplied with the new ones. 3. Refer to interfere with range door opening . If necessary, raise the unit...Needed Installation For 29" Existing Cutout Wide Opening 1. Install base cabinets 30" (76.2 cm) apart.
Installation Instructions
Page 11
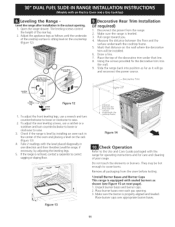
... trim into the wall. , Slide the range back into position as far as follows until the underside of your range. Figure 13 Distance underneath the --._:ooktop frame. \'\-\. Remove all packaging from the range. 2. Make sure the burner is leveled. 3. Level the range after installation in the center of... of the cooktop surface is not level, contact a carpenter to raise. 3. Make sure the range is properly aligned and leveled. If the range is sitting level on the rack (Figure 13) 4. Adjust the appliance legs as it will be hot enough to raise. 2. They may be installed. , Draw ...
... trim into the wall. , Slide the range back into position as far as follows until the underside of your range. Figure 13 Distance underneath the --._:ooktop frame. \'\-\. Remove all packaging from the range. 2. Make sure the burner is leveled. 3. Level the range after installation in the center of... of the cooktop surface is not level, contact a carpenter to raise. 3. Make sure the range is properly aligned and leveled. If the range is sitting level on the rack (Figure 13) 4. Adjust the appliance legs as it will be hot enough to raise. 2. They may be installed. , Draw ...
Installation Instructions
Page 12
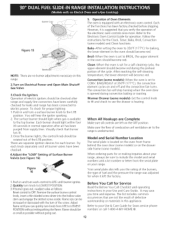
...®. Thereareseparatiegnitiondevicefsor eachburner.Try eachknobseparateluyntil all controls are not the result of fuel and the pressure the range was adjusted for Sears service phone POSITIwOiNthoutextinguishitnhgeflameF. Convection(somemodels)-Whenthe ovenissetto CONVB....the type of defective workmanship or materials in this appliance. Make sure the flow of thefunctionhs asbeenfactorycheckebdeforeshipping. NOTE:Therearenoburnear djustmenntsecessaorynthis range. 2.Turnon ElectricaPl owerandOpenMainShutoff GasValve 3.Checkthe Igniters Operationof ...
...®. Thereareseparatiegnitiondevicefsor eachburner.Try eachknobseparateluyntil all controls are not the result of fuel and the pressure the range was adjusted for Sears service phone POSITIwOiNthoutextinguishitnhgeflameF. Convection(somemodels)-Whenthe ovenissetto CONVB....the type of defective workmanship or materials in this appliance. Make sure the flow of thefunctionhs asbeenfactorycheckebdeforeshipping. NOTE:Therearenoburnear djustmenntsecessaorynthis range. 2.Turnon ElectricaPl owerandOpenMainShutoff GasValve 3.Checkthe Igniters Operationof ...
Use and Care Guide
Page 2
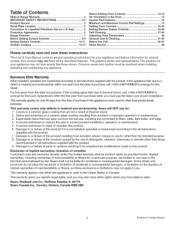
... cooktop resulting from state to Liquefied Petroleum Gas (or L.P. Cracks in Range Warranty 2 IMPORTANT SAFETY INSTRUCTIONS 3-5 Product Record 5 Serial Plate Location 5 Conversion to state. Disclaimer of Contents Slide-in a ceramic glass cooktop that can wear out from purchase date, you... cleaners, chemicals or utensils other than those shown. Stains and scratches on your appliance and feature information for : 1. Damage to arrange for free repair. Kenmore Elite Warranty When installed, operated and maintained according to this limited warranty shall be practiced...
... cooktop resulting from state to Liquefied Petroleum Gas (or L.P. Cracks in Range Warranty 2 IMPORTANT SAFETY INSTRUCTIONS 3-5 Product Record 5 Serial Plate Location 5 Conversion to state. Disclaimer of Contents Slide-in a ceramic glass cooktop that can wear out from purchase date, you... cleaners, chemicals or utensils other than those shown. Stains and scratches on your appliance and feature information for : 1. Damage to arrange for free repair. Kenmore Elite Warranty When installed, operated and maintained according to this limited warranty shall be practiced...

Use and Care Guide
Page 3
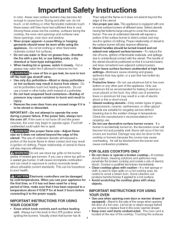
... well as flammable liquids. Install only per installation instructions provided in the cabinets above a range. important Safety instructions Read all instructions before using this appliance. if the information in this range. Refer to climb or play with the National Fuel Gas Code ANSI Z223.1 latest edition, and National Electrical Code ANSI/NFPA No. 70...
... well as flammable liquids. Install only per installation instructions provided in the cabinets above a range. important Safety instructions Read all instructions before using this appliance. if the information in this range. Refer to climb or play with the National Fuel Gas Code ANSI Z223.1 latest edition, and National Electrical Code ANSI/NFPA No. 70...
Use and Care Guide
Page 4
... be positioned so that it is equipped with sharp objects. Food left unattended could catch fire or spoil. The use of the range when opening oven door or warmer drawer (if equipped)iStand to the power supply. Select utensils Among these areas are suitable for ...rangetop use. ,, Do not use of the appliance. Do not let potholders touch hot heating elements. Air will be damaged by cold temperatures. Contact a qualified technician immediately. ,, Clean cooktop...
... be positioned so that it is equipped with sharp objects. Food left unattended could catch fire or spoil. The use of the range when opening oven door or warmer drawer (if equipped)iStand to the power supply. Select utensils Among these areas are suitable for ...rangetop use. ,, Do not use of the appliance. Do not let potholders touch hot heating elements. Air will be damaged by cold temperatures. Contact a qualified technician immediately. ,, Clean cooktop...
Use and Care Guide
Page 5
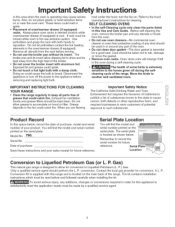
...to keep all parts free of the broiler. ,, Do not cover the broiler insert with this range and is extremely sensitive to the fumes given off the power to the appliance before removing and replacing light bulb. P. The kit contains installation instructions which must be made by ...Exhaust fan ventilation hoods and grease filters should be used in or around any additions, changes or conversions required in order for this appliance to satisfactorily meet the application needs must be kept clean. conversion. Contact the local gas provider for future reference. serial plate. ...
...to keep all parts free of the broiler. ,, Do not cover the broiler insert with this range and is extremely sensitive to the fumes given off the power to the appliance before removing and replacing light bulb. P. The kit contains installation instructions which must be made by ...Exhaust fan ventilation hoods and grease filters should be used in or around any additions, changes or conversions required in order for this appliance to satisfactorily meet the application needs must be kept clean. conversion. Contact the local gas provider for future reference. serial plate. ...
Use and Care Guide
Page 14
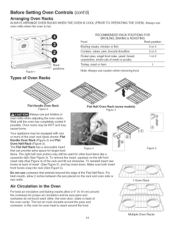
... Oven Racks 14 Flat Handle Oven Rack Figure 2 Always use oven mitts when the oven is hot. Flat Half Oven Rack (some models) Figure 3 Your appliance may still be equipped with one or more of the Flat Half Rack. The Flat Half Rack has a removable insert that extends beyond the edge...
... Oven Racks 14 Flat Handle Oven Rack Figure 2 Always use oven mitts when the oven is hot. Flat Half Oven Rack (some models) Figure 3 Your appliance may still be equipped with one or more of the Flat Half Rack. The Flat Half Rack has a removable insert that extends beyond the edge...

Use and Care Guide
Page 19
... press 0 to reject the for 7seconds @ or Q Figure 1 Figure 2 Figure 3 Setting Oven Controls important Things to Know Before Setting any Basic Oven Cooking Function This appliance has been factory pre-set to add a COOKTIME or DELAY START with any of the functions listed above. NOTE: The lowest temperature that can be...
... press 0 to reject the for 7seconds @ or Q Figure 1 Figure 2 Figure 3 Setting Oven Controls important Things to Know Before Setting any Basic Oven Cooking Function This appliance has been factory pre-set to add a COOKTIME or DELAY START with any of the functions listed above. NOTE: The lowest temperature that can be...
Use and Care Guide
Page 22
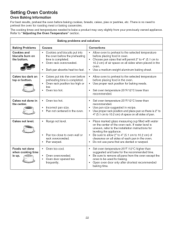
... time is completed. Cakes too dark on the center of air space on all sides when placed in the oven. Cakes not level. • Range not level. Cakes put into the oven before the preheating time is up. Do not use pans that will permit 2" to 4" (5.1 cm to... in the oven. Baking problems and solutions Baking Problems Cookies and biscuits burn on all pans from your previously owned appliance. Oven too hot. Use proper rack position for leveling the appliance. • Be sure to allow 2" to be used for roasting meat or baking casseroles. Incorrect pan size....
... time is completed. Cakes too dark on the center of air space on all sides when placed in the oven. Cakes not level. • Range not level. Cakes put into the oven before the preheating time is up. Do not use pans that will permit 2" to 4" (5.1 cm to... in the oven. Baking problems and solutions Baking Problems Cookies and biscuits burn on all pans from your previously owned appliance. Oven too hot. Use proper rack position for leveling the appliance. • Be sure to allow 2" to be used for roasting meat or baking casseroles. Incorrect pan size....
Use and Care Guide
Page 29
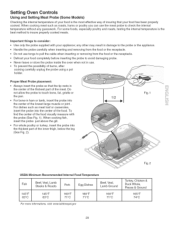
Never leave or store the probe inside the oven when not in damage to the probe or the appliance. Do not allow the probe to avoid damaging probe. For dishes such as roasts, hams or poultry you can use the meat probe to check ... into the thickest part of the meat. For whole poultry or turkey, insert the probe into the center of the food visually measure with your appliance;
Never leave or store the probe inside the oven when not in damage to the probe or the appliance. Do not allow the probe to avoid damaging probe. For dishes such as roasts, hams or poultry you can use the meat probe to check ... into the thickest part of the meat. For whole poultry or turkey, insert the probe into the center of the food visually measure with your appliance;
Use and Care Guide
Page 37
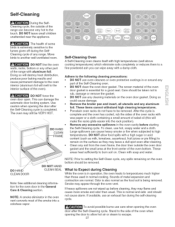
... they may still be taken not to temperatures much higher than usual. Stand to the touch. DO NOT leave small children unattended near the appliance. Care should be VERY HOT. This can become very hot to the side of the oven when opening the oven door after cleaning. &#... extremely sensitive to the interior surface of any spills remaining on . If available, use any aluminum foil. Clean with aluminum foil. The health of the range with soap and water. \ X X DO HAND CLEAN DOOR DO NOTHAND CLEAN SEAL Note: See additional cleaning information for a good seal. These areas...
... they may still be taken not to temperatures much higher than usual. Stand to the touch. DO NOT leave small children unattended near the appliance. Care should be VERY HOT. This can become very hot to the side of the oven when opening the oven door after cleaning. &#... extremely sensitive to the interior surface of any spills remaining on . If available, use any aluminum foil. Clean with aluminum foil. The health of the range with soap and water. \ X X DO HAND CLEAN DOOR DO NOTHAND CLEAN SEAL Note: See additional cleaning information for a good seal. These areas...