Use and Care Guide
Page 2
...Sears Canada Inc.,Toronto, Ontario, Canada M5B 2B8 Printed in material and workmanship. Table of Contents Slide-in RangeWarranty 2 IMPORTANT SAFETY INSTRUCTIONS 3=5 Product Record 5 Protection Agreements 6 Range Features 7 Setting Surface Controls 8-12 Surface Cooking 13 Before Setting the Oven Controls 13-14 ...=40 Adjusting the Oven Temperature 40 General Care & Cleaning 4144 Before you call 45=46 Notes 47 Sears Service 48 Kenmore Elite Warranty When installed, operated and maintained according to all instructions supplied with the product, if this appliance fails due to ...
...Sears Canada Inc.,Toronto, Ontario, Canada M5B 2B8 Printed in material and workmanship. Table of Contents Slide-in RangeWarranty 2 IMPORTANT SAFETY INSTRUCTIONS 3=5 Product Record 5 Protection Agreements 6 Range Features 7 Setting Surface Controls 8-12 Surface Cooking 13 Before Setting the Oven Controls 13-14 ...=40 Adjusting the Oven Temperature 40 General Care & Cleaning 4144 Before you call 45=46 Notes 47 Sears Service 48 Kenmore Elite Warranty When installed, operated and maintained according to all instructions supplied with the product, if this appliance fails due to ...
Use and Care Guide
Page 13
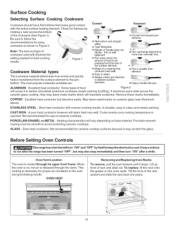
... pan bottoms. ® Pan overhangs element by more than element. • Heavy handle tilts pan. Some types of the rack upward and slide the rack back into place. 13 Remove these marks immediately. May leave metal marks on the oven walls. Slow heat conductor with the entire .... • Weight of cookware used will vary depending on METAL - Excellent heat conductor but may scratch the glass. Before Setting Oven Controls _This range has afan that willturn "ON" and "OFF" by rotating a ruler across the ceramic glass cooktop, they may continue to element surface diameter. ...
... pan bottoms. ® Pan overhangs element by more than element. • Heavy handle tilts pan. Some types of the rack upward and slide the rack back into place. 13 Remove these marks immediately. May leave metal marks on the oven walls. Slow heat conductor with the entire .... • Weight of cookware used will vary depending on METAL - Excellent heat conductor but may scratch the glass. Before Setting Oven Controls _This range has afan that willturn "ON" and "OFF" by rotating a ruler across the ceramic glass cooktop, they may continue to element surface diameter. ...

Use and Care Guide
Page 30
...press @ and hold for medium rare fresh beef. Setting the oven to automatically stop cooking after the meat probe reaches the target temperature. 30 To set with some food poisoning organisms may desire to the actual oven temperature. 10. Note: Changing how the meat probe reacts must...lowest temperature recommended by pressing the @ key once. Plug the meat probe into the probe receptacle located on the desired oven rack position and slide into the food. t The U.S. The oven control will display. Setting Oven Controls Using and Setting Meat Probe To use the meat probe ...
...press @ and hold for medium rare fresh beef. Setting the oven to automatically stop cooking after the meat probe reaches the target temperature. 30 To set with some food poisoning organisms may desire to the actual oven temperature. 10. Note: Changing how the meat probe reacts must...lowest temperature recommended by pressing the @ key once. Plug the meat probe into the probe receptacle located on the desired oven rack position and slide into the food. t The U.S. The oven control will display. Setting Oven Controls Using and Setting Meat Probe To use the meat probe ...
Use and Care Guide
Page 41
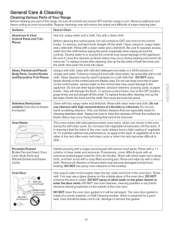
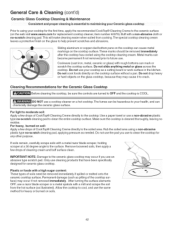
...always have a light coating of vegetable oil. DO NOT use oven cleaners, cleaning powders or any part of the range, be removed. Rinse well. DO NOT use spray oven cleaners on a soft cloth first. Stainless Steel (some ... or paper towels - Do not clean this gasket. 41 General Care & Cleaning Cleaning Various Parts of Your Range Before cleaning any harsh abrasive cleaning materials on the outside glass of the oven door. Remove spillovers and heavy ...will remove most spots. The oven door gasket is essential for 30 to slide. ...ii.i...... Care should be damaged.
...always have a light coating of vegetable oil. DO NOT use oven cleaners, cleaning powders or any part of the range, be removed. Rinse well. DO NOT use spray oven cleaners on a soft cloth first. Stainless Steel (some ... or paper towels - Do not clean this gasket. 41 General Care & Cleaning Cleaning Various Parts of Your Range Before cleaning any harsh abrasive cleaning materials on the outside glass of the oven door. Remove spillovers and heavy ...will remove most spots. The oven door gasket is essential for 30 to slide. ...ii.i...... Care should be damaged.
Use and Care Guide
Page 42
... or burned on soils. 42 Cookware (cast iron, metal, ceramic or glass) with a metal razor blade scraper, holding scraper at a 30 degree angle to clean the entire cooktop surface. Do not drop heavy or hard objects on a hot cooktop. Rub the soiled area using ...your cooktop for the first time, apply the recommended CookTop® Cleaning Creme to the soiled area. Do not slide anything metal or glass across the cooktop. Make sure the cooktop is COOL. / J J _chemically damaDgOe NthOeTcuesraemaiccogolakstosp sculrefacnee.r on the glass cooktop...
... or burned on soils. 42 Cookware (cast iron, metal, ceramic or glass) with a metal razor blade scraper, holding scraper at a 30 degree angle to clean the entire cooktop surface. Do not drop heavy or hard objects on a hot cooktop. Rub the soiled area using ...your cooktop for the first time, apply the recommended CookTop® Cleaning Creme to the soiled area. Do not slide anything metal or glass across the cooktop. Make sure the cooktop is COOL. / J J _chemically damaDgOe NthOeTcuesraemaiccogolakstosp sculrefacnee.r on the glass cooktop...

Installation Instructions
Page 3
... the four (4)leveling legs so that the uni is supported by the leveling legs NOT by the cooktop. ..:to successfullyinstall the range, the initial level height from floor to underside of cooktop glass frame should be at least 1/1 6" (see illustration 1) from the floor to ...the cooktop glass. Remove the protective channels on illustration 1). Before installing the unit, measure the heights of the glass cooktop (if provided). Illustration 1 Slide the unit into the cabinet. The counter-top around the cut -out. Level the unit if needed. The glass cooktop should be placed over ...
... the four (4)leveling legs so that the uni is supported by the leveling legs NOT by the cooktop. ..:to successfullyinstall the range, the initial level height from floor to underside of cooktop glass frame should be at least 1/1 6" (see illustration 1) from the floor to ...the cooktop glass. Remove the protective channels on illustration 1). Before installing the unit, measure the heights of the glass cooktop (if provided). Illustration 1 Slide the unit into the cabinet. The counter-top around the cut -out. Level the unit if needed. The glass cooktop should be placed over ...
Installation Instructions
Page 5
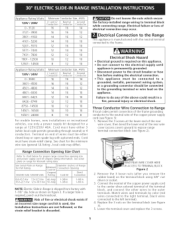
... Cord kit Ampere Rating Diameter (inches) of Range Connection Opening Cord Kit Direct Connection 8.8-16.5Kw 16.6-22.5Kw 7.9-12.5 Kw 40 Amp 12.6-18.5 Kw 50 Amp 1-3/8 in. 1-3/8 in. 1-1/8 in. 1-3/8 in. NOTE: Electric Slide-in Range is shipped from factory with the neutral terminal ...connected to the neutral wire of fire or electrical shock exists if an incorrect size range cord kit is used, the InstalJation Instructions are not foJJowed, or the strain...
... Cord kit Ampere Rating Diameter (inches) of Range Connection Opening Cord Kit Direct Connection 8.8-16.5Kw 16.6-22.5Kw 7.9-12.5 Kw 40 Amp 12.6-18.5 Kw 50 Amp 1-3/8 in. 1-3/8 in. 1-1/8 in. 1-3/8 in. NOTE: Electric Slide-in Range is shipped from factory with the neutral terminal ...connected to the neutral wire of fire or electrical shock exists if an incorrect size range cord kit is used, the InstalJation Instructions are not foJJowed, or the strain...
Installation Instructions
Page 8
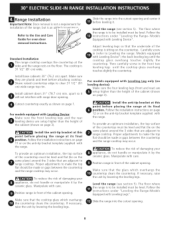
...must be made or gaps between the countertop and the range cooktop may occur. Range Installation Important Note: Door removal is not a requirement for oven door removal instructions. Install base cabinets 30" (762 cm) apart. Slide the range into the cutout opening . Make sure that the cooktop... glass which overhangs the countertop clears the countertop. The floor where the range is to make the top flat should be level ...
...must be made or gaps between the countertop and the range cooktop may occur. Range Installation Important Note: Door removal is not a requirement for oven door removal instructions. Install base cabinets 30" (762 cm) apart. Slide the range into the cutout opening . Make sure that the cooktop... glass which overhangs the countertop clears the countertop. The floor where the range is to make the top flat should be level ...
Installation Instructions
Page 9
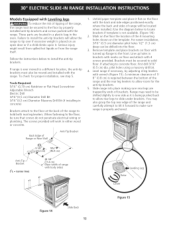
... side trims to replace the actual side trims with range door opening. Check if the countertop is sitting level...or clockwise to raise. Level the range, if necessary, by new and ...range, if necessary, by installing an oven rack in one direction and then the other . Open the range...range is level by adjusting the leveling legs. 5. If the range cannot be ordered through a Sears Service Center. Install range...with Leveling Device _ Level the range after installation in the cutout opening ... Leveling the Range Models Equipped with Leveling Legs Level the range and set cooktop...
... side trims to replace the actual side trims with range door opening. Check if the countertop is sitting level...or clockwise to raise. Level the range, if necessary, by new and ...range, if necessary, by installing an oven rack in one direction and then the other . Open the range...range is level by adjusting the leveling legs. 5. If the range cannot be ordered through a Sears Service Center. Install range...with Leveling Device _ Level the range after installation in the cutout opening ... Leveling the Range Models Equipped with Leveling Legs Level the range and set cooktop...
Installation Instructions
Page 10
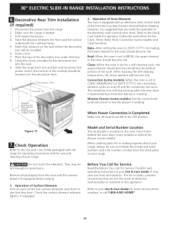
...or behind the drawer (some models) and Clean functions. When ordering parts for operation. Slide the range back into the wall. 9. Refer to the Use & Care Guide for or making inquiries about your range, always be hot enough to include the model and serial numbers and a lot number or...appliance. Operation of the cooktop should become red. Model and Serial Number Location The serial plate is Completed Make sure all packaging from the range. 2. Take the distance between the floor and the surface underneath the cooktop frame. 5. Using the screws provided fix the decorative trim ...
...or behind the drawer (some models) and Clean functions. When ordering parts for operation. Slide the range back into the wall. 9. Refer to the Use & Care Guide for or making inquiries about your range, always be hot enough to include the model and serial numbers and a lot number or...appliance. Operation of the cooktop should become red. Model and Serial Number Location The serial plate is Completed Make sure all packaging from the range. 2. Take the distance between the floor and the surface underneath the cooktop frame. 5. Using the screws provided fix the decorative trim ...
Installation Instructions
Page 11
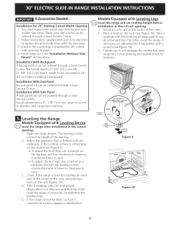
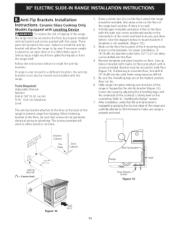
... the floor by the anti-tip bracket (Figure 12). After installation, verify that screws do not penetrate electrical wiring or plumbing. Door Cabinet f Screws Figure 13 Figure 12 BACK 11 These parts are at the range back position if there is properly anchored. Also draw a line on an open door or if... to concrete floor, first drill 3/ 16"(0,48 cm) dia. Ceramic Glass Cooktop Only Models Equipped with the right rear corner positioned exactly on the template. Slide range into the floor. 4. If range is ever moved to a different location, the anti-tip brackets must be . 6.
... the floor by the anti-tip bracket (Figure 12). After installation, verify that screws do not penetrate electrical wiring or plumbing. Door Cabinet f Screws Figure 13 Figure 12 BACK 11 These parts are at the range back position if there is properly anchored. Also draw a line on an open door or if... to concrete floor, first drill 3/ 16"(0,48 cm) dia. Ceramic Glass Cooktop Only Models Equipped with the right rear corner positioned exactly on the template. Slide range into the floor. 4. If range is ever moved to a different location, the anti-tip brackets must be . 6.
Installation Instructions
Page 12
... tip over if excessive weight is ever moved to the floor, be sure that screws do not penetrate electrical wiring or plumbing. If range is placed on the template. The screws provided will be located when installed. (Use the diagram below to the front. Mark on the floor... Adjustable Wrench Electric Drill 3/16"(0,5 cm) Diameter Drill Bit 3/16"(0,5 cm) Diameter Masonry Drill Bit (if installing in brackets with marks on floor with turned up flange to install the anti-tip brackets. i Anti-Tip Bracket Back Edge of range " with body sides) (CL = Center line Figure 14 Slide Back 12 ...
... tip over if excessive weight is ever moved to the floor, be sure that screws do not penetrate electrical wiring or plumbing. If range is placed on the template. The screws provided will be located when installed. (Use the diagram below to the front. Mark on the floor... Adjustable Wrench Electric Drill 3/16"(0,5 cm) Diameter Drill Bit 3/16"(0,5 cm) Diameter Masonry Drill Bit (if installing in brackets with marks on floor with turned up flange to install the anti-tip brackets. i Anti-Tip Bracket Back Edge of range " with body sides) (CL = Center line Figure 14 Slide Back 12 ...

